
OBD-II Code C1101: Comprehensive Guide to Causes, Diagnosis, and Fixes
What C1101 means, why it triggers, and how to fix it for good
- Code C1101 disables your anti-lock brakes and traction control, increasing stopping distances by up to 30% on slippery surfaces.
- The definition of C1101 varies by brand: it indicates a wheel speed sensor fault on Nissans, high battery voltage (over 17V) on Hyundais, and a brake booster sensor failure on GM trucks.
- Never buy parts based solely on a generic C1101 code; use a $50+ ABS-capable scanner to read the manufacturer-specific definition and pinpoint the exact failing component.
- Cleaning rust and metallic debris from the wheel speed sensor's magnetic tip and tone ring resolves the code for under $15 in brake cleaner.
What Does C1101 Mean?
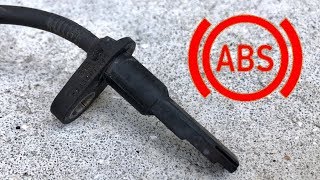
C1101 is a manufacturer-specific Diagnostic Trouble Code (DTC) that most commonly indicates the vehicle's computer has detected a fault in a wheel speed sensor circuit. These sensors tell the computer how fast each wheel is spinning. When this signal becomes erratic or is lost entirely, the computer disables the ABS and traction control systems as a safety precaution. However, the meaning varies significantly by manufacturer. On many Hyundai and Kia vehicles, it indicates a high system voltage issue, while on certain GM vehicles, it points to a faulty brake booster sensor.
Technical definition: The official SAE/ISO definition for C1101 is set by the vehicle manufacturer. Its most common definition is a fault within a wheel speed sensor circuit, often specified to a particular wheel, such as "RR RH SENSOR-1" (Right Rear) on Nissan vehicles. For some Mercedes-Benz models, it specifies "Right-Front Axle VSS Circuit." In contrast, for many Hyundai and Kia models, it is defined as "Battery Voltage High," triggered when the system voltage exceeds a specific threshold (e.g., 17V-18V). For Chevrolet and GM vehicles, it translates to "Brake Booster Vacuum Sensor Performance," indicating the sensor's signal is outside its expected 0.13 to 3.30-volt range.
Can I Drive With C1101?
Yes, But With Caution. Yes, you can drive, but your Anti-lock Braking System (ABS) and Traction/Stability Control systems are disabled. Your regular hydraulic brakes still function, but your wheels will lock up during hard braking. This increases stopping distances by up to 30% on slippery surfaces and dramatically raises the risk of skidding in an emergency maneuver. Get the vehicle diagnosed and repaired promptly to restore these critical safety features.
Common Causes
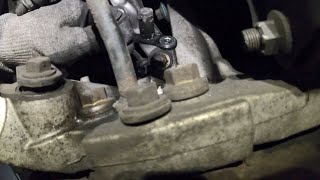
- Faulty Wheel Speed Sensor (Very Common) — The sensor itself fails internally due to age, heat cycles, or moisture intrusion. This is the most frequent cause of a C1101 code on Nissan, Infiniti, Ford, and Mercedes vehicles.
- Damaged, Rusted, or Dirty ABS Tone Ring (Common) — The tone ring (or reluctor ring) that the sensor reads cracks, loses teeth, or gets covered in thick rust and metallic debris, obscuring the signal. On Nissans, this ring is a magnetic strip on the wheel bearing that delaminates.
- Damaged Wiring or Corroded Connector (Common) — The wires leading to the sensor are exposed to the elements and sustain damage from road debris, chafing against suspension components, or rodent activity. The electrical connector also corrodes or fills with water, disrupting the signal.
- High System Voltage (Hyundai/Kia Specific) (Less Common) — On Hyundai and Kia models, C1101 is triggered by the control module detecting system voltage over 17V, almost always caused by a faulty alternator or voltage regulator.
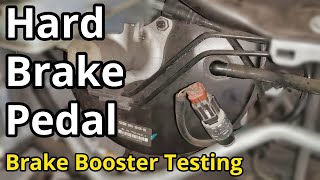
- Faulty Brake Booster Vacuum Sensor (GM Specific) (Less Common) — On specific GM vehicles (like the Chevrolet Silverado), C1101 indicates a performance problem with the brake booster vacuum sensor, which has its own 5-volt reference circuit from the Electronic Brake Control Module (EBCM).
- Bad Wheel Hub/Bearing Assembly (Less Common) — Excessive play or wobble in a worn-out wheel bearing changes the critical air gap between the sensor and the tone ring, causing an erratic signal. On modern cars, the tone ring is integrated into the hub assembly.
- Faulty ABS Control Module (Rare) — The ABS computer itself develops an internal fault, such as a failed driver circuit or cold solder joint, and is no longer able to correctly process the signal from the wheel speed sensor.
Symptoms
- ABS Warning Light On — The ABS warning light stays illuminated continuously on your dashboard.
- Traction/Stability Control Light On — The traction control (TCS) or electronic stability control (ESC/VDC) light turns on, as these systems rely on the wheel speed sensors to function.
- ABS System Inoperative — During a hard stop, the wheels lock up and skid instead of pulsing. This increases stopping distances, especially on wet or loose surfaces.
- Erratic ABS Activation — A failing sensor sends a false signal, causing the ABS to activate unnecessarily at low speeds on dry pavement, resulting in a grinding noise and pulsing pedal.
- Stiff Brake Pedal (GM-specific) — If the code is related to the brake booster vacuum sensor on applicable Chevrolet or GM models, the brake pedal feels hard to press, and the red 'BRAKE' warning light illuminates.
Diagnostic Flowchart
Tap your situation to follow the diagnostic path that matches what you're seeing on this code.
Common Fixes & Costs
- Clean Sensor and/or Tone Ring — Parts: $5-$15, Labor: $50-$100, ~0.8 hr book time (DIY)
- Replace Wheel Speed Sensor — Parts: $20-$150, Labor: $100-$200, ~1.5 hr book time (DIY)
- Repair Wiring or Connector — Parts: $10-$50, Labor: $120-$350, ~2.0 hr book time (Intermediate)
- Replace Wheel Hub Bearing Assembly — Parts: $150-$400, Labor: $200-$450, ~2.5 hr book time (Intermediate)
- Replace or Rebuild ABS Control Module — Parts: $250-$800, Labor: $150-$300, ~2.0 hr book time (Professional)
DIY vs Professional
- Clean Sensor and/or Tone Ring — Beginner: Yes
Tools: Jack, jack stands, socket set, brake cleaner, various brushes. - Replace Wheel Speed Sensor — Beginner: Yes
Tools: Jack, jack stands, socket set, torque wrench, wire brushes. - Repair Wiring or Connector — Beginner: No
Tools: Multimeter, soldering iron or quality crimpers, heat shrink tubing, wire strippers, wiring diagrams. - Replace Wheel Hub Bearing Assembly — Beginner: No
Tools: Heavy-duty tools including large axle nut socket, breaker bar, torque wrench capable of high torque values (150+ ft-lbs), slide hammer or press. - Replace or Rebuild ABS Control Module — Beginner: No
Tools: Socket set, scan tool capable of ABS bleeding and module configuration.
Used vs. New Parts: Buying Guide
When a used part is worth it: Buying a used wheel speed sensor is not recommended. The labor to install the part is often more than the part itself, and a used sensor has unknown life remaining. It only makes sense if the part is from a very low-mileage vehicle and the savings are substantial (>75%).
Donor-vehicle mileage cap: roughly under 40000 miles for the part to have meaningful remaining life.
Donor quality checklist:
- Verify donor vehicle VIN to ensure exact part number match.
- Avoid parts from vehicles in rust-belt states, as corrosion damages the sensor and wiring.
- Physically inspect the sensor for cracks and the wiring for brittleness.
Decision logic:
- If The part is a simple bolt-in wheel speed sensor → Buy a new OEM or high-quality aftermarket (e.g., Bosch, NTK, VDO) sensor. The cost difference is not worth the risk of premature failure.
- If The required part is a complete hub assembly → New is strongly preferred. A used hub has a used bearing with unknown life.
- If The required part is the ABS Control Module → A professionally rebuilt unit with a warranty is a viable option to save money over a new OEM unit. A used module from a junkyard is risky and requires dealer programming.
Warranty tradeoff: Used parts: Typically 30-day warranty, if any. Aftermarket new: 1-year to limited-lifetime warranty. OEM new: 12-month/12,000-mile warranty.
Worst-case if a used part fails: $150-$300 if a used/cheap sensor fails after install, requiring repeat labor for diagnosis and replacement.
What Happens If You Wait — Timeline
- Immediate (First Drive): ABS, Traction Control (TCS), and Stability Control (ESC/VDC) warning lights illuminate and the systems are disabled. The ABS module stores code C1101. (MPG impact: 0%% · Added cost: $0. The cost is a significant and immediate loss of safety features, increasing the risk of skidding and extending stopping distances.)
- 0-6 Months: The vehicle continues to operate with conventional brakes. There is no progressive mechanical damage caused by the electronic fault itself. (MPG impact: 0-1%% · Added cost: $0. The only potential cost is from an accident that the ABS/ESC systems could have prevented.)
- 6-12+ Months: If the root cause was a failing wheel bearing, continued driving causes the bearing to degrade further, eventually leading to a loud grinding noise and potential hub failure. (MPG impact: 0-2%% · Added cost: $0 - $450. If the underlying cause was a bad wheel bearing, it eventually requires replacement of the hub assembly.)
- Long Term: The C1101 fault itself does not cause cascading failures. The car continues to operate without ABS/TCS/ESC indefinitely. (MPG impact: 0%% · Added cost: $0. The cost remains the high risk of an accident.)
Cost of Not Fixing It
- Immediate: Loss of ABS, traction control, and stability control. Increased risk of skidding and longer stopping distances in emergency situations or on slippery surfaces. (Added cost: 0 (Risk-based, not component damage))
- 0-6 months: No direct mechanical damage is caused by ignoring this code. The primary cost is the significantly increased risk of an accident. (Added cost: 0 (Risk-based))
- 6+ months: If an underlying hub bearing issue caused the code, continued driving causes the bearing to degrade further, leading to hub failure. The main cost remains the elevated safety risk. (Added cost: 0 - $450 (Potential hub replacement))
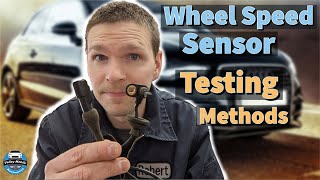
Diagnosis Steps
- Read the Full Code Definition
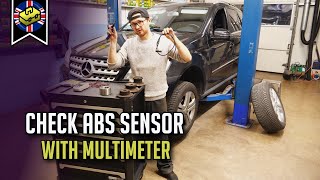
Use an advanced OBD-II scanner capable of reading ABS/Chassis codes. Note the exact definition provided by the scanner, as it varies by make. The code C1101 is often paired with another code that specifies the exact wheel (e.g., C1105 on a Nissan indicating 'Right Rear Sensor 2'). 🎬 Watch: Diagnosing and fixing Nissan ABS sensor codes
Tools: ABS-capable OBD-II Scanner (Beginner) - Check for Manufacturer-Specific Causes
If you drive a Hyundai/Kia, check the charging system output with a multimeter at the battery terminals while the engine is running; a voltage over 17V confirms an alternator issue. For GM's 'Brake Booster Vacuum Sensor' code, test the sensor's 5V reference and signal voltage at the sensor connector.
Tools: Multimeter (Intermediate) - Analyze Live Data with a Scan Tool
Using an ABS-capable scanner, view the live data stream for all four wheel speed sensors. Drive the vehicle slowly in a straight line. A sensor that reads 0 MPH, drops out intermittently, or shows a speed wildly different from the others is the source of the fault.
Tools: ABS-capable Scanner with Live Data (Intermediate) - Visual Inspection
Safely raise and support the vehicle at the identified wheel. Visually inspect the sensor, its wiring harness, and the connector for cut wires, melting, or green corrosion on the connector pins.
Tools: Jack, Jack Stands, Flashlight (Beginner) - Inspect and Clean the Tone Ring
Remove the sensor (usually held by one 10mm or 12mm bolt). Look inside the mounting hole and inspect the ABS tone ring for heavy rust buildup, dirt, or visible cracks. Clean it carefully with a brush and brake cleaner.
Tools: Socket Set, Brake Cleaner, Wire Brush (Intermediate) - Swap Sensors to Confirm Failure
If the front or rear sensors are identical side-to-side, swap the suspected bad sensor with the known good sensor from the other side. Clear the codes and drive. If the fault code moves to the other side, the sensor is faulty. If the code remains on the original side, the problem is in the wiring or hub.
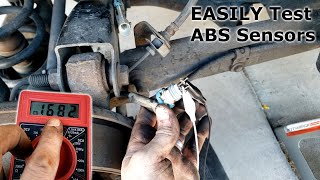
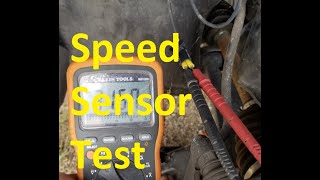
Tools: Basic Hand Tools, OBD-II Scanner (Intermediate) - Test Passive Sensor Resistance and Voltage
For a 2-wire passive sensor, disconnect it and measure resistance across the pins with a multimeter set to Ohms (Ω). Compare to the service manual (e.g., Ford F-150 Front: 300-500 Ω). Next, set the multimeter to AC Volts (V~), spin the wheel hub by hand, and verify it generates a small AC voltage (>100mV).
Tools: Multimeter, Vehicle-specific resistance values (Intermediate) - Analyze the Signal with an Oscilloscope
For active sensors or intermittent faults, back-probe the signal wire at the sensor connector with an oscilloscope. As you spin the wheel, a healthy digital (active) sensor produces a clean square wave. A garbled or absent waveform indicates a problem with the sensor, tone ring, or hub bearing.
Tools: Oscilloscope, Back-probe pins (Advanced)
When This Code Triggers (Freeze-Frame Conditions)
- Vehicle Speed: 25-45 mph (Steady city or highway driving. The fault sets when the module compares wheel speeds and finds one that is erratic or missing.)
- System Voltage: 13.5-14.5 V (Normal operating voltage. An exception is on Hyundai/Kia where the fault triggers on HIGH voltage (17V+).)
- Brake Pedal Status: Off (The code sets during a continuous self-check while driving, not necessarily during a braking event.)
- Engine RPM: 1200-2500 RPM (Corresponds to steady-state driving, not hard acceleration or deceleration.)
Related Codes
- C1105 — A common partner code to C1101 on Nissan and Infiniti vehicles. They refer to the same physical sensor but different failure modes. Seeing both strongly points to a fault at the Right Rear wheel location.
- C1203 — Appears alongside C1101 on Infiniti models, indicating a general 'Vehicle Speed Information Circuit' failure. The ABS module sets C1203 because it cannot get reliable data when the C1101 fault is active. Fixing C1101 resolves C1203.
- C0035 to C0051 — These are standardized SAE codes for wheel speed sensor circuits (e.g., C0040 for Right Front). A professional scanner shows both a generic C1101 and a specific C00xx code, pinpointing the exact wheel.
- U-codes (e.g., U0121) — A 'Lost Communication With ABS Control Module' code alongside C1101 indicates a serious problem with the ABS module's power, ground, or the module itself, rather than a single sensor circuit.
Climate & Environmental Factors
- Snow and Ice Buildup: Packed snow, ice, or slush physically blocks the wheel speed sensor's view of the tone ring, causing a temporary loss of signal. The light turns off on its own after the vehicle thaws.
- Road Salt and De-icing Agents: These chemicals are highly corrosive and are a primary cause of C1101 in winter regions. They rust the tone ring, corrode electrical connectors, and degrade wiring insulation over time.
- Extreme Cold: Very cold temperatures cause wiring to become brittle and crack. It also freezes moisture inside connectors, interrupting the electrical signal and triggering a fault code.
- High Humidity / Water: Moisture intrusion into the sensor itself or its connector is a common failure mode. Driving through deep water or living in a humid climate shortens the life of the sensor and its wiring.
How to Talk to a Mechanic About This Code
Say this: "I have an ABS and traction control light on, and my scanner shows code C1101. I know this has several causes depending on the make. I'd like to schedule a diagnostic appointment. Can you please check the manufacturer-specific definition for my [Your Car's Make/Model/Year] and view the live wheel speed sensor data to confirm which corner is faulting?"
This signals you understand the complexity beyond a simple code. It directs the technician to perform a specific, effective diagnostic test (viewing live data) rather than guessing or replacing parts. It preempts common misdiagnoses, like chasing a wheel sensor on a Hyundai when C1101 means 'High Voltage'.
Avoid saying:
- 'My ABS light is on, can you just fix it?'
- 'I have a C1101, please replace the wheel speed sensor.' (This asks them to replace a part without confirming it's the cause).
- 'Just do whatever you think is necessary.' (This gives a blank check for unnecessary work).
Questions to ask before authorizing the repair:
- What was the specific fault found? Was it the sensor, the wiring, the tone ring, or something else?
- Can you show me the live data from the scan tool that shows the failing sensor?
- If the recommendation is to replace the hub, can you explain why the sensor alone isn't the fix?
- Will you provide a written estimate that breaks down parts and labor costs?
- What is the warranty on the recommended parts and your labor?
Where to Take It: Dealer vs Independent vs Chain
- Dealer:
Recommended if you have a GM or Hyundai where the code has a unique meaning, or if the vehicle is under warranty. Otherwise, it's a capable but expensive option.
Best for: Vehicles under warranty., Complex manufacturer-specific quirks (like GM brake booster sensor or Hyundai high voltage issues)., Repairs requiring module programming or special coverage adjustments.
Downsides: Highest labor rates, often 1.5-2x an independent shop., Recommends more expensive assemblies (e.g., entire hub) when a smaller component is the cause. (Typical cost: +50% vs. baseline) - Independent Shop:
Best fit for the most common cause of C1101 (wheel speed sensor circuit fault). A good independent shop provides the best balance of expertise and value.
Best for: Most out-of-warranty vehicles., Common wheel-speed-sensor-related C1101 faults on makes like Nissan, Ford, and BMW., Cost-effective diagnosis and repair.
Downsides: Diagnostic tool capability varies; ensure they have a professional scanner that reads ABS live data., Quality depends on the shop's reputation and technician certifications (look for ASE). (Typical cost: +0% vs. baseline) - Chain Shop:
Acceptable only if you have already diagnosed the problem to be a specific wheel speed sensor and are just looking for a cheap installation. AVOID for initial diagnosis.
Best for: Simple, pre-diagnosed wheel speed sensor replacement.
Downsides: Lacks the advanced diagnostic tools or experience to accurately pinpoint the fault beyond reading the code., High pressure to upsell leads to replacing parts that aren't broken., Less likely to correctly diagnose manufacturer-specific variations of the code. (Typical cost: -10% vs. baseline)
When to Walk Away From the Repair
If the total estimated repair cost exceeds 40-50% of the car's private-party value, seriously consider selling or trading it in rather than repairing it.
- Car worth $4000, fix is $2000: Walk away. A $2,000 repair on a $4,000 car is 50% of its value and rarely makes financial sense.
- Car worth $12000, fix is $300: Fix it. A $300 repair for a sensor is well below the threshold and restores a critical safety feature.
- Car worth $3000, fix is $1800: Walk away. The repair cost is 60% of the car's value. The ABS module is likely faulty, and it's not worth investing that much into an older vehicle.
What Scan Tool You Need for This Code
Minimum: A scanner that reads and clears codes from the ABS module and displays live data for all four wheel speed sensors.
A standard $20 engine code reader cannot communicate with the ABS module. It will not see 'C' codes like C1101. You need a tool that specifically lists ABS/SRS diagnostic capabilities, and live data is essential to confirm the diagnosis without guessing.
Budget: BlueDriver Pro (~$99) — Connects to a smartphone app via Bluetooth. It reads and clears ABS codes and displays live data for individual wheel speed sensors on supported makes. This identifies the faulty wheel.
Mid-range: Foxwell NT630 Plus (~$150) — A dedicated handheld unit providing extensive ABS/SRS diagnostics. It reads/clears codes and views live wheel speed sensor data. Its key advantage is bi-directional control, allowing it to perform an 'auto bleed' of the ABS pump after hydraulic repairs.
Professional: Autel MaxiCOM MK808 / MK808BT (~$450-600) — A professional-level tablet scanner. It offers full-system diagnostics, deep bi-directional controls, and graphs live data from all four wheel speed sensors simultaneously for easy comparison.
Rent vs buy: Many auto parts stores read codes for free, but their tools only provide the code without the specific location. Buying a budget-tier ABS-capable scanner is a smart investment for any DIYer, as it prevents costly misdiagnosis by confirming the fault before buying parts.
How to Clear the Code After You Fix It
- Ensure the new part is correctly installed and all connectors are secure.
- Use an ABS-capable OBD-II scan tool to connect to the Anti-lock Brake System module.
- Select the option to 'Erase Codes' or 'Clear DTCs'.
- Turn the ignition off, then back on, and verify the ABS warning light turns off after the initial bulb check.
Drive cycle (~10 minutes): A specific drive cycle is not required for the ABS light. The system performs a self-test upon startup and as soon as the vehicle begins moving. Drive the vehicle for 5-10 minutes, including some turns, to confirm the light does not return.
Readiness monitors affected: This code does not affect engine-related emissions readiness monitors.
Watch out for:
- Using a basic engine code reader that cannot access or clear ABS module codes.
- Disconnecting the battery does not reliably clear the C1101 code from the ABS module's memory.
- The light returning immediately upon driving indicates the root cause was not fixed.
Will This Fail Emissions / State Inspection?
No — by itself this code doesn't fail OBD inspection (but it can keep readiness monitors from setting, which causes a separate fail).
- California: An illuminated ABS light does NOT cause a vehicle to fail its smog check. The emissions test is separate from the safety systems.
- New York: The NYS inspection includes a check of safety equipment. The ABS light is not an automatic fail, but the red 'BRAKE' warning light IS a cause for failure.
- Texas: An illuminated ABS light is not a cause for rejection in the Texas vehicle safety inspection. The regular service brakes must function correctly.
Most Commonly Affected Vehicles
- Infiniti Q50, G35, G37 (2007-2018) — This code is very common and points to a failure of a rear wheel speed sensor. On the Q50, C1101 frequently refers to the passenger side rear sensor.
- Nissan Altima, Frontier, Navara, Qashqai, Leaf, Titan (2007-2018) — Prone to C1101, caused by a broken magnetic tone ring integrated with the rear wheel bearing assembly, or a failed sensor. C1101 specifically indicates the Right Rear sensor on many models.
- Ford F-150, Focus, Mondeo, Galaxy (2003-2019) — Triggered by sensor failure or excessive rust buildup on the sensor and tone ring, especially in rust-belt regions. For the F-150, rear sensor wiring is a common failure point.
- BMW 3 Series (E90), 5 Series (E60), X3 (E83), X5 (E53, E70) (2000-2015) — Frequently experiences wheel speed sensor circuit failures leading to the ABS/DSC/Brake trifecta of lights. Wiring insulation becomes brittle and cracks near the sensor connector.
- Mercedes-Benz C-Class (W204), E-Class (W212), A-Class (W169) (2004-2018) — On many of these vehicles, C1101 specifically points to a circuit issue with the right-front axle wheel speed sensor.
- Hyundai / Kia Santa Fe, i10, i30, Elantra, Optima (2004-2016) — C1101 does not indicate a wheel sensor fault on these models. It means 'Battery Voltage High,' pointing to a charging system issue like a faulty alternator.
- Chevrolet / GMC Silverado, Tahoe, Suburban, Sierra (2014-2018) — C1101 is defined as 'Brake Booster Vacuum Sensor Performance.' This sensor is located on the brake booster and is unrelated to wheel speed. Covered under Special Coverage Adjustment N182202780.
- Volkswagen / Audi Golf, Passat, A3, A4 (2005-2016) — Suffer from bad sensors, failed ABS module solder joints, and wiring harness damage in the wheel wells.
Manufacturer-Specific Notes
- Nissan / Infiniti: C1101 almost always refers to the Rear Right wheel speed sensor. The cause is often a brittle magnetic encoder ring on the rear wheel bearing that cracks and falls off. TSB NTB12-093 emphasizes checking the tone ring before replacing parts.
- Mercedes-Benz: C1101 specifically indicates a problem with the Right Front axle VSS (Vehicle Speed Sensor) circuit, making location diagnosis straightforward with a capable scanner.
- Hyundai / Kia: C1101 means 'Battery Voltage High'. The ABS or EPS module detects voltage above a set threshold (e.g., 17V) due to a failing alternator/regulator. Diagnosing this as a wheel speed sensor issue is a costly mistake.
- Chevrolet / GM: C1101 means 'Brake Booster Vacuum Sensor Performance'. If the return signal is outside the 0.13 to 3.30-volt range, it sets this code. This is covered under Special Coverage Adjustment N182202780 for 2014-2018 trucks, extending the warranty to 10 years/150,000 miles.
- Ford: The code is triggered by a standard wheel speed sensor failure, but cleaning heavy rust buildup from the sensor's magnetic tip and the hub mounting surface is a highly successful first step before replacing parts.
Real Owner Stories
2014 Infiniti Q50 - The $1,000 quote for a 10-minute fix
Owner of a 2014 Infiniti Q50 experienced the ABS, AWD, and Chassis Control warning lights. A Nissan dealership quoted a $700 teardown fee to inspect an internal wiring harness, with a total repair estimate approaching $1,000.
Outcome: The owner bought the sensor for $15 and replaced it in 10 minutes, resolving all warning lights. The dealership's proposed wiring harness inspection was a costly misdiagnosis.
Lesson: For Nissan/Infiniti vehicles, C1101 is almost always the right rear wheel speed sensor. Check forums for make/model-specific quirks before authorizing expensive diagnostic labor.
2018 Nissan LEAF - Aftermarket Part Misdiagnosis
A 2018 Nissan LEAF at 60,000 miles threw a C1101-01 code, specifically identifying the 'RR RH Sensor-1'.
Outcome: The immediate return of the code after replacing the sensor pointed away from an intermittent issue and towards a hard fault, such as a dead-on-arrival aftermarket part or a persistent wiring issue.
Lesson: If a new part doesn't fix the code, don't assume the ABS module has failed. The problem is often the quality of the replacement part or a wiring issue. Swapping the new sensor with the one from the opposite side tests if the new part is faulty.
Nissan Frontier - The No-Cost 'Dirty Sensor' Fix
An owner of a Nissan Frontier had the ABS light on with code C1101, indicating the rear right wheel sensor. Faced with a dealer part cost of nearly $200, they tried a simpler approach first.
Outcome: After reinstalling the cleaned sensor and clearing the codes, the ABS light went away and did not return. The fix cost nothing but time and brake cleaner, avoiding a $200 part replacement.
Lesson: Before buying a new sensor, perform a thorough visual inspection and cleaning. A buildup of rust and debris on the sensor tip or tone ring is a very common cause of this code.
Hyundai Elantra - The 'Not a Wheel Sensor' Fault
A Hyundai owner gets a C1101 code. Assuming it's a wheel speed sensor, they begin inspecting the wheels and brakes.
Outcome: They discover that on many Hyundai models, C1101 means 'Battery Voltage High'. Using a multimeter at the battery terminals with the engine running, they measure 17.5V. The actual problem was a failing alternator overcharging the system. Replacing the alternator resolved the C1101 code.
Lesson: The definition of C1101 is highly manufacturer-specific. Always verify the exact meaning for your vehicle's make and model before starting any diagnosis. A simple voltage check saves hours of wasted time.
How to Prevent This Code From Triggering
- Clean Wheel Speed Sensors and Hub Area (Every 1-2 years or during brake service) — Road grime, metallic brake dust, and rust build up on the sensor's magnetic tip and the tone ring, obscuring the signal. Regular cleaning with brake cleaner maintains a clear reading.
- Apply Dielectric Grease to Connectors (Whenever a sensor connector is disconnected) — Dielectric grease is a non-conductive, waterproof sealant. Applying it to the inside of the connector's weather seal prevents moisture and road salt from corroding the metal pins.
- Perform Regular Brake Fluid Flushes (Every 2-3 years, or as per manufacturer recommendation) — Old brake fluid absorbs moisture, causing corrosion inside the expensive ABS hydraulic control unit and its valves over time.
- Visually Inspect Sensor Wiring (During every tire rotation or oil change) — The wiring harness leading to the sensor is exposed. Checking for chafing against suspension parts or loose mounting clips catches damage before the wire breaks.
Frequently Asked Questions
Can I fix code C1101 myself?
Yes, if the cause is a bad wheel speed sensor or a dirty tone ring, it is a straightforward DIY repair involving a single bolt. Proper diagnosis using an ABS scanner is required to avoid replacing the wrong part. Leave complex wiring or module replacements to professionals.
How much does it cost to fix code C1101?
A DIY sensor replacement costs $20 to $150 for the part. A professional shop charges $200 to $400 for diagnosis and sensor replacement. If the ABS module has failed, expect costs to exceed $1,000.
My scanner just says C1101. How do I know which wheel is the problem?
A basic $20 code reader cannot pinpoint the wheel. You must use an advanced OBD-II scanner capable of reading ABS modules to get the specific location, such as 'Right Rear Sensor'. Viewing live data on these scanners also reveals exactly which wheel reads 0 MPH while driving.
What are common misdiagnosis mistakes for C1101?
The biggest mistake is replacing a wheel speed sensor without testing the wiring or cleaning the tone ring first. Another common error is ignoring manufacturer-specific definitions, like replacing wheel sensors on a Hyundai when the code actually means 'Battery Voltage High'. Always swap identical sensors side-to-side to confirm a failure before buying parts.
Will clearing the code make the light go away?
Clearing the code with a scanner turns the light off temporarily. However, the ABS control module runs a self-test as soon as you start driving. If the hardware problem remains, the warning lights will illuminate immediately.
Can a bad alignment or tires cause a C1101 code?
Severe misalignment or mismatched tire sizes rarely cause a C1101 circuit code. These issues typically trigger 'implausible signal' codes instead. Focus your diagnosis on the sensor, wiring, and tone ring.
How do I reset the ABS light after repair?
After replacing the faulty component, you must clear the code from the ABS control module using a compatible OBD-II scanner. The light will not turn off automatically on most modern vehicles. Disconnecting the battery rarely clears ABS codes.
Key Takeaways
- Code C1101 disables your anti-lock brakes and traction control, increasing stopping distances by up to 30% on slippery surfaces.
- The definition of C1101 varies by brand: it indicates a wheel speed sensor fault on Nissans, high battery voltage (over 17V) on Hyundais, and a brake booster sensor failure on GM trucks.
- Never buy parts based solely on a generic C1101 code; use a $50+ ABS-capable scanner to read the manufacturer-specific definition and pinpoint the exact failing component.
- Cleaning rust and metallic debris from the wheel speed sensor's magnetic tip and tone ring resolves the code for under $15 in brake cleaner.
Helpful Videos

Shop the Parts Behind C1101
Below are the parts most often responsible for code C1101, ranked by how frequently each one is the actual culprit (per the diagnosis above). Tap any to see what we have for your vehicle.


The information in this article is provided for general reference and educational purposes only. Vehicle specifications, procedures, and part compatibility can vary by production date, trim level, and region. Always consult your vehicle's factory service manual and verify part numbers before purchasing or performing repairs. Safety-critical components such as airbags, seat belts, and braking systems should be installed by a qualified professional.
- 🧭 Diagnostic Flowchart
- 🎬 Helpful Videos
- 🛍️ Shop This Part
- What Does C1101 Mean?
- Can I Drive With C1101?
- Common Causes
- Symptoms
- Common Fixes & Costs
- DIY vs Professional
- Used vs. New Parts: Buying Guide
- What Happens If You Wait — Timeline
- Cost of Not Fixing It
- Diagnosis Steps
- When This Code Triggers (Freeze-Frame Conditions)
- Related Codes
- Climate & Environmental Factors
- How to Talk to a Mechanic About This Code
- Where to Take It: Dealer vs Independent vs Chain
- When to Walk Away From the Repair
- What Scan Tool You Need for This Code
- How to Clear the Code After You Fix It
- Will This Fail Emissions / State Inspection?
- Most Commonly Affected Vehicles
- Manufacturer-Specific Notes
- Real Owner Stories
- 2014 Infiniti Q50 - The $1,000 quote for a 10-minute fix
- 2018 Nissan LEAF - Aftermarket Part Misdiagnosis
- Nissan Frontier - The No-Cost 'Dirty Sensor' Fix
- Hyundai Elantra - The 'Not a Wheel Sensor' Fault
- How to Prevent This Code From Triggering
- Frequently Asked Questions
- Can I fix code C1101 myself?
- How much does it cost to fix code C1101?
- My scanner just says C1101. How do I know which wheel is the problem?
- What are common misdiagnosis mistakes for C1101?
- Will clearing the code make the light go away?
- Can a bad alignment or tires cause a C1101 code?
- How do I reset the ABS light after repair?
- Key Takeaways
- 🎟️ Get 5% Off