
OBD-II Code C1224: A Comprehensive Guide to All Meanings & Fixes
What C1224 means, why it triggers, and how to fix it on any vehicle
- Code C1224 has at least four completely different manufacturer definitions; verify your specific vehicle's meaning before buying any parts.
- Over 80% of C1224 triggers stem from simple electrical faults like a broken wire, corroded connector pin, or a failed right rear wheel speed sensor.
- Driving with C1224 increases emergency stopping distances by up to 37% in wet conditions because your Anti-lock Braking System (ABS) and stability control are completely disabled.
- Never assume the ABS control module is faulty without first testing the $5 dashboard warning bulb (on Fords) or the $50 wheel speed sensor (on GM/Dodge vehicles).
What Does C1224 Mean?
Code C1224 is a manufacturer-specific chassis code indicating a fault within the brake control system, but its meaning varies dramatically between automakers. It points to a simple electrical fault, a failed sensor, or a complex communication error. The most common definitions are a loss of signal from the right rear wheel speed sensor (GM/Dodge) or an open circuit for the dashboard brake warning lamp (Ford). For Toyota, it indicates a loss of the engine RPM signal, while on some Chevrolet trucks, it points to an accelerator pedal or transmission issue. You must verify the specific definition for your vehicle's make, model, and year before attempting any diagnosis.
Technical definition: The official SAE/OBD-II definition for C1224 is set by the manufacturer. Prevalent definitions include 'Right Rear Wheel Speed Sensor Input Signal is Zero', 'Lamp Brake Warning Output Circuit Open', or 'NE Signal Circuit Open or Short'. Less common definitions include 'Incorrect Gear Ratio' on GMC trucks with the 4T65-E transmission, or 'Accelerator Pedal Position Sensor 2 Circuit Low Input' on certain Chevrolets.
Can I Drive With C1224?
Yes, But With Caution. Yes, but only to a repair shop. Your Anti-lock Brakes (ABS), Vehicle Stability Control (VSC), and Traction Control (TCS) are disabled. This significantly increases the risk of losing control and extends braking distances. Studies show stopping distances without ABS increase by over 14% on dry pavement and up to 37% on wet surfaces. Continued driving operates the vehicle without key safety systems designed to prevent skidding and wheel lock-up.
Common Causes
- Damaged, corroded, or moisture-contaminated wiring/connectors. (Very Common) — Road debris, vibration, and water intrusion break wires or corrode connector pins in the wheel speed sensor or brake lamp harnesses, creating an open or short circuit.
- Failed right rear wheel speed sensor. (Common) — The sensor fails internally due to age, heat cycles, or physical damage, preventing it from generating the required AC or digital signal for the ABS module.
- Blown fuse or faulty brake warning light bulb (Ford). (Common) — For the 'Lamp Circuit Open' variation, a blown instrument cluster fuse or a burned-out dashboard warning bulb creates an open circuit.
- Failing wheel bearing or damaged ABS tone ring. (Less Common) — Excessive play from a worn wheel bearing damages the integrated tone ring or increases the air gap between the ring and the sensor, causing signal loss.
- Incorrect or low-quality aftermarket parts. (Less Common) — Control modules are highly sensitive to sensor resistance. An aftermarket sensor not built to precise OEM specifications fails to communicate correctly.
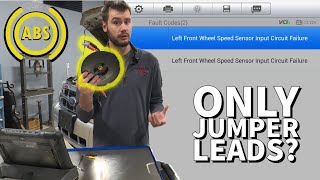
- Faulty ABS, Body Control Module (BCM), or Electronic Brake Control Module (EBCM). (Rare) — The control module itself fails internally. This is the last component to suspect after exhausting all wiring and sensor possibilities. 🎬 See this professional guide on diagnosing ABS sensor faults.
- Interference from other electrical components. (Rare) — Wheel speed sensor wiring routed too close to high-energy components like spark plug wires picks up electrical noise, leading to an erratic signal.
Symptoms
- ABS warning light is on — The ABS module detects a fault, disables the system, and illuminates the warning light.
- Traction Control (TCS) or Stability Control (VSC/ESC) light is on — These systems depend on accurate wheel speed data. A fault in a wheel speed sensor circuit disables these safety features.
- Brake warning light does NOT illuminate — If the fault is 'Lamp Brake Warning Output Circuit Open', the red or amber brake warning light fails to turn on during the initial key-on bulb check.
- Erratic or non-functional speedometer — On vehicles using a rear wheel speed sensor for the vehicle speed reading, a C1224 fault causes the speedometer to drop to zero or fluctuate wildly.
- ABS activates erratically or not at all — Wheels lock up during a hard stop on a slippery surface, or the brake pedal pulsates at low speeds as the system incorrectly activates.
- 4x4 or AWD warning light is on — All-wheel-drive systems require speed data from all four wheels. A fault disables the system and illuminates a warning light.
Diagnostic Flowchart
Tap your situation to follow the diagnostic path that matches what you're seeing on this code.
Common Fixes & Costs
- Replacing the right rear wheel speed sensor
— Parts: $40-$150, Labor: $100-$200, ~1 hr book time
(DIY)
: OEM
: OEM - Repairing wiring or cleaning connectors — Parts: $5-$25, Labor: $100-$250, ~1.5 hr book time (Intermediate)
- Replacing a blown fuse or dashboard warning bulb
— Parts: $1-$30, Labor: $0-$100, ~0.5 hr book time
(DIY)
: OEM - Replacing the wheel hub bearing assembly — Parts: $150-$450, Labor: $200-$400, ~2.5 hr book time (Professional)
- Replacing the ABS/BCM/EBCM Module — Parts: $400-$900+, Labor: $150-$300, ~1.8 hr book time (Professional)
Used vs. New Parts: Buying Guide
When a used part is worth it: For a simple wheel speed sensor, buy new. A used sensor is of unknown condition. A used ABS module makes sense for older vehicles to save money, provided it comes with a warranty.
Donor-vehicle mileage cap: roughly under 50000 miles for the part to have meaningful remaining life.
Donor quality checklist:
- Verify the donor vehicle wasn't scrapped for a related system failure.
- Avoid parts from rust-belt vehicles.
- Match the part number exactly; identical-looking sensors have different internal resistance.
Decision logic:
- If The required part is a wheel speed sensor, fuse, or bulb. → Buy new. The cost is low, and reliability is high.
- If The required part is an expensive ABS control module and the vehicle is old. → Buy a used module from a reputable salvage yard, but factor in programming costs.
- If The part is a wheel hub assembly. → Always buy new. It is a critical safety component.
Warranty tradeoff: Used parts offer a 30-90 day warranty. New aftermarket parts offer 1-year to lifetime warranties. New OEM parts offer 1-2 year warranties.
Worst-case if a used part fails: $150-$300 if a used sensor fails, requiring repeat labor and a new part.
What Happens If You Wait — Timeline
- Immediate: ABS, Traction Control, and Stability Control warning lights illuminate. Safety systems are disabled. Primary hydraulic brakes still function. (MPG impact: 0%% · Added cost: $0 (Safety Risk))
- 0-3 months: Stopping distances increase, and the risk of losing control in an emergency maneuver is high. Causes a failed state safety inspection. (MPG impact: 0%% · Added cost: $20-$70 (Inspection fees))
- 3-9 months (If caused by a bad wheel bearing): A failing wheel bearing degrades further, leading to loud grinding noises and damage to the wheel hub assembly, turning a bearing issue into a hub replacement. (MPG impact: 1-5%% · Added cost: $400-$1000+)
- Anytime: An accident occurs due to disabled safety systems. The driver cannot maintain control during a panic stop. Insurance claims may be denied for knowingly operating with disabled safety systems. (MPG impact: 0%% · Added cost: $500+ (Insurance deductible))
Cost of Not Fixing It
- Immediate: Loss of ABS, traction control, and stability control, resulting in an increased risk of wheel lock-up and loss of steering control. (Added cost: N/A (Safety Risk))
- 0-6 months: Increased stopping distances raise the likelihood of a collision. Causes a failed state safety inspection. (Added cost: $20-$70 (Failed inspection fee))
- 6+ months: Insurance companies deny claims if they determine the vehicle was knowingly operated with a disabled safety system. (Added cost: $500+ (Insurance deductible))
Diagnosis Steps
- Confirm Code Definition for Your Vehicle
Use an OBD-II scanner capable of reading Chassis (C) codes. Confirm the exact definition of C1224 for your specific make, model, and year. This dictates the entire diagnostic path (wheel sensor vs. lamp circuit vs. NE signal).
Tools: OBD-II Scanner (ABS/Chassis capable) (Beginner) - Live Data Analysis & Wheel Spin Test
View live data for all four wheel speed sensors. Have a helper spin the right rear wheel by hand. The reading should increase smoothly from 0 MPH. If stuck at zero or erratic, the sensor or circuit is faulty.
Tools: OBD-II Scanner with Live Data (Intermediate) - Visually Inspect the Right Rear Wheel Area
Safely raise the vehicle. Inspect the right rear wheel speed sensor, wiring harness, and connector for chafed wires, animal chewing, or heat damage. Follow the harness as far back as possible.
Tools: Jack, jack stands, flashlight (Intermediate) - Inspect and Clean the Sensor Connector
Disconnect the wheel speed sensor. Inspect pins for corrosion (green/white powder) or water intrusion. Clean with contact cleaner and apply dielectric grease before reconnecting.
Tools: Electrical contact cleaner, small brush, dielectric grease (Intermediate) - Check Fuses and Warning Lamp (Ford)
If the code is 'Lamp Brake Warning Output Circuit Open', inspect ABS/BCM and instrument cluster fuses. Turn the key to 'ON'; the brake warning light must illuminate briefly. If not, replace the bulb.
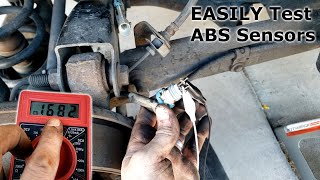
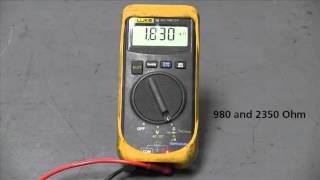
Tools: Owner's manual, fuse puller (Beginner) - Test Passive Wheel Speed Sensor Resistance (GM/Dodge)
For 2-wire passive sensors, disconnect and set a multimeter to Ohms (Ω). Expected resistance is 1600-2300 Ω (Dodge) or 800-1500 Ω (GM). Infinity (OL) indicates an open circuit; 0 Ω indicates a short.
Tools: Multimeter, wiring diagram (Advanced) - Test Active Wheel Speed Sensor Voltage (Newer Vehicles)
For 3-wire active sensors, back-probe the signal wire with the ignition ON. Slowly rotate the wheel; voltage must toggle (e.g., 0.5V to 1.2V). No change indicates a failed sensor or power/ground issue.
Tools: Multimeter, back-probe pins, wiring diagram (Advanced) - Test 'Lamp Circuit' with a Multimeter (Ford)
Disconnect the BCM and instrument cluster. Check continuity on the wire from the BCM output to the lamp connector (should be <5 ohms). Check for a short to ground (should be OL).
Tools: Multimeter, wiring diagram, back-probe pins (Advanced) - Test the 'NE Signal Circuit' (Toyota)
Check voltage between the NEO terminal on the Skid Control ECU and body ground. Engine idling: look for a pulsing voltage (3-6V alternating with <1V). Steady voltage points to a wiring or ECM fault.
Tools: Multimeter, vehicle-specific wiring diagram, back-probe pins (Advanced) - Test for Intermittent Moisture-Related Faults
Mix a 5% saltwater solution. With the fault cleared, spray the suspect sensor and harness. Test drive above 25 mph. If the code returns, you have confirmed moisture intrusion.
Tools: Spray bottle, saltwater solution (Advanced)
When This Code Triggers (Freeze-Frame Conditions)
- Vehicle Speed: > 10 mph (16 km/h) (Sets when the control module sees other wheels reporting speed while the right rear wheel reports zero for a set duration (e.g., 60 seconds).)
- System Voltage: 10-16 Volts (Logs under normal operating voltage, pointing to a specific circuit issue rather than a general low-battery fault.)
- Ignition Cycle: Key-On, Engine-Running (A hard circuit fault (open/short) is detected immediately during the startup self-test, while a signal fault requires vehicle movement.)
- Driving Condition: Steady driving or turning (Logs during normal driving when a discrepancy between wheel speeds becomes apparent to the ABS module.)
Related Codes
- C1235 — Specifies 'Right Rear Wheel Speed Sensor Circuit Open or Shorted'. Confirms a specific electrical fault in the circuit, making it a definitive diagnostic clue alongside C1224.
- C1228 — Means 'Right Rear Excessive Wheel Speed Variation'. Indicates a noisy signal and acts as a precursor to C1224 before the sensor dies completely.
- C1223 — A generic code for 'Lamp Brake Warning Output Circuit Failure'. C1224 is the specific 'Open' version of this fault on Fords.
- C1225 / C1226 — Relates to the brake lamp circuit. C1225 is 'Short to Battery' and C1226 is 'Short to Ground', unlike C1224's 'Open Circuit'.
- C1201 — On Toyota/Lexus, this 'Engine Control System' code frequently accompanies C1224, reinforcing a communication problem between the ECM and brake module.
Climate & Environmental Factors
- High Humidity / Heavy Rain: Water penetrates cracks in sensor housings or compromised wiring connectors, causing a short circuit and triggering the ABS light intermittently.
- Cold Weather / Snow & Ice: Moisture in connectors freezes and expands, interrupting the electrical signal. Packed snow physically blocks the sensor from reading the tone ring.
- Rust Belt / Road Salt: De-icing agents dramatically accelerate corrosion, leading to rusted-through wiring, corroded connector pins, and degraded ABS tone rings.
How to Talk to a Mechanic About This Code
Say this: "I have an ABS light on and my scanner shows code C1224. I know this code has different meanings for different brands. I'd like to schedule a diagnostic appointment to confirm the specific definition for my vehicle and pinpoint the cause."
Signals you understand the code's ambiguity. Directs the shop to perform a specific diagnostic task rather than just 'fixing the light,' preventing unnecessary part replacement.
Avoid saying:
- 'My ABS light is on, can you just fix it?'
- 'I think I need a new wheel speed sensor.'
- 'Just do whatever it takes to get the light off.'
Questions to ask before authorizing the repair:
- What was the specific definition of C1224 for my vehicle?
- What diagnostic steps did you take to confirm the cause?
- Can you show me the failed part or the corroded wiring?
- What is the warranty on the parts and labor?
Where to Take It: Dealer vs Independent vs Chain
- Dealer:
Recommended for unusual definitions or if an independent shop cannot diagnose it.
Best for: Vehicles under warranty., Complex, manufacturer-specific variations (Toyota NE Signal, Corvette EBCM)., Repairs requiring module programming.
Downsides: Significantly higher labor rates and parts costs., Defaults to module replacement instead of detailed wiring repair. (Typical cost: +40% vs. baseline) - Independent Shop:
Best fit for most C1224 situations. Choose a well-reviewed shop with ASE-certified technicians.
Best for: Out-of-warranty vehicles with common issues (GM/Dodge sensor, Ford lamp circuit)., Cost-conscious owners wanting expertise and value.
Downsides: Diagnostic equipment varies; ensure they have an ABS-capable scan tool., Less familiar with rare, brand-specific definitions. (Typical cost: +0% vs. baseline) - Chain Shop:
Acceptable for straightforward sensor replacement, but AVOID for initial diagnosis.
Best for: Simple, confirmed part replacements like a wheel speed sensor if already diagnosed.
Downsides: Technician skill varies widely., High pressure to upsell unnecessary services., Unlikely to perform in-depth electrical diagnostics. (Typical cost: -10% vs. baseline)
When to Walk Away From the Repair
If the estimated repair cost exceeds 40-50% of the car's private-party value, consider selling or trading it in.
- Car worth $4500, fix is $350: Fix it. A $350 repair for a wheel speed sensor restores a critical safety system well below the threshold.
- Car worth $3000, fix is $1500: Walk away. A $1500 repair for a failed ABS module is 50% of the car's value.
- Car worth $10000, fix is $1500: Borderline. Get a second opinion to ensure the ABS module is truly the problem before authorizing the repair.
What Scan Tool You Need for This Code
Minimum: A scanner that reads and clears Chassis (C) codes for the ABS module. A basic engine-only reader will not see C1224.
A standard $20 OBD-II reader only accesses Powertrain (P) codes. It is completely blind to the ABS module.
Budget: BlueDriver Pro (~$100) — Connects to a smartphone, reads/clears ABS codes, and displays live data to watch wheel speed sensor readings in real-time.
Mid-range: Foxwell NT604 Elite / Autel AutoLink AL619 (~$150) — Dedicated handheld scanners that read Engine, Transmission, ABS, and SRS codes with live data. Easy to use without a smartphone.
Professional: Autel MaxiCOM MK808 / MK808BT (~$500) — Offers full-system diagnostics, live data graphing, and bidirectional controls to activate the ABS pump for bleeding procedures.
Rent vs buy: Auto parts store loaner tools typically only read engine codes. You must purchase your own ABS-capable scanner or pay a shop for diagnosis.
How to Clear the Code After You Fix It
- Fix the underlying mechanical or electrical fault.
- Use an ABS-capable OBD-II scan tool to erase the fault codes from the brake control module.
- Perform a short test drive above 15 mph, including turns, to allow the system to verify the repair.
Drive cycle (~15 minutes): Start the vehicle and drive for 10-15 minutes, reaching speeds over 15-20 mph. If the repair was successful, the ABS light remains off. Some systems clear the history code after 100 consecutive fault-free drive cycles.
Readiness monitors affected: This chassis code does not affect powertrain emissions readiness monitors, but states may check for ABS codes during safety inspections.
Watch out for:
- Using a basic OBD-II scanner that cannot read or clear ABS-specific 'C' codes.
- Clearing the code without fixing the root cause results in the light immediately returning.
- Disconnecting the battery does not reliably clear stored fault history in the ABS module.
Will This Fail Emissions / State Inspection?
No — by itself this code doesn't fail OBD inspection (but it can keep readiness monitors from setting, which causes a separate fail).
- California: An ABS light does NOT fail a smog check. However, salvage title vehicles require a 'Brake and Lamp Inspection', where a non-functional ABS fails.
- New York: The safety inspection checks all warning lamps. An illuminated ABS light fails the vehicle.
- Texas: Annual safety inspections are no longer required for non-commercial vehicles as of 2025. An ABS light does not fail the emissions test.
Most Commonly Affected Vehicles
- General Motors (Buick, Pontiac, Chevrolet) Various (LeSabre, Grand Am) (1997-2005) — C1224 almost always means 'Right Rear Wheel Speed Sensor Input Signal = 0'. The cause is typically a failed sensor or damaged wiring harness pigtail.
- Ford Various Models (Focus, Fusion, F-150) (2000-2012) — C1224 specifically means 'Lamp Brake Warning Output Circuit Open'. Diagnosis must focus entirely on the dashboard warning light circuit, fuse, and bulb.
- Toyota Highlander / Land Cruiser (1998-2007) — C1224 indicates a fault in the 'NE Signal Circuit', a communication line for engine RPM between the ECM and Skid Control ECU.
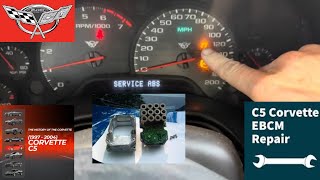
- Chevrolet Corvette (C5) (1997-2004) — 1997-2000 models are notorious for a non-repairable Electronic Brake Control Module (EBCM) that fails internally after hitting bumps, causing this code.
- Dodge / Ram Ram 1500 (3rd Gen) (2002-2008) — A single ABS sensor on the rear differential provides the speed signal. Failure sets a circuit code and causes the speedometer to fail.
- BMW 3-Series (E90) (2006-2011) — A rear wheel speed sensor failure triggers a cluster of warning lights (ABS, DSC, Brake, 4x4). Inspect the sensor, wiring, and reluctor ring.
- Lexus LS430 / Various (2001-2006) — C1224 indicates a problem with the 'NE Signal Circuit'. It often appears alongside code C1201 ('Engine Control System') and limits RPMs.
- GMC / Chevrolet Trucks Various with 4T65-E Transmission (1999-2007) — C1224 means 'Incorrect Gear Ratio', pointing to a transmission issue like low fluid or a failing internal speed sensor, not a wheel speed sensor.
Manufacturer-Specific Notes
- General Motors (GM): GM assigns C1224 to multiple issues: a wheel speed sensor on a Buick, an incorrect gear ratio on a GMC truck, or a failing EBCM on a Corvette. Always verify the definition.
- Toyota / Lexus: Defines C1224 as a fault in the 'NE Signal Circuit'. Technicians must immediately suspect a wiring issue between the ECM and Skid Control ECU, not a wheel sensor.
- Ford: Consistently uses C1224 for 'Lamp Brake Warning Output Circuit Open'. Ignore wheel speed sensors and focus entirely on testing the instrument cluster warning light bulb.
- Chevrolet: Some models log C1224 for 'Accelerator Pedal Position Sensor 2 Circuit Low Input', a completely unrelated throttle system fault.
Real Owner Stories
2002 Pontiac Grand Am - Intermittent ABS Light
The ABS and Trac Off lights came on intermittently after hitting bumps. Code C1224 indicated 'Right Rear Wheel Speed Sensor Input Signal is Zero'.
Outcome: A visual inspection revealed the wiring harness near the wheel hub chafed through its insulation, rubbing against a suspension component. Splicing the broken wire and adding new conduit resolved the issue for under $20.
Lesson: For intermittent wheel speed sensor codes triggered by bumps, always suspect a wiring issue before condemning the sensor. Visual inspection is critical.
2008 Ford Focus - Brake Light Doesn't Work
The owner failed a state safety inspection because the red 'BRAKE' warning light failed to illuminate during the key-on bulb check. Scan revealed C1224: 'Lamp Brake Warning Output Circuit Open'.
Outcome: The owner removed the instrument cluster and found the warning light bulb was burnt out. Replacing the $5 #194 bulb fixed the problem.
Lesson: Always confirm the exact definition of C1224 for your vehicle's make. On Fords, it points directly to the warning lamp circuit, not ABS sensors.
2001 C5 Corvette - ABS/Traction Control Lights After Hitting Pothole
After hitting a pothole, the ABS, Traction Control, and 'Service Active Handling' messages appeared. Code C1224 pointed to the right rear wheel speed sensor, accompanied by C1214 (EBCM relay failure).
Outcome: Forum research revealed the 1997-2000 C5 Corvette Electronic Brake Control Module (EBCM) is prone to failure from physical shock. The owner installed a used EBCM for $800, resolving all codes.
Lesson: On specific vehicles like the C5 Corvette, C1224 is a symptom of a well-documented component failure. Research vehicle-specific forums for pattern failures.
How to Prevent This Code From Triggering
- Apply Dielectric Grease to Connectors (During any brake, suspension, or wheel-end work) — Seals out moisture and oxygen, preventing terminal pin corrosion, which is a primary cause of intermittent 'signal zero' faults.
- Inspect and Secure Wiring Harnesses (Once a year or during tire rotations) — Ensures plastic conduit is secured in clips and not rubbing against suspension parts, preventing chafing that leads to broken wires.
- Clean Wheel Hub and Sensor Mounting Surface (When replacing a sensor or wheel bearing) — Removes rust buildup that pushes the sensor away from the tone ring, ensuring the correct air gap for a strong signal.
- Regularly Wash Undercarriage in Salt-Belt Regions (Frequently during winter months) — Removes corrosive road salt and de-icing brines, slowing down the degradation of wiring, connectors, and the metal tone ring.
Frequently Asked Questions
Can a bad wheel bearing cause code C1224?
Yes. Modern vehicles integrate the ABS tone ring into the wheel bearing assembly. If the bearing develops excessive play, it damages the tone ring or alters the sensor air gap, leading to a lost signal.
What is the most common misdiagnosis for C1224?
Replacing the expensive ABS control module without performing proper circuit tests. The actual fault is usually a simple broken wire or corroded connector.
Is it safe to drive with code C1224?
No. Your ABS, traction control, and stability control are disabled. This increases stopping distance by up to 37% in the wet and significantly raises the risk of a skid.
Should I use an OEM or aftermarket wheel speed sensor?
Some vehicle control modules are highly sensitive to sensor resistance. Using a cheap aftermarket sensor often fails to resolve the code. Stick to OEM or reputable OEM-equivalent brands to ensure proper communication.
How do I reset the C1224 code?
Clear the code using an ABS-capable OBD-II scanner. However, the code returns immediately upon startup if the underlying electrical or mechanical fault is not repaired first.
Can I replace a wheel speed sensor myself?
Yes, it typically involves removing the wheel, undoing a single bolt, and unplugging a connector. However, sensors in rust-prone areas seize in the knuckle and break during removal, complicating the job.
Why does my ABS light come on when it rains?
This is a classic symptom of moisture intrusion into a failing wheel speed sensor or compromised wiring harness. Water shorts the electrical circuit, causing the fault.
Key Takeaways
- Code C1224 has at least four completely different manufacturer definitions; verify your specific vehicle's meaning before buying any parts.
- Over 80% of C1224 triggers stem from simple electrical faults like a broken wire, corroded connector pin, or a failed right rear wheel speed sensor.
- Driving with C1224 increases emergency stopping distances by up to 37% in wet conditions because your Anti-lock Braking System (ABS) and stability control are completely disabled.
- Never assume the ABS control module is faulty without first testing the $5 dashboard warning bulb (on Fords) or the $50 wheel speed sensor (on GM/Dodge vehicles).
Helpful Videos
Shop the Parts Behind C1224
Below are the parts most often responsible for code C1224, ranked by how frequently each one is the actual culprit (per the diagnosis above). Tap any to see what we have for your vehicle.


The information in this article is provided for general reference and educational purposes only. Vehicle specifications, procedures, and part compatibility can vary by production date, trim level, and region. Always consult your vehicle's factory service manual and verify part numbers before purchasing or performing repairs. Safety-critical components such as airbags, seat belts, and braking systems should be installed by a qualified professional.
- 🧭 Diagnostic Flowchart
- 🎬 Helpful Videos
- 🛍️ Shop This Part
- What Does C1224 Mean?
- Can I Drive With C1224?
- Common Causes
- Symptoms
- Common Fixes & Costs
- Used vs. New Parts: Buying Guide
- What Happens If You Wait — Timeline
- Cost of Not Fixing It
- Diagnosis Steps
- When This Code Triggers (Freeze-Frame Conditions)
- Related Codes
- Climate & Environmental Factors
- How to Talk to a Mechanic About This Code
- Where to Take It: Dealer vs Independent vs Chain
- When to Walk Away From the Repair
- What Scan Tool You Need for This Code
- How to Clear the Code After You Fix It
- Will This Fail Emissions / State Inspection?
- Most Commonly Affected Vehicles
- Manufacturer-Specific Notes
- Real Owner Stories
- 2002 Pontiac Grand Am - Intermittent ABS Light
- 2008 Ford Focus - Brake Light Doesn't Work
- 2001 C5 Corvette - ABS/Traction Control Lights After Hitting Pothole
- How to Prevent This Code From Triggering
- Frequently Asked Questions
- Can a bad wheel bearing cause code C1224?
- What is the most common misdiagnosis for C1224?
- Is it safe to drive with code C1224?
- Should I use an OEM or aftermarket wheel speed sensor?
- How do I reset the C1224 code?
- Can I replace a wheel speed sensor myself?
- Why does my ABS light come on when it rains?
- Key Takeaways
- 🎟️ Get 5% Off