
OBD-II Code C1363: Brake Booster Pedal Force Switch Malfunction
What C1363 means, why it triggers, and how to fix it
- Code C1363 is a critical Toyota/Lexus safety fault indicating a failure in the brake booster's pedal force switch.
- Expect immediate symptoms including illuminated ABS, VSC, and BRAKE dashboard lights accompanied by a continuous, high-pitched interior alarm.
- The faulty sensor is permanently integrated into the brake booster assembly, requiring a complete $1,500 to $2,100 unit replacement rather than a simple sensor swap.
- Stop driving immediately; this failure disables power brake assist and increases emergency stopping distances by 2 to 3 times.
- Verify the failure by checking live scanner data for a 0.5V to 4.5V pedal sweep, and always perform a mandatory Zero Point Calibration after installing the new booster.
What Does C1363 Mean?
Code C1363 means the brake control computer (Skid Control ECU) detects a malfunction in the booster pedal force switch. This sensor tells the computer how hard and fast you press the brake pedal, which is critical for the Anti-lock Brake System (ABS) and Vehicle Stability Control (VSC). This issue is almost exclusively found on Toyota and Lexus vehicles equipped with a hydraulic (hydro-boost) brake booster system.
Technical definition: Malfunction in Booster Pedal Force Switch. This manufacturer-specific code indicates the Skid Control ECU lost the signal from the switch measuring driver-applied brake pedal force. If the signal is lost, erratic, or fails to correlate with the master cylinder pressure sensor, the ECU sets this code and disables the ABS and VSC systems.
Can I Drive With C1363?
No — Do Not Drive. Do not drive. A C1363 code signifies an imminent failure of the power brake assist system. When it fails, the brake pedal becomes extremely hard to press, requiring you to exert your full body weight. This increases your emergency stopping distance by 2 to 3 times, making a collision highly likely. The system fails without any warning beyond the dashboard lights.
Common Causes
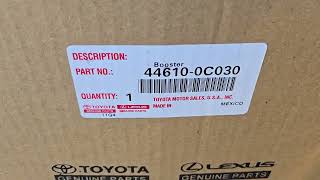
- Failed Brake Booster Assembly (Internal Switch Failure) (Very Common) — The pedal force switch fails internally. Because this switch is permanently integrated into the brake booster and master cylinder assembly on Toyota/Lexus models, the entire unit must be replaced. 🎬 Watch this step-by-step guide on replacing the brake booster assembly. It is not sold separately.
- Corroded or Damaged Wiring/Connectors (Common) — The main electrical connector leading to the brake booster assembly corrodes or loosens due to moisture or heat. This disrupts the signal from the pedal force switch and mimics a failed booster.
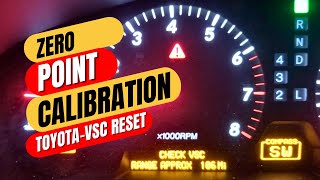
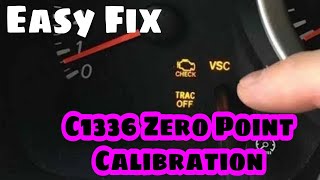
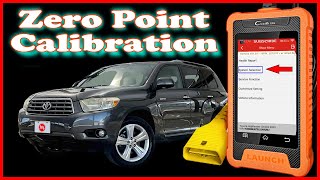
- Failure to Perform Zero Point Calibration (Less Common) — After replacing the brake booster or chassis components, a 'Zero Point Calibration' must be performed to reset the yaw rate and deceleration sensors. 🎬 See how to perform a Zero Point Calibration on your Toyota. Skipping this step causes the ECU to set C1363.
- Low Brake Fluid or Internal Leaks (Less Common) — Low brake fluid or internal leaks within the hydraulic booster cause the pump to work incorrectly, leading to abnormal pressure signals that trigger C1363 alongside other codes.
- Brittle/Broken Electrical Connector Retaining Clip (Subaru) (Less Common) — On Subarus, the plastic retaining clip on the electronic parking brake connector becomes brittle and breaks. This causes identical symptoms (multiple brake warning lights) but requires a much cheaper fix.
- Faulty Skid Control ECU (Rare) — The computer module that receives the signal from the pedal force switch fails, misinterpreting a good signal as a fault.
Symptoms
- ABS, VSC, and Brake Warning Lights On — The Anti-lock Brake System (ABS), Vehicle Stability Control (VSC), and main BRAKE lights illuminate simultaneously.
- Continuous Audible Dashboard Alarm — A continuous, high-pitched alarm sounds from the dashboard, indicating a critical hydraulic brake fault. Stop driving immediately.
- Hard Brake Pedal with Increased Stopping Distance — The brake pedal becomes extremely difficult to press, indicating a complete loss of power brake assist. 🎬 Learn how a brake booster works and how to test it. Stopping distance increases by 2 to 3 times.
- Spongy Brake Pedal — In early failure stages, the pedal feels soft or travels further to the floor than normal as the hydraulic system struggles to maintain pressure.
- Brake Pump Motor Runs Continuously (also visible on scanner) — The electric motor for the hydro-boost system runs constantly or cycles every few seconds, indicating the system is failing to hold pressure.
Diagnostic Flowchart
Tap your situation to follow the diagnostic path that matches what you're seeing on this code.
Common Fixes & Costs
- Replace Brake Booster / Master Cylinder Assembly (OEM) — Parts: $1200-$1800, Labor: $300-$500, ~2.5 hr book time (Professional)
- Replace with a Remanufactured Brake Booster Assembly — Parts: $650-$900, Labor: $300-$500, ~2.5 hr book time (Professional)
- Repair Wiring or Clean Connectors — Parts: $5-$20, Labor: $150-$250, ~1.5 hr book time (Intermediate)
- Bleed the Brake System (Scan-Tool Assisted) — Parts: $20-$35, Labor: $150-$200, ~1.0 hr book time (Advanced)
- Perform Zero Point Calibration — Parts: $0, Labor: $75-$150, ~0.5 hr book time (Advanced)
Used vs. New Parts: Buying Guide
When a used part is worth it: Purchasing a used part is strongly discouraged due to the critical safety function and known failure rate of this assembly. It only makes sense as a last resort for an older, low-value vehicle where the owner accepts the high risk of premature failure.
Donor-vehicle mileage cap: roughly under 60000 miles for the part to have meaningful remaining life.
Donor quality checklist:
- Verify the exact part number, as variations exist by year and model.
- Avoid parts from rust-belt regions due to connector and line corrosion.
- Request a video of the donor car running with no brake warning lights.
Decision logic:
- If The part is for a primary, daily-driven vehicle. → Buy a new OEM part. The safety risk and repeat labor costs outweigh any savings.
- If Budget is the primary concern and you are performing the labor yourself. → Purchase a remanufactured part from a highly reputable brand with a long warranty.
- If The vehicle is over 15 years old and has over 200,000 miles. → A low-mileage used part is an option, but expect its remaining lifespan to be uncertain.
Warranty tradeoff: Used parts offer a 30-90 day warranty. Remanufactured parts offer a 1-year to limited lifetime warranty. A new OEM part installed by a dealer carries a 12-month/12,000-mile warranty on parts and labor.
Worst-case if a used part fails: $600-$1000 if a used or remanufactured part fails, representing the cost of repeat labor and diagnostic time.
What Happens If You Wait — Timeline
- First Occurrence: An intermittent fault is detected. The ABS, VSC, and BRAKE lights flash briefly and turn off. A momentary beep sounds. Brake feel remains normal. (MPG impact: 0%% · Added cost: $0)
- Hours to Days Later: The fault becomes permanent. Warning lights stay on, and a continuous dashboard alarm sounds. The ECU disables the power brake assist system. (MPG impact: 0%% · Added cost: $150-$300 (Cost of towing).)
- Immediate (After Stage 2): The brake pedal becomes extremely hard to press. Emergency stopping distance increases by 2-3 times. (MPG impact: 0%% · Added cost: $1,500 - $2,100 (Cost of required brake booster assembly replacement).)
- Any Panic Stop Situation: The driver is unable to stop in time due to the loss of power assist, leading to a collision. (MPG impact: N/A% · Added cost: $5,000 - $25,000+ (Collision repair, insurance deductibles, and liability).)
Cost of Not Fixing It
- Immediate: Sudden and complete loss of power brake assist. The brake pedal becomes extremely hard to push, requiring 2-3 times the normal stopping distance. (Added cost: High potential for a collision, leading to thousands of dollars in vehicle damage and liability.)
- Days to Weeks: The continuous audible alarm makes driving intolerable. The vehicle automatically fails any state safety inspection. (Added cost: Cost of towing ($150-$300), plus the original repair cost.)
- Months: The vehicle remains undrivable. Ignoring the issue does not damage other components, but the extreme safety risk persists. (Added cost: The repair cost remains the same, assuming no collision occurs.)
Diagnosis Steps
- Verify the Code with an Advanced Scanner
Use an OBD-II scanner capable of reading manufacturer-specific chassis codes. Confirm C1363 is present. Document and clear all codes, then drive to see which return. Note related codes like C1246, C1252, and C1256.
Tools: Advanced OBD-II Scanner (Beginner) - Analyze Live Sensor Data
Access the live data stream for the ABS/VSC system. Monitor the 'Brake Booster Pedal Force Switch' voltage. It should sweep smoothly from ~0.5V (released) to ~4.5V (depressed). If stuck at 0V or 5V, the switch or circuit has failed.
Tools: Advanced OBD-II Scanner (Intermediate) - Perform 'Wiggle Test' on Connector
While watching the live data stream, wiggle the main electrical connector on the brake booster assembly. If the voltage jumps or cuts out, you have a poor connection, not a failed booster unit.
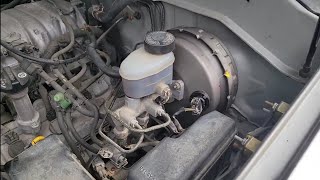
Tools: Advanced OBD-II Scanner (Intermediate) - Visually Inspect the Brake Booster Assembly
Inspect the brake booster and master cylinder assembly for fluid leaks around the pump motor and electrical connectors. Ensure the main electrical connector is fully seated and the locking tab is intact.
Tools: Flashlight (Beginner) - Listen to the Pump Motor
Listen for the hydro-boost pump motor when pressing the brake pedal. No noise indicates a C1252 (Pump Motor Fault). Continuous running points to a C1256 (Accumulator Low Pressure) fault.
Tools: None (Intermediate) - Test the Circuit with a Multimeter
Disconnect the booster connector. Using a wiring diagram, verify the switch receives a 5V reference voltage from the ECU and has a solid ground (less than 0.1V drop). If power and ground are good, the booster assembly has failed.
Tools: Multimeter, Vehicle-Specific Wiring Diagram (Advanced) - Perform Pedal Force Switch Resistance Test
Measure resistance between the specified switch pins. A known specification is ~213 Ω (released) and ~1 kΩ (depressed). Infinite or zero resistance confirms the switch has failed.
Tools: Multimeter, Vehicle-Specific Wiring Diagram (Advanced) - Inspect Brake Fluid Level
Check the fluid level in the master cylinder reservoir. Low or dark fluid indicates a leak or neglect contributing to the hydraulic unit's failure.
Tools: None (Beginner) - Perform Zero Point Calibration (Post-Repair)
After replacing the booster, use a scan tool to reset the learned values for the yaw rate and deceleration sensors. This ensures the VSC system functions correctly with the new hardware.
Tools: Advanced OBD-II Scanner or Paperclip (for manual procedure) (Advanced)
When This Code Triggers (Freeze-Frame Conditions)
- Vehicle Speed: 0 mph (The fault is detected immediately when the ignition turns on, even while stationary.)
- Brake Pedal Status: On or Off (Triggers regardless of pedal position if the sensor voltage falls outside the expected 0.5V to 4.5V range.)
- System Voltage: 11-14V (Occurs under normal battery voltage. Low system voltage is not a primary trigger for this specific code.)
- Time Since Ignition On: < 1 second (The ECU detects a complete sensor circuit failure (open or short) instantly upon startup.)
Related Codes
- C1246 — Indicates a malfunction in the Master Cylinder Pressure Sensor, located inside the same booster assembly. If live data shows both C1363 and C1246 sensors are dead, the entire assembly has failed.
- C1252 — Points to a Hydro-Booster Pump Motor fault. If the pump makes no noise when the brake is pressed, it is a C1252 power failure, whereas C1363 is an input sensor failure.
- C1256 — Indicates low accumulator pressure. A pump motor that cycles frequently confirms a C1256 pressure-holding issue, often requiring the same full assembly replacement.
- C1223 — A general ABS control system malfunction code. It appears alongside C1363 to confirm a fault exists within the overall ABS/VSC system.
Climate & Environmental Factors
- Humidity and Road Salt: High humidity and road salt accelerate corrosion of the brake booster's electrical connector. Leaked brake fluid combines with dirt to create a corrosive sludge that degrades electrical contacts.
- Extreme Cold: Extreme cold makes plastic connectors and wire insulation brittle, causing them to break. It also increases brake fluid viscosity, putting additional strain on a weakening pump motor.
How to Talk to a Mechanic About This Code
Say this: "I have a C1363 code with ABS and VSC lights on. I need a diagnostic that includes checking the live voltage data from the brake pedal force switch and a 'wiggle test' on the main connector before assuming the entire booster assembly needs replacement."
This signals you know the common failure is the expensive booster assembly, but that a simple wiring issue mimics the same fault. It directs the technician to rule out the cheaper fix first.
Avoid saying:
- 'Just fix whatever's wrong'
- 'My brake light is on, can you look at it?'
- 'The internet said I need a new brake booster.'
Questions to ask before authorizing the repair:
- What did the live data from the pedal force switch show when you pressed the brake?
- Did you inspect and test the wiring and main connector for corrosion?
- Does your estimate include the mandatory scan-tool-assisted brake bleed procedure?
- Does the estimate include performing the Zero Point Calibration after installation?
- What is the warranty on the replacement part and your labor?
Where to Take It: Dealer vs Independent vs Chain
- Dealer:
Recommended. The dealer has manufacturer-specific tools (Techstream) and ensures the complex bleeding and calibration procedures are done correctly.
Best for: Vehicles where a potential warranty extension might apply., Owners who prioritize a guaranteed fix with OEM parts.
Downsides: Highest cost, typically 1.5-2x the labor rate of an independent shop., Less willing to explore non-standard repairs like cleaning a connector. (Typical cost: +50% vs. baseline) - Independent Shop:
Good Alternative, IF you verify they have a bi-directional scanner capable of performing the ABS bleed and Zero Point Calibration.
Best for: Out-of-warranty vehicles where cost is a major factor., Shops that specialize in Toyota/Lexus.
Downsides: Quality varies widely; you must vet the shop., May lack the latest Toyota-specific software critical for this repair. (Typical cost: +0% vs. baseline) - Chain Shop:
AVOID. The risk of an incomplete repair is very high. A failed bleed or missed calibration leaves the vehicle unsafe to drive.
Best for: Simple, routine maintenance like oil changes.
Downsides: Technicians work under pressure to upsell., Extremely unlikely to have the specialized bi-directional scan tools required. (Typical cost: -10% vs. baseline)
When to Walk Away From the Repair
If the total estimated repair cost for the C1363 fault ($1,500-$2,100) exceeds 50% of your car's private-party value, consider selling or trading it in.
- Car worth $4000, fix is $2100: Borderline. The repair cost is over 50% of the car's value. If the vehicle is otherwise in excellent condition, fixing it may be worthwhile.
- Car worth $8600, fix is $2100: Fix it. The repair cost is well under the 50% threshold, making it a sound investment.
- Car worth $3000, fix is $2100: Walk away. The repair cost is 70% of the car's value. It is not economical to perform this repair.
What Scan Tool You Need for This Code
Minimum: A scanner that reads manufacturer-specific ABS/VSC trouble codes (C-codes) and displays a live data stream for brake system sensors.
A basic $20 OBD-II reader only checks engine codes (P-codes) and cannot see the C1363 chassis code or display live voltage data.
Budget: BlueDriver Pro (~$119) — Reads and clears the C1363 ABS code and displays the live data stream for the pedal force switch to diagnose a failed switch vs. a bad connection.
Mid-range: Foxwell NT510 Elite / NT710 (~$150) — Includes bi-directional controls critical for performing the mandatory scan-tool-assisted ABS brake bleed and Zero Point Calibration.
Professional: Autel MaxiCOM MK808S / Launch CRP919X (~$350-500) — Offers full bi-directional control for all systems, providing a faster interface and broader vehicle coverage for serious DIYers.
Rent vs buy: Renting is not viable. Free loaner tools from auto parts stores cannot perform the required bi-directional functions (ABS bleed, Zero Point Calibration) needed to complete the repair safely. You must buy a capable tool or use a professional shop.
How to Clear the Code After You Fix It
- Use an advanced OBD-II scan tool to clear the C1363 code from the ABS/VSC module.
- Perform the mandatory Zero Point Calibration for the yaw rate and deceleration sensors.
- Execute a scan-tool-assisted brake bleed procedure to purge air from the new hydraulic assembly.
- Test drive for 5-10 minutes involving turns and stops to confirm the warning lights remain off.
Drive cycle (~10 minutes): There is no complex drive cycle. After clearing the code and performing the Zero Point Calibration, a 10-minute test drive at city speeds with several stops and turns verifies the repair. The system confirms proper sensor input immediately.
Readiness monitors affected: This chassis code does not directly affect emissions readiness monitors, but clearing it with a scanner resets them.
Watch out for:
- Clearing the code without replacing the faulty part causes the code to return instantly.
- Skipping the Zero Point Calibration leaves the VSC and ABS lights illuminated even with a new part installed.
- Attempting a manual brake bleed without a scan tool fails to remove air from the ABS circuits, resulting in a non-functional brake pedal.
Will This Fail Emissions / State Inspection?
Yes — this code typically fails an OBD-II emissions inspection.
- California: Automatically fails the safety portion of the smog inspection if the ABS or BRAKE warning lights are illuminated.
- New York: An illuminated ABS warning light is immediate grounds for failing the state safety inspection.
- Texas: A red 'BRAKE' system warning lamp results in an automatic failure of the safety inspection.
Most Commonly Affected Vehicles
- Toyota Sequoia (2001-2007) — The most commonly cited vehicle for C1363. The hydro-boost assembly is a known failure point.
- Toyota Land Cruiser (1998-2007) — Uses a nearly identical hydro-boost system to the Sequoia, making it equally susceptible.
- Lexus LX470 (1998-2007) — Shares the same chassis and braking system as the Land Cruiser. Dealership repair costs are exceptionally high.
- Toyota 4Runner (2001-2002) — Limited and SR5 trims with VSC used a similar hydraulic booster that experiences this failure.
- Toyota Camry Hybrid (2007-2011) — Experiences similar symptoms due to internal leaks in the electro-hydraulic brake actuator (TSB T-SB-0041-14).
- Subaru Outback (2015-2018) — Exhibits identical symptoms due to a brittle electronic parking brake connector clip (TSB 06-87-22R), not a booster failure.
- Subaru Forester (2014-2016) — Subject to recall WUE-90 for a faulty brake light switch that illuminates dash warnings similar to a C1363 fault.
- Subaru Crosstrek (2013-2017) — Included in recall WUE-90 for a brake light switch malfunction causing multiple warning lights.
Manufacturer-Specific Notes
- Toyota / Lexus: The faulty Booster Pedal Force Switch is permanently integrated into the main Brake Booster Assembly. It cannot be purchased separately, forcing a complete unit replacement.
- Toyota / Lexus: Replacing the brake booster assembly requires a mandatory 'Zero Point Calibration' using a scan tool to reset the VSC sensors. Skipping this leaves warning lights on.
- Subaru: Subaru recalls (WUE-90) and TSBs (06-87-22R) address issues producing identical symptoms to C1363 (multiple brake lights) but stem from cheap fixes like a faulty brake light switch.
Real Owner Stories
2005 Toyota Sequoia with 180K miles
While driving, the ABS, VSC, and BRAKE lights illuminated alongside a loud, continuous dashboard alarm. The brake pedal became very hard to press.
What they tried:
- Checked brake fluid, which was full.
- Scanned codes at an independent shop, revealing C1363.
- Mechanic confirmed the pedal force switch was dead via live data.
Outcome: Replaced the entire brake booster and master cylinder assembly with a new OEM part. Total cost was $1,900. After replacement and Zero Point Calibration, normal brake function returned.
Lesson: Lights, an alarm, and a hard pedal confirm a complete hydro-boost assembly failure. This requires a scan tool for bleeding and calibration, making it unsuitable for DIY.
2003 Lexus LX470 with 210K miles
ABS/VSC lights came on intermittently. No alarm sounded, and the brake pedal felt normal. The only code was C1363.
What they tried:
- Monitored the 'Brake Pedal Stroke Sensor' live data with an advanced scan tool.
- Wiggled the main electrical connector on the brake booster assembly while watching the scanner.
- Observed the voltage reading jump and cut out completely during the wiggle test.
Outcome: Disconnected the connector, cleaned the pins with electrical contact cleaner, and applied dielectric grease. The C1363 code cleared and did not return. Total cost was $10.
Lesson: Always perform the 'wiggle test' on the electrical connector before buying a $1,500 part. Corrosion mimics a complete component failure.
2012 Toyota Prius V with 150K miles
ABS and brake warning lights illuminated with a hard brake pedal. Codes included C1363, C1252 (Pump Motor), and C1256 (Accumulator Low Pressure).
What they tried:
- First mechanic suggested replacing just the brake motor.
- Second hybrid-specialist mechanic explained that multiple pump/accumulator codes indicate a failure of the entire actuator assembly.
Outcome: Replaced the complete ABS actuator/accumulator assembly for $1,800 at an independent shop. Replacing just the motor would have failed to fix the root internal leak.
Lesson: When C1363 appears alongside C1252 and C1256, diagnose the system as a whole. One failing component causes others to overwork, requiring a full assembly replacement.
How to Prevent This Code From Triggering
- Perform a complete brake fluid flush. (Every 2-3 years or 30,000 miles.) — Brake fluid absorbs moisture over time. This moisture causes internal corrosion of the delicate electronic and hydraulic components within the booster assembly, leading to premature failure.
- Use only the specified brake fluid type (e.g., DOT 3). (Every time fluid is added or flushed.) — Using the wrong fluid damages seals within the complex hydro-boost system.
- Regularly inspect for brake fluid leaks. (During every oil change.) — A small leak around the master cylinder or booster introduces air and contaminants, indicating a failing seal that precedes a larger system failure.
Frequently Asked Questions
Can I just replace the C1363 sensor instead of the whole brake booster?
No. On affected Toyota and Lexus vehicles, the pedal force sensor is permanently integrated into the brake booster and master cylinder assembly. It is not sold separately, requiring a complete unit replacement.
Is it safe to drive with code C1363?
No. This code indicates an impending failure of your power brake assist, which severely compromises your ability to stop and dramatically increases stopping distance.
Why are my ABS, VSC, and BRAKE lights all on with a loud alarm?
The pedal force switch provides essential data for the ABS and VSC systems. When the computer loses this signal, it disables all related safety systems and sounds an alarm to alert you to the critical failure.
How much does it cost to fix code C1363?
Replacing the brake booster assembly with a new OEM part typically costs between $1,500 and $2,100 for parts and labor. Using a remanufactured part lowers the total cost to the $950-$1,400 range.
What is a Zero Point Calibration and why is it necessary?
It is a procedure that resets the baseline position for the vehicle's stability control sensors. It is mandatory after replacing the brake booster assembly to ensure the computer works correctly with the new part.
Could a bad battery cause code C1363?
While a weak battery causes random electrical codes, it is not a direct cause for C1363. This code points specifically to a malfunction in the brake booster's pedal force switch circuit.
My Subaru has the same symptoms, but no C1363 code. What could it be?
Subarus display identical symptoms for different reasons. Check for recall WUE-90 (brake light switch) and TSB 06-87-22R (brittle parking brake connector clip), which are common and cheap fixes.
Is it possible the problem is just a dirty connector?
Yes. Brake fluid or road grime can corrode the main electrical connector. A thorough visual inspection and 'wiggle test' should be performed before condemning the expensive booster assembly.
Key Takeaways
- Code C1363 is a critical Toyota/Lexus safety fault indicating a failure in the brake booster's pedal force switch.
- Expect immediate symptoms including illuminated ABS, VSC, and BRAKE dashboard lights accompanied by a continuous, high-pitched interior alarm.
- The faulty sensor is permanently integrated into the brake booster assembly, requiring a complete $1,500 to $2,100 unit replacement rather than a simple sensor swap.
- Stop driving immediately; this failure disables power brake assist and increases emergency stopping distances by 2 to 3 times.
- Verify the failure by checking live scanner data for a 0.5V to 4.5V pedal sweep, and always perform a mandatory Zero Point Calibration after installing the new booster.
Helpful Videos


Shop the Parts Behind C1363
Below are the parts most often responsible for code C1363, ranked by how frequently each one is the actual culprit (per the diagnosis above). Tap any to see what we have for your vehicle.


The information in this article is provided for general reference and educational purposes only. Vehicle specifications, procedures, and part compatibility can vary by production date, trim level, and region. Always consult your vehicle's factory service manual and verify part numbers before purchasing or performing repairs. Safety-critical components such as airbags, seat belts, and braking systems should be installed by a qualified professional.
- 🧭 Diagnostic Flowchart
- 🎬 Helpful Videos
- 🛍️ Shop This Part
- What Does C1363 Mean?
- Can I Drive With C1363?
- Common Causes
- Symptoms
- Common Fixes & Costs
- Used vs. New Parts: Buying Guide
- What Happens If You Wait — Timeline
- Cost of Not Fixing It
- Diagnosis Steps
- When This Code Triggers (Freeze-Frame Conditions)
- Related Codes
- Climate & Environmental Factors
- How to Talk to a Mechanic About This Code
- Where to Take It: Dealer vs Independent vs Chain
- When to Walk Away From the Repair
- What Scan Tool You Need for This Code
- How to Clear the Code After You Fix It
- Will This Fail Emissions / State Inspection?
- Most Commonly Affected Vehicles
- Manufacturer-Specific Notes
- Real Owner Stories
- 2005 Toyota Sequoia with 180K miles
- 2003 Lexus LX470 with 210K miles
- 2012 Toyota Prius V with 150K miles
- How to Prevent This Code From Triggering
- Frequently Asked Questions
- Can I just replace the C1363 sensor instead of the whole brake booster?
- Is it safe to drive with code C1363?
- Why are my ABS, VSC, and BRAKE lights all on with a loud alarm?
- How much does it cost to fix code C1363?
- What is a Zero Point Calibration and why is it necessary?
- Could a bad battery cause code C1363?
- My Subaru has the same symptoms, but no C1363 code. What could it be?
- Is it possible the problem is just a dirty connector?
- Key Takeaways
- 🎟️ Get 5% Off