
OBD-II Code C1368: Linear Solenoid Valve Offset Malfunction
What C1368 means, why it triggers, and how to fix it
- Code C1368 disables your vehicle's power brakes and regenerative braking, making it completely unsafe to drive.
- A failed brake actuator assembly causes over 80% of C1368 codes and typically costs $1,500 to $3,000 to replace.
- Code C1368 almost always triggers alongside C1345; you must fix the underlying hardware fault before the required scan-tool calibration will succeed.
- You cannot clear this code with a standard OBD-II reader; a bi-directional scan tool is mandatory to perform the 2-minute 'Linear Solenoid Valve Offset Learning' procedure.
- Test the 12V auxiliary battery and ABS motor relays before replacing the actuator, as a voltage drop below 11V instantly fails the calibration.
What Does C1368 Mean?

Code C1368 means the vehicle's computer (ECU) detected a problem during the self-test or calibration of the brake actuator's internal solenoids. These solenoids control brake fluid pressure. When their learned settings fall outside the acceptable manufacturer range, the ECU logs this code, indicating a hardware failure or an interrupted calibration.
Technical definition: The official SAE/ISO definition for C1368 is "Linear Solenoid Valve Offset Malfunction." The system logs this code when the learned offset value of the linear solenoid valve is out of specification, which almost always occurs after a 'Linear Solenoid Valve Offset Learning' calibration attempt fails.
🎬 Watch: How to perform the Linear Valve Offset procedure.Can I Drive With C1368?
No — Do Not Drive. This code indicates a critical failure within the electronically controlled brake system. Driving is unsafe because brake performance is severely compromised. The system reverts to a failsafe mode with no power assistance, requiring extreme pedal effort to stop the vehicle. Continued driving is hazardous.
Common Causes

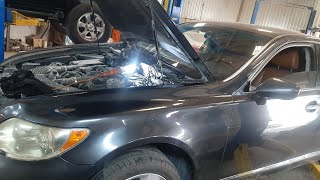
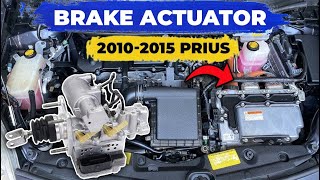
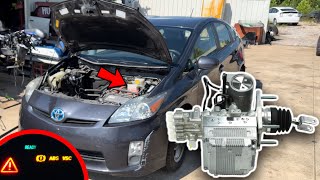
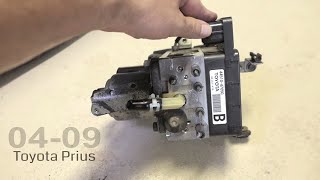
- Failed Brake Actuator Assembly (Very Common) — The internal solenoids, accumulator, or integrated Skid Control ECU within the brake actuator assembly fail mechanically or electronically. This prevents the unit from passing the self-calibration test and requires full replacement. 🎬 See the easiest way to replace a Prius brake actuator.
- Failed or Interrupted Calibration (Common) — This code appears after replacing a 12V battery, replacing the brake actuator, or performing a wheel alignment if the required 'Linear Solenoid Valve Offset Learning' procedure is interrupted. Pressing the brake pedal or leaving the parking brake on during the self-test instantly fails the calibration.
- Air in the Brake Lines or Actuator (Common) — Air trapped in the brake actuator or lines interferes with the calibration process, causing it to fail. This happens after brake pad or fluid service if the system isn't bled correctly using a scan tool's automated procedure. 🎬 Watch: How to bleed ABS brakes using a scan tool.
- Low or Unstable 12V Battery Voltage (Less Common) — The calibration procedure requires a stable voltage between 11V and 15.5V. If the 12V auxiliary battery is weak or failing under load, the calibration aborts and logs this code.
- Failed ABS Motor Relay(s) (Less Common) — The brake actuator relies on external relays. If an ABS motor relay fails, the pump cannot operate during the calibration procedure. This is a cheap, easily verifiable fix to check before replacing the actuator.
- Damaged Wiring or Poor Connection (Rare) — A damaged wire or a corroded connector pin at the brake actuator assembly interrupts communication during the calibration process, causing an immediate failure.
Symptoms

- ABS, VSC, and Brake Warning Lights On — The dashboard illuminates with multiple warning lights related to braking and stability control, accompanied by a continuous or intermittent warning beep.
- Unusual Noises from Brake Actuator — The brake actuator pump runs constantly or makes frequent clicking, whirring, or buzzing sounds when the brake is pressed or when the vehicle is parked.
- Hard Brake Pedal — The brake pedal feels stiff and requires significantly more physical effort to press due to a complete loss of power assist.
- Loss of Regenerative Braking — On hybrid vehicles, this fault disables the regenerative braking system, negatively affecting fuel economy and causing the high-voltage battery to discharge faster in stop-and-go traffic.
- Brake Dragging or Sticking (also visible on scanner) — A failed internal valve remains partially open or closed, causing one or more brake calipers to drag, which overheats the rotor and destroys the brake pad.
Diagnostic Flowchart

Tap your situation to follow the diagnostic path that matches what you're seeing on this code.
Common Fixes & Costs
- Replace Brake Actuator Assembly
— Parts: $800-$1500 (new OEM), $150-$500 (used), Labor: $400-$800, ~4.5 hr book time
(Professional)
Toyota Prius (2004-2009): OEM 44500-47141 (replaces 44500-47140) (Alt: Cardone (12-4001, Reman))
Toyota Camry Hybrid (2007-2011): OEM 44050-06170, 47050-33110 (Alt: Dorman (601-045))
Lexus LS460 (2007-2012): OEM 44050-50110, 44510-50070 (Alt: Remanufactured units only) - Perform Linear Solenoid Valve Offset Calibration — Parts: $0, Labor: $150-$250, ~1 hr book time (Professional)
- Replace 12V Auxiliary Battery
— Parts: $200-$300, Labor: $50-$100, ~0.5 hr book time
(DIY)
Toyota Prius (2004-2009): OEM 28800-21171 (Alt: Optima (DS46B24R), ACDelco (B24RAGM))
Toyota Camry Hybrid (2007-2011): OEM 28800-28062 (Alt: Duralast Platinum (35-AGM)) - Bleed Brake System using Scan Tool — Parts: $15-$40, Labor: $150-$250, ~1.5 hr book time (Advanced)
- Replace ABS Motor Relay(s)
— Parts: $20-$60, Labor: $0-$50, ~0.2 hr book time
(DIY)
Toyota Prius (2004-2009): OEM 90987-04004 (Alt: ACDelco (F1757), Denso (567-0003))
Lexus LS460 (2007-2012): OEM 90987-02028 (Alt: Denso (567-0007))
DIY vs Professional
- Replace ABS Motor Relay(s) — Beginner:
- Replace 12V Auxiliary Battery — Beginner:
- Perform Linear Solenoid Valve Offset Calibration — Beginner:
- Bleed Brake System using Scan Tool — Beginner:
- Replace Brake Actuator Assembly — Beginner:
Used vs. New Parts: Buying Guide
When a used part is worth it: A used brake actuator only makes sense when the vehicle has over 200,000 miles and a $2,000+ repair exceeds the car's value. It is a high-risk purchase.
Donor-vehicle mileage cap: roughly under 80000 miles for the part to have meaningful remaining life.
Donor quality checklist:
- Purchase from a reputable seller offering at least a 90-day warranty.
- Prioritize parts from lower-mileage, rear-end collision vehicles.
- Match the OEM part number exactly, prioritizing superseded (updated) part numbers.
- Avoid parts from regions with high humidity or road salt, as internal corrosion causes this failure.
Decision logic:
- If The vehicle is your primary transportation and safety is the top priority → Buy a new OEM part. The high cost is justified for reliability in a critical safety system.
- If Budget is the primary constraint and you accept the risk of doing the labor twice → Buy a used part from a low-mileage donor with a warranty.
- If The part is a remanufactured unit from a non-OEM source → Be extremely cautious. Remanufactured actuator quality varies wildly, and failure rates are high.
Warranty tradeoff: Used parts offer a 30-90 day part-only warranty, meaning you pay labor costs again if it fails. New OEM parts include a 1-year warranty that covers labor if installed by a dealer.
Worst-case if a used part fails: $500 - $1000. If a used part fails calibration, you pay for the labor to diagnose, remove, and replace it a second time.
What Happens If You Wait — Timeline
- 0-1 week: Code C1368 is set. ABS, VSC, and Brake lights are on. Regenerative braking is disabled on hybrids. (MPG impact: 5-15% (Hybrids)% · Added cost: $0)
- 1 week - 2 months: If caused by an internal leak, the actuator pump motor runs frequently to maintain pressure. Lack of regenerative braking strains the HV battery. (MPG impact: 10-20% (Hybrids)% · Added cost: $50-$150 in wasted fuel and pump wear.)
- 2-6 months: The overworked pump motor burns out. The system loses all power assist, resulting in a hard brake pedal. A stuck valve causes a brake to drag, destroying the pad and rotor. (MPG impact: 10-25%+% · Added cost: $800 - $2000 (Actuator replacement plus destroyed brake rotor/pad).)
- 6+ months: Catastrophic failure. The vehicle is completely unsafe to drive. Constant lack of regenerative charging contributes to premature high-voltage battery failure. (MPG impact: N/A (Vehicle is undrivable)% · Added cost: $3000 - $7000+ (Actuator replacement plus new HV battery).)
Cost of Not Fixing It
- Immediate: Complete loss of ABS, stability control (VSC), and regenerative braking. Brake performance is severely compromised, creating a major safety hazard. (Added cost: $0)
- 0-3 months: The actuator's electric pump motor runs continuously to maintain pressure, burning out the motor. On hybrids, lack of regenerative braking strains the high-voltage battery. (Added cost: $1500 - $3000)
- 1-6 months: A stuck internal valve causes a brake caliper to drag constantly, destroying the brake pads, rotor, and potentially the caliper on that wheel. (Added cost: $300 - $900)
Diagnosis Steps
- Read All Trouble Codes
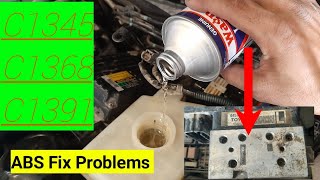
Use an advanced OBD-II scanner to read codes from the ABS/VSC module. Note codes C1345, C1256, C1391, and C1451. If C1256 or C1391 are present, the actuator has definitively failed internally.
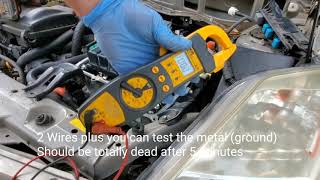
Tools: Advanced OBD-II Scanner (Beginner) - Check 12V Battery Health
Test the 12V auxiliary battery. Voltage must remain stable above 11.0V during the calibration attempt. A battery that drops voltage under load instantly fails the calibration.
Tools: Digital Multimeter, Battery Load Tester (Beginner) - Test ABS Motor Relays
Locate the ABS motor relays in the fuse box. Swap the relay with an identical one from a non-critical system (like the horn). If calibration now succeeds, the original relay was faulty.
Tools: Fuse Box Diagram (Beginner) - Attempt Linear Solenoid Calibration
Use a bi-directional scan tool to run the 'Linear Solenoid Valve Offset Learning' utility. Ensure the car is in Park, parking brake released, and brake pedal untouched. If it fails and C1368 returns, proceed to the next step.
Tools: Advanced OBD-II Scanner (Intermediate) - Perform Scan Tool-Actuated Brake Bleed
Air in the system causes calibration failure. Use the scan tool to perform a full automated brake bleed, which cycles the internal solenoids to purge trapped air. Attempt calibration again afterward.
Tools: Advanced OBD-II Scanner, Brake Bleeder Kit, Brake Fluid (Advanced) - Analyze Freeze Frame Data
View the Freeze Frame data stored when C1368 triggered. Look for abnormal wheel cylinder voltages or solenoids drawing incorrect current. This pinpoints which internal valve failed the test.
Tools: Advanced OBD-II Scanner (Advanced) - Inspect Wiring and Connectors
Visually inspect the main connector at the brake actuator assembly. Look for corrosion or loose pins that interrupt high-speed communication.
Tools: Flashlight (Intermediate) - Confirm Brake Actuator Failure
If the battery is good, relays work, bleeding is complete, and calibration still fails repeatedly, the brake actuator assembly has failed internally and requires replacement.
Tools: Advanced OBD-II Scanner (Professional)
When This Code Triggers (Freeze-Frame Conditions)
- Vehicle Speed: 0 mph (Code is set during a stationary self-test, never while driving.)
- Brake Pedal: OFF (The calibration procedure requires the brake pedal to remain untouched.)
- Shift Lever Position: Park (P) (The test only initiates when the vehicle is in Park.)
- Parking Brake: Released (The calibration aborts if the parking brake is engaged.)
- System State: Test Mode / Learning (The code logs when the ECU attempts the 'Linear Solenoid Valve Offset Learning' and the result falls outside the expected range.)
Related Codes
- C1345 — C1345 means 'Linear Solenoid Valve Offset Learning Undone'. It is the status code indicating no valid calibration exists. C1368 is the error explaining *why* it's undone. You must fix the root cause of C1368 to clear C1345.
- C1256 — C1256 indicates 'Low Pressure in Accumulator'. This points directly to a hardware failure (failing pump or internal leak). If present with C1368, the actuator assembly must be replaced.
- C1391 — C1391 means 'Abnormal Leak in Accumulator'. This confirms an internal leak prevents the system from holding pressure. Replacing the brake actuator is mandatory.
- C1451 — C1451 stands for 'Motor Drive Permission Malfunction'. The ECU blocks the calibration procedure if C1451 is active. You must diagnose and repair C1451 before addressing C1368.
Climate & Environmental Factors
- High Humidity: Brake fluid absorbs moisture from the air. In humid climates, this lowers the boiling point and causes internal corrosion of the actuator's sensitive metal valves, leading to premature failure.
- Extreme Cold: Cold temperatures reduce 12V battery output. A weak battery fails to provide the stable voltage required for the calibration self-test, triggering C1368 even if the actuator is mechanically sound.
How to Talk to a Mechanic About This Code
Say this: "I have a C1368 code with the ABS and brake lights on. Please start by testing the 12V battery under load and checking the ABS motor relays. If those are good, attempt the 'Linear Solenoid Valve Offset Learning' procedure before quoting a full actuator replacement."
This prevents the shop from immediately jumping to the most expensive conclusion (actuator replacement) and directs them to check cheaper, common failure points first.
Avoid saying:
- 'My brake light is on, can you fix it?'
- 'Just replace whatever is broken.'
- 'The internet said I need a new brake actuator.'
Questions to ask before authorizing the repair:
- Did the 'Linear Solenoid Valve Offset Learning' procedure fail? If so, what were the exact circumstances?
- What was the result of the 12V battery load test?
- Were there any other codes stored, specifically C1256 or C1391?
- If you are recommending an actuator replacement, is the quote for a new OEM, a remanufactured, or a used part?
- What is the warranty on both the part and the labor for this repair?
Where to Take It: Dealer vs Independent vs Chain
- Dealer:
A strong, safe choice if cost is not the primary concern. They are guaranteed to have the right tools and knowledge for this complex repair.
Best for: Vehicles where a Warranty Enhancement Program might still apply., Complex cases where other shops have failed to diagnose the issue., When you want the highest guarantee of correct tools (Techstream) and procedures.
Downsides: Highest labor rates and part costs, often 50-100% more than an independent shop., Quick to recommend full actuator replacement without checking cheaper alternatives. (Typical cost: +75% vs. baseline) - Independent Shop:
The best-value option, but requires vetting. Ask directly: 'Can you perform a Toyota brake actuator calibration and bleed?' If they hesitate, move on.
Best for: Out-of-warranty vehicles where cost is a major factor., Shops that specialize in Toyota/Lexus hybrids.
Downsides: Quality varies widely. You MUST confirm they own a tool capable of performing Toyota's 'Linear Solenoid Valve Offset Learning'. (Typical cost: +0% vs. baseline) - Chain Shop:
AVOID for diagnosing or repairing C1368. They are not equipped for the specialized electronic procedures required.
Best for: Testing or replacing the 12V battery.
Downsides: Almost never have the required bi-directional scan tools or technician training for this repair., High risk of misdiagnosis. (Typical cost: -10% vs. baseline)
When to Walk Away From the Repair
If the estimated repair cost for the brake actuator exceeds 50% of the car's current private-party market value, seriously consider selling the car as-is.
- Car worth $5000, fix is $3500: Walk away. A $3,500 repair on a $5,000 car is not a sound investment. Consider selling it as a 'mechanic's special'.
- Car worth $15000, fix is $3000: Fix it. The repair cost is significant but well below the threshold, preserving a valuable asset.
- Car worth $6000, fix is $1600: Borderline, but a reasonable risk if using an independent shop. Be aware of the potential for future repairs on an older hybrid.
What Scan Tool You Need for This Code
Minimum: A bi-directional scan tool that executes 'Special Functions' within the ABS/VSC module for Toyota/Lexus. It MUST support 'Linear Solenoid Valve Offset Learning' and 'ABS Brake Bleed'.
A basic code reader is useless. It reads and clears C1368, but the code returns instantly because the root problem—the lack of a valid calibration (C1345)—is not addressed.
Budget: None (~$0) — No scan tool under $100 has the required bi-directional capabilities for this specific brake calibration.
Mid-range: Foxwell NT510/NT530 with Toyota Software (~$150) — Performs the automated ABS bleed and the linear solenoid calibration on most Toyota/Lexus models. It is the most affordable entry point for this task.
Professional: Autel MaxiCOM MK808 / Toyota Techstream Software (~$400-600) — Offers full bi-directional control, replicating dealership capabilities. Reliably performs the memory reset, solenoid calibration, and automated bleeding procedures.
Rent vs buy: Rent is not an option, as auto parts stores do not lend out bi-directional tools. For a one-time fix, paying a shop $150-$250 for calibration labor is more economical than buying a $400 scanner.
How to Clear the Code After You Fix It
- Fix the underlying hardware or electrical fault (e.g., replace actuator, charge battery).
- Connect a compatible bi-directional scan tool (e.g., Toyota Techstream, Autel).
- Navigate to the 'ABS/VSC/TRAC' module utility.
- Select and run the 'Linear Solenoid Valve Offset Learning' procedure.
- Follow the on-screen prompts exactly: vehicle stationary, in Park, parking brake off, and brake pedal untouched.
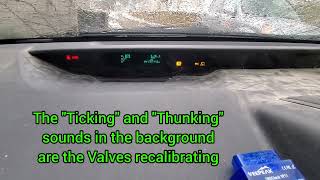
Drive cycle (~2 minutes): This code is not cleared by driving. The 'cycle' is the automated calibration procedure performed with a scan tool while parked. The process takes 1-2 minutes, during which the warning lights blink. Codes C1368 and C1345 clear automatically upon successful calibration.
Readiness monitors affected: This is a chassis code and does not affect emissions readiness monitors.
Watch out for:
- Attempting to clear the code with a basic OBD-II reader fails; the code returns instantly because the calibration remains 'undone' (C1345).
- Repeated calibration failures confirm the root hardware issue in the actuator is not fixed.
- Using a weak 12V battery during the procedure causes it to fail.
- Touching the brake pedal or leaving the parking brake on during the procedure aborts the test.
Will This Fail Emissions / State Inspection?
No — by itself this code doesn't fail OBD inspection (but it can keep readiness monitors from setting, which causes a separate fail).
- California: This code does not fail the OBD-II smog check because it does not illuminate the Check Engine Light. However, driving with an active brake fault is unsafe and results in a citation if stopped.
- New York: An illuminated ABS warning light is immediate grounds for safety inspection failure. The vehicle will not pass.
- Texas: The annual safety inspection rejects vehicles with an active red 'Brake' warning light. The vehicle will fail.
Most Commonly Affected Vehicles
- Toyota Prius (2004-2015) — Extremely common on Gen 2 (2004-2009) and Gen 3 (2010-2015) models. Gen 2 models were covered under expired Warranty Enhancement Program ZG1.
- Toyota Camry Hybrid (2007-2014) — Prone to identical actuator failures. A warranty enhancement program was previously offered for 2007-2011 models.
- Lexus LS460 (2007-2012) — These flagship sedans frequently experience this issue and were part of Lexus Warranty Enhancement Program ZLG.
- Lexus RX400h / RX450h (2006-2015) — These hybrid SUVs use a similar brake actuator assembly and suffer from identical internal leak and calibration failures.
- Toyota Highlander Hybrid (2006-2007) — Included in Toyota's original Warranty Enhancement Program (ZG1) for brake actuator assembly failures.
- Toyota Prius C (2012-2019) — Uses a scaled-down version of the hybrid braking system and is known to suffer from actuator failures triggering C1368.
Manufacturer-Specific Notes
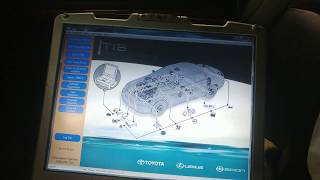
- Toyota/Lexus: This code is overwhelmingly exclusive to Toyota and Lexus vehicles with electronically controlled brakes (ECB). Repair almost always requires their proprietary 'Techstream' software.
- Toyota/Lexus: Due to high failure rates, Toyota issued Warranty Enhancement Programs (ZG1, ZLG) extending actuator coverage to 10 years/150,000 miles. Most have expired, but always check your VIN with a dealer.
- Toyota/Lexus: Attempting calibration with a cheap, incompatible scan tool often corrupts the process, leaving the system uncalibrated and inducing codes C1345 and C1368.
Real Owner Stories
2007 Toyota Prius at 204k miles with C1256 & C1391, then C1368 after repair attempt
Owner bought a Prius with existing brake codes (C1256, C1391). After replacing the actuator with a used part from eBay, the original codes cleared but C1345 and C1368 appeared.
What they tried:
- Replaced the brake actuator with a used part.
- Performed brake bleed and reset ABS with Techstream.
- Attempted the 'Linear Solenoid Valve Offset Learning' procedure multiple times.
- Charged the 12V battery fully before calibration attempts.
Outcome: The calibration repeatedly failed at the 40-second mark. The owner replaced the faulty eBay actuator with another used unit from a junkyard, which calibrated successfully on the first try.
Lesson: A used brake actuator is a high-risk part. If calibration fails after replacement, the 'new' used part is likely defective.
2012 Prius at 77k miles with C1368 after a wheel alignment
After a body shop performed a wheel alignment, the ABS, VSC, and Brake warning lights came on with codes C1345 and C1368. The car had no prior codes.
What they tried:
- The body shop tried and failed to clear the codes.
- A Toyota dealer diagnosed it as a 'worn out part' and quoted $3,500 for replacement.
- The owner acquired Techstream software to attempt the calibration themselves.
Outcome: The alignment technician interrupted the brake system's self-test by pressing the brake pedal. The owner successfully fixed the issue by re-running the 'Linear Solenoid Valve Offset Learning' procedure with Techstream.
Lesson: If C1368 appears immediately after service, it is a procedural error, not a hardware failure. Insist the shop re-runs the calibration before authorizing expensive replacements.
2006 Prius with a dead 12V battery, leading to C1368 after replacement
The 12V auxiliary battery died. After replacing it, codes C1345 and C1368 appeared. The actuator pump was not running constantly.
What they tried:
- Attempted linear offset calibration with multiple scan tools while a charger was connected. All attempts failed.
- Replaced the actuator with a used, updated part number from eBay.
- Performed the scan tool brake bleed procedure twice.
Outcome: The linear calibration continued to fail even after replacing the actuator, pointing to a faulty replacement part or a damaged Skid Control ECU.
Lesson: Replacing the 12V battery forces the system to re-learn its calibration, revealing pre-existing hidden faults. A silent pump does not guarantee the actuator is healthy.
How to Prevent This Code From Triggering
- Change brake fluid regularly (Every 2-3 years or 30,000 miles) — Brake fluid absorbs moisture, causing internal corrosion of the actuator's sensitive solenoids. Fresh fluid prevents this degradation.
- Maintain the 12V auxiliary battery (Annually) — The brake system's calibration is highly sensitive to voltage. A weak 12V battery causes self-tests to fail and triggers C1368.
- Address warning lights promptly (Immediately) — Ignoring initial brake warning lights leads to a cascade of failures. An unaddressed internal leak forces the pump motor to run continuously until it burns out.
Frequently Asked Questions
My actuator isn't making noise all the time. Can it still be bad?
Yes. The internal solenoids fail electronically or mechanically, causing the C1368 calibration failure without making constant noise. A constantly running pump indicates an accumulator leak, but silent electronic failures are equally common.
My mechanic immediately said I need a new actuator. Is it something else?
It is possible. A thorough technician verifies 12V battery health, tests ABS relays, and attempts a scan-tool calibration before condemning the actuator. If those steps fail, the actuator is definitively the culprit.
I tried the calibration with a scan tool and it failed. What does that mean?
A failed 'Linear Solenoid Valve Offset Learning' procedure with an immediate C1368 return indicates a hard physical fault. The ECU cannot get a valid reading from the solenoids due to air in the lines, a bad relay, or a failed actuator.
Wasn't there a recall for this? Is the repair free?
Toyota and Lexus issued 'Warranty Enhancement Programs' (like ZG1 and ZLG) extending actuator coverage to 10 years or 150,000 miles. Most of these have expired due to age. Call a dealership with your VIN to check for any remaining coverage.
Why did this code appear after I changed my 12V battery?
Disconnecting the battery erases the brake system's calibration memory. When power is restored, the system attempts a self-calibration. If a previously hidden hardware fault exists, it fails this test and triggers C1368.
Can I replace the brake actuator myself?
Advanced DIYers can physically replace the part, but finishing the job requires a dealership-level scan tool (like Techstream). Without this tool to perform the mandatory automated bleed and calibration, the vehicle remains unsafe to drive.
Is a used brake actuator a good idea?
Buying a used actuator is highly risky because many are pulled from vehicles with pre-existing brake faults. If the used part fails calibration, you waste hundreds of dollars in labor. Only buy used if it includes a strong warranty.
My mechanic quoted me over $3,000. Is that a rip-off?
Not necessarily. A new OEM actuator costs $1,000 to $2,500, and the complex installation, automated bleeding, and calibration add 4 to 6 hours of labor.
Can a wheel alignment cause code C1368?
Indirectly, yes. If a technician presses the brake pedal or disturbs the vehicle during the automatic startup self-test, it interrupts the calibration. Re-running the scan-tool calibration procedure fixes this.
Key Takeaways
- Code C1368 disables your vehicle's power brakes and regenerative braking, making it completely unsafe to drive.
- A failed brake actuator assembly causes over 80% of C1368 codes and typically costs $1,500 to $3,000 to replace.
- Code C1368 almost always triggers alongside C1345; you must fix the underlying hardware fault before the required scan-tool calibration will succeed.
- You cannot clear this code with a standard OBD-II reader; a bi-directional scan tool is mandatory to perform the 2-minute 'Linear Solenoid Valve Offset Learning' procedure.
- Test the 12V auxiliary battery and ABS motor relays before replacing the actuator, as a voltage drop below 11V instantly fails the calibration.
Helpful Videos

Shop the Parts Behind C1368
Below are the parts most often responsible for code C1368, ranked by how frequently each one is the actual culprit (per the diagnosis above). Tap any to see what we have for your vehicle.


The information in this article is provided for general reference and educational purposes only. Vehicle specifications, procedures, and part compatibility can vary by production date, trim level, and region. Always consult your vehicle's factory service manual and verify part numbers before purchasing or performing repairs. Safety-critical components such as airbags, seat belts, and braking systems should be installed by a qualified professional.
- 🧭 Diagnostic Flowchart
- 🎬 Helpful Videos
- 🛍️ Shop This Part
- What Does C1368 Mean?
- Can I Drive With C1368?
- Common Causes
- Symptoms
- Common Fixes & Costs
- DIY vs Professional
- Used vs. New Parts: Buying Guide
- What Happens If You Wait — Timeline
- Cost of Not Fixing It
- Diagnosis Steps
- When This Code Triggers (Freeze-Frame Conditions)
- Related Codes
- Climate & Environmental Factors
- How to Talk to a Mechanic About This Code
- Where to Take It: Dealer vs Independent vs Chain
- When to Walk Away From the Repair
- What Scan Tool You Need for This Code
- How to Clear the Code After You Fix It
- Will This Fail Emissions / State Inspection?
- Most Commonly Affected Vehicles
- Manufacturer-Specific Notes
- Real Owner Stories
- 2007 Toyota Prius at 204k miles with C1256 & C1391, then C1368 after repair attempt
- 2012 Prius at 77k miles with C1368 after a wheel alignment
- 2006 Prius with a dead 12V battery, leading to C1368 after replacement
- How to Prevent This Code From Triggering
- Frequently Asked Questions
- My actuator isn't making noise all the time. Can it still be bad?
- My mechanic immediately said I need a new actuator. Is it something else?
- I tried the calibration with a scan tool and it failed. What does that mean?
- Wasn't there a recall for this? Is the repair free?
- Why did this code appear after I changed my 12V battery?
- Can I replace the brake actuator myself?
- Is a used brake actuator a good idea?
- My mechanic quoted me over $3,000. Is that a rip-off?
- Can a wheel alignment cause code C1368?
- Key Takeaways
- 🎟️ Get 5% Off