
Ultimate Guide to OBD-II Code C1407: Rear Passenger-Side Wheel Speed Sensor Circuit Failure
The Most Comprehensive Resource for What C1407 Means, Why It Triggers, and How to Fix It for Good
- Code C1407 disables your ABS and traction control because the computer lost the electrical signal from the rear passenger-side wheel speed sensor.
- Inspect the exposed wiring harness above the rear axle first; corrosion or broken wires cause over 60% of C1407 faults, not the sensor itself.
- Use a multimeter to test the sensor's resistance (typically 800-2,500 Ohms for passive sensors) before spending $50-$250 on a replacement part.
- Never ignore a humming rear wheel bearing alongside this code; excessive bearing play destroys the integrated tone ring and requires a $350-$1,000 hub replacement.
What Does C1407 Mean?

Code C1407 indicates the vehicle's ABS control module detects a critical electrical fault in the circuit for the rear passenger-side (RH) wheel speed sensor. The computer determined the signal from this sensor is missing, erratic, or has an electrical open or short. This disables safety systems that depend on accurate wheel speed data to detect skids or wheel lock-up.
Technical definition: Open or Short in Rear Speed Sensor RH Circuit. The ABS module sets this Diagnostic Trouble Code (DTC) when it detects a complete loss of signal (open circuit) or an invalid signal (short circuit) from the rear right wheel speed sensor for a specified duration, typically when driven above 25 mph for 60 seconds.
Can I Drive With C1407?

Yes, But With Caution. Yes, but your Anti-lock Braking System (ABS), Traction Control (TRAC), and Vehicle Stability Control (VSC/ESC) are disabled. Your standard hydraulic brakes still function, but the wheels will lock up and skid under hard braking or on slippery surfaces, increasing stopping distances and the risk of losing steering control. Driving without ABS significantly compromises safety in emergency situations. Address the issue immediately to restore these critical safety features.
Common Causes

- Damaged, Stretched, or Corroded Wiring Harness (Very Common) — This is the primary cause. The wiring harness leading to the sensor is exposed to road debris, water, ice, and salt, causing corrosion in the connector pins or breaks in the wire. Suspension movement also stretches and breaks wires internally over time, especially at sharp bends near the axle.
- Failed Rear Right Wheel Speed Sensor (Very Common) — The sensor is an electronic component living in a harsh environment. Internal failure due to heat cycles, vibration, or moisture intrusion is a frequent reason for this code. Always test the sensor with a multimeter before replacing it.
- Failed Wheel Hub/Bearing Assembly (Common) — On modern vehicles, the tone ring is integrated into the wheel bearing and hub assembly. A worn, loose wheel bearing creates an excessive air gap between the sensor and the ring, causing a weak or lost signal. The entire hub assembly must be replaced to fix this.
- Damaged or Debris-Covered ABS Tone Ring (Common) — The sensor reads a toothed or magnetic ring (tone ring) on the axle or wheel hub. If this ring is cracked, missing teeth, or covered in metallic brake dust or rust, the sensor cannot generate a clean signal.
- Improper Repair or Modification (Uncommon) — Installing aftermarket suspension lift kits or lowering springs stretches or improperly routes the sensor wiring harness. Additionally, previous repairs in the same area (e.g., brake jobs) often result in pinched wires during reassembly.
- Rodent Damage to Wiring (Less Common) — Rodents chew on automotive wiring, particularly the soy-based insulation used in modern cars. A chewed harness causes an immediate open or short circuit and is easily found during a visual inspection.
- Faulty ABS/VSC Control Module (Rare) — The internal circuitry that processes the signal from the sensor fails in rare instances. This is the most expensive cause and requires exhaustive testing of all other components before replacement.
Symptoms
- ABS, Traction Control, and Brake Warning Lights Illuminated — The ABS and Traction Control (TRAC/VSC) lights illuminate immediately when the module detects the circuit fault. On some vehicles, the main red brake warning light also illuminates to signify a serious braking system fault.
- Inaccurate or Inoperative Speedometer — Vehicles without a dedicated transmission output speed sensor use one of the rear wheel speed sensors for the speedometer reading. A failure causes the speedometer to read 0 MPH or behave erratically.
- Cruise Control Disabled — As a safety precaution, the vehicle disables the cruise control system when an active ABS fault is present.
- Delayed or Harsh Transmission Shifting — If the vehicle uses wheel speed sensor data for transmission control, a loss of signal leads to incorrect shift points, causing harsh or erratic shifting.
Diagnostic Flowchart
Tap your situation to follow the diagnostic path that matches what you're seeing on this code.
Common Fixes & Costs

- Repair or Replace Wiring Pigtail/Harness — Parts: $20-$70, Labor: $125-$250, ~1.5 hr book time (Intermediate)
- Replace Rear Wheel Speed Sensor — Parts: $50-$250, Labor: $100-$200, ~1.5 hr book time (DIY)
- Replace Rear Wheel Hub Bearing Assembly — Parts: $100-$450, Labor: $250-$550, ~2.5 hr book time (Intermediate)
- Clean Tone Ring and Sensor Mounting Surface — Parts: $5-$15, Labor: $75-$150, ~0.8 hr book time (DIY)
- Replace ABS/VSC Control Module — Parts: $800-$2500, Labor: $200-$500, ~2.0 hr book time (Professional)
DIY vs Professional
- Replace Rear Wheel Speed Sensor — Beginner: Yes
- Repair or Replace Wiring Pigtail/Harness — Beginner: No
- Replace Rear Wheel Hub Bearing Assembly — Beginner: No
- Clean Tone Ring and Sensor Mounting Surface — Beginner: Yes
Used vs. New Parts: Buying Guide
When a used part is worth it: Buying used parts for C1407 is never recommended. Sensors, wiring, and hubs are wear items exposed to harsh conditions. The only exception is sourcing a complete wiring harness from a low-mileage donor vehicle if a new OEM harness is discontinued.
Donor-vehicle mileage cap: roughly under 30000 miles for the part to have meaningful remaining life.
Donor quality checklist:
- Never buy a used wheel hub; it is a wear item with unknown remaining life.
- OEM or high-quality aftermarket sensors (Denso, Bosch) are strongly preferred over used sensors to prevent repeat failures.
- Verify the part number exactly, as salvage yard parts look identical but have different internal electronics.
Decision logic:
- If The part is a wheel hub bearing assembly. → Always buy new. Reputable aftermarket brands (Timken, SKF, MOOG) offer a good balance of cost and quality.
- If The part is the wheel speed sensor or wiring pigtail. → Buy new OEM or a top-tier aftermarket brand. The cost saving on a used sensor is not worth the risk of repeat labor costs.
- If Vehicle is old and budget is extremely tight. → A used sensor from a reputable salvage yard with a warranty is a last resort, carrying a high risk of early failure.
Warranty tradeoff: Used parts: 30-90 day warranty (part only). Aftermarket new: 1-year to limited lifetime warranty. OEM new: 1-year/12,000-mile warranty.
Worst-case if a used part fails: $200-$400 if a used part fails shortly after installation, requiring a second repair.
What Happens If You Wait — Timeline
- 0-1 month (from onset of bearing noise): A faint humming or growling noise appears above 40 mph. The ABS light is usually OFF as bearing play is minimal. (MPG impact: 0%% · Added cost: $0. The cost is limited to the standard wheel bearing replacement ($350-$1000).)
- 1-3 months: The noise becomes a louder grinding. The bearing develops enough play to affect the tone ring's position relative to the sensor, causing the C1407 code to set and the ABS light to illuminate. (MPG impact: 0-1%% · Added cost: $50-$150 for a prematurely worn tire if not addressed promptly.)
- 3-6 months: The wheel becomes noticeably loose. A vibration is felt in the steering wheel or floor. The bearing generates significant heat, and the risk of seizure increases dramatically. Driving is highly dangerous. (MPG impact: 1-2%% · Added cost: $200-$800. Excessive heat and movement damage the wheel hub and axle spindle, requiring more parts and labor.)
- Potentially at any time after stage 2: Catastrophic failure. The bearing seizes or disintegrates, causing the wheel to lock up or completely separate from the vehicle, leading to a total loss of control. (MPG impact: N/A% · Added cost: $2,000 to total vehicle loss. A wheel separation incident causes extensive damage to the suspension, axle, brakes, and bodywork.)
Cost of Not Fixing It
- Immediate: ABS, Traction Control, and Stability Control are disabled. In an emergency stop or on a slippery surface, wheels lock up, causing a skid and complete loss of steering control. (Added cost: Potential for an at-fault accident, with costs ranging from a $500 deductible to a total loss of the vehicle.)
- 1-6 months: If the underlying cause is a bad wheel bearing, it continues to degrade, causing noise, vibration, and uneven tire wear. (Added cost: $150-$300 for a prematurely worn tire.)
- 6+ months: A severely worn wheel bearing fails completely, leading to the wheel separating from the vehicle while driving. This is a catastrophic failure. (Added cost: $2,000+ for repairs to the axle, suspension, and body, plus the potential for a severe accident.)
Diagnosis Steps
- Confirm Code with ABS-Capable Scan Tool
Use an OBD-II scanner that reads Chassis (C) codes to confirm C1407 is active. Note any other codes. A basic engine code reader cannot communicate with the ABS module.
Tools: OBD-II Scanner (with ABS/Chassis capability) (Beginner) - Thorough Visual Inspection
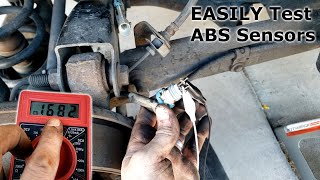
Safely raise and support the vehicle. Locate the rear passenger-side wheel speed sensor. Trace its wiring harness from the wheel hub backward. Look for cracked insulation, green corrosion in the connector, sharp bends, rubbing on the suspension, or rodent chew marks. Gently tug the wires at the connector to ensure they are secure.
Tools: Jack, Jack Stands, Flashlight (Beginner) - Analyze Live Data Stream
Use your advanced scan tool to view live data PIDs for all four wheel speed sensors. Have a helper drive the vehicle slowly. The rear right sensor will read 0 MPH or an erratic value, while the other three sensors show a smooth, consistent speed. This confirms the signal is failing to reach the module.
Tools: Advanced OBD-II Scanner with Live Data (Intermediate) - Component Resistance and Voltage Checks
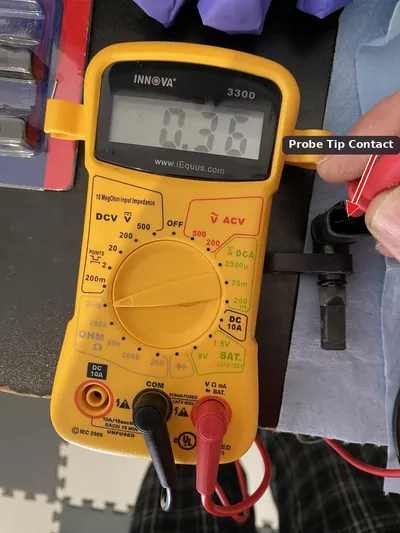
Disconnect the sensor harness. For PASSIVE sensors (2-wire): Set a multimeter to Ohms (Ω) and measure resistance across the sensor's two pins. The reading must be within manufacturer spec, typically 800-2,500 Ohms. An infinite reading (OL) means open, and 0 Ohms means shorted. For ACTIVE sensors (2 or 3-wire): Turn ignition ON. Check for reference voltage (usually 5V or 12V) at the harness connector coming from the car.
Tools: Multimeter, Vehicle-Specific Repair Manual (Advanced) - Check for Shorts to Power/Ground
With the sensor disconnected and the key on, check for voltage between each pin on the harness connector and a known good chassis ground. One pin has the reference voltage, and the other (signal wire) has very low voltage. Next, check the resistance from each pin to chassis ground. The ground pin shows continuity (less than 1 Ohm), while the power/signal pin shows very high resistance.
Tools: Multimeter (Advanced) - Inspect the Tone Ring and Wheel Bearing
Remove the single bolt holding the wheel speed sensor and carefully pull it out of the hub. Look inside the mounting hole with a flashlight to inspect the tone ring for cracks, missing teeth, or heavy rust. Grab the wheel at the 12 and 6 o'clock positions and attempt to rock it. Significant play indicates a bad wheel bearing, compromising the integrated tone ring.
Tools: Basic Hand Tools (Socket Set, Wrenches), Flashlight (Intermediate) - Harness Continuity Test
If the sensor tests good but the signal is absent, prove the wiring is broken. Disconnect the sensor and the main ABS control module connector. Using a multimeter and long leads, check for continuity on both wires individually from the sensor connector to the corresponding pins at the module connector. A reading of OL (Open Line) confirms a hidden break in the harness.
Tools: Multimeter, Long Test Leads, Vehicle-Specific Wiring Diagram (Advanced) - Dynamic Voltage Output Test (Passive Sensor)
For passive sensors, set your multimeter to AC Volts (ACV). Connect the meter leads to the two sensor pins. Spin the wheel by hand at a steady pace. You will see a small AC voltage generated, typically over 100-250mV, increasing with speed. A reading of 0V indicates a failed sensor or tone ring problem.
Tools: Multimeter (Advanced) - Oscilloscope Waveform Analysis
For a definitive test, connect a lab scope to the sensor's signal and ground wires. Spin the wheel by hand. A good active sensor produces a clean square wave. A good passive sensor produces a clean sine wave. A bad sensor, damaged tone ring, or excessive wheel bearing play results in a noisy, erratic, or flat waveform.
Tools: Automotive Oscilloscope, Probing Leads (Professional)
When This Code Triggers (Freeze-Frame Conditions)
- Vehicle Speed: 25-65 mph (The code sets when driving at a steady speed for a short duration (e.g., 60 seconds), as the module expects a consistent signal from all wheels.)
- Engine RPM: 1200-2500 RPM (Corresponds to steady-state city or highway cruising.)
- System Voltage: 13.0-14.5V (Normal operating voltage with the engine running ensures the fault isn't due to a low battery.)
- ABS/VSC System Status: Enabled/Active (The fault logs when the system actively monitors wheel speeds, which is anytime the vehicle is in motion.)
Related Codes
- C1408 — The identical fault for the driver's side: 'Open or Short in Rear Speed Sensor LH Circuit'. If both C1407 and C1408 are present, look for a shared failure point, such as a common harness connector or damage near the rear differential.
- C1201 — On Toyota/Lexus vehicles, this is an informational code set by the ECM whenever a primary ABS/VSC fault like C1407 occurs. Always diagnose and fix C1407 first; C1201 clears automatically.
- C1405 / C1406 — The equivalent codes for the front wheel speed sensors (C1405 for Front Left, C1406 for Front Right). The diagnostic process is identical but performed on the front axle.
- C1415 — On some Lexus/Toyota models, this code for 'Front Speed Sensor RH Malfunction' appears alongside C1407. Their simultaneous appearance suggests a wider system issue, such as a problem at the ABS module or a shared power/ground circuit.
Climate & Environmental Factors
- Road Salt and Humidity (Rust Belt Regions): Saltwater is a powerful electrolyte that dramatically accelerates corrosion of the wiring harness connectors and pins. It seeps past weather seals and into micro-cracks in the wire insulation, causing the copper wire to corrode and break.
- Cold Weather and Freeze/Thaw Cycles: Water enters a compromised connector or wire and freezes. The ice expansion severs a weak connection or pushes contacts apart, triggering intermittent faults that appear in winter and disappear when the weather warms.
- Off-Roading and Debris: Driving on unpaved roads exposes the rear axle wiring to mud, rocks, and branches. This physically tears wires, packs connectors with dirt, or abrades the insulation, leading to a short or open circuit.
How to Talk to a Mechanic About This Code
Say this: "I have an ABS light on and my scanner shows code C1407, which is a 'Rear Right Wheel Speed Sensor Circuit Failure'. I'd like to book a diagnostic appointment. Since this is a circuit code, please start by testing the wiring harness and connector for continuity and shorts before recommending a new sensor."
This signals to the shop that you understand the code and that the most common cause is the wiring, not the sensor itself. It prevents them from taking the easy route of just replacing the sensor, saving you money on unnecessary parts and labor.
Avoid saying:
- My ABS light is on, can you fix it?
- I think I need a new ABS sensor.
- Just do whatever it takes to turn the light off.
Questions to ask before authorizing the repair:
- What were the results of the multimeter test on the wiring harness? Was there an open, a short to ground, or a short to power?
- Did you test the sensor itself? What was its resistance reading or voltage output?
- If you are recommending a harness repair, will you be using heat-shrink butt connectors with sealant to prevent future corrosion?
- What is the warranty on the parts and labor for this specific repair?
Where to Take It: Dealer vs Independent vs Chain
- Dealer:
Recommended only if the issue is complex or under warranty. Otherwise, an independent shop is more cost-effective for this common fault.
Best for: Vehicles under warranty, Complex electrical issues after an independent shop has failed, When a rare ABS module failure is suspected and requires programming
Downsides: Highest labor rates, May prefer to replace an entire harness rather than perform a more affordable spot repair (Typical cost: +50% vs. baseline) - Independent Shop:
Best choice for most owners. A reputable independent shop has the tools and experience to diagnose and fix a C1407 circuit fault correctly and affordably.
Best for: Out-of-warranty vehicles, Diagnosing and repairing common wiring and sensor issues, Wheel bearing/hub replacements
Downsides: Shop quality and diagnostic skill vary greatly; check reviews and look for ASE certifications. (Typical cost: +0% vs. baseline) - Chain Shop:
AVOID for diagnosing a C1407 code. They are likely to misdiagnose the issue as a bad sensor, leading to wasted money and a quick return of the ABS light.
Best for: Simple part replacements like brakes or tires, not diagnostics.
Downsides: Technicians lack the in-depth electrical diagnostic skills for a 'circuit' code., High pressure to sell parts leads to replacing the sensor without proper testing, failing to fix the root cause. (Typical cost: -10% vs. baseline)
When to Walk Away From the Repair
If the estimated repair cost for the C1407 fault, combined with any other known needed repairs, exceeds 40-50% of your car's private-party value, seriously consider selling or trading it in.
- Car worth $15000, fix is $450: Fix it. This is a routine repair cost and is a small fraction of the car's value.
- Car worth $5000, fix is $850: Borderline, but likely worth fixing. This assumes the repair is a wheel hub assembly. If the rest of the car is in good shape, it's a reasonable expense.
- Car worth $3000, fix is $2500: Walk away. A quote this high suggests a major harness or module failure. The repair cost is over 80% of the car's value. It is not economically viable.
What Scan Tool You Need for This Code
Minimum: A scanner that reads and clears ABS (Anti-lock Brake System) codes and displays live data for all four wheel speed sensors.
A basic $20 engine code reader CANNOT see ABS codes like C1407. You need a tool that specifically lists ABS/SRS capability. Without live data, you cannot watch the wheel speed sensor signals in real-time to confirm which one is failing, making diagnosis pure guesswork.
Professional: Autel MaxiCOM MK808 / XTOOL D7 (~$450) — Offers full-system, bi-directional diagnostics. While not strictly necessary for C1407, these tools allow you to perform active tests and access manufacturer-specific data and functions that speed up diagnosis of more complex problems.
Rent vs buy: Most auto parts stores read engine codes for free, but their free service and loaner tools DO NOT read ABS codes. If you plan to diagnose and fix this yourself, you must buy a scanner with ABS capability. Given the cost of a single diagnostic visit to a shop ($100+), buying a budget ABS scanner pays for itself in one use.
How to Clear the Code After You Fix It
- Use an ABS-capable OBD-II scan tool to clear the Diagnostic Trouble Code (DTC) from the ABS module.
- Perform a test drive to confirm the warning lights do not return.
- If emissions testing is required, complete a full drive cycle to set readiness monitors.
Drive cycle (~20 minutes): A general drive cycle includes a cold start, 2-3 minutes of idling, 5-10 minutes of mixed city driving (25-40 mph) with several full stops, followed by 5-10 minutes of steady highway driving (55-60 mph).
Readiness monitors affected: An ABS fault like C1407 does not directly affect emissions readiness monitors., However, clearing codes resets all monitors, requiring a drive cycle before a state emissions test.
Before emissions retest: drive at least 50 miles to fully set monitors.
Watch out for:
- Using a basic engine code reader that cannot access and clear codes from the ABS module.
- Not confirming the fix with a test drive; the light returns immediately if the root cause remains.
- Assuming the car is ready for an emissions test immediately after clearing codes.
Will This Fail Emissions / State Inspection?
No — by itself this code doesn't fail OBD inspection (but it can keep readiness monitors from setting, which causes a separate fail).
- California: An illuminated ABS light is a safety issue but will NOT cause a failure of the OBD-II emissions (smog) test. It is grounds for failure of a comprehensive vehicle safety inspection.
- New York: An illuminated ABS warning light IS grounds for the vehicle to FAIL the annual safety inspection.
- Texas: An illuminated yellow/amber ABS light will NOT cause a failure of the state safety inspection. Only the red 'BRAKE' warning light is cause for rejection.
Most Commonly Affected Vehicles
- Toyota Tacoma (2005-2020) — Extremely common due to the wiring harness being routed in an exposed area above the rear axle, leading to wire fatigue and corrosion. The connector itself is a frequent failure point.
- Toyota Highlander (2007-2019) — Known for intermittent failures caused by water intrusion into the rear sensor connectors. Rust also causes sensors to seize in the hub.
- Toyota Hilux (2015-2020) — Well-documented failures of both the wiring harness and the sensor itself (OEM P/N 89545-0K240). Often triggers a cascade of warning lights including 4x4 and brake warnings.
- Toyota Yaris (2012-2018) — The factory harness routing includes a sharp bend near the connector that cracks the wire insulation over time, leading to corrosion and an open circuit.
- Lexus ES350 / RX350 (2007-2018) — Shares components with Toyota and suffers from identical wiring and connector corrosion issues, especially in cold climates.
- Hyundai / Kia Various (Santa Fe, Ioniq, Sportage, Forte) (2014-2022) — Common due to internal sensor failure or wiring issues. On models like the Santa Fe, the sensor is integrated with the wheel bearing, making the repair more expensive.
- Chevrolet / GMC Silverado / Sierra 1500 (2007-2014) — Caused by corrosion in harness connectors or wire breaks where the harness flexes with suspension travel near the rear axle.
- BMW 1-Series / 3-Series (E8x, E9x) (2004-2013) — Sensors are notorious for seizing in the wheel hub due to galvanic corrosion. They break during removal, requiring the remaining plastic piece to be drilled out.
Manufacturer-Specific Notes
- Toyota / Lexus / Scion: The most common point of failure is the wiring harness connector located just above the rear axle, which is highly susceptible to moisture and wire fatigue. Toyota has issued Technical Service Bulletins recommending the installation of an updated wiring pigtail.
- Ford: On certain 4WD trucks like the F-150, C1407 means 'Traction Control Motor Circuit Malfunction.' This points to the electric shift motor on the 4x4 transfer case, not a wheel speed sensor. Verify the code definition for your specific vehicle.
- BMW: Rear sensors are infamous for seizing inside the aluminum wheel carrier. Technicians frequently have to break the old sensor and carefully drill out the remaining plastic body. Applying a thin coat of silicone dielectric grease to the body of the new sensor prevents this.
- General (Rust Belt): In regions with heavy road salt use, the single bolt holding the sensor (often an 8mm or 10mm) rusts and snaps off during removal. This requires drilling and tapping a new hole, significantly increasing labor time and cost.
Real Owner Stories
2014 Toyota Yaris with low mileage in a cold climate
ABS and ESP lights came on. Scan revealed code C1407. Vehicle has low miles but is exposed to harsh weather with heating and cooling cycles.
What they tried:
- Visual inspection of the rear passenger-side wheel speed sensor connector.
Outcome: The wiring harness connector had a sharp bend right at the sensor, causing the insulation to crack. Green corrosion was visible inside the connector, indicating an open circuit. The fix was replacing the connector pigtail, not the sensor itself.
Lesson: On many Toyota models, inspect the wiring harness and connector first. A sharp bend in the harness routing is a known failure point that leads to cracked wires and corrosion.
2007 Toyota Highlander with intermittent ABS/TRAC/VSC lights
Warning lights came on and off. Scanned codes for both rear wheel speed sensors. Live data showed sensors working correctly during a test drive.
What they tried:
- Cleared codes, but they returned.
- Visually inspected the rear harness connectors.
Outcome: Severe green corrosion was found on the copper terminals upon disconnecting the harnesses. The corrosion infiltrated the left rear sensor. The fix required replacing both rear wiring harnesses and the entire left rear wheel bearing/hub/sensor assembly because rust seized the components together.
Lesson: Intermittent lights often point to a wiring or connector issue. In rust-prone regions, a simple sensor job escalates into a full hub replacement if components are seized.
2019 Jeep Wrangler JLU with multiple dashboard lights
ABS, traction control, and other lights illuminated. An independent mechanic replaced the wheel speed sensor, but it did not fix the issue.
What they tried:
- Replaced the right front wheel speed sensor (at an independent shop) - no change.
- Took the vehicle to a dealership for advanced diagnostics.
Outcome: The dealer diagnosed two wires within the main ABS wiring harness shorted together. They quoted $4,500 to replace the entire harness, stating a spot repair had no guarantee.
Lesson: Never assume the sensor is the problem. A 'circuit' code like C1407 points to an electrical issue, very often the wiring. Replacing the sensor first is a common, expensive misdiagnosis.
Lexus GX with a cascade of warning lights
Multiple safety system lights appeared simultaneously. Battery tested fine. Owner decided to self-diagnose.
What they tried:
- Purchased a Bluetooth OBD-II reader capable of reading ABS codes.
- Scan revealed a short in the rear left ABS circuit (code C1408).
- Replaced the rear ABS wiring harness ($100 part) despite no visible damage.
Outcome: Replacing the wiring harness immediately cleared all warning lights. The owner saved an estimated $1,000 compared to a dealer repair by spending $155 on diagnostic tools and the correct part.
Lesson: Investing in a good ABS-capable scanner ($100-$150) pays for itself instantly. It pinpoints the correct wheel and confirms the fault type, preventing expensive guesswork.
How to Prevent This Code From Triggering
- Apply dielectric grease to sensor connectors (Whenever connectors are disconnected) — Dielectric grease is a non-conductive, silicone-based sealant that prevents moisture, salt, and dirt from entering the electrical connector, stopping the corrosion that leads to circuit faults.
- Periodically clean sensor mounting surfaces and tone rings (Every 1-2 years or during brake service) — Cleaning rust and debris from the sensor mounting hole ensures the correct air gap to the tone ring. Cleaning metallic dust off the tone ring prevents signal interference.
- Treat underbody wiring harnesses with a corrosion inhibitor (Annually before winter in Rust Belt regions) — Products like Fluid Film create a barrier that repels salt and brine, protecting the thin plastic insulation on wiring harnesses from becoming brittle and cracking.
- Regularly wash the vehicle's undercarriage (Frequently during winter months in areas with road salt) — Physically washing away salt and de-icing chemicals reduces the time these corrosive agents have to attack connectors and wiring insulation.
- Address failing wheel bearings immediately (As needed) — Replacing a noisy wheel bearing prevents excessive play from destroying the integrated ABS tone ring or the sensor itself.
Frequently Asked Questions
Why did my ABS, Traction Control, and Brake lights all come on at once?
The ABS, Traction Control, and Stability Control systems all use the wheel speed sensors to function. When the computer loses the signal from one wheel, it disables all these safety systems as a precaution, triggering their respective warning lights. Some vehicles also illuminate the main brake light to emphasize the seriousness of the fault.
Can I just clean the ABS sensor to fix code C1407?
While cleaning a sensor tip covered in metallic debris sometimes resolves a poor signal issue, code C1407 specifically points to an 'Open or Short Circuit'. This means the computer detected an electrical failure. You are far more likely dealing with a broken wire, a corroded connector, or an internally failed sensor than simple surface contamination.
I replaced the sensor but the code C1407 came back. What's next?
This classic scenario almost always means the fault lies in the wiring harness between the sensor and the ABS module, or the tone ring is damaged. The wiring is the most likely culprit. Perform continuity and short-to-ground tests on the harness to find the hidden break or short before replacing any more parts.
What is the most common mistake when fixing C1407?
The most common mistake is immediately replacing the wheel speed sensor without testing the circuit. Because damaged wiring is the most frequent cause, this often fails to fix the problem and wastes money. Inspect and test the circuit with a multimeter and scan tool live data to confirm the failure point before buying parts.
Why is the repair cost so high? The sensor seems cheap.
Costs escalate if the sensor seizes in the hub and requires hours of labor to drill out. Additionally, if the tone ring fails, it is often integrated into the entire wheel hub bearing, requiring a more expensive part and labor-intensive replacement. Finally, finding a hidden break in the wiring harness drives up diagnostic labor costs.
Is it safe to drive with the ABS light on?
Your standard brakes will still stop the car, but the anti-lock function is disabled. In a panic stop or on a wet road, your wheels will lock up, causing a skid and a loss of steering control. Drive with increased caution, leave extra following distance, and repair the system immediately.
What does 'Open or Short' actually mean?
An 'Open' circuit means there is a physical break in the wire or a disconnected plug, preventing the electrical signal from passing through. A 'Short' circuit means the electrical signal routes to the wrong place, such as another wire or the vehicle's metal frame. Both conditions corrupt the sensor data and trigger the C1407 code.
Key Takeaways
- Code C1407 disables your ABS and traction control because the computer lost the electrical signal from the rear passenger-side wheel speed sensor.
- Inspect the exposed wiring harness above the rear axle first; corrosion or broken wires cause over 60% of C1407 faults, not the sensor itself.
- Use a multimeter to test the sensor's resistance (typically 800-2,500 Ohms for passive sensors) before spending $50-$250 on a replacement part.
- Never ignore a humming rear wheel bearing alongside this code; excessive bearing play destroys the integrated tone ring and requires a $350-$1,000 hub replacement.
Helpful Videos
Shop the Parts Behind C1407
Below are the parts most often responsible for code C1407, ranked by how frequently each one is the actual culprit (per the diagnosis above). Tap any to see what we have for your vehicle.


The information in this article is provided for general reference and educational purposes only. Vehicle specifications, procedures, and part compatibility can vary by production date, trim level, and region. Always consult your vehicle's factory service manual and verify part numbers before purchasing or performing repairs. Safety-critical components such as airbags, seat belts, and braking systems should be installed by a qualified professional.
- 🧭 Diagnostic Flowchart
- 🎬 Helpful Videos
- 🛍️ Shop This Part
- What Does C1407 Mean?
- Can I Drive With C1407?
- Common Causes
- Symptoms
- Common Fixes & Costs
- DIY vs Professional
- Used vs. New Parts: Buying Guide
- What Happens If You Wait — Timeline
- Cost of Not Fixing It
- Diagnosis Steps
- When This Code Triggers (Freeze-Frame Conditions)
- Related Codes
- Climate & Environmental Factors
- How to Talk to a Mechanic About This Code
- Where to Take It: Dealer vs Independent vs Chain
- When to Walk Away From the Repair
- What Scan Tool You Need for This Code
- How to Clear the Code After You Fix It
- Will This Fail Emissions / State Inspection?
- Most Commonly Affected Vehicles
- Manufacturer-Specific Notes
- Real Owner Stories
- 2014 Toyota Yaris with low mileage in a cold climate
- 2007 Toyota Highlander with intermittent ABS/TRAC/VSC lights
- 2019 Jeep Wrangler JLU with multiple dashboard lights
- Lexus GX with a cascade of warning lights
- How to Prevent This Code From Triggering
- Frequently Asked Questions
- Why did my ABS, Traction Control, and Brake lights all come on at once?
- Can I just clean the ABS sensor to fix code C1407?
- I replaced the sensor but the code C1407 came back. What's next?
- What is the most common mistake when fixing C1407?
- Why is the repair cost so high? The sensor seems cheap.
- Is it safe to drive with the ABS light on?
- What does 'Open or Short' actually mean?
- Key Takeaways
- 🎟️ Get 5% Off