
OBD-II Code C1511: Steering Torque Sensor '1' Malfunction
The Ultimate 2026 Guide to What C1511 Means, Why It Triggers, and How to Fix It
- Code C1511 disables your power steering system, increasing steering effort by 3 to 5 times and creating an immediate crash risk.
- In 90% of cases, fixing C1511 requires replacing the entire steering column or rack assembly, costing between $800 and $3,000.
- If you drive a 2011-2017 Hyundai or Kia, check the $20 flexible steering coupler before authorizing a $1,500 steering column replacement.
- After replacing any steering component, you must perform a 'Torque Sensor Zero Point Calibration' using an advanced bi-directional scan tool, or the system will remain disabled.
What Does C1511 Mean?
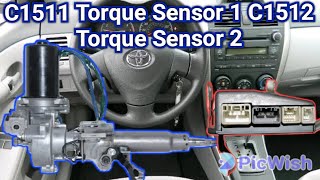
Code C1511 indicates the Power Steering Control Module (PSCM) detected a critical fault with the primary torque sensor (TRQ1). This sensor measures the force and direction applied to the steering wheel, signaling the PSCM to provide electric assistance. When the TRQ1 signal is lost, erratic, or out of range, the system enters fail-safe mode and shuts off power assist to prevent unpredictable steering.
Technical definition: The SAE/OBD-II definition is "Torque Sensor 1 Malfunction." The PSCM determined the voltage from the torque sensor 1 signal circuit is below the minimum threshold (<0.25V) or above the maximum threshold (>4.6V), indicating an open circuit, short circuit, or internal sensor failure.
Can I Drive With C1511?
No, recommended Do not drive. The loss of power assist dramatically increases steering effort by 3 to 5 times the normal force. This makes emergency maneuvers extremely difficult and poses an immediate crash risk, especially at low speeds. While it won't cause further mechanical damage, the risk of losing vehicle control is too high.
Common Causes
- Internal failure of the steering torque sensor. (Very Common) — The sensor degrades over time. In most vehicles, it is permanently integrated into the steering column or rack and requires replacing the entire unit.
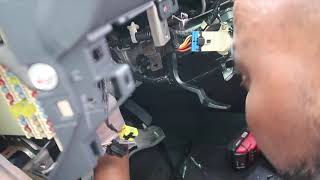
- Damaged, corroded, or loose wiring. (Common) — The harness connecting the sensor to the PSCM chafes, breaks, or corrodes. This severs communication and often occurs after unrelated under-dash repairs or impacts.
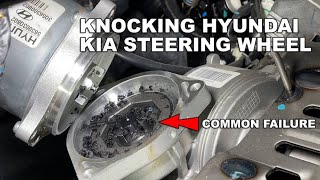
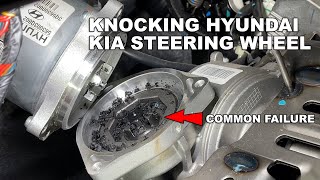
- Worn steering motor coupler (Hyundai/Kia). (Common) — A flexible rubber coupler in the steering motor disintegrates, creating excessive play. This causes the two torque sensors to report conflicting data, triggering C1511 or C1513.
- Software glitch or incompatibility. (Less Common) — Certain Ford models have overly sensitive PSCM software. A dealer software update resolves the code without hardware replacement. 🎬 See details on the Ford Escape torque sensor recall and software fix.
- Power Steering Control Module (PSCM) failure. (Less Common) — The control module fails due to internal faults, voltage spikes, or water intrusion, misinterpreting data or failing to power the sensor.
- Loss of calibration. (Rare) — Following a battery replacement or alignment, the system loses its 'zero point' calibration. This usually sets C1515 but triggers C1511 if uncalibrated readings fall far out of range.
- Poor main chassis ground. (Rare) — A corroded main ground strap causes floating voltages and erratic behavior across multiple electronic systems, including power steering.
Symptoms
- Power Steering (EPS/PS) warning light illuminates — The dashboard displays a warning light, typically a steering wheel icon with an exclamation mark, or the letters 'EPS' or 'PS'.
- Steering becomes extremely heavy — Immediate loss of power assist makes the steering wheel extremely difficult to turn, especially at low speeds or when parking.
- Intermittent loss of power steering — Power assist cuts out and returns intermittently, indicating a failing sensor or a loose connection before complete failure.
- Steering pulls or feels jerky — The system provides incorrect assistance, causing the wheel to feel jerky, 'notchy', or pull to one side.
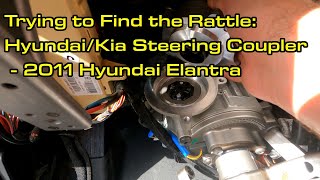
- Clicking or clunking noise from steering column — A classic symptom of a failed steering coupler in Hyundai/Kia vehicles, most apparent when turning the wheel while stationary.
Diagnostic Flowchart
Tap your situation to follow the diagnostic path that matches what you're seeing on this code.
Common Fixes & Costs
- Replacement of the Steering Column Assembly — Parts: $500-$1200, Labor: $300-$650, ~3.5 hr book time (Professional)
- Replacement of the Steering Rack and Pinion Assembly — Parts: $800-$2200, Labor: $450-$800, ~4 hr book time (Professional)
- Replacement of the Steering Motor Coupler (Hyundai/Kia) — Parts: $5-$20, Labor: $250-$450, ~2 hr book time (Intermediate)
- Wiring Harness or Connector Repair — Parts: $10-$300, Labor: $200-$700, ~3 hr book time (Advanced)
- Replacement of the Power Steering Control Module (ECU) — Parts: $800-$1100, Labor: $150-$350, ~1.5 hr book time (Professional)
Used vs. New Parts: Buying Guide
When a used part is worth it: For older vehicles (over 100k miles) where a new OEM steering column or rack is cost-prohibitive, a used part from a reputable salvage yard is a sensible option.
Donor-vehicle mileage cap: roughly under 80000 miles for the part to have meaningful remaining life.
Donor quality checklist:
- Verify the part number matches exactly.
- Choose a part from a vehicle with the lowest possible mileage.
- Inspect connectors for damage or corrosion.
- Avoid parts from flood cars.
- Check for any signs of physical damage to the housing.
Decision logic:
- If Vehicle is newer or has low mileage (<80K miles) → Buy new (OEM or quality remanufactured) for longevity and a better warranty.
- If Vehicle is older (>120K miles) and budget is the primary concern → A used part with a short-term warranty is an acceptable risk.
- If The specific part has a very high failure rate (e.g., a known design flaw) → Favor a new part with updated components over a used one that will likely fail the same way.
Warranty tradeoff: Used parts typically come with a 30-90 day warranty. New aftermarket parts offer 1-year to limited lifetime warranties. New OEM parts carry a 1-year warranty.
Worst-case if a used part fails: $500-$1200 if a used part fails after the warranty period, requiring a second labor charge and another part.
What Happens If You Wait — Timeline
- First Occurrence: Intermittent loss of power steering occurs. The EPS light illuminates but turns off after restarting the car. (MPG impact: 0%% · Added cost: $0)
- Days to Weeks: Intermittent failures become frequent. The driver notices a 'notch' or slight jerk in the steering before assist cuts out. (MPG impact: 0%% · Added cost: $100-$300 (for a tow if it fails in an inconvenient location).)
- Weeks to Months: The system experiences a 'hard fault'. The EPS warning light is permanently on, and there is a total loss of power steering assist. (MPG impact: 0%% · Added cost: The full cost of the required repair ($800-$3000).)
- Immediate Risk at Any Stage: Power assist fails during a critical maneuver, creating a sudden and severe risk of a crash. (MPG impact: N/A% · Added cost: Potential total loss of the vehicle and significant safety risk.)
Cost of Not Fixing It
- Immediate: Significant safety hazard due to loss of steering control, especially in emergencies or at low speeds. High risk of an accident. (Added cost: $100-$300 (for a tow), up to total loss of vehicle in a crash.)
- 0-3 months: Continued unsafe driving conditions. Potential for abnormal tire wear if the failure mode causes a consistent pull. (Added cost: $50-$200 (for tire wear).)
- 3+ months: The problem is a hard fault and will not resolve itself. The primary safety risk remains constant until repaired. (Added cost: The eventual cost of the required repair.)
Diagnosis Steps
- Scan for All Trouble Codes
Use an OBD-II scanner capable of reading Chassis (C-codes). Check for C1512 (Torque Sensor 2) or C1513 (Sensor Deviation), which isolate the fault to the sensor, wiring, or mechanical play.
Tools: OBD-II Scanner (with EPS/Chassis capability) (Beginner) - Analyze Live Sensor Data
Monitor 'Torque Sensor 1' and 'Torque Sensor 2' live data. Centered, both read ~2.5V. Turning right increases TRQ1 to ~4.0V and decreases TRQ2 to ~1.0V. A stuck or erratic TRQ1 reading confirms a circuit fault.
Tools: Advanced Diagnostic Scanner (Intermediate) - Perform Basic Electrical Health Check
Verify battery voltage is above 12.4V with the engine off. Clean battery terminals and inspect EPS fuses. Low system voltage causes false module faults.
Tools: Multimeter, Basic hand tools (Beginner) - Visually Inspect Wiring and Connectors
Inspect the harness between the steering column/rack and the PSCM. Look for chafing, melting, or backed-out pins. Disconnect and check for corrosion.
Tools: Flashlight, Inspection mirror (Intermediate) - Test Wiring Harness Integrity
Disconnect the harness from the PSCM and sensor. Measure end-to-end continuity (<1 Ω) and check for shorts to ground (OL or >10 kΩ) on each signal wire.
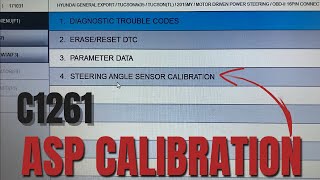
Tools: Multimeter, Vehicle-specific wiring diagram (Advanced) - Attempt Sensor Calibration
If wiring and data are plausible, perform a 'Torque Sensor Zero Point Calibration'. If it fails or C1511 returns immediately, the sensor or PSCM has a hard hardware failure.
Tools: Advanced Diagnostic Scanner (Professional) - [PRO TIP] Bench Test Sensor Voltage Output
Disconnect the sensor. Apply 5V to the power/ground pins. Measure the signal pin voltage. It must sit at ~2.5V and change smoothly when turning the input shaft. A fixed reading confirms a bad sensor.
Tools: Multimeter, Wiring diagram, 5V power supply (Advanced) - [PRO TIP] Analyze Sensor Waveform with Oscilloscope
Back-probe TRQ1 and TRQ2 at the ECU. Turn the wheel lock-to-lock. Look for dropouts or noise in the opposing analog voltage signals that a scan tool misses.
Tools: Oscilloscope, Back-probe kit (Advanced)
When This Code Triggers (Freeze-Frame Conditions)
- Vehicle Speed: 0-10 MPH (Fault often occurs or is most noticeable during low-speed maneuvers like parking.)
- Steering Wheel Position: Variable (The code sets while turning or driving straight if the sensor signal drops out.)
- System Voltage: 12.6-14.8V (The fault typically occurs when system voltage is normal; low voltage causes other module errors.)
- Engine State: Engine Running (Logged when the engine is running and power assist is expected.)
Related Codes
- C1512 — Diagnostic twin for Torque Sensor 2 (TRQ2). If C1511 and C1512 appear together, it points to a shared problem like the power/ground supply or a faulty PSCM.
- C1513 — Indicates a deviation between Torque Sensor 1 and 2 signals. This is a key indicator of a mechanical issue like the worn Hyundai/Kia coupler creating a 'lag' between readings.
- C1514 — Points specifically to a problem with the power supply voltage *to* the torque sensor assembly, directing focus to the PSCM output and power wires.
- C1515 — Means the torque sensor zero point calibration is lost. It is a software issue fixed by performing the calibration procedure.
Climate & Environmental Factors
- High Humidity / Water Ingress: Moisture penetrates connectors and circuit boards, leading to corrosion on pins and traces. This causes short circuits or high resistance, triggering C1511.
- Extreme Temperatures: Extreme cold causes electrical components to react slowly, reducing assist on startup. Extreme heat accelerates the degradation of electronic components within the PSCM.
- Road Salt: Accelerates corrosion of under-vehicle components, including the steering rack connectors and chassis ground points, directly causing electrical failures.
How to Talk to a Mechanic About This Code
Say this: "I have a C1511 code and the power steering has failed. I'd like to book a diagnostic. Before quoting a full steering column or rack replacement, please test the wiring, connectors, and power supply to the torque sensor. If it's a Hyundai/Kia, please inspect the steering coupler first."
Directs the mechanic to follow a logical, cost-effective diagnostic process, starting with the simplest potential failures before condemning an expensive assembly.
Avoid saying:
- My steering feels heavy.
- Just fix whatever is wrong with the steering.
- I think I need a new steering rack.
Questions to ask before authorizing the repair:
- Did you test the torque sensor's voltage output and check the wiring harness for continuity and shorts to ground?
- Can you show me the live data from torque sensor 1 and 2 on the scan tool?
- Does the quote for replacing the column/rack include the mandatory zero-point calibration and a wheel alignment?
- What is the warranty on the replacement part and the labor?
Where to Take It: Dealer vs Independent vs Chain
- Dealer:
Necessary for warranty/recall work. Otherwise, it is the most expensive option.
Best for: Vehicles under warranty, Vehicles with a known recall or software update for this issue (e.g., Ford Escape)
Downsides: Highest labor rates (40-80% premium), More likely to replace an entire assembly rather than troubleshoot wiring (Typical cost: +60% vs. baseline) - Independent Shop:
Best fit for most situations, provided the shop is equipped with modern, bi-directional scan tools.
Best for: Out-of-warranty vehicles, Finding a balance between expertise and value
Downsides: Diagnostic capabilities and experience with EPS systems vary widely. (Typical cost: +0% vs. baseline) - Chain Shop:
Not recommended. The C1511 code requires diagnostic depth beyond the scope of most chain shops.
Best for: Simple maintenance like oil changes and brakes
Downsides: Technicians often lack specialized training for complex electronic diagnostics., High potential for misdiagnosis leading to unnecessary repairs. (Typical cost: -10% vs. baseline)
When to Walk Away From the Repair
If estimated repair cost exceeds 50% of the car's KBB private-party value, consider alternatives to repair.
- Car worth $6000, fix is $1800: Fix it — The repair is ~30% of the vehicle's value and is a worthwhile investment.
- Car worth $3500, fix is $2200: Borderline — At over 60% of the car's value, get a second opinion. Consider selling as-is.
- Car worth $2500, fix is $1900: Walk away — The repair cost is not justified by the vehicle's value.
What Scan Tool You Need for This Code
Minimum: A scanner that reads Chassis (C) codes, displays live data from the EPS module, and performs a 'Torque Sensor Zero Point Calibration'.
A basic $20-50 code reader only reads engine (P) codes. It cannot read C1511, view sensor data, or perform the mandatory calibration after repair.
Budget: BlueDriver Pro (~$100) — Reads enhanced codes (ABS, SRS, EPS) to identify C1511 and displays live data from power steering sensors.
Mid-range: Foxwell NT510 Elite (~$180) — Reads and clears EPS codes, graphs live torque sensor data, and performs the required Steering Angle Sensor (SAS) calibration.
Professional: Autel MaxiCOM MK808 / MK808S (~$500) — Offers comprehensive diagnostics of the EPS system and has a dedicated function for the 'Torque Sensor Zero Point Calibration'.
Rent vs buy: For a one-time diagnosis, paying a professional shop is more cost-effective. If you perform regular maintenance, buying a mid-range scanner is a valuable investment.
How to Clear the Code After You Fix It
- Reconnect battery if disconnected for repair.
- Use an advanced OBD-II scan tool to clear the C1511 code from the Power Steering Control Module.
- Perform the 'Torque Sensor Zero Point Calibration' using the scan tool. This is a mandatory step after component replacement.
- Perform a short test drive, turning the wheel lock-to-lock to confirm smooth operation.
Drive cycle (~15 minutes): The EPS module does not require a complex drive cycle. A 15-minute test drive with mixed steering inputs confirms the repair is successful.
Readiness monitors affected: None. This is a chassis code and does not affect emissions readiness monitors.
Watch out for:
- Clearing the code without fixing the root cause results in the code returning immediately.
- Forgetting to perform the mandatory 'Torque Sensor Zero Point Calibration' prevents the system from working.
Will This Fail Emissions / State Inspection?
No — by itself this code doesn't fail OBD inspection (but it can keep readiness monitors from setting, which causes a separate fail).
- California: The active EPS warning light on the dashboard leads to a failure of the visual inspection portion of the smog check.
- New York: An illuminated power steering warning light is an automatic failure of the annual safety inspection.
- Texas: In counties requiring an annual safety inspection, an illuminated warning light results in a failed inspection.
Most Commonly Affected Vehicles
- Toyota Corolla (2009-2014) — Extremely common issue. The torque sensor is integrated into the steering column. Replacement of the entire column assembly is the standard repair.
- Lexus IS250 / IS350 (2006-2013) — Failure is typically the torque sensor within the electronic steering rack. Wiring harness issues at the ECU connector also occur after engine work.
- Ford Escape (2008-2011) — Subject to recall (NHTSA #14V284000) for torque sensor failure. The dealer fix is often a software update, followed by column replacement if codes persist.
- Chevrolet Malibu (2007-2012) — Covered under special program (GM #14329) for loss of power steering assist due to faulty torque sensors.
- Toyota Prius (2004-2009) — Diagnosis requires careful analysis of live data to differentiate between the sensor, ECU, and wiring using specific voltage checks.
- Hyundai Elantra / Sonata (2011-2017) — The primary suspect for EPS failure or noise is the flexible steering coupler (P/N 56315-2K000-FFF), a much more common failure point than the sensor.
- Lexus LS460 (2007-2012) — Triggered by a fault in the steering gear assembly containing the sensor, or wiring issues between the rack and control modules.
- Nissan Versa / Kicks (2021-2021) — Subject to recall (NHTSA #21V381000) for an intermittent internal failure of the torque sensor requiring steering column replacement.
Manufacturer-Specific Notes
- Toyota/Lexus: The torque sensor is integrated into the steering column or rack. The official repair is replacing the entire assembly, followed by a mandatory zero point calibration.
- Hyundai/Kia: A clicking noise with intermittent EPS failure is almost always a disintegrated flexible steering coupler (P/N 56315-2K000-FFF). Always check this sub-$20 part first.
- General Motors: GM issued special coverage extensions for faulty torque sensors. A corroded main ground strap between the engine and chassis is also a known weak point.
- Ford: Ford issued multiple recalls for EPS failures. The prescribed fix starts with a PSCM software update before replacing the steering column or gear.
Real Owner Stories
2013 Hyundai Elantra at 35K miles - The Misdiagnosis
Owner noticed a 'thud' sound when turning the steering wheel and took it to a mechanic.
Outcome: The owner researched the symptoms and discovered the common steering coupler failure. The $20 part was replaced at another shop for under $300, saving nearly $2,900.
Lesson: On a Hyundai or Kia with steering noise, always suspect the inexpensive flexible coupler first to avoid unnecessary column replacement.
2008-2011 Ford Escape - The Software Fix
Owner experienced a sudden loss of power steering assist and the EPS warning light came on.
Outcome: The dealer updated the PSCM software under the recall, which resolved the issue without requiring hardware replacement.
Lesson: Always check for recalls and TSBs. A free software update is often the entire fix for specific Ford models.
2011 Lexus IS-F - The Post-Repair Gremlin
After a DIY valve cover gasket replacement, the owner immediately got a C1511 code and no power steering.
Outcome: The owner replaced the engine wiring loom with a $20 used part. The calibration succeeded, restoring power steering. A wire was damaged during the initial engine repair.
Lesson: If C1511 appears immediately after unrelated engine work, the cause is almost certainly a disturbed wiring harness or connector.
How to Prevent This Code From Triggering
- Maintain Battery and Electrical System Health (Annually) — A weak battery or corroded terminals cause low voltage or voltage spikes, leading to module errors and premature failure.
- Prevent Water Intrusion (Annually or after heavy rain) — Moisture is a primary enemy of the PSCM and harness connectors. Keep sunroof drains clear and avoid deep puddles.
- Address Steering Noises Immediately (As needed) — A 'clicking' noise in a Hyundai or Kia is an early warning of a failing steering coupler. Replacing it promptly prevents complex sensor deviation faults.
- Ensure Calibration After Alignment (After every wheel alignment) — Modern vehicles require a steering angle/torque sensor zero point calibration after an alignment to prevent error codes and improper steering assist.
Frequently Asked Questions
Can I just replace the torque sensor itself?
Almost never. On most vehicles, the torque sensor is permanently integrated into the steering column or rack assembly and is not sold separately. You must replace the entire assembly.
What is the most common misdiagnosis for C1511?
The most common mistake is replacing an expensive steering column or rack without checking basic electrical connections. Mechanics often miss the inexpensive $20 steering coupler on Hyundai/Kia models or damaged wiring harnesses on Lexus vehicles.
Can a bad battery or alternator cause code C1511?
Yes. Low system voltage (below 12.2V) or alternator voltage spikes cause the Power Steering Control Module to behave erratically. Disconnecting the battery also wipes the system's calibration, triggering related codes.
Is it dangerous to drive with code C1511?
Yes, it is a severe safety risk. The sudden loss of power steering makes the car extremely difficult to steer, especially during emergency maneuvers or at low speeds. Tow the vehicle to a repair shop.
Will restarting my car fix the C1511 code?
Restarting the car temporarily restores power steering if the fault is intermittent. However, it does not fix the underlying hardware problem. The failure will return, often at an unsafe moment.
What is 'zero point calibration' and is it always necessary?
Zero point calibration is a mandatory scan tool procedure that tells the EPS module the 'straight ahead' position of the steering wheel. It is absolutely required after replacing the steering column, rack, or control module. Skipping this step leaves the system inoperative.
Can I use a used steering column from a junkyard?
Yes, a warranted used part from a reputable salvage yard significantly reduces repair costs. However, the part requires professional installation and a mandatory zero point calibration to function. There is also a risk the used part has a shorter lifespan.
Key Takeaways
- Code C1511 disables your power steering system, increasing steering effort by 3 to 5 times and creating an immediate crash risk.
- In 90% of cases, fixing C1511 requires replacing the entire steering column or rack assembly, costing between $800 and $3,000.
- If you drive a 2011-2017 Hyundai or Kia, check the $20 flexible steering coupler before authorizing a $1,500 steering column replacement.
- After replacing any steering component, you must perform a 'Torque Sensor Zero Point Calibration' using an advanced bi-directional scan tool, or the system will remain disabled.
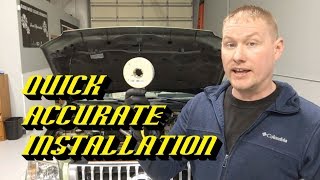
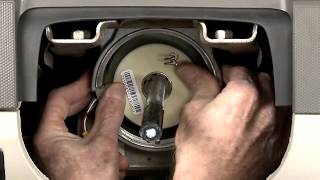
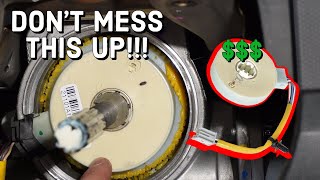
Helpful Videos


Shop the Parts Behind C1511
Below are the parts most often responsible for code C1511, ranked by how frequently each one is the actual culprit (per the diagnosis above). Tap any to see what we have for your vehicle.


The information in this article is provided for general reference and educational purposes only. Vehicle specifications, procedures, and part compatibility can vary by production date, trim level, and region. Always consult your vehicle's factory service manual and verify part numbers before purchasing or performing repairs. Safety-critical components such as airbags, seat belts, and braking systems should be installed by a qualified professional.
- 🧭 Diagnostic Flowchart
- 🎬 Helpful Videos
- 🛍️ Shop This Part
- What Does C1511 Mean?
- Can I Drive With C1511?
- Common Causes
- Symptoms
- Common Fixes & Costs
- Used vs. New Parts: Buying Guide
- What Happens If You Wait — Timeline
- Cost of Not Fixing It
- Diagnosis Steps
- When This Code Triggers (Freeze-Frame Conditions)
- Related Codes
- Climate & Environmental Factors
- How to Talk to a Mechanic About This Code
- Where to Take It: Dealer vs Independent vs Chain
- When to Walk Away From the Repair
- What Scan Tool You Need for This Code
- How to Clear the Code After You Fix It
- Will This Fail Emissions / State Inspection?
- Most Commonly Affected Vehicles
- Manufacturer-Specific Notes
- Real Owner Stories
- 2013 Hyundai Elantra at 35K miles - The Misdiagnosis
- 2008-2011 Ford Escape - The Software Fix
- 2011 Lexus IS-F - The Post-Repair Gremlin
- How to Prevent This Code From Triggering
- Frequently Asked Questions
- Can I just replace the torque sensor itself?
- What is the most common misdiagnosis for C1511?
- Can a bad battery or alternator cause code C1511?
- Is it dangerous to drive with code C1511?
- Will restarting my car fix the C1511 code?
- What is 'zero point calibration' and is it always necessary?
- Can I use a used steering column from a junkyard?
- Key Takeaways
- 🎟️ Get 5% Off