
OBD-II Code C2114: Dynamics Sensor Supply Voltage Low
The Ultimate 2026 Guide to Diagnosing and Fixing C2114
- Code C2114 indicates the dynamics sensor is receiving less than the required 6.5V to 12V, disabling your ABS and stability control.
- Test your battery first; a resting voltage below 12.4V is the most common and cheapest cause of this code.
- Standard hydraulic brakes remain fully functional, but the lack of ABS increases stopping distances by up to 20% on wet roads.
- Ignore ABS diagnostics if you drive a Toyota or Lexus; on those brands, C2114 means tire pressure sensor #4 is inactive.
- Never replace the $200+ dynamics sensor or ABS module without first verifying power and ground at the sensor connector with a multimeter.
What Does C2114 Mean?
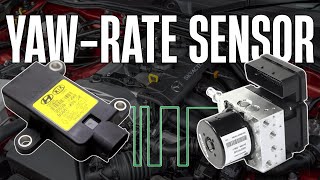
Your car's main computer detects low voltage in the Dynamics Sensor power supply circuit. This sensor tells the ABS and traction control systems if the car is turning, tilting, or skidding.
Technical definition: The SAE/OBD-II definition is 'Dynamics Sensor Supply Voltage Low'. The ABS module detects that voltage supplied to the Dynamics Sensor (G/Yaw Rate Sensor) has dropped below the specified threshold (often 6.5V for Chrysler/Jeep or 12V for others). This fault prevents sensor initialization, disabling Electronic Stability Control (ESC).
Can I Drive With C2114?
Yes, But With Caution. Yes, but with caution. Standard hydraulic brakes function normally, but critical safety systems (ABS, Traction Control, and Electronic Stability Control) are disabled. This dramatically increases the risk of wheel lock-up and skidding during emergency braking or on slippery surfaces. Get the vehicle diagnosed immediately.
Common Causes
- Damaged Wiring or Connectors (Very Common) — Exposed underbody wiring harnesses chafe, corrode, or break from road debris and moisture. Loose or corroded connector pins also create intermittent connections, causing a loss of power or ground.
- Failing or Weak Vehicle Battery (Common) — Modern safety systems require stable voltage. A weak battery dropping below 12V during cranking triggers this code, even if the sensor and wiring are perfectly fine.
- Faulty Dynamics / Yaw Rate Sensor (Common) — The sensor's internal electronics degrade over time, causing it to fail, draw incorrect voltage, and trigger the code.
- Faulty Anti-Lock Brake System (ABS) Module (Less Common) — The ABS module supplies power to the dynamics sensor. Internal module failure cuts this power, often accompanied by code C2200.
- CAN Bus Network Fault (Less Common) — A short or open in the local CAN bus communication network triggers false C2114 codes, particularly on Mitsubishi vehicles.
- Blown Fuse (Rare) — A blown ABS or stability control fuse cuts circuit power, usually indicating a larger electrical short in the system.
Symptoms
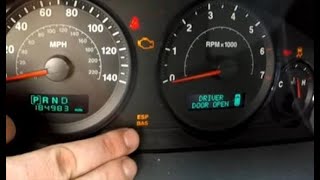
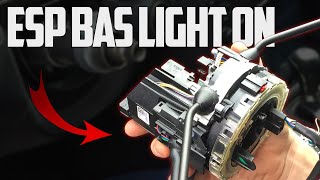
- ABS Light On — The Anti-lock Braking System warning light illuminates on the dashboard.
- Traction Control / Stability Control Light On — The Electronic Stability Control (ESC) or Traction Control System (TCS) light illuminates.
- ESP/BAS Light On — On Chrysler, Dodge, and Jeep vehicles, the 'ESP/BAS' light illuminates, indicating a fault in the Electronic Stability Program. 🎬 See common causes and fixes for the ESP BAS light.
- ABS and Traction Control Disabled — The ABS does not activate during hard braking (wheels lock up) and traction control does not intervene during wheel spin.
Diagnostic Flowchart
Tap your situation to follow the diagnostic path that matches what you're seeing on this code.
Common Fixes & Costs
- Replacing the Vehicle Battery — Parts: $150-$300, Labor: $0-$50, ~0.5 hr book time (DIY)
- Repairing Damaged Wiring or Connectors — Parts: $10-$50, Labor: $150-$400, ~1.5 hr book time (Intermediate)
- Replacing the Dynamics / Yaw Rate Sensor
— Parts: $100-$600, Labor: $120-$200, ~1 hr book time
(DIY)
Jeep Wrangler (JK, 2012-2018): OEM 56038988AC (Alt: {"brand": "Standard Motor Products", "part_number": "ALS2531"})
Dodge Durango (2011-2018): OEM 56029469AA (Alt: {"brand": "Standard Motor Products", "part_number": "ALS2591"}) - Replacing the ABS Control Module
— Parts: $200-$1500, Labor: $150-$300, ~1.5 hr book time
(Professional)
Jeep Wrangler (JK, 2014-2018): OEM 68259556AD (Alt: {"brand": "Cardone (Reman)", "part_number": "12-4204"}) - CAN Bus Wiring and Module Repair — Parts: $20-$100, Labor: $250-$800, ~3 hr book time (Professional)
Used vs. New Parts: Buying Guide
When a used part is worth it: For expensive components like the Dynamics Sensor or ABS Module, a used part from a reputable salvage yard offers significant savings. This is ideal for older vehicles where a new OEM part is cost-prohibitive.
Donor-vehicle mileage cap: roughly under 100000 miles for the part to have meaningful remaining life.
Donor quality checklist:
- Match the part number exactly; modules are VIN-specific and a mismatched part will not program to your vehicle.
- Purchase from a supplier offering a 30-90 day warranty.
- Avoid parts from flood or heavy-impact vehicles.
Decision logic:
- If The part is a high-cost OEM-only ABS module or sensor (> $800) → Purchase a used OEM or a remanufactured unit from a reputable rebuilder.
- If The vehicle is over 10 years old and budget is the primary concern → A used part with a warranty is a reasonable choice.
- If The part is an aftermarket sensor available for a reasonable price (< $250) → Buy new aftermarket for a longer warranty and guaranteed fitment.
Warranty tradeoff: Used parts typically have a 30-90 day warranty covering only the part. New aftermarket parts carry a 1-year to limited lifetime warranty. A remanufactured module is the best compromise of cost and reliability.
Worst-case if a used part fails: $300-$500 if a used electronic module fails after installation, requiring repeat labor for removal, replacement, and reprogramming.
What Happens If You Wait — Timeline
- Immediate: Code sets, and the ABS, Traction Control, and Stability Control warning lights illuminate. All related safety systems are disabled. Conventional hydraulic brakes still function. (MPG impact: 0%% · Added cost: $0. The primary cost is a significant reduction in vehicle safety.)
- 1-6 months: The safety risk remains constant. If the root cause is a small break in wiring insulation, continued exposure to moisture and road salt begins to cause corrosion at the breach point. (MPG impact: 0%% · Added cost: $0, but the future repair is becoming more complex.)
- 6-18 months: Corrosion spreads along the copper wire under the insulation, turning a simple spot repair into a difficult one requiring a new section of wire or a pigtail connector. (MPG impact: 0%% · Added cost: $200-$400 in increased labor costs for wiring repair.)
- 18+ months: Severe corrosion causes the wire to break completely or create an intermittent short. A short in the power supply circuit damages the driver circuit within the ABS control module, forcing a high-cost module replacement. (MPG impact: 0%% · Added cost: $500-$2800+ if the ABS module is damaged by the ongoing wiring fault.)
Cost of Not Fixing It
- Immediate: Increased risk of skidding and loss of control during emergency braking or on slippery surfaces. Inability to steer during a panic stop. (Added cost: Cost of an accident.)
- 0-6 months: No direct mechanical damage is caused by ignoring this code. The primary cost is significantly reduced vehicle safety. (Added cost: Negligible, besides the eventual repair cost.)
- 6+ months: Continued exposure of a damaged wiring harness to the elements leads to extensive corrosion, making the eventual repair more difficult and costly. (Added cost: $200-$800 if wiring damage worsens or a module is damaged.)
Diagnosis Steps
- Read Fault Codes
Use an OBD-II scanner capable of reading Chassis (C) codes to confirm C2114. Note any other codes (e.g., U0125, C2200, C121A). Always diagnose power-related codes like C2114 first.
Tools: Advanced OBD-II Scanner (Beginner) - Check Battery and Charging System
Test the vehicle's battery for proper voltage (above 12.4V with engine off) and ensure the alternator charges correctly (13.5V-14.5V). Low system voltage triggers this code.
Tools: Multimeter, Battery Tester (Beginner) - Visually Inspect Wiring and Connectors
Locate the dynamics sensor (under the center console, passenger seat, or on the frame). Inspect the wiring harness for cuts, chafing, melting, or corrosion. Check the connectors at the sensor and ABS module.
Tools: Flashlight, Trim Removal Tools (Intermediate) - Check Sensor Power and Ground
Disconnect the sensor. Turn the ignition 'ON'. Use a multimeter to check for voltage at the supply wire in the harness connector. A reading below the manufacturer's threshold (or below 12V if no spec exists) indicates a supply issue. Next, test resistance between the ground pin and a known chassis ground. Resistance must be less than 1 ohm.
Tools: Multimeter, Vehicle-Specific Wiring Diagram (Intermediate) - Perform a Voltage Drop Test
Reconnect the sensor and back-probe the ground wire. With the ignition on, measure voltage between the back-probed ground wire and the battery's negative terminal. A reading above 0.2 volts indicates excessive resistance in the ground circuit.
Tools: Multimeter with Back-Probes (Advanced) - Test Circuits for High Resistance (Open)
Disconnect the battery, sensor, and ABS module. Measure the resistance of the power supply wire from the ABS module connector to the sensor connector. It must be below 5.0 ohms. Repeat for the ground wire. A reading of 'O.L.' means the wire is broken.
Tools: Multimeter, Vehicle-Specific Wiring Diagram (Advanced) - Analyze Scan Tool Live Data
View live data PIDs for 'Dynamics Sensor Supply Voltage'. With key on, engine off, this value must match battery voltage (12.0-12.6V). If the reading is erratic or below 6.5V, it confirms the low voltage condition. Monitor yaw rate and G-force PIDs; frozen values confirm a power or communication issue.
Tools: Advanced OBD-II Scanner (Advanced) - Check CAN Bus Integrity (If Applicable)
For vehicles like Mitsubishi, disconnect the battery and measure resistance between the CAN bus terminals (CAN-H and CAN-L) at the sensor connector. A reading of ~60 ohms is healthy. A reading of 120 ohms indicates a broken wire or missing terminating resistor.
Tools: Multimeter, Vehicle-Specific Wiring Diagram (Advanced)
When This Code Triggers (Freeze-Frame Conditions)
- System Voltage: 11.5-12.5V (During startup or immediately after, especially with a weak battery.)
- Vehicle Speed: 0-15 mph (Code sets during the initial system self-check just after starting the engine and beginning to move.)
- Time Since Engine Start: < 1 minute (The fault is detected quickly during the ABS module's power-on self-test.)
- ABS/ESC Status: Inactive/Fault (The code sets when the ABS module fails to power up or communicate with the dynamics sensor.)
Related Codes
- U0125 — 'Lost Communication With Dynamics Sensor'. C2114 means the sensor lost power, and U0125 means it cannot communicate because it lacks power. Always diagnose the C2114 power issue first.
- C2200 — 'Anti-Lock Brake Module Internal'. The ABS module powers the dynamics sensor. Its internal failure (C2200) directly causes the sensor's supply voltage to drop (C2114). If both are present, replace the ABS module.
- C123C — 'Dynamics Sensor Mounting/Installation Performance'. A power supply issue (C2114) causes the sensor to send bad data, triggering C123C. Fix power codes before troubleshooting performance codes.
- C121A — 'Steering Angle Sensor Not Initialized'. A power interruption in the stability system causes the Steering Angle Sensor to lose calibration. Re-initialize the steering angle sensor after fixing the C2114 power issue.
Climate & Environmental Factors
- Road Salt / High Humidity: In regions with heavy road salt use or high humidity, salt and moisture accelerate the corrosion of wiring harnesses, connector pins, and ground points. This corrosion creates high resistance, causing the voltage drop that triggers the code.
- Extreme Cold: Extreme cold temperatures weaken a marginal battery, causing its voltage to drop below the threshold required by the ABS computer, triggering C2114 on startup. Cold also makes old plastic wiring insulation brittle and prone to cracking.
How to Talk to a Mechanic About This Code
Say this: "I have an ABS light on and my scanner is showing code C2114, 'Dynamics Sensor Supply Voltage Low'. I'd like to schedule one hour of diagnostic time for a technician to test the power, ground, and integrity of the wiring circuit between the ABS module and the dynamics sensor."
This language shows you've done your research and directs the shop to perform a proper electrical diagnosis instead of guessing and replacing the expensive sensor or module. It establishes a clear, time-boxed diagnostic step.
Avoid saying:
- 'My ABS light is on, can you fix it?'
- 'Just replace the sensor.'
- 'Do whatever it takes to fix it.'
Questions to ask before authorizing the repair:
- What voltage did you measure at the sensor's power pin, and what is the manufacturer's specification?
- What was the resistance reading on the ground circuit for the sensor?
- If you are recommending a wiring repair, can you show me the break or corrosion you found?
- If you are recommending an ABS module or sensor replacement, what specific tests did you perform to rule out a wiring problem?
- Is there a warranty on the recommended parts and labor?
Where to Take It: Dealer vs Independent vs Chain
- Dealer:
Recommended if the diagnosis points to a failed ABS module that requires programming, or if you lack a highly skilled independent electrical shop.
Best for: Vehicles under warranty, Complex cases involving module programming (e.g., ABS module replacement), Known manufacturer-specific issues (like the Jeep JK ABS module failures)
Downsides: Highest labor rates, Defaults to replacing expensive assemblies instead of performing detailed wiring repairs (Typical cost: +50% vs. baseline) - Independent Shop:
Best fit. An independent shop with a skilled diagnostician is perfectly suited to trace this electrical fault. Vet the shop by checking reviews for terms like 'electrical' or 'diagnostic'.
Best for: Out-of-warranty vehicles, Diagnosing and repairing wiring issues, which is the most common cause, Owners looking for the best balance of cost and expertise
Downsides: Quality and diagnostic skill vary greatly. You must find a shop with a good reputation for electrical work. (Typical cost: +0% vs. baseline) - Chain Shop:
AVOID for diagnosis. This electrical fault requires more expertise than is typically found at a chain shop.
Best for: Simple part swaps that you have already diagnosed yourself
Downsides: Technicians lack the advanced electrical diagnostic training needed to trace this fault., Business model pressures technicians to sell parts rather than spend time on complex diagnosis. (Typical cost: -10% vs. baseline)
When to Walk Away From the Repair
If the estimated repair cost exceeds 40-50% of the car's private-party value, seriously consider selling or trading it in.
- Car worth $5000, fix is $2200: Walk away. A worst-case C2114 repair (new OEM ABS module) easily reaches this cost. The repair is nearly 50% of the car's value.
- Car worth $15000, fix is $450: Fix it. This cost represents a typical wiring repair, which is well below the threshold and restores a critical safety system.
- Car worth $3000, fix is $1800: Walk away. The repair cost is 60% of the vehicle's value. It makes no financial sense to proceed.
What Scan Tool You Need for This Code
Minimum: A scanner that reads and clears Anti-lock Braking System (ABS) codes. Basic engine-only code readers will not see Chassis ('C') codes like C2114.
A standard $20 OBD-II reader only communicates with the engine control module. The C2114 code is stored in the ABS module, requiring a more capable scanner to access.
Budget: BlueDriver Pro Scan Tool (~$99) — Reads and clears ABS codes, displays live data for sensor voltage, and provides repair reports. This is enough for a skilled DIYer to see the voltage drop and confirm the fault.
Mid-range: Foxwell NT630 Plus / Innova 5610 (~$150) — Adds critical bidirectional controls. It performs the 'Zero Point Calibration' required after replacing a yaw rate sensor and offers ABS brake bleeding functions.
Professional: Autel MaxiCOM MK808 / MK808BT Pro (~$450-600) — Offers OEM-level diagnostics, including full bidirectional control, advanced live data graphing, and module programming required for replacing an ABS control module.
Rent vs buy: Many auto parts stores offer a loaner tool program where you can borrow an ABS-capable scanner for free. If this is a one-time repair, renting is the most cost-effective option. Buy only if you plan to do your own diagnostics regularly.
How to Clear the Code After You Fix It
- Reconnect any disconnected components (battery, sensor, module).
- Use an OBD-II scanner capable of reading Chassis codes to clear the C2114 and any related faults.
- Perform a 'Zero Point Calibration' for the new dynamics sensor if it was replaced.
- Perform a drive cycle to allow the system to self-test.
Drive cycle (~15 minutes): Start the engine and idle for 2 minutes. Drive in city conditions (25-35 mph) with a few stops. Drive at a steady highway speed (55-60 mph) for 5 minutes. The warning lights remain off if the repair was successful.
Readiness monitors affected: This is a Chassis (C) code and does not directly affect emissions readiness monitors like the Catalyst or O2 sensor monitors.
Watch out for:
- Disconnecting the battery will not clear this code from the ABS module's memory.
- Forgetting to calibrate a new dynamics sensor causes the light to return immediately.
- If the code returns, the root cause (usually wiring or the ABS module) was not correctly identified.
Will This Fail Emissions / State Inspection?
No — by itself this code doesn't fail OBD inspection (but it can keep readiness monitors from setting, which causes a separate fail).
- California: An illuminated ABS light will NOT cause a failure of the emissions (smog) check. The test only checks the Check Engine Light and emissions readiness monitors.
- New York: An illuminated ABS warning light is grounds for failing the annual safety inspection.
- Texas: An illuminated ABS light will NOT cause a failure of the state safety inspection. However, an illuminated red 'Brake' warning light causes a failure.
Most Commonly Affected Vehicles
- Jeep Wrangler (JK) (2007-2018) — Extremely common on the JK platform. It frequently appears with U0125 and C2200 codes, pointing towards a failing ABS module or wiring damage from off-roading.
- Jeep Compass / Patriot (2007-2017) — Wiring harness damage, particularly where it passes through the firewall or near the wheel wells, is a common cause for this code on these models.
- Dodge Durango (2011-2022) — Service manuals show detailed diagnostic procedures for C2114. The cause is typically wiring or the sensor itself, located under the center console.
- Dodge Charger / Challenger (2011-2022) — Shares a similar electronics platform with the Durango. Often accompanied by C121A if the power loss causes the steering angle sensor to lose calibration.
- Chrysler 300 (2011-2020) — Uses a similar ABS/ESC system as Dodge counterparts. C2114 specifically points to the dynamics sensor power circuit.
- Mitsubishi Outlander, Lancer (2007-2020) — C2114 points to an abnormality in the G and Yaw Rate Sensor operation voltage. Service documentation dictates diagnosing the CAN bus lines before checking the sensor or ABS module.
- Hyundai Santa Fe, Sonata (2007-2012) — Owners report this code leading to yaw rate sensor replacement or expensive ABS module failures.
- Ford Edge, Fusion, Explorer (2015-2024) — Triggers a 'Service AdvanceTrac' warning. The cause is often a failed central yaw rate sensor, requiring calibration after replacement.
Manufacturer-Specific Notes
- Jeep / Dodge / Chrysler: C2114 reliably points to a low voltage problem in the power circuit for the dynamics sensor. The combination of C2114, U0125, and C2200 is a definitive indicator of a failed ABS module on models like the Jeep Wrangler JK.
- Toyota / Lexus: On Toyota and Lexus vehicles, C2114 means 'Transmitter ID4 Inactive'. It relates to the Tire Pressure Monitoring System (TPMS) and indicates the system is not receiving a signal from the sensor in the fourth tire.
- Ford / Lincoln: A fault corresponding to C2114 symptoms triggers the 'Service AdvanceTrac' warning light. After replacing the failed yaw rate sensor, a 'Zero Point Calibration' using a diagnostic scan tool is mandatory.
- GM (Chevrolet / GMC / Cadillac): The Electronic Brake Control Module (EBCM) supplies power to all related sensors. An internal fault in the EBCM cuts power to the dynamics sensor circuit, making the EBCM itself the primary suspect.
- Mitsubishi: Mitsubishi service manuals explicitly state that if C2114 is present, the CAN bus lines must be diagnosed before any other components. Network faults are a common cause of false codes.
Real Owner Stories
2009 Jeep Wrangler JK with multiple ABS codes
ABS, ESP/BAS, and traction control lights illuminated simultaneously and reappeared every time the vehicle hit 10 mph. Codes pulled were C2114, U0125, and C2200.
Outcome: The combination of codes, specifically C2200 (Anti-Lock Brake Module Internal), indicated a failed ABS module. Because the ABS module supplies power to the dynamics sensor, its internal failure directly caused the C2114 (low voltage) and U0125 (lost communication) codes.
Lesson: When C2114 is present alongside C2200 (ABS Module Internal Fault), the ABS module is the culprit. Diagnose the module before spending time and money on the sensor or wiring.
2011 Jeep Compass with C2114
ABS and traction control lights were on. A repair shop replaced the dynamics sensor for over $600, but the problem remained.
Outcome: The technician traced the wire and found a clean break in the harness. Repairing the single broken wire resolved the code and restored system function. The initial misdiagnosis cost the owner $600 for an unnecessary part.
Lesson: Misdiagnosing C2114 is expensive. Always verify power and ground at the sensor connector with a multimeter before replacing parts. A simple broken wire is the most common cause.
Mitsubishi Outlander with C2114
ABS/ASC warning lights illuminated with code C2114 stored.
Outcome: Mitsubishi's official service manual dictates diagnosing the CAN bus lines first. An incorrect diagnostic code sets if there is a communication error on the local CAN bus between the module and the sensor. Checking resistance between the CAN lines prevented an unnecessary module replacement.
Lesson: Follow manufacturer-specific diagnostic procedures. For Mitsubishi, a CAN bus fault is a primary suspect for C2114 and must be ruled out before replacing expensive components.
How to Prevent This Code From Triggering
- Apply Dielectric Grease to Connectors (Anytime a connector is disconnected) — Dielectric grease is a non-conductive sealant that blocks moisture, road salt, and dirt from entering electrical connectors. Applying a thin layer prevents the corrosion that causes high resistance and voltage drops.
- Perform Regular Battery Health Checks (Twice a year) — Modern safety modules are highly sensitive to system voltage. A weak battery is a common cause of C2114. Regular testing identifies a marginal battery before it triggers fault codes.
- Protect Underbody Wiring (Once, or as needed) — If the dynamics sensor harness is exposed under the vehicle, protect it with high-quality plastic conduit or abrasion-resistant wrap. This adds a physical barrier against impacts, chafing, and moisture.
- Wash the Vehicle's Undercarriage (Seasonally, especially in the 'Salt Belt') — Washing the underbody removes accumulated road salt and grime that trap moisture against wiring harnesses. This directly reduces the rate of corrosion, a primary cause of high-resistance faults.
Frequently Asked Questions
Is it safe to drive with code C2114?
Yes, but with caution. Standard brakes work, but ABS and stability control are disabled. Drive slower and allow extra stopping distance, especially on wet roads.
What is the difference between C2114 on a Jeep vs. a Toyota?
They are completely unrelated. On Chrysler/Jeep, C2114 is a stability control power failure. On Toyota/Lexus, C2114 means tire pressure sensor #4 is inactive.
Does the dynamics sensor need to be calibrated after replacement?
Yes. Replacing the sensor requires a 'zero point calibration' using a professional scan tool. This teaches the computer the sensor's neutral position so stability control functions correctly.
Can a bad wheel alignment cause code C2114?
No, poor alignment does not cause electrical fault codes like C2114. However, a severe impact that ruins alignment can simultaneously sever the sensor's wiring. Alignment issues typically trigger performance codes, not voltage codes.
What are the most common mistakes when diagnosing C2114?
The biggest mistake is replacing the expensive sensor or ABS module before testing the battery. Always verify power and ground at the sensor connector first. On Mitsubishis, check the CAN bus network to rule out false codes.
Why are my ABS, traction control, and brake lights all on at the same time?
ABS, traction control, and stability control share the same module and sensors. A power failure to the dynamics sensor disables the entire integrated system. The dashboard illuminates all related lights to warn the driver.
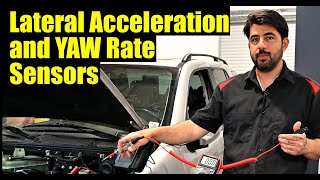
What is a dynamics sensor and what does it do?
It measures the vehicle's rotation (yaw) and side-to-side motion (lateral acceleration). It tells the stability control system if the car is actually turning where the driver is steering. If it detects a skid, the ABS module applies individual brakes to restore control.
Key Takeaways
- Code C2114 indicates the dynamics sensor is receiving less than the required 6.5V to 12V, disabling your ABS and stability control.
- Test your battery first; a resting voltage below 12.4V is the most common and cheapest cause of this code.
- Standard hydraulic brakes remain fully functional, but the lack of ABS increases stopping distances by up to 20% on wet roads.
- Ignore ABS diagnostics if you drive a Toyota or Lexus; on those brands, C2114 means tire pressure sensor #4 is inactive.
- Never replace the $200+ dynamics sensor or ABS module without first verifying power and ground at the sensor connector with a multimeter.
Helpful Videos
Shop the Parts Behind C2114
Below are the parts most often responsible for code C2114, ranked by how frequently each one is the actual culprit (per the diagnosis above). Tap any to see what we have for your vehicle.


The information in this article is provided for general reference and educational purposes only. Vehicle specifications, procedures, and part compatibility can vary by production date, trim level, and region. Always consult your vehicle's factory service manual and verify part numbers before purchasing or performing repairs. Safety-critical components such as airbags, seat belts, and braking systems should be installed by a qualified professional.
- 🧭 Diagnostic Flowchart
- 🎬 Helpful Videos
- 🛍️ Shop This Part
- What Does C2114 Mean?
- Can I Drive With C2114?
- Common Causes
- Symptoms
- Common Fixes & Costs
- Used vs. New Parts: Buying Guide
- What Happens If You Wait — Timeline
- Cost of Not Fixing It
- Diagnosis Steps
- When This Code Triggers (Freeze-Frame Conditions)
- Related Codes
- Climate & Environmental Factors
- How to Talk to a Mechanic About This Code
- Where to Take It: Dealer vs Independent vs Chain
- When to Walk Away From the Repair
- What Scan Tool You Need for This Code
- How to Clear the Code After You Fix It
- Will This Fail Emissions / State Inspection?
- Most Commonly Affected Vehicles
- Manufacturer-Specific Notes
- Real Owner Stories
- 2009 Jeep Wrangler JK with multiple ABS codes
- 2011 Jeep Compass with C2114
- Mitsubishi Outlander with C2114
- How to Prevent This Code From Triggering
- Frequently Asked Questions
- Is it safe to drive with code C2114?
- What is the difference between C2114 on a Jeep vs. a Toyota?
- Does the dynamics sensor need to be calibrated after replacement?
- Can a bad wheel alignment cause code C2114?
- What are the most common mistakes when diagnosing C2114?
- Why are my ABS, traction control, and brake lights all on at the same time?
- What is a dynamics sensor and what does it do?
- Key Takeaways
- 🎟️ Get 5% Off