
OBD-II Code C2191: Manufacturer-Specific Chassis Code
What C2191 means, why it triggers, and how to fix it
- Verify your vehicle's manufacturer before diagnosing C2191, as it means 'Test Mode Active' on a Toyota but indicates a critical 'G-Sensor Plausibility' failure on a Mercedes or Audi.
- Expect disabled Electronic Stability Program (ESP) and Traction Control systems on European vehicles, requiring immediate repair to restore safe emergency handling.
- Ignore C2191 on Toyota and Lexus models if it appears alone; it is a normal test-mode artifact that clears automatically after driving above 12 mph.
- Analyze live data from all 4 wheel speed sensors and the G-sensor simultaneously using an advanced OBD-II scanner to pinpoint the exact failing component.
- Perform a mandatory 'Zero Point Calibration' with a bi-directional scan tool after replacing a G-sensor on Audi or VW models to permanently clear the dashboard warning lights.
What Does C2191 Mean?
C2191 is a manufacturer-specific chassis code. For Toyota and Lexus, it indicates a 'Vehicle Speed Signal Error' within the Tire Pressure Monitoring System, usually appearing only in a diagnostic test mode. For Mercedes-Benz, Audi, or VW, it indicates a 'Longitudinal Acceleration Sensor Plausibility' fault, meaning the G-sensor's data contradicts wheel speed sensor data.
Technical definition: The SAE/ISO definition for C2191 is manufacturer-specific. For Toyota/Lexus, it is 'Vehicle Speed Signal Error (Test Mode DTC)', stored when the tire pressure ECU enters test mode without receiving a valid speed signal of at least 12 mph (20 km/h). For European manufacturers, it means 'Longitudinal Acceleration Sensor Plausibility', triggered when the longitudinal G-sensor's reported acceleration is illogical compared to the calculated acceleration from the wheel speed sensors.
Can I Drive With C2191?
Yes, But With Caution. You can drive, but with extreme caution. This code disables the Electronic Stability Program (ESP) and Traction Control (TCS). Without these systems, the risk of losing control during emergency maneuvers or on slippery surfaces increases significantly. Braking distances also extend. Diagnose and repair the vehicle immediately to restore safety functions.
Common Causes
- Faulty Longitudinal Acceleration Sensor (G-Sensor) (Very Common) — This sensor, a core part of the ESP/TCS system, fails internally due to age, vibration, or thermal stress, sending incorrect or erratic data. It is the most frequent cause on European vehicles.
- Faulty Wheel Speed Sensor (Common) — A failing wheel speed sensor provides bad data, making the acceleration sensor's correct signal appear faulty to the control module. This is the most common misdiagnosis point for plausibility codes.
- Damaged or Corroded Wiring/Connectors (Common) — The wiring harness leading to the acceleration sensor or wheel speed sensors can be damaged by road debris or moisture. Corrosion inside the connector is a frequent failure point, especially in winter climates with heavy road salt.
- Faulty ABS/ESP Control Module (Less Common) — The control module that processes sensor data can fail internally. On certain BMW models, this module (RDC) is mounted in a wheel well and is highly susceptible to water intrusion and corrosion.
- CAN Bus Communication Failure (Rare) — The acceleration sensor and wheel speed sensors communicate with the control module over the CAN bus network. A broken wire or a fault in an unrelated module prevents the signal from reaching the ESP module.
- Incorrect Sensor Mounting or Vehicle Modification (Rare) — If the vehicle has had suspension work, was in an accident, or was lowered, the G-sensor might not be mounted securely or at the correct angle, causing inaccurate readings that fail the plausibility check.
- Software Glitch Requiring Module Reflash (Rare) — The logic within the ABS/ESP control module can become corrupted. Manufacturers occasionally issue software updates (reflashes) via Technical Service Bulletins to fix bugs causing false plausibility codes.
Symptoms
- ABS, Traction Control (TCS), or ESP Warning Lights and Messages — The most common indicator. A warning light illuminates, and the dashboard displays messages like 'ESP Inoperative', 'Traction Control Off', or 'Service Stability System'.
- Tire Pressure Monitoring System (TPMS) Fault Message — On makes like Toyota and Ford, a 'Tire Pressure Sensor Fault' message appears, as the system relies on vehicle speed data to function correctly.
- Erratic Stability Control Activation — The stability system incorrectly applies the brakes on a single wheel during turns or acceleration because it receives bad data from a sensor, creating a dangerous driving situation.
- Cruise Control Inoperative — Modern cruise control systems, especially adaptive cruise control, rely on the same sensor data as the stability system. A fault causes the cruise control to become unavailable.
Diagnostic Flowchart
Tap your situation to follow the diagnostic path that matches what you're seeing on this code.
Common Fixes & Costs
- Replace Longitudinal Acceleration Sensor — Parts: $50-$550, Labor: $100-$250, ~1.5 hr book time (Intermediate)
- Replace a Faulty Wheel Speed Sensor — Parts: $35-$250, Labor: $150-$250, ~1.2 hr book time (DIY)
- Repair Damaged Wiring or Connector — Parts: $10-$75, Labor: $150-$400, ~2.5 hr book time (Intermediate)
- Replace ABS/ESP/RDC Control Module — Parts: $600-$2500+, Labor: $200-$500, ~3 hr book time (Professional)
- Perform ABS/ESP Module Software Update (Reflash) — Parts: $0, Labor: $150-$300, ~1.5 hr book time (Professional)
DIY vs Professional
- Replace a Faulty Wheel Speed Sensor 🟢 Beginner
Tools: Jack and jack stands, lug wrench, socket set, torque wrench, penetrating oil. - Replace Longitudinal Acceleration Sensor 🟢 Beginner
Tools: Trim removal tools, socket set, advanced bi-directional scan tool. - Repair Damaged Wiring or Connector 🟢 Beginner
Tools: Soldering iron, heat shrink tubing, wire strippers, multimeter, vehicle-specific connector pins. - Replace ABS/ESP/RDC Control Module 🟢 Beginner
Tools: Socket set, diagnostic scan tool capable of VIN programming and coding.
Used vs. New Parts: Buying Guide
When a used part is worth it: For expensive, combined sensor units (like a Mercedes Yaw/Longitudinal sensor) on an older, high-mileage vehicle, a used part from a reputable seller with a warranty is a cost-effective option. Avoid used parts for simple wheel speed sensors where new aftermarket options are affordable.
Donor-vehicle mileage cap: roughly under 100000 miles for the part to have meaningful remaining life.
Donor quality checklist:
- Verify the exact part number matches; superseded parts may not be compatible.
- Purchase from a seller that offers at least a 30-90 day warranty.
- Check photos for signs of corrosion or physical damage.
- For BMW RDC modules, avoid parts from donors in rust-belt or high-humidity climates due to the risk of water damage.
Decision logic:
- If The part is a simple wheel speed sensor → Buy a new aftermarket part from a reputable brand (e.g., Bosch, Denso, NTK). The cost savings of used is minimal and not worth the risk.
- If The part is an expensive G-Sensor/Yaw sensor assembly (> $400 new) → A used part from a low-mileage donor is a reasonable choice, provided it has a warranty.
- If The part is a control module (ABS, RDC, etc.) → Favor having your original module rebuilt to avoid programming issues. If buying used, confirm you have a way to code it to your vehicle's VIN before purchasing.
Warranty tradeoff: Used parts typically have a 30-90 day functional warranty. New aftermarket parts often carry a 1-year to limited lifetime warranty. New OEM parts have a 1-2 year warranty.
Worst-case if a used part fails: $300-$800 if a used electronic module or sensor fails after installation, requiring repeat labor costs plus the price of another replacement part.
What Happens If You Wait — Timeline
- Immediate: Code sets and the ABS/ESP/TCS warning light illuminates. The vehicle's stability and traction control systems are immediately disabled as a fail-safe. (MPG impact: 0%% · Added cost: $0)
- 0-3 months: Driving without ESP/TCS significantly increases the risk of losing control in an emergency maneuver or on slippery surfaces. The chance of an accident is elevated. (MPG impact: 0%% · Added cost: $500 - $25,000+ (potential accident cost))
- 3-12 months: If the root cause is a failing wheel bearing causing a bad speed sensor signal, continued driving destroys the bearing and hub. This escalates a $200 sensor repair into an $800 bearing and hub replacement. (MPG impact: 0-1%% · Added cost: $300 - $600 (from secondary component failure))
- At Next State Inspection: The vehicle fails its annual safety inspection in most states that require one, due to the active ABS/ESP warning light. The vehicle cannot be legally registered or driven until the repair is made. (MPG impact: 0%% · Added cost: $150 - $3000+ (cost of the required repair to pass inspection))
Cost of Not Fixing It
- Immediate: Electronic Stability Program (ESP) and Traction Control (TCS) are disabled. The risk of losing control of the vehicle in an emergency maneuver or on slippery surfaces is significantly increased. (Added cost: N/A)
- Ongoing: Increased risk of a single or multi-vehicle accident. The cost of an accident caused by loss of control ranges from a minor body repair to a total loss of the vehicle. (Added cost: $500 - $50,000+)
- Next Inspection: The vehicle fails its state safety inspection in many jurisdictions due to the illuminated ABS/ESP warning light, preventing legal registration renewal until the fault is repaired. (Added cost: $150 - $3000+)
Diagnosis Steps
- Scan for All Codes
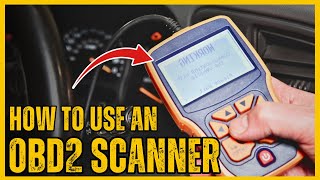
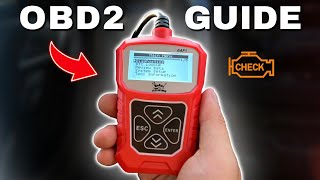
Use an advanced OBD-II scanner capable of reading manufacturer-specific 'C' (Chassis) codes from the ABS/ESP module. Note C2191 and any related codes for wheel speed sensors or module communication. A basic $20 code reader will not see this code.
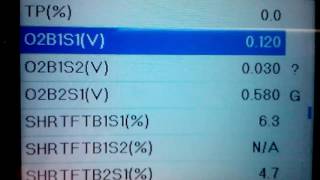
Tools: Advanced OBD-II Scanner (Beginner) - Analyze Live Sensor Data
Use the advanced scanner to view live data from the longitudinal acceleration sensor and all four wheel speed sensors while driving. Confirm all wheel speed sensors report matching speeds. The G-sensor reading should be stable at 0 G on a flat surface and change smoothly during acceleration and braking. Any sensor that is lagging, frozen, or erratic is the source of the fault.
Tools: Advanced OBD-II Scanner (Intermediate) - Visual Inspection of Components and Wiring
Locate the longitudinal acceleration sensor (often under the center console or seats) and the wheel speed sensors. Inspect the sensors and wiring harnesses for visible damage, corrosion, or loose connections. On BMWs, check the RDC module in the rear wheel well for water damage.
Tools: Flashlight, Trim Removal Tools (Intermediate) - Check for Technical Service Bulletins (TSBs)
Search online for TSBs related to code C2191 for your specific vehicle make, model, and year. Manufacturers often release bulletins for known issues, which saves significant diagnostic time.
Tools: Internet Access (Beginner) - Test G-Sensor Circuit with a Multimeter
Disconnect the G-sensor connector. With the ignition on (engine off), use a multimeter to test the circuit. For a typical 3-wire sensor, verify a 5-volt reference wire, a ground wire (less than 100mV), and a signal wire. A missing reference voltage or bad ground points to a wiring or module issue, not a faulty sensor.
Tools: Multimeter, Vehicle Wiring Diagram, Back-probe pins (Advanced) - Perform Sensor Calibration
Many vehicles require the longitudinal acceleration sensor to be calibrated using a diagnostic scan tool after replacement or if the mounting is disturbed. This 'Zero Point Calibration' tells the control module the sensor's baseline reading on a flat surface.
Tools: Advanced OBD-II Scanner (Advanced) - Analyze Sensor Waveform with an Oscilloscope
For intermittent issues, connect an oscilloscope to the G-sensor's signal wire and a wheel speed sensor's signal wire. While an assistant drives, observe the waveforms. A noisy, erratic, or flat-lined signal indicates a faulty sensor or wiring issue that a multimeter misses.
Tools: Oscilloscope, Back-probe connectors (Professional) - Check CAN Bus Resistance
If a communication error is suspected, disconnect the battery. At the DLC, measure the resistance between CAN High and CAN Low pins. A healthy network reads approximately 60 ohms. A reading of 120 ohms indicates a broken wire or unplugged module.
Tools: Multimeter, Vehicle Wiring Diagram (Professional)
When This Code Triggers (Freeze-Frame Conditions)
- Vehicle Speed: 15-45 mph (The fault often sets during dynamic driving, such as turning, accelerating, or braking, where the G-sensor's reading is compared against wheel speed data.)
- Steering Angle: >15 degrees (The plausibility check is most active during cornering, when the ESP module expects to see lateral and longitudinal G-forces that correlate with steering input and wheel speed differentials.)
- Brake Pedal Status: On or Off (The code triggers during braking if the deceleration measured by the G-sensor is not plausible compared to the deceleration calculated from the wheel speed sensors.)
- System Voltage: 11.5-14.5V (Low or fluctuating system voltage causes sensor data errors, leading to a plausibility fault. The freeze frame captures the voltage at the moment of the fault.)
Related Codes
- C1236 — Indicates 'Low Vehicle Speed Signal'. If present with C2191, it strongly suggests the problem is with the vehicle speed signal source (like a wheel sensor) rather than the G-sensor itself.
- C0031 - C0051 — Correspond to specific wheel speed sensor and steering angle sensor circuit faults. A C2191 accompanied by a code like C0031 tells you exactly where to start your diagnosis. Fix the wheel speed sensor issue first.
- P2191 — A powertrain code for 'System Too Lean at Higher Load'. It is completely unrelated to C2191. P2191 indicates an engine fuel/air mixture problem, while C2191 points to chassis systems.
- C2174 — On Toyota/Lexus vehicles, this code for 'Vehicle Speed Signal Malfunction' is a companion to C2191. Seeing C2174 indicates a real-world fault, whereas C2191 alone is just a test mode artifact.
Climate & Environmental Factors
- Cold Weather: Extremely low temperatures alter the electrical resistance of sensors and make wiring insulation brittle, leading to intermittent signals or connection failures.
- Humidity and Moisture: Moisture is the primary catalyst for corrosion on sensor connectors, pins, and circuit boards. This is especially problematic for components in exposed areas, like wheel speed sensors or wheel-well mounted modules.
- Road Salt (Winter Climates): Salt spray dramatically accelerates corrosion of exposed wiring, connectors, and sensor housings. It works its way into non-sealed connectors and causes electrical faults that are difficult to trace.
How to Talk to a Mechanic About This Code
Say this: "My scanner shows code C2191 for a plausibility fault. Please check the live data from all four wheel speed sensors and the G-sensor before recommending any part replacements."
This directs the technician to perform a logical diagnostic test (live data analysis) rather than blindly replacing the most expensive part (the G-sensor), preventing misdiagnosis.
Avoid saying:
- 'My traction control light is on, can you just fix it?'
- 'I have a C2191 code, please replace the acceleration sensor.'
- 'Just do whatever you think is necessary.'
Questions to ask before authorizing the repair:
- Can you show me the live data graph that shows which sensor is failing?
- Did you check for any related codes from the wheel speed sensors?
- If the G-sensor needs to be replaced, does this vehicle require a 'Zero Point Calibration' afterwards, and is that included in the labor quote?
- What is the warranty on the recommended parts and labor?
Where to Take It: Dealer vs Independent vs Chain
- Dealer:
Recommended if module replacement and coding are confirmed, or for complex diagnostics on European vehicles.
Best for: Vehicles under warranty., Complex repairs requiring module programming/coding (e.g., BMW RDC or ABS module replacement)., Manufacturer-specific quirks on German or other European brands.
Downsides: Highest labor rates., May recommend expensive module replacement when a simpler wiring or sensor fix is possible. (Typical cost: +50% vs. baseline) - Independent Shop:
Best fit for most C2191 scenarios, especially for sensor or wiring issues. A brand-specialist indie is ideal.
Best for: Out-of-warranty vehicles., Diagnosing and replacing common failures like G-sensors or wheel speed sensors., Shops specializing in your vehicle's brand (e.g., a German auto specialist) will have the right tools for calibration.
Downsides: Quality and equipment vary; ensure they have an advanced scanner capable of ABS/ESP diagnostics and calibration. (Typical cost: +0% vs. baseline) - Chain Shop:
AVOID for initial diagnosis. Acceptable only for a straightforward wheel speed sensor replacement after a proper diagnosis has been made elsewhere.
Best for: Simple, clear-cut wheel speed sensor replacement if you've already diagnosed the specific corner.
Downsides: Technicians may lack the advanced diagnostic training for plausibility codes., Unlikely to have tools for sensor calibration or module programming., High pressure to upsell may lead to incorrect recommendations. (Typical cost: -10% vs. baseline)
When to Walk Away From the Repair
If the estimated repair cost exceeds 40% of the car's private-party value, seriously consider selling the car as-is or trading it in.
- Car worth $4500, fix is $850: Fix it. The repair cost is well below the 40% threshold and restores a critical safety system.
- Car worth $2200, fix is $1800: Walk away. A repair cost this high (over 80% of the car's value) for a single issue is not a sound investment. The money is better put toward a replacement vehicle.
What Scan Tool You Need for This Code
Minimum: A scanner that can read and clear manufacturer-specific Chassis (ABS, ESP, SRS) codes and display live data from those modules.
A basic $20 engine code reader cannot see 'C' codes like C2191. You need a tool that accesses the ABS/ESP control module to even know the code exists, and live data is essential to distinguish between a bad G-sensor and a bad wheel speed sensor.
Budget: BlueDriver Pro (~$120) — Reads and clears enhanced codes (ABS/ESP) for most major brands. It displays live data from wheel speed sensors and other chassis sensors, which is crucial for diagnosing a plausibility fault.
Mid-range: Foxwell NT510 Elite (~$180) — Comes with one free manufacturer-specific software package that provides OE-level diagnostics. It performs bi-directional controls and special functions like the 'Zero Point Calibration' required for G-sensors on many Toyota, Audi, and VW models.
Professional: Autel MaxiCOM MK808S (~$450) — Offers full-system diagnostics, bi-directional control, and over 30 service functions for a huge range of vehicles. It easily performs ABS diagnostics, sensor calibrations, and module adaptations, making it a powerful tool for tracing complex electrical issues.
Rent vs buy: For a one-time diagnosis, auto parts stores like AutoZone scan for ABS codes for free. However, they cannot perform calibrations. If your vehicle (especially Audi/VW/Toyota) requires calibration after a sensor replacement, buying a mid-range tool like the Foxwell NT510 Elite is cheaper than a single trip to the dealer.
How to Clear the Code After You Fix It
- Fix the underlying mechanical or electrical fault.
- Use an advanced OBD-II scan tool to clear the code from the ABS/ESP module.
- If a sensor was replaced, perform any required calibration (e.g., 'Zero Point Calibration').
- Perform a test drive that includes turns, acceleration, and braking to confirm the light does not return.
Drive cycle (~15 minutes): For non-Toyota models, after clearing the code, a 15-minute drive including city and highway speeds with several turns confirms the fix. For Toyota/Lexus, the C2191 'test mode' code clears automatically after driving above 12 mph (20 km/h) for a few seconds. A full emissions drive cycle is not required.
Readiness monitors affected: None
Watch out for:
- Using a basic OBD-II reader that cannot access or clear codes from the chassis (ABS/ESP) control module.
- Forgetting to perform a mandatory sensor calibration after replacement, causing the light to return immediately.
- On Toyota/Lexus, mistaking the normal 'test mode' C2191 for a real fault.
Will This Fail Emissions / State Inspection?
Yes — this code typically fails an OBD-II emissions inspection.
- California: An ABS/ESP light is not an automatic failure for the emissions (smog) test, but the inspector will fail the vehicle on a separate safety check. Official BAR guidance states only the Check Engine Light fails the OBD test.
- New York: An illuminated ABS or ESP warning light causes an automatic failure during the annual safety inspection. The vehicle cannot pass until the light is off.
- Texas: An illuminated ABS lamp does not cause rejection during the safety inspection, but a lit 'Brake' warning light will fail.
Most Commonly Affected Vehicles
- Toyota Corolla (2009-2013) — This code appears as a 'Vehicle Speed Signal Error' in the TPMS module during test mode. It is not a fault code in normal operation.
- Lexus RX350 / CT200h (2010-2015) — Similar to Toyota, C2191 is a Test Mode DTC for the TPMS, indicating a check for a vehicle speed signal. Ignore it if no other codes are present.
- Mercedes-Benz E-Class (W211), C-Class (W203) (2003-2009) — Prone to failures of the yaw rate / longitudinal acceleration sensor, which is part of the ESP system. The combined sensor is often located under the center console.
- Audi / Volkswagen A3, TT, Jetta, GTI (2000-2008) — These models experience faults with the G251 (Longitudinal Acceleration Sensor), leading to ESP warning lights. A 'Basic Setting' calibration using VCDS is mandatory after replacement.
- Ford Explorer, F-150, Kuga (2005-2014) — These vehicles have known issues with the TPMS module losing communication or receiving faulty speed data, causing a 'Tire Pressure Sensor Fault' warning.
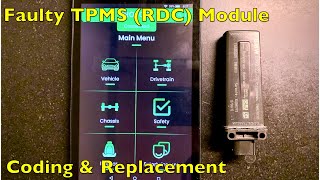
- BMW 3-Series (E9x), X3 (F25), X5 (E70) (2006-2017) — A TPMS malfunction is often caused by a failed RDC module. For E9x models, it is located in the rear passenger-side wheel well and is prone to water damage.
- Chevrolet Silverado (2008-2020) — TPMS issues are frequent, often stemming from sensor battery failure or issues during tire rotation that are resolved with a TPMS relearn tool.
- Subaru Outback, Legacy, Forester (2015-2021) — Subaru issued TSB 06-87-22R for an issue where a cracked Electronic Parking Brake (EPB) connector lock tab causes EPB warnings and triggers chassis codes.
Manufacturer-Specific Notes
- Toyota / Lexus: Code C2191 is specifically a 'Test Mode DTC'. It only sets when a technician puts the TPMS system into a diagnostic check mode and clears automatically after the vehicle is driven over 12 mph (20 km/h).
- Mercedes-Benz: The yaw rate sensor and the longitudinal acceleration sensor are combined into a single, expensive unit. A failure in one aspect requires replacing the entire assembly, typically located under the driver's seat.
- BMW: The TPMS control module (RDC) is frequently located in the rear passenger-side wheel well. Its location makes it highly susceptible to water intrusion from clogged body drains, leading to a total loss of communication.
- Subaru: TSB 06-87-22R addresses issues where hitting a bump causes multiple warning lights due to a cracked connector lock tab on the EPB actuator. The warranty on this specific part is extended to 15 years/unlimited miles.
- Audi / Volkswagen: After replacing the G251 longitudinal acceleration sensor, a 'Basic Setting' calibration must be performed using a compatible scan tool on a perfectly level surface. Failure to calibrate results in the ESP light returning immediately.
Real Owner Stories
2008 Audi A3 Quattro at 110K miles
ESP light came on intermittently at first, then stayed on permanently. No other symptoms were noticed during driving.
What they tried:
- Scanned with VCDS and found code for 'G251 Longitudinal Acceleration Sensor - Implausible Signal'.
- Attempted a 'Basic Setting' calibration with VCDS, but the fault returned immediately.
- Replaced the G251 sensor located under the steering column.
- Performed the Basic Setting calibration again on a level surface.
Outcome: Replacing the sensor and performing the calibration successfully cleared the code and turned off the ESP light.
Lesson: For Audi/VW, a G251 fault almost always requires both replacement and a 'Basic Setting' calibration with a tool like VCDS. Simply swapping the part is not enough.
2007 BMW E90 3-Series with 125K miles
TPMS warning light came on and would not reset. Tire pressures were correct, and a tire shop confirmed all wheel sensors were transmitting.
What they tried:
- Replaced the 5-amp TPMS fuse, which was blown. The light returned after 10 minutes of driving.
- Visually inspected the RDC module in the passenger-side rear wheel well and found significant corrosion from water damage.
- Replaced the RDC module with a used one from a junkyard, but the light remained on.
- Took the car to a shop that confirmed the used module needed to be coded to the car's VIN.
Outcome: After the independent shop coded the used RDC module to the vehicle for a one-hour labor charge, the TPMS system began working correctly and the light stayed off.
Lesson: On BMWs, a TPMS fault is very often the RDC module in the wheel well failing due to water damage. Replacing it requires VIN coding, so buying a used part only makes sense if you have a way to get it programmed.
2010 Toyota Tacoma after DIY work
After using a new scan tool to explore vehicle systems, the TPMS light began flashing rapidly and would not stop. No actual tire pressure issues were present.
What they tried:
- Driving the vehicle, which normally clears test mode, did not work.
- Attempting to use a TPMS tool to relearn sensors failed because the ECU was stuck.
- Jumping the TC and CG pins on the OBD-II port slowed the flashing but didn't solve the problem.
Outcome: The owner purchased a Toyota-specific Techstream cable and software. Using Techstream, they accessed the TPMS module, saw its status was 'Test Mode', and forced it back to 'Normal Mode', which immediately turned off the light.
Lesson: On Toyota/Lexus, C2191 is a 'Test Mode' code. It is possible to accidentally put the system into this mode with a scan tool, and sometimes only the dealer-level Techstream software can exit the mode if it gets stuck.
2005 Mercedes-Benz E320 (W211) at 150K miles
ESP, ABS, and brake warning lights all came on. Cruise control stopped working.
What they tried:
- An advanced scanner pulled a code pointing to the right rear wheel speed sensor.
- The shop replaced the right rear wheel speed sensor, but the lights came back on.
- Further diagnosis revealed the actual problem was a rusted and damaged ABS tone ring on the rear axle shaft, which was providing an implausible signal.
Outcome: The entire rear axle shaft had to be replaced because the rust was too severe to just replace the ring. After replacement, the codes were cleared and did not return.
Lesson: A wheel speed sensor 'implausible signal' fault isn't always the sensor itself. It can be the tone ring it reads from, which can be damaged by rust or a failing wheel bearing. This is a common point of misdiagnosis.
How to Prevent This Code From Triggering
- Apply Dielectric Grease to Exposed Connectors (Every 1-2 years or during brake service) — Applying a thin layer of non-conductive dielectric grease to the seals of connectors for wheel speed sensors and other underbody components helps block moisture and road salt from causing corrosion on the pins.
- Regularly Clean Wheel Wells and Undercarriage (Seasonally, especially after winter) — Washing away built-up road salt, mud, and debris prevents these corrosive materials from sitting on sensors, wiring, and connectors, reducing the risk of corrosion-related failures.
- Inspect and Clear Body Drains (Annually, especially in the fall) — On vehicles like BMWs where modules are placed in wheel wells or trunk cavities, clogged sunroof or body drains cause water to overflow and saturate the electronics. Keeping these drains clear prevents this common cause of module failure.
- Consider an Oil-Based Undercoating in Salt-Belt Regions (Annually before winter) — Products like Fluid Film or Krown create a protective, self-healing barrier over the underbody, shielding electrical connectors and sensor housings from direct salt spray and moisture, significantly slowing corrosion.
Frequently Asked Questions
What is a Longitudinal Acceleration Sensor?
It is a small sensor, also called a G-sensor, that measures your car's forward and backward motion. It is a key part of your Electronic Stability Program (ESP) and Traction Control System (TCS), helping the car detect if it is skidding.
Can I replace the acceleration sensor myself?
For many vehicles, yes, as it is often located under the center console and held in by a few bolts. However, European cars like Audi and VW require the new sensor to be calibrated with a professional scan tool after installation. This 'Zero Point Calibration' is crucial for the ESP system to function.
Why did my traction control light turn on with this code?
The traction and stability control systems need accurate data on acceleration to work. When the computer gets a signal from the G-sensor that it cannot trust, it turns the system off as a safety precaution and illuminates the warning light.
Is C2191 the same as P2191?
No, they are completely different. C2191 is a manufacturer-specific Chassis code, usually for stability or tire pressure systems. P2191 is a standardized Powertrain code for a 'System Too Lean at Higher Load' condition in the engine.
A mechanic said the code only appears in 'test mode'. What does that mean?
On Toyota and Lexus vehicles, C2191 is designed to appear when the Tire Pressure Monitoring System is put into a special diagnostic mode. It is used to confirm the system is ready for a test and is not a sign of a real-world problem. The code automatically clears after driving over 12 mph.
What is a common misdiagnosis for C2191?
A common mistake is replacing the G-sensor when a faulty wheel speed sensor is the actual culprit. Because C2191 is a 'plausibility' code, bad data from one wheel speed sensor makes a perfectly good G-sensor appear faulty. Always verify live data from all wheel speed sensors before replacing the G-sensor.
I replaced the sensor, cleared the codes, but the light came back. What now?
First, verify if the new sensor required a 'Zero Point Calibration' with a scan tool. Second, re-inspect the wiring and connector for hidden corrosion. Third, consider a more complex issue like a failing ABS/ESP control module or a CAN bus communication problem.
Where is the longitudinal acceleration sensor located?
The location varies by vehicle. Common locations include under the center console, beneath the driver or passenger seat, or integrated into the ABS/ESP module itself. On many Mercedes-Benz and BMW models, it is part of a sensor cluster in the center of the vehicle.
Key Takeaways
- Verify your vehicle's manufacturer before diagnosing C2191, as it means 'Test Mode Active' on a Toyota but indicates a critical 'G-Sensor Plausibility' failure on a Mercedes or Audi.
- Expect disabled Electronic Stability Program (ESP) and Traction Control systems on European vehicles, requiring immediate repair to restore safe emergency handling.
- Ignore C2191 on Toyota and Lexus models if it appears alone; it is a normal test-mode artifact that clears automatically after driving above 12 mph.
- Analyze live data from all 4 wheel speed sensors and the G-sensor simultaneously using an advanced OBD-II scanner to pinpoint the exact failing component.
- Perform a mandatory 'Zero Point Calibration' with a bi-directional scan tool after replacing a G-sensor on Audi or VW models to permanently clear the dashboard warning lights.
Helpful Videos


Shop the Parts Behind C2191
Below are the parts most often responsible for code C2191, ranked by how frequently each one is the actual culprit (per the diagnosis above). Tap any to see what we have for your vehicle.


The information in this article is provided for general reference and educational purposes only. Vehicle specifications, procedures, and part compatibility can vary by production date, trim level, and region. Always consult your vehicle's factory service manual and verify part numbers before purchasing or performing repairs. Safety-critical components such as airbags, seat belts, and braking systems should be installed by a qualified professional.
- 🧭 Diagnostic Flowchart
- 🎬 Helpful Videos
- 🛍️ Shop This Part
- What Does C2191 Mean?
- Can I Drive With C2191?
- Common Causes
- Symptoms
- Common Fixes & Costs
- DIY vs Professional
- Used vs. New Parts: Buying Guide
- What Happens If You Wait — Timeline
- Cost of Not Fixing It
- Diagnosis Steps
- When This Code Triggers (Freeze-Frame Conditions)
- Related Codes
- Climate & Environmental Factors
- How to Talk to a Mechanic About This Code
- Where to Take It: Dealer vs Independent vs Chain
- When to Walk Away From the Repair
- What Scan Tool You Need for This Code
- How to Clear the Code After You Fix It
- Will This Fail Emissions / State Inspection?
- Most Commonly Affected Vehicles
- Manufacturer-Specific Notes
- Real Owner Stories
- 2008 Audi A3 Quattro at 110K miles
- 2007 BMW E90 3-Series with 125K miles
- 2010 Toyota Tacoma after DIY work
- 2005 Mercedes-Benz E320 (W211) at 150K miles
- How to Prevent This Code From Triggering
- Frequently Asked Questions
- What is a Longitudinal Acceleration Sensor?
- Can I replace the acceleration sensor myself?
- Why did my traction control light turn on with this code?
- Is C2191 the same as P2191?
- A mechanic said the code only appears in 'test mode'. What does that mean?
- What is a common misdiagnosis for C2191?
- I replaced the sensor, cleared the codes, but the light came back. What now?
- Where is the longitudinal acceleration sensor located?
- Key Takeaways
- 🎟️ Get 5% Off