
OBD-II Code C3136: Air Suspension Reservoir Pressure Sensor Circuit
What C3136 means, why it triggers, and how to fix it
- Code C3136 indicates a malfunction in the air suspension reservoir pressure sensor circuit, primarily affecting 2005-2016 Land Rover and Jaguar models.
- A failing air compressor or a leaking air spring causes this code 80% of the time, rather than a faulty pressure sensor.
- Driving with an active C3136 code forces the compressor to overwork, turning a $350 air leak repair into a $2,000 compressor replacement.
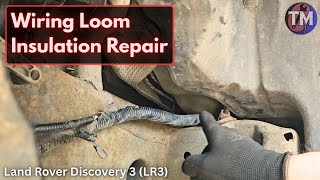
- On Land Rover LR3 and Discovery 3 models, inspect the passenger-side floor wiring harness for water corrosion before replacing any suspension parts.
- Always test the $20 compressor relay (part YWB500220) and the 60A fusible link before authorizing a costly compressor replacement.
What Does C3136 Mean?
Trouble code C3136 indicates the air suspension control module detects an electrical circuit problem with the reservoir pressure sensor. This sensor monitors air pressure in the storage tank. When this code triggers, the computer rejects the pressure reading, shuts down the air suspension system, and displays a 'SUSPENSION FAULT' warning.
Technical definition: C3136 is a manufacturer-specific code for Jaguar Land Rover (JLR) defined as 'Air Suspension Reservoir Pressure Sensor Circuit Malfunction'. It triggers when the sensor's voltage signal falls outside the expected 0.5V to 4.5V range. This indicates an open circuit, a short to ground or power, or an intermittent electrical fault. The system logs this fault when it loses reliable pressure data from the storage reservoir.
Can I Drive With C3136?
Yes, But With Caution. Yes, but your air suspension is disabled. The vehicle locks at a low 'access' height, providing a harsh ride, reduced ground clearance, and poor handling. Drive cautiously for short distances to a repair shop only. Continued driving with a leak destroys the air compressor, turning a $400 air spring repair into a $2,200 compressor replacement. Severe height imbalances degrade braking and handling, increasing safety risks.
Common Causes
- Failing Air Suspension Compressor (Very Common) — The compressor is a mechanical pump with a piston seal that wears out over time. As it weakens, it fails to build pressure fast enough, leading to pressure-related faults. A worn-out compressor is the single most frequent cause of air suspension problems. 🎬 Watch: Step-by-step guide to replacing a failing air compressor.
- Failed Compressor Relay or Fusible Link (Common) — The compressor is controlled by a 70A relay and protected by a 60A fusible link. The relay sticks in the 'on' position, burning out the compressor, or fails to activate entirely. A blown fusible link cuts all power. Check this cheap part before replacing the compressor.
- Leaking Air Springs or Struts (Common) — The rubber air bags at each corner develop microscopic cracks with age. These leaks force the compressor to run constantly to maintain ride height, eventually burning it out and triggering C3136.
- Faulty Reservoir/Center Valve Block (Common) — The pressure sensor is integrated into the reservoir valve block. This block fails internally, develops leaks, or the sensor itself dies, sending incorrect data to the control module.
- Corroded Passenger Sill Wiring (LR3/Discovery 3) (Less Common) — On Land Rover LR3 models, the suspension wiring harness runs along the passenger side floor sill. Water leaks from clogged sunroof drains cause wires to corrode and break, interrupting the sensor signal.
- Clogged Air Dryer or Exhaust Filter (Less Common) — The air dryer contains desiccant beads that break down into a fine white powder over time. This dust clogs valve blocks and the compressor's exhaust filter, preventing proper venting and causing pressure sensor errors.
- Faulty Ride Level Control Module (RLCM) (Rare) — The suspension control module itself fails due to internal software glitches, power supply issues, or circuit board failure, causing it to misinterpret sensor data.
Symptoms
- 'Suspension Fault' Warning on Dash — An amber warning light or 'SUSPENSION FAULT' message appears on the instrument cluster. The vehicle also displays 'NORMAL HEIGHT ONLY'.
- Vehicle Sagging or Uneven — One or more corners of the vehicle sit lower than the others, especially after parking overnight. This is a definitive sign of an air leak.
- Vehicle Stuck at Access Height (Harsh Ride) — The system defaults to its lowest setting and refuses to raise. The ride quality degrades significantly, feeling rough over bumps with sloppy handling.
- Compressor Not Running or Runs Constantly — The control module stops commanding the compressor to prevent damage, or the compressor runs continuously trying to compensate for a leak.
Diagnostic Flowchart
Tap your situation to follow the diagnostic path that matches what you're seeing on this code.
Common Fixes & Costs
- Replace Air Suspension Compressor Relay — Parts: $15-$50, Labor: $10-$50, ~0.1 hr book time (Beginner)
- Replace Air Suspension Compressor Assembly — Parts: $450-$2100, Labor: $200-$400, ~2.0 hr book time (Intermediate)
- Replace Leaking Air Spring/Strut — Parts: $350-$1700, Labor: $250-$750, ~2.5 hr book time (Intermediate)
- Replace Reservoir or Center Valve Block — Parts: $300-$600, Labor: $150-$250, ~1.2 hr book time (Intermediate)
- Repair Corroded Wiring Harness — Parts: $20-$100, Labor: $300-$1000, ~4.0 hr book time (Professional)
DIY vs Professional
- Replace Air Suspension Compressor Relay 🟢 Beginner
Tools: None or a small fuse puller. - Replace Leaking Air Spring/Strut 🟢 Beginner
Tools: Jack, jack stands, torque wrench, basic socket set, specialized strut nut tool, advanced scan tool. - Replace Air Suspension Compressor Assembly 🟢 Beginner
Tools: Jack, jack stands, socket set, trim removal tools. - Replace Reservoir or Center Valve Block 🟢 Beginner
Tools: Jack, jack stands, socket set, line wrenches. - Repair Corroded Wiring Harness 🟢 Beginner
Tools: Multimeter, wire strippers, soldering iron, heat shrink, trim removal tools.
Used vs. New Parts: Buying Guide
When a used part is worth it: A used OEM air compressor from a low-mileage vehicle is a cost-effective option. Do not buy used air springs, as the rubber degrades with age regardless of mileage.
Donor-vehicle mileage cap: roughly under 60000 miles for the part to have meaningful remaining life.
Donor quality checklist:
- Verify the donor vehicle's mileage and ensure it wasn't scrapped due to suspension failure.
- Match the part number exactly. Confirm if it is a Hitachi or AMK unit.
- Inspect for corrosion around electrical connectors and air line fittings.
Decision logic:
- If The part is a wear item like a compressor or air spring AND the vehicle is a long-term keeper → Buy new OEM or a high-quality aftermarket unit for maximum longevity and warranty.
- If Budget is the primary concern and the vehicle is older → A used OEM compressor from a verified low-mileage source is a viable risk. Avoid cheap, no-name new parts from online marketplaces.
- If The failed part is an electronic module or valve block → Used is a good value, as these parts have lower wear rates than mechanical compressors.
Warranty tradeoff: Used parts from a salvage yard typically offer a 30-90 day warranty. Aftermarket new parts often come with a 1-year to limited lifetime warranty. New OEM parts usually have a 1-2 year warranty.
Worst-case if a used part fails: $400-800 if a used or cheap new compressor fails prematurely, requiring repeat labor costs plus the price of another replacement part.
What Happens If You Wait — Timeline
- 0-1 month: An intermittent 'Suspension Fault' light appears, often after startup or in cold weather, but clears on its own. The vehicle's height seems mostly normal. This is an early electrical glitch or a very minor leak. (MPG impact: 0%% · Added cost: $0)
- 1-4 months: The fault becomes persistent. If caused by a leak, one corner sags slightly overnight, but re-inflates on startup. The compressor runs more frequently to compensate, causing increased wear. (MPG impact: 0-1%% · Added cost: $50)
- 4-8 months: The compressor is audibly overworked and sounds louder. The vehicle sags significantly overnight. The system locks into 'Normal Height Only'. The compressor piston seal is heavily worn, and the motor is at risk of overheating. (MPG impact: 1-2%% · Added cost: $500-$2200)
- 8+ months: The compressor fails completely. It won't run at all or runs without building pressure. The vehicle is stuck on its bump stops, providing a harsh and unsafe ride. The failed compressor blows the main 60A fuse. (MPG impact: N/A% · Added cost: $800-$3000+)
Cost of Not Fixing It
- 0-1 month: A persistent 'Suspension Fault' warning and a disabled suspension system. The vehicle is stuck at a low height, resulting in a harsh ride and reduced ground clearance. (Added cost: Negligible)
- 1-6 months: If the fault is due to an air leak, the compressor runs continuously to compensate, leading to overheating and complete failure. This turns a leak repair into a mandatory compressor replacement. (Added cost: $500-$2200)
- 6+ months: Continued driving on sagging suspension causes accelerated tire wear, places stress on bushings and ball joints, and negatively impacts braking and handling, creating a safety risk. (Added cost: $300-$1500+)
Diagnosis Steps
- Read All Fault Codes
Use a scanner capable of reading manufacturer-specific 'C' (Chassis) codes. Note all codes from the Ride Level Control Module (RLCM). Code C1A20 (Pressure increases too slow) confirms a weak compressor or leak.
Tools: Advanced OBD-II Scanner (JLR SDD, GAP IID Tool, etc.) (Beginner) - Test Compressor Relay and Fusible Link
Locate the 70A air suspension relay (part YWB500220) in the engine bay fuse box and the main 60A fusible link. Swap the relay with an identical one from a non-critical system (like the horn). Check the fusible link for continuity.
Tools: Fuse Puller, Multimeter (Beginner) - Perform Visual and Auditory Inspection
With the vehicle running, listen for hissing sounds from any corner or the compressor area. Park on level ground, measure the height from wheel center to fender on all four corners, and check again overnight to confirm leaks.
Tools: Tape Measure, Flashlight (Beginner) - Test for Leaks with Soapy Water
If a corner sags, spray the air spring and air line connections with soapy water. Bubbles pinpoint the exact location of the leak.
Tools: Spray Bottle, Soapy Water (Beginner) - Inspect Compressor and Reservoir Area
Visually inspect the air compressor and reservoir valve block. Look for corrosion, physical damage, loose connectors, or white dust residue indicating desiccant contamination.
Tools: Flashlight, Jack and Jack Stands (Intermediate) - Inspect Passenger Sill Wiring Harness (LR3/Discovery 3)
Pull back the passenger side floor carpet and sill plates. Inspect the large wiring loom for water damage, green corrosion on connectors, or broken wires, especially the twisted pair for the CAN bus.
Tools: Trim Removal Tools, Flashlight (Intermediate) - Live Data Pressure Sensor Plausibility Check
Monitor the live data PID for 'Reservoir Pressure'. A healthy compressor raises pressure to 146 PSI. If the reading is stuck at 0 PSI despite the compressor running, it confirms a sensor circuit issue.
Tools: Advanced OBD-II Scanner (Advanced) - Check Sensor Voltage and Wiring Continuity
Back-probe the reservoir pressure sensor connector. Pin 1 is 5V reference, Pin 2 is ground, and Pin 3 is signal. The signal voltage varies between 0.5V (0 PSI) and 4.5V (200 PSI). A static voltage indicates a faulty sensor or circuit.
Tools: Multimeter, Wiring Diagram, Back-probe Kit (Advanced)
When This Code Triggers (Freeze-Frame Conditions)
- System State: Active/Running (Fault logs when the system actively tries to change or maintain pressure, such as vehicle startup or compensating for load.)
- Reservoir Pressure Reading: Implausible/Static (Triggers when the sensor reports a voltage out of its expected range (e.g., 0V or 5V) or a value that doesn't change when the compressor runs.)
- Compressor Status: Commanded On (Occurs when the control module commands the compressor to run, but the pressure sensor reading does not increase as expected.)
- Battery Voltage: 11.5V - 14.5V (Low system voltage during startup causes the suspension ECU to glitch and set false codes.)
Related Codes
- C1A20 — Means 'Pressure increases too slow'. It points directly to a weak compressor or a significant leak. If present with C3136, the root cause is mechanical, not electrical.
- C1131 — Means 'Air Supply Malfunction'. Triggered when the compressor fails to run at all due to a bad relay or motor failure.
- C1A13 — Means 'Pressure does not decrease when venting'. Points to a clogged compressor exhaust filter or a stuck exhaust valve. Trapped pressure causes abnormal readings that falsely trigger C3136.
- C1A27 — Means 'Compressor Circuit'. Indicates a general electrical failure in the compressor's power circuit, pointing to a faulty relay or blown 60A fusible link.
Climate & Environmental Factors
- Cold Weather: Cold temperatures contract the air inside the springs, causing a drop in pressure and ride height. Moisture within the system freezes and blocks air lines or valves. Rubber components become stiffer, increasing the risk of cracking and leaks.
- High Humidity: Humid environments introduce more moisture into the system. This overwhelms the air dryer's desiccant material, leading to accelerated breakdown and allowing moisture to pass into the system, causing internal corrosion.
- High Altitude: At higher altitudes, ambient air pressure is lower. The compressor works harder to achieve the target pressure, leading to increased wear and a shorter lifespan.
How to Talk to a Mechanic About This Code
Say this: "I have a Land Rover with a C3136 suspension fault code and a 'Suspension Fault' message on the dash. I want to schedule a diagnostic appointment to determine the root cause, whether it's a weak compressor, an air leak, or an electrical issue, before replacing any parts."
This signals that you understand the code is for a circuit malfunction and that the sensor itself is rarely the true cause. It directs the mechanic to perform a comprehensive diagnosis rather than just replacing the first part indicated by the code.
Avoid saying:
- 'My air suspension is broken, can you fix it?'
- 'The code says it's a pressure sensor, just replace that.'
- 'Just do whatever it takes to get the light off.'
Questions to ask before authorizing the repair:
- What was the result of the compressor performance test? How long does it take to fill the reservoir?
- Did you perform a leak-down test or a soapy water test to rule out air leaks? If so, where?
- If you suspect a wiring issue, have you checked the harness in the passenger sill for corrosion?
- Can you provide me with the live data readings for the reservoir pressure sensor?
- What is the warranty on the proposed parts and labor?
Where to Take It: Dealer vs Independent vs Chain
- Dealer:
Best for: Vehicles still under warranty, Complex software updates (like after an AMK compressor upgrade), Recall-related work
Downsides: Highest labor rates, typically 1.5-2x more than independent shops., Often recommends replacing entire assemblies instead of smaller failed components. (Typical cost: +75% vs. baseline) - Independent Shop:
Highly Recommended. An independent Land Rover specialist is the best choice for this repair. They possess the necessary brand-specific knowledge and diagnostic tools to accurately pinpoint the common causes at a much more reasonable cost than a dealership.
Best for: Out-of-warranty vehicles where cost is a major factor., Shops that specialize specifically in Land Rover or European vehicles., Building a long-term relationship with a trusted mechanic.
Downsides: Quality and expertise vary significantly; vetting is crucial., May not have immediate access to the very latest dealer-only software or tools. (Typical cost: +0% vs. baseline) - Chain Shop:
Not Recommended. Avoid chain shops for this type of repair. They are ill-equipped to handle the nuances of a C3136 code, which requires deep system knowledge and specific diagnostic tools.
Best for: Simple, non-specialized repairs like tires, brakes, or oil changes.
Downsides: Generally lack the specialized diagnostic equipment and expertise for complex, brand-specific systems like Land Rover air suspension., High risk of misdiagnosis, leading to unnecessary and expensive parts replacement. (Typical cost: -10% vs. baseline)
When to Walk Away From the Repair
If the total estimated repair cost for the air suspension system exceeds 50% of the vehicle's current private-party value, it is time to seriously consider selling the vehicle as-is or trading it in.
- Car worth $5500, fix is $2800: Walk away. The repair cost is at the 50% threshold. A single major repair of this magnitude on an older, high-maintenance vehicle is often just the beginning.
- Car worth $12000, fix is $750: Fix it. The repair is a small fraction of the vehicle's value and restores a key feature.
- Car worth $4000, fix is $800: Borderline. This is a significant percentage of the car's value. Get a second opinion to confirm the diagnosis and consider if the rest of the vehicle is in excellent condition before proceeding.
What Scan Tool You Need for This Code
Minimum: A scanner that reads and clears manufacturer-specific Chassis ('C') codes for Jaguar Land Rover vehicles. It must access the Ride Level Control Module (RLCM).
A generic $20 OBD-II reader will NOT see 'C' codes like C3136. It only reads generic 'P' (Powertrain) codes, leaving you completely blind to the actual suspension fault.
Budget: Autel AP200 (~$70) — This Bluetooth dongle pairs with your smartphone. It reads and clears JLR-specific codes from all modules, including suspension, and views live sensor data.
Mid-range: iCarsoft LR V3.0 or Foxwell NT530 (with JLR software) (~$190) — These handheld units provide deep access to JLR systems. They read/clear codes, graph live data, and perform bi-directional tests, such as activating the compressor to test its function.
Professional: GAP IIDTool BT (~$550-700) — Considered the gold standard by Land Rover enthusiasts. It allows you to read/clear faults, view live pressure data, manually control individual air springs, and perform system calibrations after a repair.
Rent vs buy: Auto parts stores do NOT rent scanners with the required JLR-specific capabilities. Buying a capable scanner is a wise investment that pays for itself by avoiding a single diagnostic fee at a shop.
How to Clear the Code After You Fix It
- Fix the underlying mechanical or electrical fault.
- Use a compatible OBD-II scan tool capable of reading 'C' (Chassis) codes to clear the fault from the Ride Level Control Module.
- With the engine running, cycle the suspension through all height settings to confirm functionality.
Drive cycle (~15 minutes): A specific drive cycle is not required. After clearing the code, a 15-minute test drive with several stops and starts verifies the fix. A software calibration is required after replacing the compressor or a height sensor.
Readiness monitors affected: Not applicable. Readiness monitors relate to emissions systems, not chassis systems.
Watch out for:
- Using a basic code reader that cannot access or clear chassis codes.
- Clearing the code without fixing the root cause, causing the code to return quickly.
- Forgetting to perform a ride height calibration with a proper scan tool after replacing sensors or the compressor.
Will This Fail Emissions / State Inspection?
Yes — this code typically fails an OBD-II emissions inspection.
- California: An illuminated warning light related to a primary vehicle operational system causes an inspection failure. The 'Suspension Fault' message fails the visual portion.
- New York: The NYS vehicle safety inspection includes checking for the proper operation of warning lights. A persistent 'Suspension Fault' light is grounds for failure.
- Texas: In counties requiring safety inspections, the suspension is checked. The resulting symptoms (uneven height) or the illuminated warning light causes the vehicle to fail the safety inspection.
Most Commonly Affected Vehicles
- Land Rover Discovery 3 / LR3 (2005-2009) — Highly prone to C3136. Primary causes are failure of the original Hitachi compressor and water ingress corroding the main wiring harness in the passenger sill.
- Land Rover Range Rover Sport (2006-2013) — Pre-2010 models used a Hitachi compressor, while 2010-2013 models switched to a more reliable AMK unit. Swapping types requires a software update.
- Land Rover Discovery 4 / LR4 (2010-2016) — Uses the more reliable AMK compressor from the factory. Still suffers from compressor wear and air spring leaks over time.
- Land Rover Range Rover (L322) (2006-2012) — Uses a similar Wabco or AMK compressor setup and experiences identical pressure-related faults.
- Jaguar XJ (X350/X358) (2003-2009) — Suffers from compressor failure and leaks. Logs C3136 or related plausibility codes like C2302 and C2303.
- Porsche Cayenne (9PA / 955/957) (2003-2010) — Uses a similar air suspension architecture. Logs a nearly identical fault under code '1772 - Pressure Sensor Signal'.
- Audi Q7 (4L) (2007-2015) — Shares its platform with the Porsche Cayenne. Experiences the same air suspension issues, logging codes like '01772'.
Manufacturer-Specific Notes
- Jaguar Land Rover: This code is almost exclusive to JLR. The most significant quirk is the high failure rate due to wiring corrosion in the passenger floor area of the Discovery 3/LR3. Upgrading early models from the original Hitachi compressor to the newer AMK style requires a mandatory ECU software update.
- VAG (Audi/Porsche/VW): These brands log the same fault under code '01772'. A common misdiagnosis is replacing the valve block when the actual cause is a weak compressor that only builds 7-8 bar of pressure instead of the required 14-16 bar.
- Ford / Lincoln: Ford SUVs use different codes (C1725/C1726). A frequent quirk is the plastic linkage arms for the height sensors becoming brittle and popping off the ball studs, leading to incorrect height readings.
- General: Across all makes, a weak vehicle battery causes random, intermittent electronic faults, including air suspension warnings. Always test the battery and charging system first.
Real Owner Stories
2006 Land Rover LR3 with intermittent 'Suspension Fault'
Owner experienced a 'Suspension Fault' warning that appeared for a short time and cleared itself after restarting. The issue only occurred after heavy rain.
Outcome: Forum feedback pointed towards water ingress. The recommended action was to inspect the passenger-side floor sill for wiring harness corrosion, a known weak point caused by clogged sunroof drains.
Lesson: On an LR3, if suspension faults appear after rain, immediately suspect water has entered the cabin and is affecting the main wiring loom. The root cause is water intrusion that needs sealing.
2006 LR3 with 'Suspension Fault' after replacing compressor.
After burning out the original compressor, the owner replaced it with a new AMK unit but did not change the relay. Upon startup, the new compressor ran for a split second, then a 'Suspension Fault' appeared.
Outcome: The owner learned that upgrading from the Hitachi compressor to the AMK unit requires a mandatory software update for the suspension control module. Without the update, the system does not operate the new compressor correctly.
Lesson: When replacing a Land Rover air compressor, especially upgrading to the AMK model, you MUST replace the relay (part YWB500220) and perform the necessary ECU software update.
LR3 with 'Suspension Fault' that progressed to total failure.
The vehicle initially showed a 'Normal Height Only' fault. Over months, the front end began to sag overnight. After sitting for 3 days, the compressor was very hot, and the vehicle would not raise at all.
Outcome: The fault persisted because the system needed a full ride height calibration with a diagnostic tool. The initial leak had been ignored for too long, causing the compressor to burn out completely.
Lesson: Do not ignore early signs like overnight sagging. These indicate a leak that forces your compressor to run constantly, inevitably leading to its failure. A small initial repair prevents a massive bill.
How to Prevent This Code From Triggering
- Periodically cycle the suspension height. (Weekly) — Regularly raising the vehicle to off-road height and lowering it to access height moves the valve blocks and circulates air, preventing solenoids from sticking and keeping seals lubricated.
- Clean sunroof drains and check A-pillar seals (LR3/RRS). (Annually (before rainy season)) — Catastrophic electrical failures on these models are caused by water leaking into the cabin and corroding the main wiring harness in the passenger floor sill. Keeping drains clear is the best prevention.
- Service the compressor's air dryer desiccant. (Every 3-4 years or 50,000 miles) — Desiccant beads absorb moisture. Over time, they become saturated and break down into a fine powder that clogs valve blocks and solenoids. Replacing the desiccant prevents contaminating the entire system.
- Perform regular visual and auditory inspections. (Monthly) — Listen for the compressor running more than usual or for faint hissing sounds when parked. Visually inspect the rubber air springs for cracks. Catching a small leak early prevents the compressor from burning out.
- Keep the undercarriage and suspension components clean. (Seasonally) — Mud, salt, and road debris accumulate on air springs and height sensors, causing abrasion on the rubber and interfering with sensor linkages. A clean system is less likely to suffer from physical damage.
Frequently Asked Questions
Can I just replace the pressure sensor to fix C3136?
Rarely. The code indicates a problem in the circuit, not necessarily the sensor itself. The true cause is usually a weak compressor, a wiring fault, or a significant air leak.
My suspension warning light is on but the car seems to drive fine. Can I ignore it?
No. Ignoring the light forces your compressor to overwork to compensate for a leak. Continuing to drive burns out the compressor, turning a simple leak repair into a costly replacement.
Is it expensive to fix air suspension?
Costs range widely based on the root cause. A simple relay fix costs $20, while a single Jaguar XJ air strut replacement exceeds $1,400. Accurate diagnosis prevents wasting money on unnecessary parts.
Can I convert my air suspension to traditional coil springs?
Yes, conversion kits cost between $1,000 and $2,500 for parts. This offers a permanent, reliable solution but eliminates adjustable ride height and alters the vehicle's factory ride quality.
My car drops overnight. Is that normal?
No, a healthy air suspension system maintains its height for weeks. Any noticeable drop overnight is a definitive sign of an air leak. You must locate and repair the leak in the air springs, lines, or valve block.
What is the most common misdiagnosis for C3136?
The biggest mistake is immediately replacing the reservoir valve block and sensor. The true cause is usually a weak compressor or a failed compressor relay. Always test compressor performance and relay continuity before replacing expensive valve blocks.
The compressor was replaced, but the code came back. What now?
First, ensure you replaced the compressor relay; a faulty old relay destroys a new compressor. Second, check for a significant air leak that the new compressor is struggling to overcome. Finally, if upgrading to an AMK compressor on an older Land Rover, you must reprogram the suspension ECU.
Why does my suspension fault light come on randomly but the car's height seems fine?
This happens due to intermittent electrical faults in the sensor wiring or a failing compressor relay. A weak vehicle battery also causes random voltage drops that trigger suspension module faults on startup. Always test your battery and charging system first.
What is the '60A fusible link' and how does it relate to my air suspension?
It is a large 60A fuse (Part No. YQG100440) in the engine bay that provides main power to the compressor. If the compressor motor fails and draws too much current, this link blows and cuts all power. It is a critical, often overlooked diagnostic check.
What is an AMK vs. Hitachi compressor?
Hitachi was the original equipment supplier for early Land Rover models, but suffered high failure rates. Land Rover switched to a more robust AMK compressor around 2010. Upgrading older models to the AMK unit is highly recommended but requires an ECU software update.
Key Takeaways
- Code C3136 indicates a malfunction in the air suspension reservoir pressure sensor circuit, primarily affecting 2005-2016 Land Rover and Jaguar models.
- A failing air compressor or a leaking air spring causes this code 80% of the time, rather than a faulty pressure sensor.
- Driving with an active C3136 code forces the compressor to overwork, turning a $350 air leak repair into a $2,000 compressor replacement.
- On Land Rover LR3 and Discovery 3 models, inspect the passenger-side floor wiring harness for water corrosion before replacing any suspension parts.
- Always test the $20 compressor relay (part YWB500220) and the 60A fusible link before authorizing a costly compressor replacement.
Helpful Videos

Shop the Parts Behind C3136
Below are the parts most often responsible for code C3136, ranked by how frequently each one is the actual culprit (per the diagnosis above). Tap any to see what we have for your vehicle.


The information in this article is provided for general reference and educational purposes only. Vehicle specifications, procedures, and part compatibility can vary by production date, trim level, and region. Always consult your vehicle's factory service manual and verify part numbers before purchasing or performing repairs. Safety-critical components such as airbags, seat belts, and braking systems should be installed by a qualified professional.
- 🧭 Diagnostic Flowchart
- 🎬 Helpful Videos
- 🛍️ Shop This Part
- What Does C3136 Mean?
- Can I Drive With C3136?
- Common Causes
- Symptoms
- Common Fixes & Costs
- DIY vs Professional
- Used vs. New Parts: Buying Guide
- What Happens If You Wait — Timeline
- Cost of Not Fixing It
- Diagnosis Steps
- When This Code Triggers (Freeze-Frame Conditions)
- Related Codes
- Climate & Environmental Factors
- How to Talk to a Mechanic About This Code
- Where to Take It: Dealer vs Independent vs Chain
- When to Walk Away From the Repair
- What Scan Tool You Need for This Code
- How to Clear the Code After You Fix It
- Will This Fail Emissions / State Inspection?
- Most Commonly Affected Vehicles
- Manufacturer-Specific Notes
- Real Owner Stories
- 2006 Land Rover LR3 with intermittent 'Suspension Fault'
- 2006 LR3 with 'Suspension Fault' after replacing compressor.
- LR3 with 'Suspension Fault' that progressed to total failure.
- How to Prevent This Code From Triggering
- Frequently Asked Questions
- Can I just replace the pressure sensor to fix C3136?
- My suspension warning light is on but the car seems to drive fine. Can I ignore it?
- Is it expensive to fix air suspension?
- Can I convert my air suspension to traditional coil springs?
- My car drops overnight. Is that normal?
- What is the most common misdiagnosis for C3136?
- The compressor was replaced, but the code came back. What now?
- Why does my suspension fault light come on randomly but the car's height seems fine?
- What is the '60A fusible link' and how does it relate to my air suspension?
- What is an AMK vs. Hitachi compressor?
- Key Takeaways
- 🎟️ Get 5% Off