
P0009 on 2012-2018 Cadillac CTS: Causes and Fixes for Timing Chain Issues
P0009 on a Cadillac CTS with a V6 engine almost always means the timing chains have stretched. This is a serious, complex, and expensive repair that involves replacing the chains, tensioners, and guides. The root cause is often linked to extended oil change intervals and inherent design weaknesses in early chain versions. Expect a shop bill of $1,800 to $3,500+.
- P0009 on a 2012-2018 Cadillac CTS V6 is not a simple sensor issue; it signifies a serious mechanical problem with the timing chains.
- The only correct fix is to replace the timing chains, tensioners, and guides as a complete kit.
- This is a labor-intensive and expensive repair that should be performed by a professional mechanic.
- Maintaining proper engine oil level and using high-quality oil can help prolong the life of the new timing components.
- Do not ignore this code. Driving with a faulty timing chain can lead to complete engine failure.
What's Unique About the 2012-2018 Cadillac CTS
The GM High Feature V6 engines (3.0L LFW and 3.6L LFX) used in this era of Cadillac CTS have a well-documented history of premature timing chain stretching. This issue was so prevalent that General Motors issued multiple Technical Service Bulletins (TSBs) and even a Special Coverage Adjustment (#11340C) that extended the warranty for this specific problem to 10 years or 120,000 miles for certain model years. The primary causes are believed to be a combination of an aggressive oil life monitoring system that allowed for overly long oil change intervals, leading to oil degradation, and an early timing chain design that was susceptible to wear. While many vehicles can get a P0009 from a bad sensor, on this specific platform, the root cause is overwhelmingly a mechanical failure of the timing chains themselves.
Diagnostic Flowchart
Tap your situation to follow the diagnostic path that matches what you're seeing on this vehicle.
Generation note: The 2012-2018 range covers the end of the second generation CTS (2012-2013) and the entire third generation (2014-2019). The 3.6L LFX V6 engine, which is prone to this issue, was a primary engine option in both generations, making this guide applicable across the full year range. Notably, the timing chain design was reportedly improved in 2013, making 2012 models potentially more susceptible.
Symptoms You May Notice
- Check Engine Light is on
- Engine running rough or idling poorly
- Reduced engine power and sluggish acceleration
- Engine may be hard to start or have extended crank times
- Rattling or whining noise from the front of the engine, especially on a cold start
- Increased fuel consumption
- Replacing only the camshaft position sensor on Bank 2
- Replacing only the crankshaft position sensor
- Replacing the VVT solenoids without checking the mechanical timing
- Assuming the problem is electrical without checking cam/crank correlation with a scan tool
Most Likely Causes
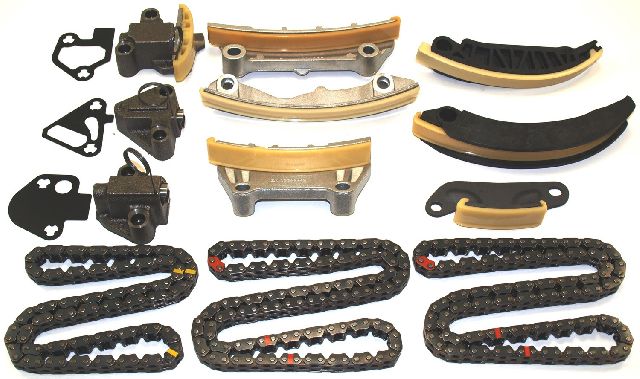
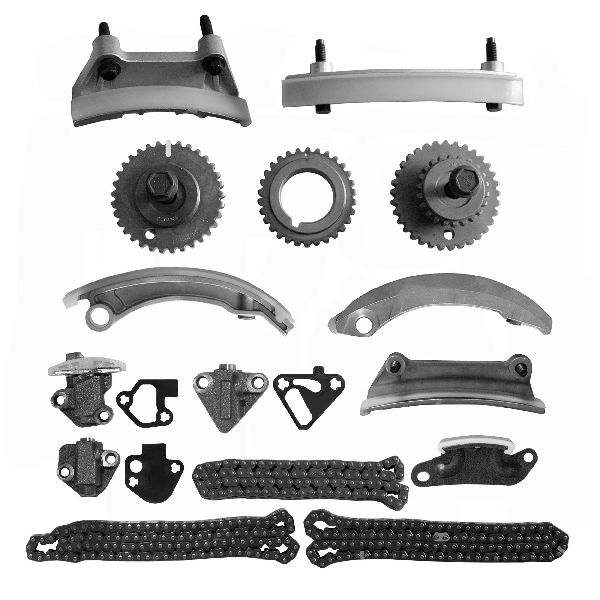
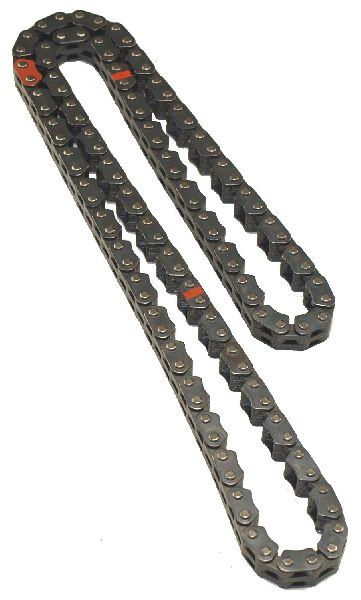
- Stretched Timing Chains 🔴 High Probability → Shop Engine Timing Chain The original timing chains on some GM 3.6L engines were susceptible to premature wear and stretching. This is a widely known issue acknowledged by GM through TSBs and a special coverage program. The issue is exacerbated by oil degradation.
How to confirm: A technician can use an advanced scan tool to view camshaft deviation data; 🎬 Watch: How to test timing chain stretch with a labscope. significant deviation confirms a timing issue. Physical inspection, which is labor-intensive, is the ultimate confirmation, revealing slack in the chains.
Typical fix: Replace all three timing chains (primary and two secondary) along with the tensioners and guides. This is typically done as a complete kit. TSB 12-06-01-009F specifically notes that sprockets and actuators should not be replaced unless found to be faulty.
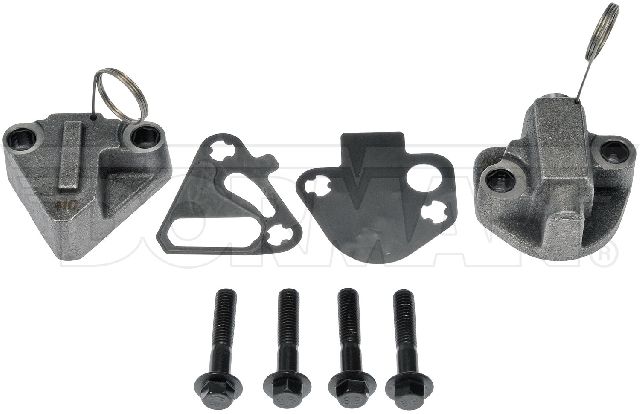
Est. part cost: $250-$600 - Worn Timing Chain Tensioners or Guides 🔴 High Probability → Shop Engine Timing Chain The tensioners and plastic guides wear out along with the chains. A failing hydraulic tensioner can lose pressure, allowing slack in the chain and causing the timing correlation error.
How to confirm: Diagnosed along with the timing chains. If the chains are loose, the tensioners and guides are considered part of the failure and are always replaced.
Typical fix: Always replaced as part of a complete timing chain service. GM timing chain kits include new tensioners.
Est. part cost: $0 (Included in timing chain kit) - Low or Degraded Engine Oil 🟡 Medium Probability The timing chain tensioners are hydraulically operated by engine oil pressure. GM's oil life monitor algorithm could allow for intervals up to 12,000 miles, which, combined with some engines consuming a quart of oil every 2,000 miles, created a high risk of running low on oil or using degraded oil. This starves the tensioners, accelerating wear on the entire timing system.
How to confirm: Check the oil level and condition on the dipstick. Review vehicle service history for oil change intervals. If the GM OLM was followed exclusively, it's a strong contributing factor.
Typical fix: An oil and filter change with the correct Dexos-spec oil is critical, but if the P0009 code is already set, the mechanical damage to the chains is likely done. Correcting oil change habits (e.g., every 5,000 miles) is preventative for the new parts.
Est. part cost: $50-$100
Rare But Worth Checking
- Faulty Camshaft or Crankshaft Position Sensor: → Shop Engine Crankshaft Position Sensor While possible, this is very unlikely to be the root cause on this specific vehicle. The TSBs point directly to mechanical chain issues. Owners and technicians often attempt to replace these sensors first, but the code almost always returns until the chains are replaced.
- Failed Camshaft Phaser / Actuator: → Shop Engine Camshaft The variable valve timing (VVT) actuators can fail, but this typically sets other codes (like P0018 or P0019) more directly related to phaser performance. It's less common as the primary cause for P0009 alone and TSB 12-06-01-009F advises against replacing them as part of a standard timing chain job.
- Shifted Crankshaft Reluctor Wheel: → Shop Engine Crankshaft On some GM vehicles, the reluctor wheel on the crankshaft (which the sensor reads) can shift, causing a timing correlation code. This is mentioned in GM Service Bulletin #PIP3423P as a possibility, though less common than chain stretch.
Diagnosis Steps
- Verify the engine oil level and condition. If low, dirty, or incorrect type, correct it, clear the codes, and see if the code returns. This is a critical first step.
- Use an advanced scan tool to read the specific camshaft deviation PIDs (Parameter IDs). This data can show if the cams on Bank 2 are lagging or leading the crankshaft's position, confirming a timing issue. A deviation of more than 4-5 degrees is typically a strong indicator of a stretched chain.
- Listen carefully to the front of the engine for any rattling or whining sounds, especially during a cold start, that could indicate a loose chain or worn guide.
- Inspect the wiring and connectors for the camshaft and crankshaft sensors for any damage or corrosion.
- If scan tool data confirms a significant deviation, the diagnosis is almost certainly stretched timing chains. The final step is to perform the repair, which involves removing the engine front cover 🎬 Watch: Expert tips and tricks for the easiest replacement method. to physically access and replace the timing components.
Parts You'll Likely Need
- Engine Timing Chain Kit
(OEM #12700436)— This is the definitive fix. A complete kit ensures all worn components (chains, guides, tensioners) are replaced simultaneously, as recommended by GM TSB #12-06-01-009F. This specific kit is for certain 2008-2012 models; always verify the correct kit part number by VIN.
Trusted brands: ACDelco (OEM), Cloyes
OEM price range: $300-$500
Aftermarket price range: $200-$400
Related Codes That Often Appear With This One
- P0008 — P0008 is the equivalent timing correlation code for Bank 1. When chains stretch significantly, it's common for both banks to be out of sync, triggering both codes.
- P0017 — This code specifies a correlation issue between the Crankshaft Position and the Bank 1 Exhaust Camshaft Position. It often appears with P0008 and P0009 as part of the same timing chain failure.
- P0018 — This code specifies a correlation issue between the Crankshaft Position and the Bank 2 Intake Camshaft Position, directly related to the P0009 fault.
- P0019 — This code specifies a correlation issue between the Crankshaft Position and the Bank 2 Exhaust Camshaft Position, also directly related to the P0009 fault.
Technical Service Bulletins (TSBs) & Recalls
- PIP3423P: Provides diagnostic guidance linking P0009 directly to loose timing chains or tensioners.
- 12-06-01-009F: Announces official timing chain kits from the manufacturer to fix stretched chains causing P0009 and advises against replacing non-failed components like sprockets.
Platform-Specific Known Issues
- TSB #PIP3423P explicitly states that DTC P0009 may be set and directs technicians to inspect for loose timing chains or tensioners.
- TSB #12-06-01-009F announces the availability of high feature V6 timing chain kits for repairing stretched timing chains that cause DTC P0009.
- Special Coverage Adjustment #11340C: GM extended the warranty on the timing chains to 10 years or 120,000 miles for certain 2007-2009 models due to premature wear. While this may not cover the 2012-2018 range, it establishes a history of the problem. Owners of early models in the specified range should check their vehicle's eligibility with a GM dealer.
Mechanic-Grade Diagnostic Values
- VVT (Variable Valve Timing) Solenoid Resistance — expected: 5 - 15 Ohms. Failure: A reading of OL (Open Line), 0 Ohms (short), or extremely high resistance (Mega-Ohms) indicates a failed solenoid.
- Crankshaft Reluctor Wheel Position — expected: 25mm to 26mm from the end of the machined surface of the crankshaft throw to the edge of the open space in the reluctor wheel.. Failure: Any significant deviation from this measurement indicates the reluctor wheel has slipped on the crankshaft, which requires crankshaft replacement as per TSB #PIP3423P. This can be inspected with a borescope through the crankshaft position sensor hole.
Scan Tool Commands That Help
- GDS2 / Professional Scan Tool: Camshaft Position Actuator Solenoid Test — This bidirectional command allows a technician to manually activate each VVT solenoid to check for a response. It can help determine if a solenoid is mechanically stuck or electrically failed before removing it, though it won't rule out clogged oil screens within the solenoid.
Wiring & Ground Locations
- ECM (Engine Control Module) — On 2014+ models, the ECM is located below the left headlamp assembly, requiring removal of the front bumper or wheel well liner to access.. The ECM is the central computer that receives signals from the cam/crank sensors and sets code P0009. Its location makes it susceptible to damage from a front-end collision, and its connectors should be checked for corrosion or damage if sensor signals are erratic.
- G101 — On or near the left front strut tower in the engine compartment.. This is a primary engine ground. A poor connection at G101 can cause erratic behavior from multiple engine sensors, including the camshaft and crankshaft position sensors, potentially leading to false codes.
- G102 — Located at the right front of the engine compartment.. Another critical engine ground point. Verifying this ground is clean and tight is a fundamental step in diagnosing any electronic engine control issue.
- G131 — Located on the left rear of the engine block.. A ground located directly on the engine block is critical for providing a clean reference for sensors mounted to the engine, such as the cam and crank sensors.
Real Owner Repair Stories
- Camaro5 Forums user 'secrethero89' (2011 Chevrolet Camaro V6 (LFX Engine) with 55,000 miles) — Check Engine Light with codes P0008 and P0009, sluggish performance, and extreme power loss.
❌ Tried (didn't work) Replaced all timing chains with a Cloyes kit., Replaced all 4 camshaft position sensors., Replaced all 4 VVT solenoids., Replaced all 4 VVT sprockets (cam phasers)., Flashed and reinstalled ECM software.
✅ What actually fixed it The crankshaft reluctor wheel had slipped by 1.5 teeth. A mechanic was able to reposition the wheel without removing the crankshaft and applied a tack weld to prevent future movement. The user confirmed the correct position should be approximately 3.5 teeth from the crank's edge.
When the Usual Fixes Don't Work
- While stretched timing chains are the cause for P0009 in the vast majority of cases, there is documented evidence of the code persisting after a full timing chain replacement. In these instances, the root cause was found to be a shifted crankshaft reluctor wheel. This was confirmed by a Camaro owner with the same LFX engine and is supported by GM's own Technical Service Bulletin #PIP3423P, which instructs technicians to check the reluctor wheel if standard diagnostics do not find the cause. This highlights a critical, though rare, diagnostic path when the common fix fails.
OEM Part Supersession History
12651450→12700436— Represents an updated kit with the latest revisions of timing chain components available at the time.12693218→12700436— Consolidation of various kits into a single, updated service part number.
Model Year Variations Within This Range
- 2012 only: The 2012 model year LFX engine carried over the timing chain design from the previous LLT engine. This design was more prone to stretching.
- 2013-2018: For the 2013 model year, GM introduced a redesigned, improved timing chain for the LFX V6. While not immune to failure (especially with poor oil maintenance), these later chains are considered more durable and less likely to stretch prematurely than the 2012 version.
Helpful Videos


We Have This Part in Stock


The information in this article is provided for general reference and educational purposes only. Vehicle specifications, procedures, and part compatibility can vary by production date, trim level, and region. Always consult your vehicle's factory service manual and verify part numbers before purchasing or performing repairs. Safety-critical components such as airbags, seat belts, and braking systems should be installed by a qualified professional.
- Cadillac CTS:
- 🧭 Diagnostic Flowchart
- 🎬 Helpful Videos
- 🛍️ Shop This Part
- What's Unique About the 2012-2018 Cadillac CTS
- Symptoms You May Notice
- Most Likely Causes
- Rare But Worth Checking
- Diagnosis Steps
- Parts You'll Likely Need
- Related Codes That Often Appear With This One
- Technical Service Bulletins (TSBs) & Recalls
- Platform-Specific Known Issues
- Mechanic-Grade Diagnostic Values
- Scan Tool Commands That Help
- Wiring & Ground Locations
- Real Owner Repair Stories
- When the Usual Fixes Don't Work
- OEM Part Supersession History
- Model Year Variations Within This Range
- 🎟️ Get 5% Off