
P0017 on 2005-2009 GMC Envoy 4.2L: Crank/Cam Correlation Causes and Fixes
On the 2005-2009 GMC Envoy with the 4.2L engine, code P0017 is most often caused by a faulty exhaust camshaft position actuator solenoid (VVT solenoid) or low/dirty engine oil. The solenoid gets clogged by oil sludge, leading to poor VVT operation. Replacing the solenoid is a common DIY fix costing between $30 and $90. Always check oil level and condition first.
- Always check your engine oil level and condition first; it's the simplest and a very common fix for P0017 on this engine.
- The most likely part to have failed is the exhaust camshaft position actuator solenoid (VVT solenoid), not the camshaft position sensor.
- Before attempting expensive repairs like a timing chain replacement, consider less common but documented issues like a loose crankshaft balancer bolt, as noted in official TSBs.
- This code indicates a mechanical timing correlation issue. While you can continue driving, it's best to address it promptly to avoid poor performance and potential engine damage.
What's Unique About the 2005-2009 Gmc ENVOY

The 4.2L inline-6 engine (Atlas LL8) in the GMC Envoy and its platform mates is notoriously sensitive to oil quality and pressure, which directly impacts the VVT system. The VVT system relies on oil pressure to phase the exhaust camshaft, and low or dirty oil is a primary cause of failure. Several manufacturer Technical Service Bulletins (TSBs) point to specific, non-obvious causes for this code beyond typical sensor failure. These include a loose crankshaft balancer bolt and the need to verify mechanical oil pressure, indicating a pattern of mechanical issues rather than just simple electronic faults. 🎬 Watch: Common causes and simple solutions for P0014 and P0017. [9, PIP4913A, PIP4581B] The acceptable oil pressure is at least 12 PSI at 1200 RPM.
Diagnostic Flowchart

Tap your situation to follow the diagnostic path that matches what you're seeing on this vehicle.
Symptoms You May Notice
- Check Engine Light is on
- Rough idle or stalling, sometimes only after the engine warms up.
- Poor acceleration and loss of power.
- Rattling or clattering noise from the engine, especially on startup or at idle.
- Difficulty starting the engine, or it cranks but won't start.
- Engine running rough and then dying.
- Reduced fuel economy.
- Replacing the camshaft position sensor when the actual fault is with the camshaft position actuator solenoid (VVT solenoid).
- Replacing timing components without first checking for simpler issues like low/dirty oil, a faulty VVT solenoid, or performing an engine flush.
- Replacing the crankshaft position sensor without performing the required CASE (Crankshaft Angle Sensor Error) relearn procedure with a capable scan tool.
Most Likely Causes

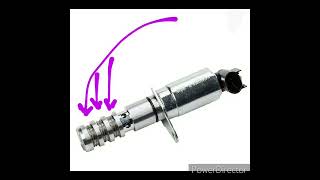
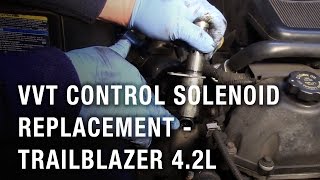
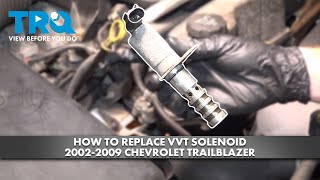
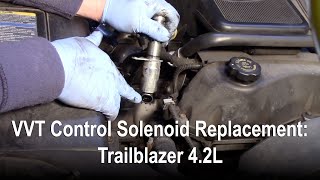
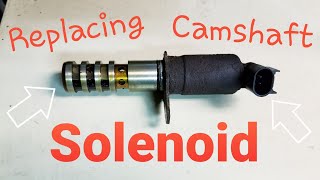
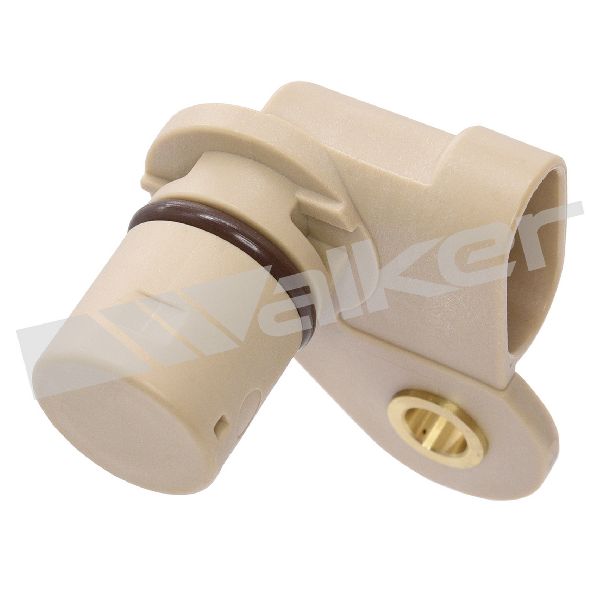
- Faulty Exhaust Camshaft Position Actuator Solenoid (VVT Solenoid) 🔴 High Probability → Shop Engine Camshaft The solenoid's fine mesh screens can get clogged with sludge from dirty oil, or the screens can tear and get ingested by the engine. The solenoid can also fail electrically or its internal seals can leak, sometimes causing oil to seep into the electrical connector.
How to confirm: Remove the solenoid (held by one 10mm bolt near the front of the cylinder head, by the power steering pump) 🎬 See this walkthrough on how to replace the VVT solenoid. and inspect its three screens for debris or tears. You can also swap it with the intake solenoid (they are identical) to see if the code changes to P0016. A multimeter can be used to check for an open circuit in the solenoid.
Typical fix: Clean with brake cleaner or, more commonly, replace the solenoid. Always use an OEM or high-quality replacement like ACDelco to avoid premature failure.
Est. part cost: $30-$90 - Low or Dirty Engine Oil 🔴 High Probability The VVT system is hydraulically operated by engine oil. Low levels or oil that is broken down or sludged cannot provide the necessary pressure for the cam phaser to operate correctly. This is the most common and basic cause for VVT-related codes on this engine.
How to confirm: Check the oil level on the dipstick and inspect its condition. This should always be the first step before replacing any parts.
Typical fix: Perform an oil and filter change using the manufacturer-specified oil viscosity (5W-30). An engine flush product like Sea Foam or BG EPR may help in cases of heavy sludge before the oil change.
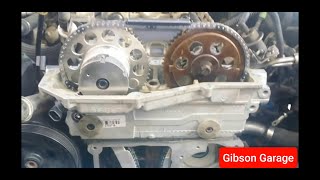
Est. part cost: $40-$80 - Stretched Timing Chain or Failed Tensioner 🟡 Medium Probability → Shop Engine Timing Chain Over time, especially on higher-mileage engines (typically over 100,000-150,000 miles), the timing chain can stretch. This causes the cam and crank correlation to fall out of the acceptable range, setting the code.
How to confirm: This is an involved diagnosis. A rattling noise from the front of the engine is a common symptom. A mechanic can use a scan tool to observe cam/crank deviation, but physical inspection for chain slack by removing the engine's front cover is the definitive confirmation.
Typical fix: Replace the timing chain, guides, and tensioner as a kit.
Est. part cost: $150-$400 - Loose Crankshaft Balancer Bolt ⚪ Low Probability → Shop Engine Crankshaft A specific TSB for this platform (PIP4581B) notes that an improperly torqued or loose crankshaft balancer can cause the reluctor wheel to wobble, leading to erratic signals and this code.
How to confirm: Check the torque of the crankshaft balancer bolt to ensure it meets the factory specification. This often requires holding the flywheel to prevent engine rotation.
Typical fix: Re-torque the bolt to the proper specification. The procedure may involve a torque angle gauge.
Est. part cost: $0 (if only tightening is needed)
Rare But Worth Checking
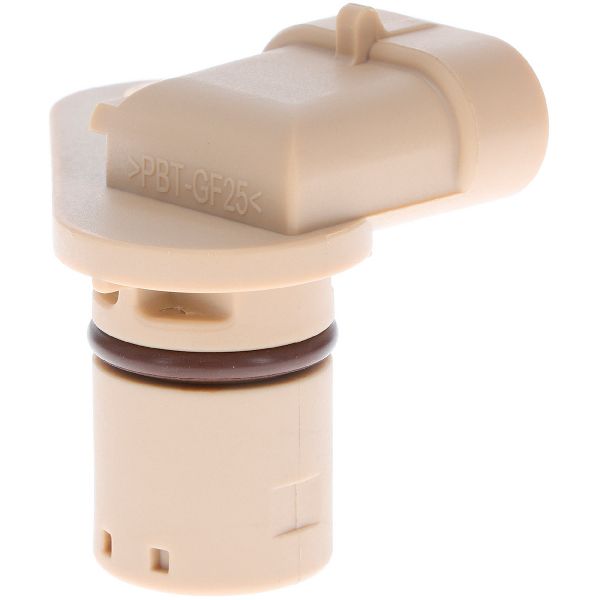
- Failed Camshaft Position Sensor (Exhaust): → Shop Engine Camshaft Position Sensor While often replaced as part of a 'parts shotgun' approach, the sensor itself is less likely to be the cause than the actuator solenoid or oil issues. However, a failing sensor can send incorrect data to the ECM.
- Sticking/Failed Cam Phaser (Actuator): → Shop Engine Timing Gear The cam phaser (the gear on the end of the camshaft) can get stuck due to oil sludge or internal failure, preventing it from adjusting timing correctly. This is a more mechanically intensive repair than the solenoid.
- Excessive Crankshaft End Play: → Shop Engine Crankshaft Mentioned in TSB PIP3694F and PIP4945B, excessive back-and-forth movement of the crankshaft (>.0153 inches) due to worn thrust bearings can throw off the timing correlation enough to trigger P0017. This is a sign of a significant internal engine problem.
- Low Oil Pressure from Worn Oil Pump/Bearings: Beyond just low oil level, mechanical wear in the oil pump or main/rod bearings can cause system-wide low oil pressure, starving the VVT system. A mechanical gauge test is needed to confirm. Nominal pressure is 12 PSI at 1200 RPM.
Diagnosis Steps

- Check the engine oil level and condition. If low or dirty, perform an oil and filter change with 5W-30 oil, clear the code, and test drive. This is the first and most crucial step.
- Scan for any other DTCs. Codes like P0014 can provide additional clues.
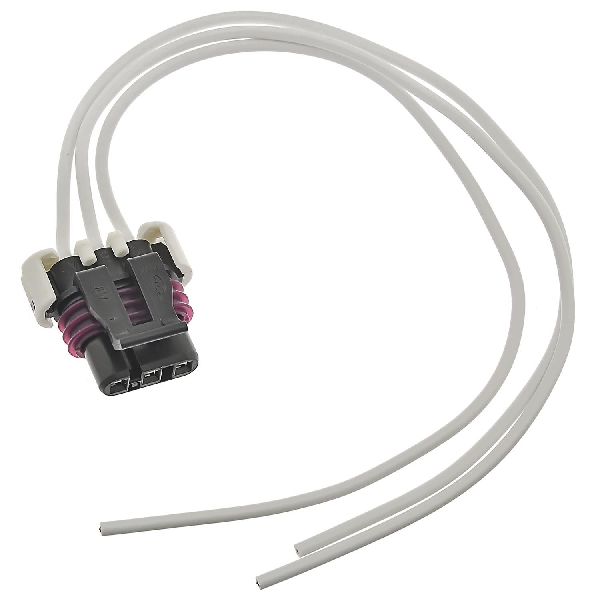
- Inspect the wiring and connector for the exhaust VVT solenoid for damage or oil contamination. Oil in the connector indicates a failed solenoid seal.
- Remove and inspect the exhaust VVT solenoid. Check for clogged or torn screens. Clean with brake cleaner or replace if damaged. An ACDelco part is strongly recommended.
- A common diagnostic trick is to swap the exhaust and intake VVT solenoids (they are identical on the 4.2L LL8) and see if the code follows the solenoid (changing to P0016). If it does, the solenoid is bad.
- If the issue persists, check oil pressure with a mechanical gauge to rule out low pressure as per TSB PIP4913A. Pressure should be at least 12 PSI at 1200 RPM.
- Check the torque on the crankshaft balancer bolt as per TSB PIP4581B.
- With a capable scan tool, command the VVT solenoid on and off to see if the cam phaser responds and if the desired vs. actual positions match.
- If all else fails, a more in-depth mechanical inspection of the timing chain for stretch, as well as the tensioners and phasers, is required. Also, check crankshaft end play to rule out a worn thrust bearing.
Parts You'll Likely Need
- Camshaft Position Actuator Solenoid (VVT Solenoid)
(OEM #12615873)— This is the most frequent point of failure due to clogging from engine oil contaminants or electrical failure. The screens are delicate and can tear.
Trusted brands: ACDelco (OEM), Dorman (917-010)
OEM price range: $50-$90
Aftermarket price range: $30-$60 - Camshaft Position Sensor (Exhaust)
(OEM #12576519)— Though less common than the solenoid, a failing sensor can send incorrect data to the ECM, triggering the code. Often replaced unnecessarily.
Trusted brands: ACDelco, Bosch
OEM price range: $40-$70
Aftermarket price range: $25-$50 - Timing Chain Kit — For higher mileage vehicles, a stretched chain is a common cause of correlation codes. A kit ensures all wear components (chain, guides, tensioner) are replaced together.
Trusted brands: Cloyes, Melling
OEM price range: $250-$400
Aftermarket price range: $150-$250
Related Codes That Often Appear With This One
- P0014 — This code is for "Camshaft Position B - Timing Over-Advanced or System Performance (Bank 1)". It often appears with P0017 because both relate to the exhaust cam timing control. A sticking VVT solenoid or phaser can cause both codes simultaneously. [14, 17, PIP3694F]
- P0106 — This code for "Manifold Absolute Pressure/Barometric Pressure Circuit Range/Performance Problem" can sometimes appear alongside P0017 if a rough idle is present, as the erratic valve timing can affect manifold vacuum. This is noted in TSB PIP3694F.
- P0300 — A general "Random Misfire Detected" code can be triggered if the incorrect cam timing is severe enough to cause poor combustion across multiple cylinders.
Technical Service Bulletins (TSBs) & Recalls
- PIP4945B: A summary document for P0017 on inline GM engines, listing multiple potential causes including incorrect timing, loose crank bolt, and excessive crank end play.
- PIP4913A: Recommends checking oil pressure if the cause of P0017 is not found through normal diagnostics.
- PIP4581B: Suggests re-torquing the crankshaft balancer bolt when P0017 is accompanied by a rattle noise.
- PIP3694F: Connects P0017 with P0014 and P0106, rough idle, and belt noise, often pointing to the VVT actuator or crankshaft end play.
Platform-Specific Known Issues

- TSB PIP4581B specifically calls out the need to re-torque the crankshaft balancer bolt if a rattle noise is present with code P0017 and other diagnostics don't find a cause.
- TSB PIP4913A advises technicians to monitor oil pressure with a mechanical gauge if standard diagnostics and other bulletins fail to isolate the cause, highlighting the system's dependence on proper oil pressure.
- TSB PIP3694F links P0017 with engine belt noise, rough idle, and potentially code P0106, pointing towards a faulty camshaft position actuator or excessive crankshaft end play from a worn thrust bearing.
- TSB PIP4945B consolidates information, noting that P0017 can be set for many reasons, including incorrect engine timing after a repair, a loose crank bolt, or excessive crankshaft end play.
Mechanic-Grade Diagnostic Values
- Exhaust VVT Solenoid (CPAS) Resistance — expected: 6-10 Ohms. Failure: A reading of 0 Ohms (short circuit) or infinite/OL (open circuit).
- Crankshaft End Play — expected: 0.0044 to 0.0153 inches. Failure: Movement greater than 0.0153 inches indicates worn thrust bearings. A measurement near 0.050 inches suggests catastrophic failure.
- Camshaft Position Sensor (3-wire) Voltage — expected: With key on, engine off: 5V on the reference wire and 5V on the signal wire (relative to ground). When a metal object is passed over the sensor tip, the signal voltage should drop to 0V.. Failure: No voltage, or voltage that does not change when tested, indicates a faulty sensor or wiring issue.
Scan Tool Commands That Help
- Tech 2 / GDS2 or equivalent high-end scanner: CMP Actuator Solenoid Control — Used to command the VVT solenoid on and off to verify its mechanical operation and observe the change in cam timing on the scanner's live data. However, this function may be inhibited once DTC P0017 is set as a current code.
- Tech 2 / GDS2 or equivalent high-end scanner: Crankshaft Position (CKP) System Variation Learn (CASE Relearn) — This procedure is required after replacing the crankshaft position sensor to allow the ECM to learn the minor variations in the crankshaft reluctor wheel. Failure to perform this can sometimes contribute to correlation codes.
Wiring & Ground Locations
- G103 — On the left front of the engine compartment, on the radiator support.. This is a primary ground point for the forward lamp harness and other components in the front of the engine bay. A poor connection here can introduce electrical noise or voltage drops affecting sensor readings.
- G105 — Under the hood on the firewall, near the instrument panel harness pass-through.. This ground serves various engine and body components. A loose or corroded connection can cause intermittent and hard-to-diagnose electrical issues.
- G109 / G110 — On the lower left side of the engine block.. These are critical engine block grounds. Since the camshaft and crankshaft sensors rely on a stable ground reference, a fault at these points can directly cause correlation issues and trigger P0017.
Real Owner Repair Stories
- GMTNation Forum User 'LOWCLASS21' (2005 Trailblazer, 4.2L I6, 80,000 miles) — P0017 code appeared immediately after replacing crank and cam sensors.
❌ Tried (didn't work) Replacing crankshaft position sensor (aftermarket), Replacing camshaft position sensor (aftermarket), Dealer replaced camshaft actuator solenoid (OEM), Oil change and cleaning the (new) solenoid
✅ What actually fixed it Another user in the thread reported the final fix for their identical, persistent P0017 was replacing the camshaft phaser assembly after multiple cleanings of the solenoid only provided a temporary solution. - GMTNation Forum User 'Brimmy' (2005 GMC Envoy XL, 4.2L I6, 185,000 miles) — P0017 code returned instantly after major work, stalling when put in gear, crank-no-start.
❌ Tried (didn't work) Replaced VVT solenoid, Replaced camshaft position sensor, Replaced crankshaft position sensor, Replaced timing chain and guides, Replaced cam phaser
✅ What actually fixed it The thread did not have a final confirmed fix from the original poster, but the expert diagnosis pointed to two high-probability causes for failure after all parts were replaced: 1) The new timing chain was installed incorrectly, potentially off by a single tooth. 2) A failed main thrust bearing was causing excessive crankshaft end play, a condition that must be checked mechanically and is often overlooked.
OEM Part Supersession History
12568078, 12576768, 12597025, 12602516→12615873— GM updated the part over the years to improve reliability and performance.
Heads up: The newest part number, 12615873, is the correct and most reliable replacement for all previous versions on the specified vehicles.
Model Year Variations Within This Range
- 2006-2009: The engine management system was updated. The PCM was split into a separate Engine Control Module (ECM) and Transmission Control Module (TCM). A Mass Airflow (MAF) sensor was also added.
- 2006+ or 2008+: The crankshaft reluctor wheel was changed from a 7x to a 58x tooth pattern. Sources conflict on the exact year of the change (some state 2006, others 2008). This makes engine swaps between certain years incompatible without also swapping the corresponding ECM and wiring harness.
- 2006-2009: The 4.2L engine received a redesigned cylinder head and ignition coils, and horsepower was increased from 275 to 291.
Helpful Videos


![How to Fix P0017 Engine Code in 6 Minutes [4 DIY Methods / Only $6.81]](https://img.youtube.com/vi/Vcj-f_J2hyo/mqdefault.jpg)
We Have This Part in Stock


The information in this article is provided for general reference and educational purposes only. Vehicle specifications, procedures, and part compatibility can vary by production date, trim level, and region. Always consult your vehicle's factory service manual and verify part numbers before purchasing or performing repairs. Safety-critical components such as airbags, seat belts, and braking systems should be installed by a qualified professional.
- Gmc ENVOY:
- 🧭 Diagnostic Flowchart
- 🎬 Helpful Videos
- 🛍️ Shop This Part
- What's Unique About the 2005-2009 Gmc ENVOY
- Symptoms You May Notice
- Most Likely Causes
- Rare But Worth Checking
- Diagnosis Steps
- Parts You'll Likely Need
- Related Codes That Often Appear With This One
- Technical Service Bulletins (TSBs) & Recalls
- Platform-Specific Known Issues
- Mechanic-Grade Diagnostic Values
- Scan Tool Commands That Help
- Wiring & Ground Locations
- Real Owner Repair Stories
- OEM Part Supersession History
- Model Year Variations Within This Range
- 🎟️ Get 5% Off