
P0030 on 1997-2004 Ford F-150 4.6L/5.4L: HO2S Heater Circuit Causes and Fixes
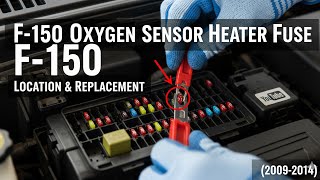
This code indicates a problem with the heater circuit for the upstream oxygen sensor on the passenger side (Bank 1, Sensor 1). The most common fix is to replace the sensor itself. Before replacing, check the associated fuse (Fuse #18, 15A in the engine compartment fuse box for 99-03 models) and inspect the wiring for any melting or damage, a common issue on these trucks.
- P0030 specifically points to the heater circuit of the upstream O2 sensor on the passenger side.
- The most likely cause is a failed O2 sensor, which is a common wear-and-tear item.
- Before replacing the sensor, always check fuse #18 (15A) in the engine bay fuse box (for '99-'03) and inspect the wiring harness for any signs of melting or damage, as this is a common issue on this platform.
- Driving with this code will negatively impact fuel economy and will cause an emissions test failure.
What's Unique About the 1997-2004 Ford F-150
On the 10th generation F-150 with the Triton V8, the P0030 code is a straightforward issue almost always pointing to the sensor itself. Due to the engine bay layout, the wiring for the passenger-side sensor is routed near the hot exhaust manifold, making it susceptible to heat damage over time. Owners frequently find that either the sensor's internal heater has simply burned out from age or its connector and wiring have melted. This platform is also known for having the O2 sensor seize in the exhaust bung, making removal difficult without a specialized O2 sensor socket and significant leverage.
Generation note: The 1997-2004 year range primarily covers the 10th generation of the F-150 (1997-2003). The 2004 model year is an overlap year, featuring both the new 11th generation and a continuation of the 10th generation sold as the 'F-150 Heritage'. The information provided here is specific to the 10th generation platform and its 2-valve Triton engines.
Symptoms You May Notice
- Check Engine Light is on
- Decreased fuel economy
- Failing a vehicle emissions test
- Slightly rougher idle on a cold start
- Engine may hesitate slightly before it reaches operating temperature
- Replacing the wrong O2 sensor (e.g., the downstream sensor or the sensor on the driver's side). Bank 1 is always the passenger side on Ford V8s.
- Replacing the PCM before verifying the wiring and sensor are faulty.
- Assuming the sensor is bad without checking the fuse first.
Most Likely Causes
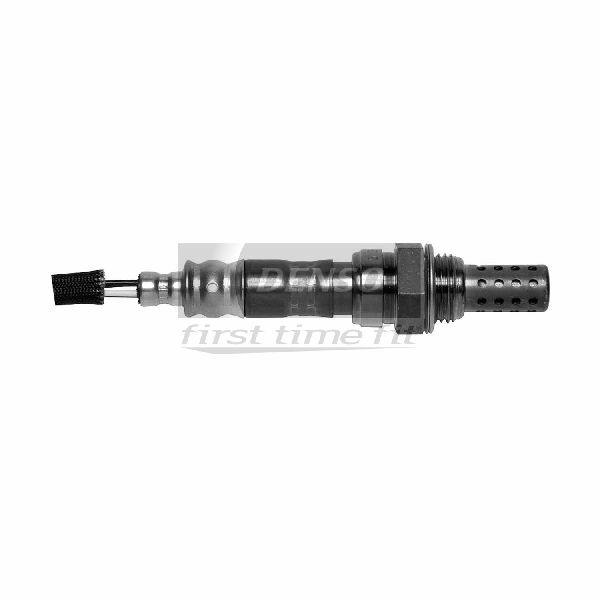
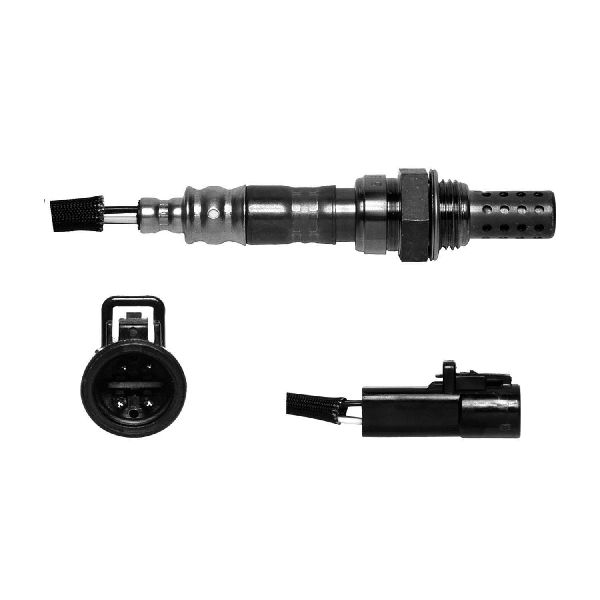
- Failed Oxygen Sensor Heater Element 🔴 High Probability → Shop Oxygen Sensor The internal heater element in the O2 sensor is a wear item that simply burns out over time due to constant heat cycles. Owners report this as the most frequent fix.
How to confirm: Disconnect the sensor and measure the resistance between the two heater circuit pins (usually the two wires of the same color, often white) with a multimeter. A healthy sensor should have a resistance between 3 and 30 Ohms. An infinite resistance reading (OL) indicates an open circuit and a failed heater. Forum users report measuring around 6-7 ohms on a good sensor.
Typical fix: Replace the Bank 1, Sensor 1 oxygen sensor.
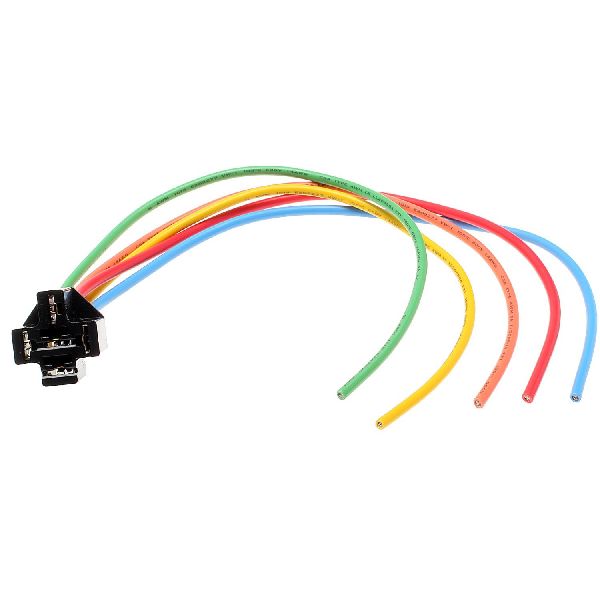
Est. part cost: $40-$90 - Damaged Wiring or Connector 🟡 Medium Probability The wiring harness for the passenger-side O2 sensor is routed close to the exhaust manifold, making it vulnerable to melting or becoming brittle and cracking from heat exposure. Forum members on F150forum.com frequently report this exact scenario.
How to confirm: Visually inspect the entire length of the sensor's wiring harness and the connector for signs of melting, chafing, or corrosion. Check for continuity on the power and ground wires from the PCM to the sensor connector.
Typical fix: If the connector is melted, it needs to be replaced with a new pigtail connector. The Motorcraft pigtail is part number WPT-1355. Damaged sections of the wire must be repaired with heat-shrink butt connectors.
Est. part cost: $15-$40 for a pigtail connector - Blown Fuse ⚪ Low Probability A short circuit in the O2 sensor's heater element or its wiring can cause the corresponding fuse to blow. This is less common than the sensor or wiring failing on its own.
How to confirm: Locate the fuse box in the engine compartment. For 1999-2003 models, check fuse #18 (a 15A fuse), which powers the HEGO sensors. For 1997-1998 models, check fuse #13 (20A) in the same box. A visual inspection or a continuity test with a multimeter will confirm if it's blown.
Typical fix: Replace the blown fuse. Note: If the fuse blows again immediately, it indicates a persistent short circuit in the wiring or the sensor itself that must be found and fixed.
Est. part cost: $1-$5
Rare But Worth Checking
- Faulty Powertrain Control Module (PCM): → Shop Engine Control Module (ECM) This is a very rare cause. The PCM's internal driver for the heater circuit can fail. This should only be considered after all other possibilities (sensor, wiring, fuse) have been thoroughly ruled out by testing power and ground at the sensor connector.
Technical Service Bulletins (TSBs) & Recalls
- Bulletin #TSB-14-0129: While issued for other Ford models like the Escape, this bulletin notes that DTC P0030, along with P0132 and P0135, are stored in the PCM memory and cause the Malfunction Indicator Lamp (MIL) to illuminate, requiring specific service procedures to correct the condition.
- Bulletin #TSB 16-0143: This manufacturer record indicates that certain Ford vehicles may exhibit an illuminated MIL with diagnostic trouble codes P0030 and/or P0130, directing technicians to follow established service steps for a permanent fix.
Diagnosis Steps
- Confirm the presence of the P0030 code using an OBD-II scanner.
- Check for any other related trouble codes.
- Locate and inspect the fuse for the O2 sensor heater circuit (Engine compartment fuse box, #18 on 99-03 models). Replace if blown.
- Safely raise the vehicle and locate the Bank 1, Sensor 1 O2 sensor. It is on the passenger side, in the exhaust manifold or downpipe, before the catalytic converter.
- Visually inspect the sensor's wiring harness and connector for any signs of melting, chafing, or physical damage. Pay close attention to where it runs near the exhaust.
- Disconnect the sensor. Use a multimeter to test the resistance of the heater circuit within the sensor itself. An open circuit (infinite resistance) or a reading outside the 3-30 Ohm range confirms the sensor has failed.
- With the key on and engine off, test the vehicle-side harness connector for power (should be ~12V) and ground. If either is missing, there is a wiring issue between the PCM and the sensor.
- If the fuse, wiring, power, and ground are all good, the oxygen sensor is the confirmed culprit.
- If a new sensor does not resolve the issue, re-check all wiring repairs. Only then should a faulty PCM be considered, which is extremely rare.
Parts You'll Likely Need
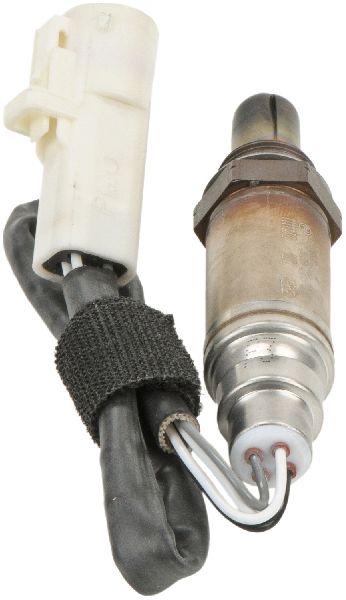
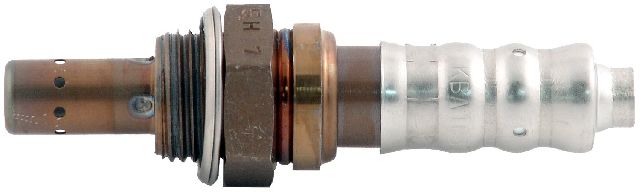
- Upstream Oxygen Sensor (Bank 1, Sensor 1)
(OEM #XL3Z-9F472-AA (Engineering P/N), DY-835 (Service P/N))— This is the most common failure point for code P0030, as the internal heater element burns out over time.
Trusted brands: Motorcraft, Bosch, Denso, NGK/NTK
OEM price range: $65-$90
Aftermarket price range: $40-$70
Platform-Specific Known Issues
- The Bank 1 Sensor 1 O2 sensor can become seized in the exhaust manifold due to rust. Penetrating oil and a proper O2 sensor socket are highly recommended for removal. In severe cases, heating the manifold bung with a torch may be necessary.
Mechanic-Grade Diagnostic Values
- O2 Sensor Heater Element Resistance — expected: 3 to 30 Ohms when measured across the two same-colored wires (usually white) on the sensor connector. Many healthy sensors read between 4 and 10 Ohms.. Failure: An infinite reading (OL) indicates an open circuit (burned out element). A reading near zero indicates a short circuit.
- Heater Circuit Power Supply Voltage — expected: Approximately 12V (battery voltage) at the harness-side connector with the key on, engine off.. Failure: 0V or significantly low voltage indicates a blown fuse or an open in the power feed wire.
- Heater Control Circuit at PCM — expected: For 1999-2004 models, test continuity between the harness connector pin for the Red/White wire and Pin 93 at the PCM connector. For 1997-1998 models, test continuity between the harness pin for the Yellow/Light Blue wire and its corresponding PCM pin.. Failure: Infinite resistance (OL) indicates a broken wire between the PCM and the sensor connector.
Hidden / Shadow Codes Worth Checking
- Mode $06, Test ID $81: This refers to the O2 Heater Monitor. The PCM checks the heater circuit's integrity. For these model years, it primarily uses a voltage test. Some Ford documentation indicates the PCM will set a fault if the measured heater impedance exceeds a threshold like 44 ohms for a set duration. (see via A professional scan tool capable of displaying Mode $06 test results.)
Scan Tool Commands That Help
- Ford IDS (Integrated Diagnostic System): Datalogger & Key-On-Engine-Running (KOER) Self-Test — After confirming the P0030 code, a technician uses the Datalogger to monitor the specific PIDs for the Bank 1 Sensor 1 (O2S11) voltage and the heater status (O2HTR11). Running the KOER self-test commands the PCM to actively test all circuits, including the O2 heaters. If the heater is commanded ON but the O2 sensor voltage remains low/inactive on a cold engine, it confirms a fault in the heater circuit's function.
Wiring & Ground Locations
- PCM Pin 93 — On the 104-pin PCM connector, for 1999-2004 models.. This is the specific pin that the PCM uses to control (provide the ground for) the heater circuit for Bank 1, Sensor 1. The wire color is Red/White. Testing for continuity from this pin to the sensor connector is the definitive way to rule out a broken control wire.
- Heater Power Wire (1997-1998) — In the O2 sensor harness.. For 1997-1998 models, the wire colors are different. The power feed is a Red/Yellow wire, and the PCM control wire is Yellow/Light Blue. Knowing these colors is essential for accurate testing on early 10th gen trucks.
- G104 — A primary engine-to-chassis ground, typically located on the right (passenger) side of the engine compartment, often on or near the cylinder head or engine block.. While the O2 heater is controlled directly by the PCM, the entire system relies on solid engine and chassis grounds. A corroded or loose G104 can cause erratic voltage and ground reference issues for multiple sensors, including the O2 sensor circuit, leading to false codes.
Real Owner Repair Stories
- f150forum.com user 'Squeezsh' (2004 F-150 Heritage 5.4L (CNG)) — Rough run on first start of the day, slow O2 sensor response on Bank 1 according to scan tool app. Threw a P1131 code (related to O2 sensor not switching).
❌ Tried (didn't work) Replaced all COPs and plugs, Replaced O2 sensors, Cleaned MAF and injectors, Checked for vacuum leaks.
✅ What actually fixed it The user tested the vehicle-side harness connector for the Bank 1 O2 sensor and found no 10-12 volts on the Red/White power wire, while the same wire on Bank 2 had power. This confirmed the fault was an open circuit in the power feed wiring leading to the Bank 1 sensor, not the sensor itself. - NHTSA ODI #11404251: An owner of a similar Ford vehicle reported a no-start condition where a diagnostic scan revealed numerous codes including P0030, P0300, and P0141. The owner attempted to resolve the issue by checking for loose wires, fuses, and plugs.
When the Usual Fixes Don't Work
- W
- h
- i
- l
- e
- r
- e
- p
- l
- a
- c
- i
- n
- g
- t
- h
- e
- O
- 2
- s
- e
- n
- s
- o
- r
- i
- s
- t
- h
- e
- m
- o
- s
- t
- c
- o
- m
- m
- o
- n
- f
- i
- x
- ,
- a
- s
- i
- g
- n
- i
- f
- i
- c
- a
- n
- t
- m
- i
- n
- o
- r
- i
- t
- y
- o
- f
- c
- a
- s
- e
- s
- a
- r
- e
- c
- a
- u
- s
- e
- d
- b
- y
- w
- i
- r
- i
- n
- g
- f
- a
- u
- l
- t
- s
- .
- A
- f
- o
- r
- u
- m
- m
- e
- m
- b
- e
- r
- w
- i
- t
- h
- a
- 2
- 0
- 0
- 4
- H
- e
- r
- i
- t
- a
- g
- e
- m
- o
- d
- e
- l
- r
- e
- p
- l
- a
- c
- e
- d
- t
- h
- e
- s
- e
- n
- s
- o
- r
- ,
- b
- u
- t
- t
- h
- e
- p
- r
- o
- b
- l
- e
- m
- p
- e
- r
- s
- i
- s
- t
- e
- d
- .
- T
- h
- e
- f
- i
- n
- a
- l
- f
- i
- x
- w
- a
- s
- t
- r
- a
- c
- i
- n
- g
- t
- h
- e
- p
- o
- w
- e
- r
- w
- i
- r
- e
- (
- R
- e
- d
- /
- W
- h
- i
- t
- e
- )
- t
- o
- t
- h
- e
- s
- e
- n
- s
- o
- r
- '
- s
- h
- a
- r
- n
- e
- s
- s
- c
- o
- n
- n
- e
- c
- t
- o
- r
- a
- n
- d
- d
- i
- s
- c
- o
- v
- e
- r
- i
- n
- g
- i
- t
- h
- a
- d
- n
- o
- v
- o
- l
- t
- a
- g
- e
- ,
- i
- n
- d
- i
- c
- a
- t
- i
- n
- g
- a
- b
- r
- e
- a
- k
- i
- n
- t
- h
- e
- w
- i
- r
- e
- s
- o
- m
- e
- w
- h
- e
- r
- e
- b
- e
- t
- w
- e
- e
- n
- t
- h
- e
- f
- u
- s
- e
- b
- o
- x
- a
- n
- d
- t
- h
- e
- s
- e
- n
- s
- o
- r
- .
- T
- h
- i
- s
- h
- i
- g
- h
- l
- i
- g
- h
- t
- s
- t
- h
- e
- n
- e
- c
- e
- s
- s
- i
- t
- y
- o
- f
- t
- e
- s
- t
- i
- n
- g
- f
- o
- r
- 1
- 2
- V
- p
- o
- w
- e
- r
- a
- t
- t
- h
- e
- c
- o
- n
- n
- e
- c
- t
- o
- r
- b
- e
- f
- o
- r
- e
- s
- p
- e
- n
- d
- i
- n
- g
- m
- o
- n
- e
- y
- o
- n
- a
- n
- e
- w
- s
- e
- n
- s
- o
- r
- .
OEM Part Supersession History
F88F-9F472-AB (Service P/N: DY-832)→F85Z-9G444-BA (Service P/N: DY-1093) for 1999— Model year update.
Heads up: For upstream sensor. 1997-1998 models specifically call for DY-832.F85Z-9G444-BA (Service P/N: DY-1093)→XL3Z-9F472-AA (Service P/N: DY-835) for 2000— Model year update.
Heads up: For upstream sensor. 1999 models specifically call for DY-1093, while 2000-2003 models use DY-835. Using the wrong year's sensor may result in incorrect harness length or connector keying.N/A→N/A— N/A
Heads up: Forum users note that on some models, front/rear or left/right sensors are identical electrically but have different harness lengths. It is sometimes possible to use a sensor with a longer harness in place of one with a shorter harness, but not vice-versa. The plastic guide tabs on the connectors may also differ, requiring modification (shaving the tab) to fit.
Model Year Variations Within This Range
- 1997-1998: Uses a 20A fuse (#13) for the HEGO circuit. The upstream O2 sensor is p/n DY-832. The heater power wire is Red/Yellow and the PCM control wire is Yellow/Light Blue.
- 1999: Uses a 15A fuse (#18). The upstream O2 sensor is p/n DY-1093. The heater control wire at the PCM is Red/White (Pin 93).
- 2000-2004 (Heritage): Uses a 15A fuse (#18). The upstream O2 sensor is p/n DY-835. The heater control wire at the PCM is Red/White (Pin 93).
Diagnostic Flowchart
Other Known Issues on This Vehicle
Issues unrelated to this code that are worth knowing about as an owner of this generation:
- Spark Plug Ejection 🔴 High — Common on 2-valve Triton engines due to insufficient thread engagement in the aluminum cylinder heads. Can occur at any mileage. (Ref: While no specific recall, Ford has repair procedures and updated parts.)
- Cracked Plastic Intake Manifold 🟠 Medium — Affects 1996-2001 models with the all-plastic manifold. The front coolant crossover is prone to cracking, causing a coolant leak. (Ref: Ford later released a revised manifold with a metal crossover to solve this.)
- Broken Timing Chain Guides 🔴 High — The plastic timing chain guides can become brittle and break, often after 100,000 miles. This can cause a rattling noise on startup and, if ignored, lead to catastrophic engine failure.
- Ignition Coil Failure 🟡 Low — The coil-on-plug ignition coils are a frequent failure item, leading to engine misfires. Often caused by moisture intrusion past the coil boot.
Used vs. New Parts: Buying Guide for This Vehicle
When a used part is the smart pick: A used part is a smart choice for the wiring pigtail connector. If the original connector has melted, sourcing a pigtail from a junkyard vehicle with a clean, undamaged harness is very cost-effective.
Donor-vehicle mileage cap: roughly under 150000 miles for the part to have meaningful remaining life.
What to inspect on the donor part:
- For a pigtail: ensure the plastic isn't brittle or cracked.
- Check that the wires have at least 6-8 inches of flexible, non-brittle insulation.
- Look for clean, uncorroded metal pins inside the connector.
- Avoid any parts from vehicles with signs of engine fire or flood damage.
OEM-only on this vehicle (don't cheap out):
- No parts for this repair are strictly 'OEM-only', but using a Motorcraft sensor is highly recommended for guaranteed compatibility and longevity.
Aftermarket brands forum-validated for this vehicle:
- NTK (NGK)
- Denso
- Bosch
Brands owners have reported issues with on this vehicle:
- Unnamed or 'white-box' generic brands from online marketplaces should be avoided, as they have a higher rate of premature failure and may not have the correct internal resistance, leading to persistent codes.
Real Owner Stories
Aggregated from forums and TSBs cited above. Mileages and costs reflect what owners reported in those sources.
2005 F-150 5.4L
Symptoms: Check engine light with code P0030, truck was under powered with weird shift points after the intake tube popped off. Owner suspected raw fuel was dumped into the catalytic converter.
What fixed it: Replacing the Bank 1 Sensor 1 (upstream - passenger front) oxygen sensor.
Source hint: Ford F150 Forum: Thread '*ecoboost* P0030 after intake tube popped off'
1997 F-150 4.6L/5.4L
Symptoms: Owner needed to perform a heater test on the Right Front O2 Sensor (HO2S11).
What fixed it: Diagnostic procedure confirmed the heater element should be between 3-30 Ohms; if infinite (OL), the sensor requires replacement.
Source hint: easyautodiagnostics.com: 'Right Front O2 Sensor (HO2S11) Heater Test (1997-1998 F150 - F250)'
2002 F-150 5.4L
Symptoms: P0135 and P0030 codes persisted even after replacing the sensor twice.
What fixed it: The issue required a thorough wiring inspection, as replacing the sensor alone did not resolve the fault, highlighting potential harness issues.
Source hint: f150forum.com: Thread 'P0135 and p0030 Code help'
Related OBD-II Codes
Frequently Asked Questions
Where is the Bank 1 Sensor 1 oxygen sensor located on my 4.6L/5.4L Triton V8?
Which fuse should I check for the O2 sensor heater circuit on a 2001 Ford F-150?
My 1997 F-150 has a P0030 code; is the fuse location different than later models?
What is the correct resistance for a healthy O2 sensor heater on these trucks?
If my O2 sensor connector is melted, what is the specific Ford replacement part number?
Why does the passenger-side O2 sensor wiring fail so often on the F-150 and Expedition?
I'm having trouble removing the sensor from the manifold; is this common?
Helpful Videos


We Have This Part in Stock


The information in this article is provided for general reference and educational purposes only. Vehicle specifications, procedures, and part compatibility can vary by production date, trim level, and region. Always consult your vehicle's factory service manual and verify part numbers before purchasing or performing repairs. Safety-critical components such as airbags, seat belts, and braking systems should be installed by a qualified professional.
- Ford F-150:
- 🧭 Diagnostic Flowchart
- 🎬 Helpful Videos
- 🛍️ Shop This Part
- What's Unique About the 1997-2004 Ford F-150
- Symptoms You May Notice
- Most Likely Causes
- Rare But Worth Checking
- Technical Service Bulletins (TSBs) & Recalls
- Diagnosis Steps
- Parts You'll Likely Need
- Platform-Specific Known Issues
- Mechanic-Grade Diagnostic Values
- Hidden / Shadow Codes Worth Checking
- Scan Tool Commands That Help
- Wiring & Ground Locations
- Real Owner Repair Stories
- When the Usual Fixes Don't Work
- OEM Part Supersession History
- Model Year Variations Within This Range
- Other Known Issues on This Vehicle
- Used vs. New Parts: Buying Guide for This Vehicle
- Real Owner Stories
- 2005 F-150 5.4L
- 1997 F-150 4.6L/5.4L
- 2002 F-150 5.4L
- Related OBD-II Codes
- Frequently Asked Questions
- 🎟️ Get 5% Off