
P0030 on 2007-2009 Kia Sorento 3.8L V6: O2 Sensor Heater Circuit Causes and Fixes
On a 2007-2009 Sorento 3.8L, P0030 almost always means the heater inside the Bank 1 Sensor 1 oxygen sensor has failed. This is the upstream sensor on the passenger side, near the firewall. Before replacing it, check the 15A 'SENSOR 1' fuse in the engine bay. The part costs $60-$180, but access is very difficult, often requiring removal of the passenger-side front wheel and inner fender liner for a better angle.
- P0030 on this Sorento points to the upstream oxygen sensor on the passenger side (Bank 1).
- Before buying any parts, always check the 15A 'SENSOR 1' fuse in the engine bay fuse box.
- The most likely cause is a failed oxygen sensor, but be prepared for a difficult replacement due to its location near the firewall.
- Ignoring the code will lead to poor gas mileage and could eventually harm your catalytic converter.
What's Unique About the 2007-2009 Kia Sorento
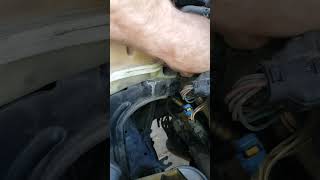
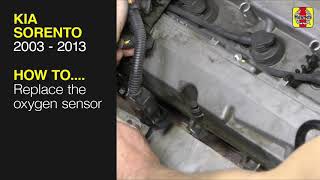
For this first-generation (BL) Kia Sorento, the 3.8L V6 engine has a longitudinal (rear-wheel drive style) layout. Bank 1 is the cylinder bank on the passenger side. The Sensor 1 (upstream) location on this bank is tucked between the engine and the firewall, making it notoriously difficult to access for diagnosis or replacement. Many owners report that the only effective way to reach it is by removing the passenger-side front wheel and the plastic fender liner to access the sensor from the side. 🎬 Watch: Step-by-step Bank 1 Sensor 1 replacement guide Even then, specialized tools like O2 sensor sockets, swivels, and long extensions are essential.
Symptoms You May Notice
- Check Engine Light illuminated
- Decreased fuel economy
- Failure to pass an emissions test
- Possible hesitation during acceleration when the engine is cold
- Engine runs in a fixed fuel mix (open-loop) for longer than usual after startup
- Replacing the oxygen sensor without checking the 'SENSOR 1' fuse first.
- Replacing the wrong oxygen sensor, such as the downstream (Sensor 2) or the sensor on the wrong bank (Bank 2, driver's side).
- Assuming the sensor is bad when the true cause is an oil-soaked connector from a leaking valve cover gasket.
Most Likely Causes
- Failed Bank 1, Sensor 1 Oxygen Sensor 🔴 High Probability → Shop Oxygen Sensor The internal heater element within the oxygen sensor is a common point of failure due to constant, extreme heat cycles. It's a wear-and-tear component.
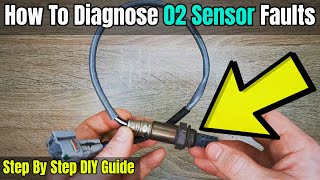
How to confirm: After confirming the fuse and wiring are intact, test the resistance of the heater circuit within the O2 sensor itself using a multimeter. 🎬 Watch: How to diagnose an O2 sensor heater fault An open circuit (infinite resistance) or a short (near-zero resistance) confirms a failed heater. A good sensor typically has a resistance between 2 and 30 ohms.
Typical fix: Replace the Bank 1, Sensor 1 oxygen sensor.
Est. part cost: $60-$180 - Blown Fuse 🟡 Medium Probability
How to confirm: Locate the fuse box in the engine bay and inspect the 15A fuse, often labeled 'SENSOR 1' or similar (e.g., 'AF heater'). A visual inspection or continuity test will show if it's blown.
Typical fix: Replace the blown 15A fuse. If it blows again immediately, a short circuit exists in the wiring that must be traced and repaired.
Est. part cost: $1-$5 - Damaged Wiring or Connector ⚪ Low Probability The sensor wiring is close to the hot exhaust manifold, increasing the risk of wires melting or becoming brittle and breaking over time. Oil leaks from the valve cover gaskets, a common issue on this engine, can also saturate the connector and wiring, causing shorts or poor connections.
How to confirm: Visually inspect the wiring harness and connector leading to the O2 sensor for any signs of melting, chafing, corrosion, or loose pins.
Typical fix: Repair the damaged section of the wiring harness or replace the connector pigtail. Clean any oil contamination with electrical contact cleaner.
Est. part cost: $15-$50
Rare But Worth Checking
- Faulty Powertrain Control Module (PCM): → Shop Engine Control Module (ECM) This is extremely rare. The PCM driver for the heater circuit can fail, but this should only be considered after all other possibilities, including the sensor, fuse, and wiring, have been exhaustively tested and ruled out.
Diagnosis Steps
- Read the trouble codes with an OBD-II scanner to confirm P0030 is present.
- Locate the engine bay fuse box and inspect the 15A fuse for the O2 sensor heaters, typically labeled 'SENSOR 1'. Replace if blown.
- If the fuse is good, safely raise the vehicle to gain access. For best results, remove the front passenger-side wheel and the inner fender liner.
- Locate the Bank 1, Sensor 1 (upstream) oxygen sensor. It is situated on the passenger-side exhaust manifold before the catalytic converter, tucked near the firewall.
- Visually inspect the sensor's wiring and connector for any obvious signs of damage, such as melted plastic, frayed wires, corrosion, or oil contamination from a potential valve cover leak.
- Disconnect the sensor and test for power and ground at the vehicle-side connector. With the key in the 'On' position, you should have battery voltage on one pin and a good ground on another.
- Using a multimeter, measure the resistance across the two heater circuit pins on the sensor itself (these are typically the two wires of the same color). A reading of infinite resistance (open circuit) or zero resistance (short circuit) indicates a failed sensor. A good heater typically has a resistance between 2 and 30 ohms.
Parts You'll Likely Need
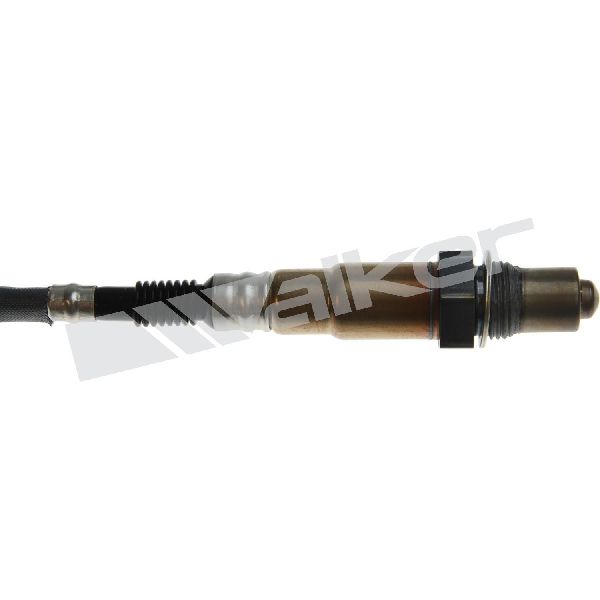
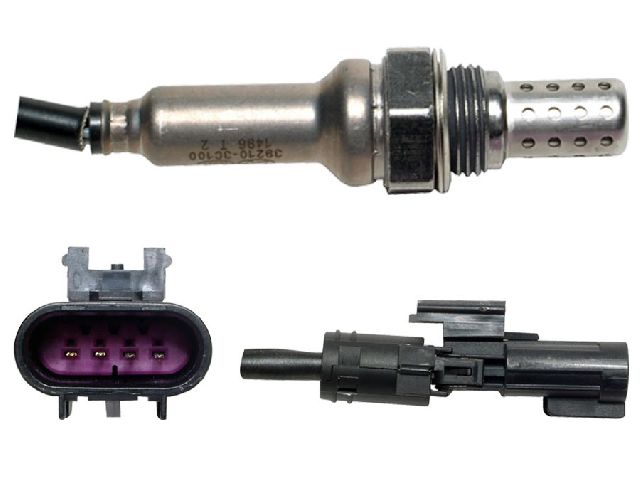
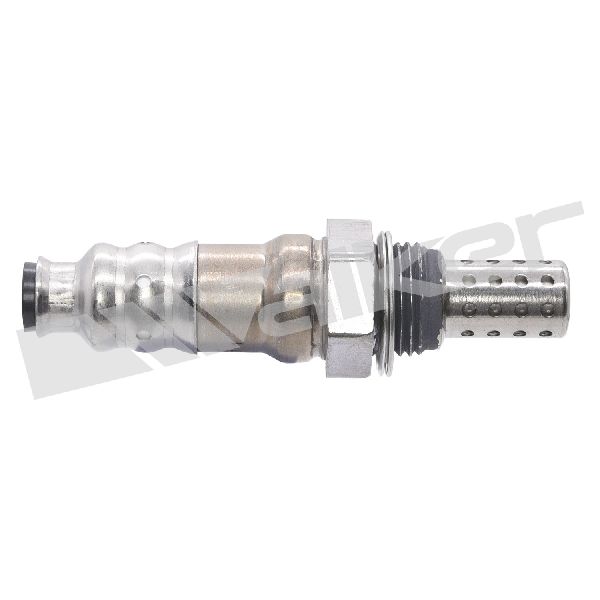
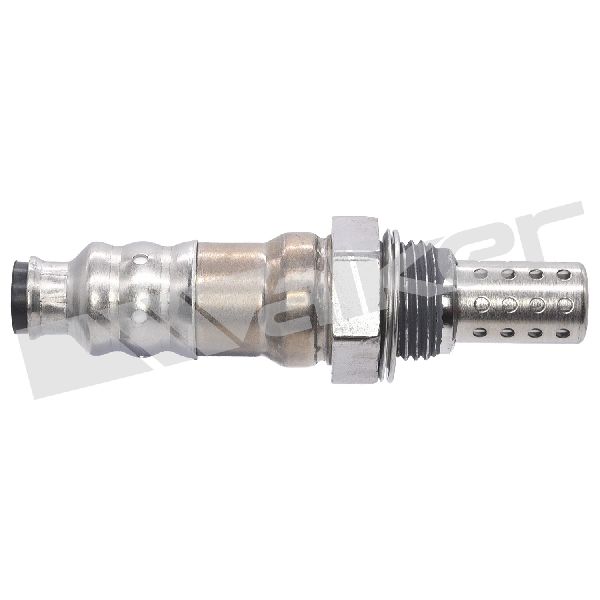
- Bank 1 Sensor 1 Oxygen Sensor
(OEM #39210-3C200)— This is the most common failure point for code P0030. The internal heater element burns out over time.
Trusted brands: Denso, Bosch, NGK/NTK
OEM price range: $110-$160
Aftermarket price range: $60-$180
Related Codes That Often Appear With This One
- P0031 — Indicates the heater circuit current is low, often caused by an open circuit in the heater element or wiring.
- P0032 — Indicates the heater circuit current is high, suggesting a short circuit in the heater element or wiring.
- P0050 — This is the equivalent heater circuit code for Bank 2, Sensor 1. If both appear, it may suggest a common power or ground issue, like the shared 'SENSOR 1' fuse.
Technical Service Bulletins (TSBs) & Recalls
- While no TSBs directly address P0030 on this specific model, Kia has issued numerous TSBs for the Sorento platform and Lambda engine family for other issues. Always check for open recalls.
Platform-Specific Known Issues
- The primary issue for the 2007-2009 Sorento 3.8L is the extremely difficult access to the Bank 1 Sensor 1 oxygen sensor, which is located on the passenger side near the firewall. This can turn a simple part swap into a multi-hour job requiring special tools like swivel sockets and long extensions.
- Many owners and mechanics on forums recommend removing the passenger front wheel and inner fender liner to get a better angle of attack on the sensor from the wheel well.
- Leaking valve cover gaskets are a common problem on the 3.8L Lambda engine. Oil can drip onto the O2 sensor connector below, causing a short or poor connection and triggering a P0030 code. This should be inspected as a potential root cause.
Mechanic-Grade Diagnostic Values
- O2 Sensor Heater Resistance — expected: 2.5 - 4.0 Ohms when cold. Some sources cite a broader acceptable range of 2-30 Ohms.. Failure: A reading of 'OL' (infinite resistance) indicates an open circuit, and a reading near 0 Ohms indicates a short circuit. Both conditions require sensor replacement.
- Heater Circuit Power at Harness Connector (Key On, Engine Off) — expected: Battery Voltage (~12V) on the power supply pin.. Failure: 0V indicates a problem upstream in the circuit, such as a blown fuse ('SENSOR 1' 15A) or a break in the power wire from the main relay.
- Heater Circuit Ground at Harness Connector — expected: The ground is provided and controlled by the PCM. A continuity test to a known good chassis ground should show an open circuit when disconnected from the sensor.. Failure: A constant ground with the key off may indicate a short to ground in the harness.
- O2 Sensor Signal Voltage (Engine Warm, at idle) — expected: Rapidly fluctuating between ~0.1V and ~0.9V.. Failure: A static voltage (e.g., stuck at 0.45V) or a voltage stuck high (above 0.8V) indicates a non-responsive or failed sensor.
Scan Tool Commands That Help
- Kia GDS (Global Diagnostic System): Actuation Test for O2 Sensor Heater — The GDS is the OEM diagnostic tool and can be used to command the O2 sensor heater circuit on or off. This is the most definitive way to test the entire circuit, including the PCM driver, wiring, and the heater element itself. If the heater can be activated with the scan tool but doesn't work during normal operation, it points towards a PCM logic issue, though this is rare.
Wiring & Ground Locations
- Bank 1 Sensor 1 Connector (C137) — On the passenger side of the engine, near the firewall, connected to the upstream O2 sensor on the exhaust manifold.. This is the main connection point for testing. A 2008 Sorento wiring diagram shows four pins: Pin 1 (Heater Power - from Engine Control Relay), Pin 2 (Heater Control - to PCM), Pin 3 (Sensor Signal), and Pin 4 (Sensor Ground). The heater circuit to test for P0030 is between Pins 1 and 2.
- G115 — A wiring diagram for a 2008 Sorento 3.8L shows a ground point labeled G115 that serves as a ground for multiple engine components, including the PCM.. While not the direct ground for the heater circuit (which is controlled by the PCM), a poor main engine or PCM ground can cause erratic behavior in all engine sensors and control modules. If multiple, seemingly unrelated electrical codes are present with P0030, checking the integrity of major ground points like G115 is a wise step.
Real Owner Repair Stories
- Go-Parts Repair Database (similar model) (Kia Sorento with P0031 (low circuit code, similar diagnosis)) — Check Engine Light
❌ Tried (didn't work) Checked fuse and relay, both were good.
✅ What actually fixed it The technician tested the resistance of the original sensor's heater circuit and measured 235,000 Ohms, far outside the specification of 2.5-4.0 ohms. Replacing the Bank 1 Sensor 1 oxygen sensor resolved the issue.
OEM Part Supersession History
39210-3C200→No supersession found, this part number appears to be stable.— N/A
Heads up: This part is used on the 3.8L engine in several Kia and Hyundai vehicles from the era, including the Sedona and Amanti. Ensure the brand and part number match the specific application, as universal sensors may have incorrect wire lengths or connectors.
Diagnostic Flowchart
Other Known Issues on This Vehicle
Issues unrelated to this code that are worth knowing about as an owner of this generation:
- Timing Chain / Tensioner Wear 🔴 High — More common on higher mileage (100k+ miles) engines, especially with poor oil change history. Can cause rattling on startup and lead to catastrophic engine failure if ignored.
- Leaking Valve Cover Gaskets 🟠 Medium — Very common. Gaskets become hard and brittle, causing oil to leak onto the exhaust manifolds (creating a burning smell) and into spark plug wells (causing misfires).
- Oil Control Valve (OCV) Failure 🟠 Medium — Common cause for various cam timing-related CEL codes (e.g., P0018, P0022). The valves get clogged with sludge or fail electrically, affecting the CVVT system.
- ABS Module Electrical Short (Recall) 🔴 High — Subject to recall (NHTSA Campaign ID: 20V518000, Kia SC098). Moisture can enter the ABS module, creating a short circuit and a risk of engine compartment fire, even when the vehicle is off. (Ref: Recall SC098)
- Stop Lamp Switch Failure (Recall) 🟠 Medium — Subject to recall. A faulty switch can cause brake lights to fail to illuminate, or stay on, and can prevent the shifter from moving out of Park. (Ref: Recall SC078)
- Oil Consumption 🟠 Medium — The 3.8L Lambda engine family can be prone to oil consumption, often linked to piston ring issues, which can be exacerbated by infrequent oil changes.
Used vs. New Parts: Buying Guide for This Vehicle
When a used part is the smart pick: NEVER for the oxygen sensor itself. It is a wear-and-tear component with a finite lifespan. A used sensor has an unknown history and could fail quickly. A used wiring pigtail from a junkyard is a smart choice if only the connector or a small section of the harness is damaged.
Donor-vehicle mileage cap: roughly under 80000 miles for the part to have meaningful remaining life.
What to inspect on the donor part:
- For a wiring pigtail: Ensure the plastic is not brittle or cracked.
- Check that the connector's locking tab is intact and functional.
- Inspect pins for any signs of green or white corrosion.
- Ensure wires are flexible and insulation is not melted or frayed.
OEM-only on this vehicle (don't cheap out):
- While not strictly 'OEM-only', using a sensor from the original equipment manufacturer (like Denso or NTK) is highly recommended. Cheap, unbranded sensors are notorious for premature failure, incorrect readings, and causing recurring codes.
Aftermarket brands forum-validated for this vehicle:
- Denso
- NTK / NGK
- Bosch
Brands owners have reported issues with on this vehicle:
- Unbranded, 'white-box' sensors from online marketplaces. While the price is tempting, forum discussions and mechanic reviews frequently cite these as a common source of comebacks and misdiagnoses.
Real Owner Stories
Aggregated from forums and TSBs cited above. Mileages and costs reflect what owners reported in those sources.
2007-2009 Kia Sorento 3.8L V6
Symptoms: Check Engine Light was on. After researching, found that the Bank 1 Sensor 1 location is a 'real knuckle-buster'.
What fixed it: Replaced the Bank 1 Sensor 1 oxygen sensor using a swivel socket and long extensions to reach the passenger-side manifold near the firewall.
Source hint: Kia-Forums.com
2007-2009 Kia Sorento 3.8L V6
Symptoms: P0030 code present.
What fixed it: Checked the engine bay fuse box and found the 15A 'SENSOR 1' fuse was blown. Replacing the fuse resolved the code without needing a new sensor.
Source hint: SorentoNation.com
Related OBD-II Codes
Frequently Asked Questions
Is there a recall for the P0030 code on my 2007-2009 Kia Sorento?
Could an oil leak from my 3.8L engine be causing this sensor code?
Where is the fuse for the Bank 1 Sensor 1 heater located?
Why is the labor for replacing this sensor so expensive on the Sorento?
Can I use a used oxygen sensor from a donor vehicle like a Hyundai Veracruz?
Helpful Videos
We Have This Part in Stock


The information in this article is provided for general reference and educational purposes only. Vehicle specifications, procedures, and part compatibility can vary by production date, trim level, and region. Always consult your vehicle's factory service manual and verify part numbers before purchasing or performing repairs. Safety-critical components such as airbags, seat belts, and braking systems should be installed by a qualified professional.
- Kia Sorento:
- 🧭 Diagnostic Flowchart
- 🎬 Helpful Videos
- 🛍️ Shop This Part
- What's Unique About the 2007-2009 Kia Sorento
- Symptoms You May Notice
- Most Likely Causes
- Rare But Worth Checking
- Diagnosis Steps
- Parts You'll Likely Need
- Related Codes That Often Appear With This One
- Technical Service Bulletins (TSBs) & Recalls
- Platform-Specific Known Issues
- Mechanic-Grade Diagnostic Values
- Scan Tool Commands That Help
- Wiring & Ground Locations
- Real Owner Repair Stories
- OEM Part Supersession History
- Other Known Issues on This Vehicle
- Used vs. New Parts: Buying Guide for This Vehicle
- Real Owner Stories
- 2007-2009 Kia Sorento 3.8L V6
- 2007-2009 Kia Sorento 3.8L V6
- Related OBD-II Codes
- Frequently Asked Questions
- 🎟️ Get 5% Off