
P0030 on 2003-2008 Toyota Corolla 1.8L: Heater Circuit Failure Causes and Fixes
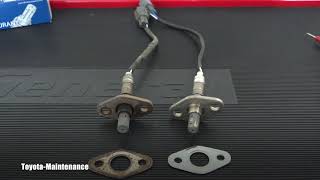
This code points to a failure in the heater circuit of the upstream oxygen sensor (Bank 1, Sensor 1), which Toyota calls an Air/Fuel Ratio Sensor. The most common fix is replacing the sensor itself, a simple DIY job. Before replacing, check the 'A/F HEATER' fuse. Expect to pay $60-$120 for an aftermarket Denso sensor (the OEM) or $150-$200 for a genuine Toyota part.
- P0030 on a 2003-2008 Corolla almost always means the upstream Air/Fuel Ratio Sensor has failed.
- Before buying a new sensor, always check the 'A/F HEATER' or 'EFI NO. 2' fuse first, as it's a simple and cheap potential fix.
- The correct part is Bank 1, Sensor 1, located on the exhaust manifold before the catalytic converter.
- Denso is the OEM supplier; using a Denso aftermarket part (like model 234-9041) is a reliable and cost-effective repair.
- This is a DIY-friendly repair that requires a 22mm oxygen sensor socket but is otherwise straightforward. The job can often be completed in under 30 minutes.
What's Unique About the 2003-2008 Toyota Corolla
On the 1.8L 1ZZ-FE engine used in the 9th generation Corolla, the P0030 code is a very common and straightforward issue. There are no widespread design flaws or complex diagnostic traps. The upstream Air/Fuel Ratio sensor simply fails with age. Denso is the original equipment manufacturer (OEM) for Toyota, so choosing a Denso replacement like the 234-9041 is a cost-effective way to get the same quality part without the dealership markup. This issue is also common on platform mates like the Toyota Matrix and Pontiac Vibe that share the same engine.
Symptoms You May Notice
- Check Engine Light is on
- Decreased fuel economy
- Rough or unstable idle, especially during warm-up before the engine enters closed-loop operation
- Failure to pass an emissions inspection
- Vehicle may enter a 'limp mode' with reduced power in some cases
- Replacing the downstream oxygen sensor (Bank 1, Sensor 2). P0030 specifically refers to Sensor 1, which is the upstream sensor in the exhaust manifold.
- Assuming the sensor is bad without checking the 'A/F HEATER' or 'EFI NO. 2' fuse first.
Most Likely Causes
- Failed Air/Fuel Ratio Sensor 🔴 High Probability → Shop Oxygen Sensor The internal heater element is a common failure point on these sensors as they age. It's a standard wear-and-tear item that eventually burns out like a light bulb filament.
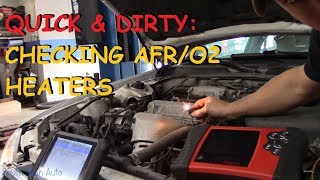
How to confirm: After checking fuses and wiring, the most definitive test is to measure the resistance across the two heater circuit pins on the sensor connector 🎬 Watch: A professional guide to testing the heater circuit with a multimeter. (usually the two same-colored wires, often black). For this specific sensor, the expected resistance is between 1.8 and 3.4 Ohms at 68°F (20°C). An open circuit (infinite resistance) or a reading far outside this range confirms a bad heater element.
Typical fix: Replace the Bank 1, Sensor 1 Air/Fuel Ratio Sensor.
Est. part cost: $60-$200 - Blown Fuse or Faulty Relay 🟡 Medium Probability
How to confirm: Check the fuse box in the engine compartment for a blown fuse. On this Corolla, it is often labeled 'EFI NO. 2' or 'A/F HEATER'. A visual inspection or a multimeter test will confirm if the fuse is blown. Also check the 'A/F HEATER' relay if present.
Typical fix: Replace the blown fuse. If it blows again immediately, there is a short circuit in the wiring that must be found and repaired.
Est. part cost: $1-$5 for a fuse, $15-$30 for a relay - Damaged Wiring or Connector ⚪ Low Probability The wiring is close to the hot exhaust manifold and can become brittle, or damaged by rodents or improper service.
How to confirm: Visually inspect the wiring harness and connector leading to the A/F sensor for any signs of melting, chafing, corrosion, or loose pins. With the key on (engine off), use a multimeter to check for 12V power at the harness-side connector. The absence of voltage points to a wiring or fuse issue, not a sensor issue.
Typical fix: Repair the damaged section of the wiring harness or clean/replace the connector.
Est. part cost: $10-$50
Rare But Worth Checking
- Faulty Engine Control Module (ECM): → Shop Engine Control Module (ECM) This is extremely rare. The ECM, which controls the ground side of the heater circuit, should only be considered after all other possibilities (sensor, fuse, wiring) have been exhaustively tested and ruled out.
- Exhaust Leak: A significant exhaust leak before the sensor can introduce oxygen and skew readings, though it's less likely to directly cause a P0030 heater circuit code, it can sometimes trigger related codes.
Diagnosis Steps
- Read the code with an OBD-II scanner to confirm P0030 is the primary code.
- Inspect the 'A/F HEATER' or 'EFI NO. 2' fuse in the engine bay fuse box. Replace it if it's blown.
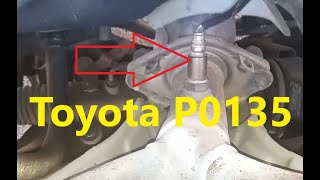
- If the fuse is good, locate the Bank 1 Sensor 1 Air/Fuel Ratio sensor. It is on the front of the engine, screwed into the exhaust manifold, easily visible from the top.
- Inspect the sensor's wiring harness and connector for any visible damage, such as melting from contact with the exhaust, frayed wires, or corrosion in the connector pins.
- Disconnect the sensor. With the ignition on (engine off), use a multimeter to verify that there are 12 volts at the power pin in the harness-side connector. If no voltage, the problem is upstream in the wiring or fuse box.
- With the sensor still disconnected, switch the multimeter to measure resistance (Ohms). Measure between the two heater pins on the sensor itself (typically the two wires of the same color).
- Confirm the reading. A good sensor should read between 1.8 and 3.4 Ohms. A reading of 'OL' (Open Loop/infinite resistance) means the heater is broken and the sensor must be replaced. A reading of 0 Ohms indicates a short.
- If all tests pass but the code persists, the issue may be an intermittent wiring problem or a rare fault in the ECM driver circuit.
Parts You'll Likely Need
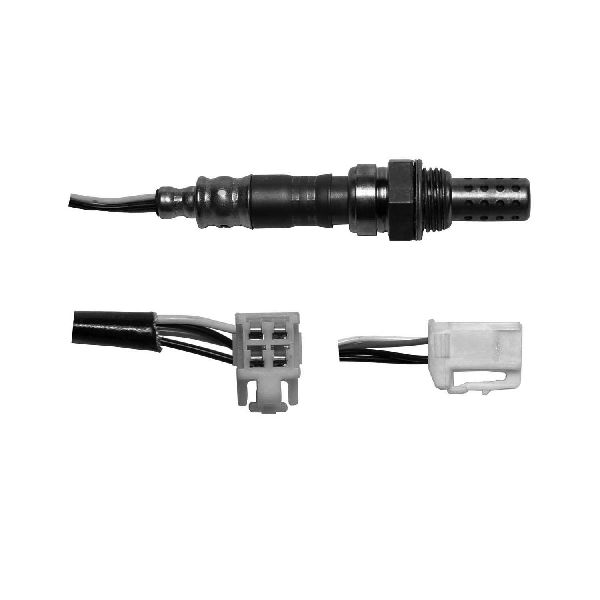
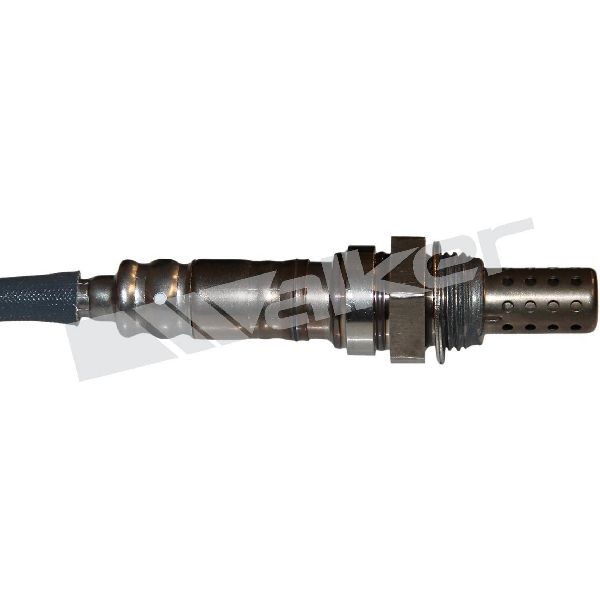
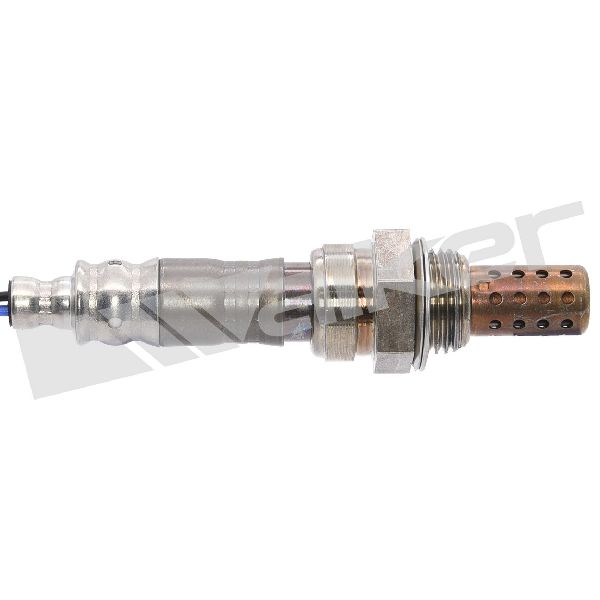
- Air/Fuel Ratio Sensor (Bank 1, Sensor 1)
(OEM #89467-12030)— This is the component that contains the heater circuit identified by the P0030 code. The internal heater element fails over time, which is the most common cause of the code.
Trusted brands: Denso (OEM, recommended), Bosch, NGK/NTK
OEM price range: $150-$200
Aftermarket price range: $60-$120
Platform-Specific Known Issues
- Owner Experience: Fuse Check is Critical: Multiple owners on forums report that the first and most important step is checking the A/F heater fuse. One owner on ToyotaNation forums spent money on a new sensor only to find the fuse was the actual problem. Always check the simple things first.
- Repair Story: DIY Replacement Success: A user on the CorollaForum detailed their successful replacement of the sensor on a 2005 Corolla. They noted that penetrating oil on the old sensor's threads a day before removal was key. They used a 22mm oxygen sensor socket and had the job done 🎬 See this walkthrough for a quick and easy sensor replacement. in under 30 minutes. The check engine light was cleared and did not return.
Mechanic-Grade Diagnostic Values
- A/F Sensor Heater Resistance — expected: 1.8 - 3.4 Ω at 20°C (68°F). Failure: Infinite resistance (Open circuit) or near 0 Ω (short circuit).
- A/F Sensor Heater Current Draw — expected: Approximately 5 to 7 amps. The ECM will set a fault if current is outside the normal range.. Failure: A current draw of less than 0.8 A may set a P0031, while a draw over 10 A may set a P0032. A P0030 indicates a general circuit malfunction.
- Heater Circuit Voltage at Connector — expected: Battery Voltage (Approx. 12V) with key on, engine off.. Failure: 0V indicates an open in the power supply side (fuse, relay, wiring).
- Heater Control Signal at ECM — expected: Pulse-Width Modulated (PWM) ground signal. Can be observed with an oscilloscope.. Failure: No signal or a steady ground/open indicates a faulty ECM driver.
Scan Tool Commands That Help
- Toyota Techstream: Active Test: A/F Control — This function allows a technician to manually command the fuel mixture rich or lean (-12.5% to +25%). While it doesn't directly test the heater, observing the A/F sensor's voltage response during this test can confirm if the sensor is responsive at all after warming up, helping to isolate a pure heater circuit issue from a failed sensing element.
- Toyota Techstream: Data List: A/F Heater Duty — This parameter shows the duty cycle percentage the ECM is commanding to the heater circuit. When the engine is cold, this should show a high percentage. If it remains at 0% on a cold start, it points to a problem with the ECM's command or an immediate fault detection, rather than the heater element itself.
Wiring & Ground Locations
- A/F Sensor Connector (B7) — On the wiring harness attached to the A/F sensor, located on the front exhaust manifold.. This is the primary connection point for testing. Pin 1 (HT) and Pin 2 (+B) are for the heater circuit. Testing for resistance on the sensor side and voltage on the harness side is done here.
- ECM Connector (E5) — Located in the engine bay, typically on the passenger side near the firewall.. The heater control wire (HT1A) from the A/F sensor runs to a specific pin on this connector. A continuity test from the sensor connector to this ECM pin can verify the integrity of the control wire. A break in this wire would cause a P0030.
- Ground Point (e.g., EA, EB) — Various points on the engine block and chassis. A key ground for the 1ZZ-FE is often found on the intake manifold or near the cylinder head.. While the heater circuit is controlled by the ECM, the ECM itself and related relays rely on solid engine and chassis grounds. A corroded or loose main engine ground can cause a variety of electrical issues, including intermittent sensor faults.
Real Owner Repair Stories
- ToyotaNation Forums (2005 Toyota Corolla S, 1.8L) — Check Engine Light with codes P0030 and P0031.
❌ Tried (didn't work) Initially suspected the A/F sensor itself.
✅ What actually fixed it The user found and replaced a blown 15A 'A/F HEATER' fuse in the under-hood fuse box. The code was cleared and did not return.
OEM Part Supersession History
89467-12030→89467-02040— Standard part number update/revision by Toyota.
Heads up: The original part number 89467-12030 is listed for the 2003-2008 Corolla with the 1ZZ-FE engine, but the superseding part 89467-02040 appears to be for the later 2ZR-FE engine (2009+ Corolla). For the 2003-2008 model range, it is critical to use the specified Denso 234-9041 or the original 89467-12030 part number, not the superseded one, to ensure compatibility.
Diagnostic Flowchart
Real Owner Stories
Aggregated from forums and TSBs cited above. Mileages and costs reflect what owners reported in those sources.
2005 Toyota Corolla S 1.8L
Symptoms: Check engine light came on with P0030 and P0031 codes.
What fixed it: Replaced the blown A/F heater fuse. The owner initially purchased a new sensor but discovered the fuse was the actual root cause before installing it.
Source hint: ToyotaNation forums thread titled 'P0031 and P0030 on 2005 Corolla S 1.8L'
2005 Toyota Corolla 1.8L
Symptoms: Check engine light illuminated with a P0030 code.
What fixed it: Replaced the Bank 1 Sensor 1 Air/Fuel Ratio sensor. The owner soaked the threads in penetrating oil a day prior and used a 22mm oxygen sensor socket, completing the job in under 30 minutes and permanently clearing the code.
Source hint: CorollaForum thread titled 'P0030 O2 heater control circuit bank 1 sensor 1'
Related OBD-II Codes
Frequently Asked Questions
Where is the Bank 1 Sensor 1 Air/Fuel Ratio sensor located on my 2003-2008 Corolla 1.8L?
What should the resistance be when testing the A/F sensor heater on this vehicle?
Which fuse should I check first for a P0030 code on a 2003-2008 Corolla?
What brand of Air/Fuel Ratio sensor is recommended as a replacement?
Does the P0030 code affect the Pontiac Vibe or Toyota Matrix the same way?
What tools do I need to replace the A/F sensor myself?
Helpful Videos


We Have This Part in Stock


The information in this article is provided for general reference and educational purposes only. Vehicle specifications, procedures, and part compatibility can vary by production date, trim level, and region. Always consult your vehicle's factory service manual and verify part numbers before purchasing or performing repairs. Safety-critical components such as airbags, seat belts, and braking systems should be installed by a qualified professional.
- Toyota Corolla:
- 🧭 Diagnostic Flowchart
- 🎬 Helpful Videos
- 🛍️ Shop This Part
- What's Unique About the 2003-2008 Toyota Corolla
- Symptoms You May Notice
- Most Likely Causes
- Rare But Worth Checking
- Diagnosis Steps
- Parts You'll Likely Need
- Platform-Specific Known Issues
- Mechanic-Grade Diagnostic Values
- Scan Tool Commands That Help
- Wiring & Ground Locations
- Real Owner Repair Stories
- OEM Part Supersession History
- Real Owner Stories
- 2005 Toyota Corolla S 1.8L
- 2005 Toyota Corolla 1.8L
- Related OBD-II Codes
- Frequently Asked Questions
- 🎟️ Get 5% Off