
P0031 on 2007-2015 Lexus RX350: A/F Sensor Heater Circuit Causes and Fixes
On a 2007-2015 Lexus RX350, P0031 almost always means the heater inside the Bank 1, Sensor 1 Air/Fuel Ratio sensor has failed. This sensor is on the rear exhaust manifold against the firewall. Replacing it with a Denso part is the typical fix, costing around $90-$180 for the part. Due to its difficult location, DIY difficulty is high (4/5). The ECM triggers this code when it detects that the current in the heater circuit is too low, typically below 0.8 amps.
- P0031 points directly to a failure in the heater circuit of the Air/Fuel sensor located on the rear exhaust manifold (firewall side).
- The sensor itself is the cause over 95% of the time; its heater element simply wears out.
- Don't be alarmed by the VSC and TRAC lights; they are a secondary effect of this engine code on a Lexus.
- This is a challenging DIY repair due to the sensor's very tight location. A 22mm O2 sensor socket, extensions, and penetrating oil are required.
- Always use a high-quality Denso sensor, as they are the OEM supplier, and double-check the part number for your specific model year.
What's Unique About the 2007-2015 Lexus RX350
On the RX350's transverse 2GR-FE engine, 'Bank 1' is the cylinder bank against the firewall, making this specific sensor (Bank 1, Sensor 1) notoriously difficult to access compared to the Bank 2 sensor near the radiator. Owners frequently report that when this code appears, the 'Check VSC', 'TRAC OFF', and sometimes 'Check AWD' lights also illuminate; this is a common, though confusing, secondary warning strategy on many Lexus and Toyota vehicles and does not indicate a problem with those systems.
Generation note: This range covers two RX350 generations: the 2nd Gen (2007-2009) and 3rd Gen (2010-2015). While the engine and code meaning are the same, the specific OEM and aftermarket part numbers for the Bank 1 Sensor 1 A/F sensor may differ. Always verify the part number with your vehicle's VIN before purchasing. For example, the Denso part for 2007-2009 is often cited as 234-9008, while 2010-2011 may use 234-9049.
Symptoms You May Notice
- Check Engine Light is on
- VSC, TRAC OFF, and/or Check AWD warning lights are also illuminated
- Decreased fuel economy
- Slightly rough idle or hesitation, especially on a cold start
- Failing a vehicle emissions test
- A strong smell of fuel may be noticeable, indicating a rich running condition.
- Replacing the wrong sensor. P0031 is ONLY for Bank 1 (firewall side), Sensor 1 (upstream, before the catalytic converter). It is easy to mistakenly replace Bank 2 (radiator side) or a downstream Sensor 2.
- Assuming the VSC/TRAC/AWD lights indicate a problem with those systems. They are a secondary warning triggered by the primary engine fault code.
Most Likely Causes
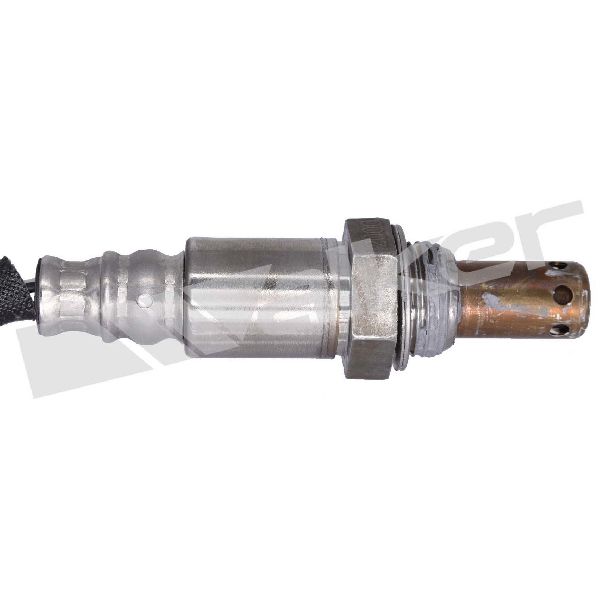
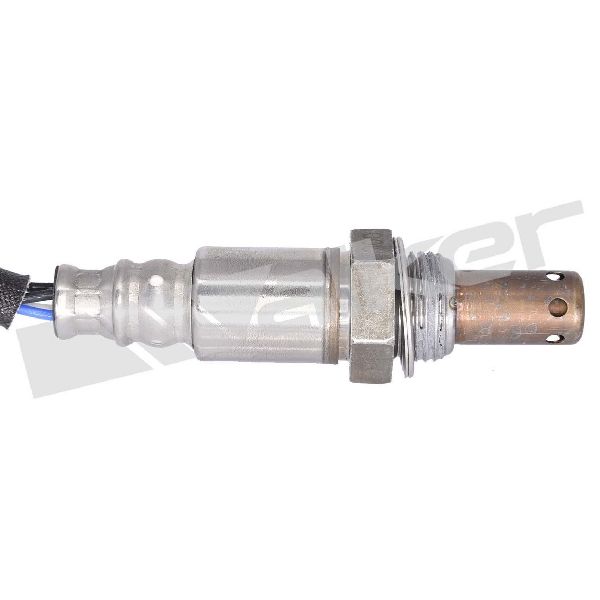
- Failed Bank 1, Sensor 1 Air/Fuel Ratio Sensor 🔴 High Probability → Shop Oxygen Sensor The internal heater element is a common wear-and-tear item that eventually burns out from thousands of heating and cooling cycles, creating an open circuit.
How to confirm: Using a multimeter, disconnect the sensor and measure the resistance across the two heater pins (typically the two same-colored wires, often black on Denso sensors). A good sensor will have a low resistance, typically between 1.8 and 3.4 Ohms at room temperature (68°F/20°C). A failed sensor will show infinite resistance (Open Loop or 'OL'), confirming the internal heater has burned out.
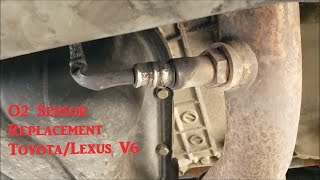
Typical fix: Replace the Bank 1, Sensor 1 Air/Fuel Ratio Sensor. This sensor is located on the rear exhaust manifold, against the firewall. 🎬 See this video for the Bank 1 sensor replacement Soaking the sensor threads with a penetrating oil like PB Blaster overnight is highly recommended. A special tool like a 22mm (or 7/8") offset or crow's foot O2 sensor socket is often required for removal due to tight access.
Est. part cost: $90-$180 - Damaged Wiring or Corroded Connector ⚪ Low Probability The wiring harness is located near the hot exhaust manifold, which can make it brittle over time. Road debris and moisture can also lead to corrosion in the connector pins.
How to confirm: Visually inspect the wiring harness leading to the sensor for any signs of melting, chafing, or breaks. Unplug the connector and check the pins for corrosion, moisture, or damage. One owner on ClubLexus reported finding an orange/brownish liquid in the connector.
Typical fix: Repair the damaged section of wire or clean the connector terminals with electrical contact cleaner. If the connector is damaged, it may need to be replaced.
Est. part cost: $5-$50 - Blown A/F Heater Fuse ⚪ Low Probability
How to confirm: Locate the fuse box in the engine bay and check the fuse labeled 'A/F HEATER' or 'EFI No. 2'. On some Toyota/Lexus models, this is a 25A fuse. Visually inspect the fuse to see if it is blown or test for continuity with a multimeter.
Typical fix: Replace the blown fuse. If the new fuse blows immediately, it indicates a short circuit in the wiring to one of the A/F sensors that must be diagnosed and repaired.
Est. part cost: $1-$5
Rare But Worth Checking
- Faulty Engine Control Module (ECM): This is extremely rare. All other possibilities, especially the sensor itself and its wiring, should be exhaustively ruled out before considering the ECM as the cause.
Diagnosis Steps
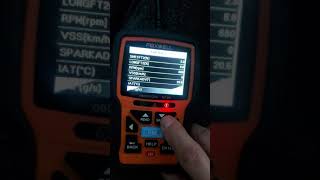
- Read the trouble codes with an OBD-II scanner to confirm P0031 is present. 🎬 Watch: A diagnostic walkthrough for the P0031 code Note any other codes like P2238 or P0051.
- Check the 'A/F HEATER' fuse (often 25A) in the engine bay fuse box. If it's blown, replace it and see if the code returns. If it blows again, suspect a short in the wiring.
- If the fuse is good, safely raise and support the vehicle to gain access from underneath.
- Locate the Bank 1, Sensor 1 A/F sensor on the rear exhaust manifold (firewall side). It is notoriously difficult to see and reach.
- Visually inspect the sensor's wiring and connector for any obvious damage, melting, or corrosion. Ensure the connector is dry and clean inside.
- Disconnect the sensor. Test the resistance of the heater element across the two same-colored wires (usually black) on the sensor side of the connector. An open circuit ('OL' or infinite resistance) confirms the sensor has failed. A good sensor should read between 1.8-3.4 ohms at 68°F (20°C).
- If resistance is within spec, check for 12V power at the harness-side connector with the ignition ON. Lack of power points to a wiring or fuse issue upstream.
- If power is present and sensor resistance is good, there may be an issue with the ground circuit or, in very rare cases, the ECM driver circuit.
Parts You'll Likely Need
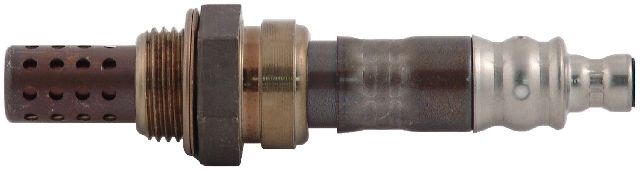
- Air/Fuel Ratio Sensor (Bank 1, Sensor 1)
(OEM #89467-0E020 (2007-2009), 89467-48160 (2010-2015))— This is the component identified by the code, and its internal heater is the most common failure point.
Trusted brands: Denso (OEM supplier)
OEM price range: $180-$280
Aftermarket price range: $90-$180 - O2 Sensor Socket Set — A specialized 22mm (7/8") offset or crow's foot oxygen sensor socket is often necessary to access and get leverage on the sensor in its tight location.
Trusted brands: Lisle, OEMTOOLS, GearWrench
Aftermarket price range: $15-$40
Related Codes That Often Appear With This One
- P2238 — P2238 refers to the A/F Sensor Pumping Current Circuit Low for the same sensor (Bank 1, Sensor 1). They often appear together because a failure in the sensor can affect both the heater and pumping current circuits.
- P0051 — This code is for 'HO2S Heater Control Circuit Low (Bank 2, Sensor 1)'. While not always present with P0031, seeing both codes simultaneously could point to a shared power supply issue, like the 'A/F HEATER' fuse, rather than two sensors failing at the exact same time.
Platform-Specific Known Issues
- Access to the Bank 1 sensor is very restricted. Mechanics and DIYers often need to work from underneath the vehicle and may need to remove underbody plastics or even an exhaust pipe section to gain enough clearance to work.
- A ClubLexus forum member confirmed the dealer quoted them ~$550 for the repair, while a Toyota dealer quoted ~$400, highlighting potential savings by using a Toyota service center.
- DIY repair requires significant patience. One owner on YouTube recommended using a chain wrench in combination with other tools to break the stubborn sensor loose from a similar 2GR-FE engine.
Mechanic-Grade Diagnostic Values
- A/F Sensor Heater Resistance — expected: 1.8 to 3.4 Ω at 20°C (68°F). Failure: Infinite resistance ('OL' on a multimeter), indicating an open circuit in the heater element.
- A/F Sensor Heater Circuit Current — expected: Greater than 0.8 A. Failure: Current is less than 0.8 A, which triggers the P0031 DTC.
- A/F Sensor Live Data (Scan Tool) — expected: A fluctuating waveform or voltage reading when the engine is running.. Failure: A flat-line voltage reading (e.g., stuck at 3.29V) on the scan tool for Bank 1 Sensor 1, while Bank 2 Sensor 1 shows normal activity.
- A/F Sensor Insulation Resistance — expected: 10 kΩ or higher. Failure: Resistance is lower than 10 kΩ, indicating a short between the heater and sensor elements.
Hidden / Shadow Codes Worth Checking
- Mode 6, TID $01, CID $01: This refers to the On-Board Diagnostic Monitor Test Results for the Bank 1 Sensor 1 Heater. A failing test here, where the test value exceeds the test limit, can confirm the heater circuit malfunction before a persistent DTC is set. (see via An advanced OBD-II scan tool capable of displaying Mode 6 test results.)
Scan Tool Commands That Help
- Toyota Techstream: Active Test: Control the Injection Volume for A/F Sensor — This test allows a technician to manually make the fuel mixture rich or lean (-12.5% to +12.5%). By observing the 'AF Lambda Bank 1' live data parameter, you can confirm if the sensor is responding to the changes. A good sensor will show lambda values shifting towards ~0.85 (rich) and ~1.14 (lean). A bad sensor will not respond, confirming it's faulty even if it's not setting a heater code.
- Toyota Techstream: Active Test: A/F Control — This function can be used to check the overall response of the A/F sensor system. If the sensor output voltage does not change when performing the active test, the sensor itself is likely malfunctioning.
Wiring & Ground Locations
- A/F HTR Relay — Located within the Integration Relay, which is in the engine room No. 1 relay block (fuse box).. This relay supplies the B+ (battery voltage) to the A/F sensor heater circuit. A failure in this relay or its integrated 'A/F' fuse can cause P0031 and/or P0051.
- ECM (Engine Control Module) — Located behind the glove box on the 2010-2015 models.. The ECM provides the pulse-width modulated ground control for the heater circuit via the HA1A pin. All wiring from the sensor's heater circuit ultimately terminates here.
- Bank 1 Sensor 1 Connector (B33 or B48) — On the back of the engine, near the firewall, attached to the wiring harness leading down to the sensor in the rear exhaust manifold.. This is the primary point for testing voltage, ground, and sensor resistance. The heater circuit pins are typically Pin 1 (HA1A - ECM control) and Pin 2 (+B - Relay power).
- Engine Room J/B Assembly — Located on the left front fender apron.. This junction block (fuse box) contains the main EFI fuses ('EFI MAIN', 'EFI NO. 2') that power the integration relay and the ECM, which are essential for the A/F heater circuit's operation.
Real Owner Repair Stories
- YouTube user Agung Wibawa (2010 Lexus RX350) — Check Engine Light, 'Check AWD system' warning, and Traction Control light were all on. Scan tool showed P0031.
❌ Tried (didn't work) The user immediately identified the sensor as the likely cause based on scan tool live data.
✅ What actually fixed it Replacing the Bank 1, Sensor 1 Air/Fuel ratio sensor with a new Denso unit resolved the code and all associated warning lights. The user showed 'before' live data with a flat line for B1S1 and 'after' data with a normal, active waveform.
OEM Part Supersession History
89467-0E020→This part number appears to be the current valid number for the 2007-2009 RX350.— N/A
Heads up: This part is specified for the 2nd generation RX350 (2007-2009). It is associated with Denso aftermarket part 234-9008.89467-48160→This part number appears to be the current valid number for the 2010-2012 RX350.— N/A
Heads up: This part is specified for the 3rd generation RX350 (2010-2012, and likely up to 2015). It is associated with Denso aftermarket part 234-9049. Using the wrong generation's sensor may result in fitment or electrical incompatibility.
Model Year Variations Within This Range
- 2007-2009 vs 2010-2015: The primary difference is the OEM and aftermarket part numbers for the Bank 1 Sensor 1 A/F sensor. The 2007-2009 models use OEM 89467-0E020 (Denso 234-9008), while 2010-2012+ models use OEM 89467-48160 (Denso 234-9049). While electrically similar, connector shapes or wire lengths may differ slightly.
Diagnostic Flowchart
Other Known Issues on This Vehicle
Issues unrelated to this code that are worth knowing about as an owner of this generation:
- Rupturing VVT-i Oil Line 🔴 High — Common on 2007-2009 models. The original rubber hose degrades and can burst, causing rapid oil loss and catastrophic engine failure if not addressed immediately. (Ref: Lexus issued a Limited Service Campaign (LSC 9LG, later extended) to replace the rubber line with an all-metal one.)
- Cracked or Melting Dashboard 🟡 Low — Very common on 2007-2009 models, especially in hot climates. The dashboard material degrades under sun exposure, becoming sticky, shiny, or developing cracks. (Ref: Lexus created a Warranty Enhancement Program (ZLD) to replace affected dashboards, but this program has since expired.)
- Power Steering Rack Leaks 🟠 Medium — A widely reported issue across the 2007-2015 model years. Leaks can develop from the rack and pinion assembly or the associated hoses, requiring costly replacement.
- Water Pump Failure 🟠 Medium — The water pump can fail, leading to coolant leaks and potential engine overheating. It's a known wear item on the 2GR-FE engine.
- Oil Leaks from Timing Cover 🟠 Medium — Some 2nd generation (2007-2009) models were prone to oil leaks from the timing chain cover seal, which is an expensive repair due to the labor involved.
Used vs. New Parts: Buying Guide for This Vehicle
When a used part is the smart pick: For this specific repair, buying a used Air/Fuel ratio sensor is NOT recommended. They are a wear-and-tear item with a finite lifespan. A used part may fail soon after installation. A used wiring harness pigtail from a junkyard is a viable option if only your connector is damaged.
Donor-vehicle mileage cap: roughly under 80000 miles for the part to have meaningful remaining life.
What to inspect on the donor part:
- If sourcing a connector pigtail, inspect for brittle or cracked insulation.
- Ensure the connector's locking tab is intact.
- Check for any signs of corrosion or bent pins inside the connector.
OEM-only on this vehicle (don't cheap out):
- Air/Fuel Ratio Sensor
Aftermarket brands forum-validated for this vehicle:
- Denso (This is the Original Equipment Manufacturer; buying a Denso-branded part is equivalent to buying the genuine Lexus part in a different box).
Brands owners have reported issues with on this vehicle:
- Unnamed or generic 'white-box' sensors from online marketplaces. Forum and mechanic consensus strongly advises against using non-OEM brands like Bosch for this specific application on Toyota/Lexus vehicles, as they can cause performance issues or fail prematurely.
Real Owner Stories
Aggregated from forums and TSBs cited above. Mileages and costs reflect what owners reported in those sources.
2010 Lexus RX350 2GR-FE
Symptoms: The dashboard displayed a confusing cluster of warning lights including Check Engine, AWD, and Trac Off. The owner had difficulty confirming the sensor's location.
What fixed it: The dealer identified and replaced the sensor on the rear exhaust manifold.
Source hint: ClubLexus.com - '2010 rx 350 p0031'
2008 Lexus RX350 2GR-FE
Symptoms: The vehicle triggered codes P0031 and P2238 simultaneously. The owner sought advice on sensor location (firewall side) and repair costs.
What fixed it: Replacement of the Bank 1, Sensor 1 A/F sensor using genuine Toyota/Denso parts.
Cost: $400-$550
Source hint: ClubLexus.com - 'RX350 CEL and Code P0031'
2007-2015 Lexus RX350 2GR-FE
Symptoms: The owner found an orange/brownish liquid inside the sensor connector during inspection.
What fixed it: Cleaning the connector terminals with electrical contact cleaner or replacing the damaged connector.
Source hint: Damaged Wiring or Corroded Connector section citing ClubLexus
Related OBD-II Codes
Frequently Asked Questions
Where is the Bank 1, Sensor 1 Air/Fuel Ratio sensor located on my Lexus RX350?
Why are my VSC, TRAC OFF, and Check AWD lights on when the code is for an oxygen sensor?
Can I test the sensor myself before buying a replacement?
Is there a specific fuse I should check for the P0031 code?
How much should I expect to pay for a professional repair at a Lexus dealer?
What tools are recommended for a DIY replacement of the rear sensor?
Helpful Videos


We Have This Part in Stock


The information in this article is provided for general reference and educational purposes only. Vehicle specifications, procedures, and part compatibility can vary by production date, trim level, and region. Always consult your vehicle's factory service manual and verify part numbers before purchasing or performing repairs. Safety-critical components such as airbags, seat belts, and braking systems should be installed by a qualified professional.
- Lexus RX350:
- 🧭 Diagnostic Flowchart
- 🎬 Helpful Videos
- 🛍️ Shop This Part
- What's Unique About the 2007-2015 Lexus RX350
- Symptoms You May Notice
- Most Likely Causes
- Rare But Worth Checking
- Diagnosis Steps
- Parts You'll Likely Need
- Related Codes That Often Appear With This One
- Platform-Specific Known Issues
- Mechanic-Grade Diagnostic Values
- Hidden / Shadow Codes Worth Checking
- Scan Tool Commands That Help
- Wiring & Ground Locations
- Real Owner Repair Stories
- OEM Part Supersession History
- Model Year Variations Within This Range
- Other Known Issues on This Vehicle
- Used vs. New Parts: Buying Guide for This Vehicle
- Real Owner Stories
- 2010 Lexus RX350 2GR-FE
- 2008 Lexus RX350 2GR-FE
- 2007-2015 Lexus RX350 2GR-FE
- Related OBD-II Codes
- Frequently Asked Questions
- 🎟️ Get 5% Off