
P0032 on 2010-2015 Toyota Prius: Heater Circuit High Fix for Bank 1 Sensor 1
This code almost always means the upstream Air/Fuel Ratio (O2) sensor has failed. The internal heater element shorts out, triggering the 'Circuit High' fault. Replacing it with an OEM Toyota or Denso part (like Denso 234-9096) is the most reliable fix. Expect to pay around $120-$180 for the part, and the repair is DIY-friendly, though accessing the sensor requires removing the wiper cowl assembly.
- P0032 on a 2010-2015 Prius points to a problem with the heater circuit in the upstream Air/Fuel Ratio sensor (Bank 1, Sensor 1).
- The most common fix by far is to replace the sensor itself due to an internal short in the heater element.
- Always use an OEM-quality sensor, like one from Denso (234-9096), to prevent compatibility issues and the code from returning.
- While the part is a simple replacement, accessing it requires removing the wiper cowl and linkage assembly, which adds time and complexity to the job.
- Before replacing the sensor, it's wise to quickly check the 'EFI MAIN' and 'EFI No. 2' fuses in the engine bay.
What's Unique About the 2010-2015 Toyota Prius
The 2010-2015 Prius (third generation) uses a wideband Air/Fuel Ratio sensor for the upstream position (Bank 1, Sensor 1), which is more sensitive than a traditional oxygen sensor. While the P0032 code is generic, on this platform it almost always points directly to the failure of the heater element within this specific sensor. Owners on forums like PriusChat consistently report that using non-OEM/Denso aftermarket sensors can cause the code to return, making the OEM Denso sensor the highly recommended replacement to ensure compatibility and longevity.
Symptoms You May Notice
- Check Engine Light is on
- Slightly reduced fuel economy (MPG)
- Vehicle may fail an emissions test
- In some rare cases, a brief hesitation or rough idle may be noticed.
- Replacing the downstream oxygen sensor (Bank 1, Sensor 2) instead of the upstream Air/Fuel Ratio sensor (Bank 1, Sensor 1).
- Using catalytic converter cleaner, as this code is related to an electrical circuit fault, not catalyst efficiency.
- Assuming the catalytic converter is bad. This code is specific to the sensor's heater circuit.
Most Likely Causes
- Failed Air/Fuel Ratio Sensor (Bank 1, Sensor 1) 🔴 High Probability → Shop Oxygen Sensor The internal heater element within the sensor is a very common failure point that shorts out over time and mileage, causing a 'high' voltage reading.
How to confirm: Disconnect the sensor and measure the resistance between the two heater circuit terminals (terminals +B and HT, often the two same-colored wires). A Toyota service manual specifies a resistance of 1.8 to 3.4 Ω at 68°F (20°C). An open circuit (infinite resistance) or a reading near zero ohms (dead short) confirms the sensor has failed.
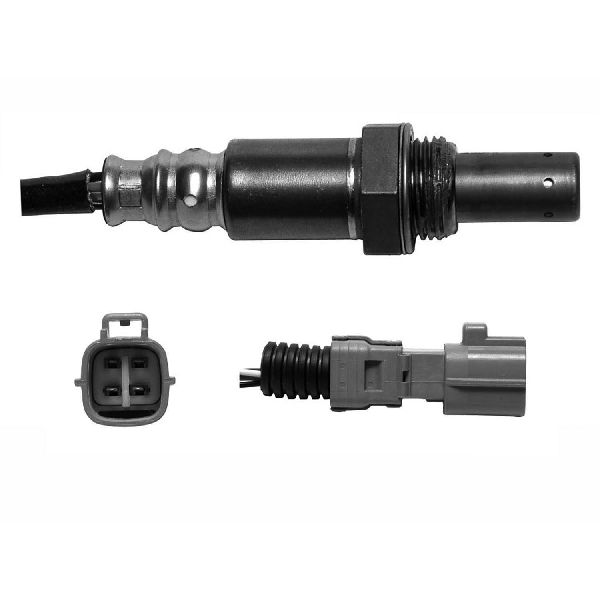
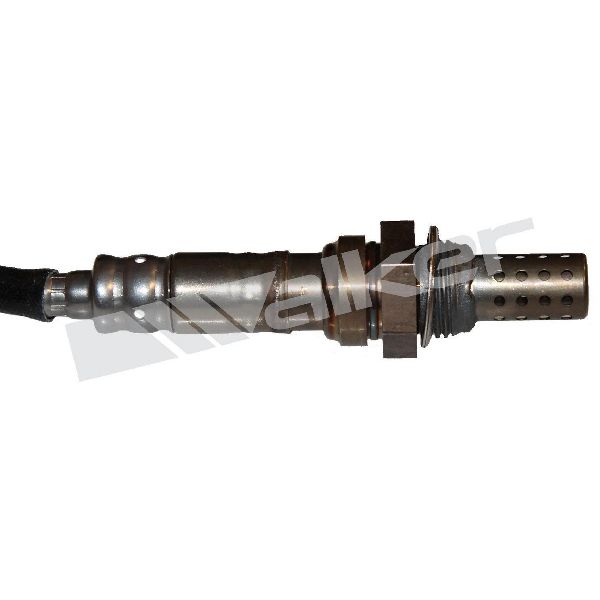
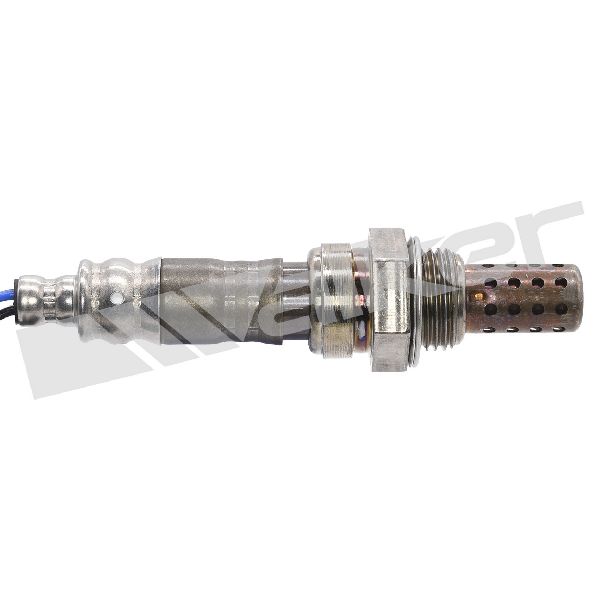
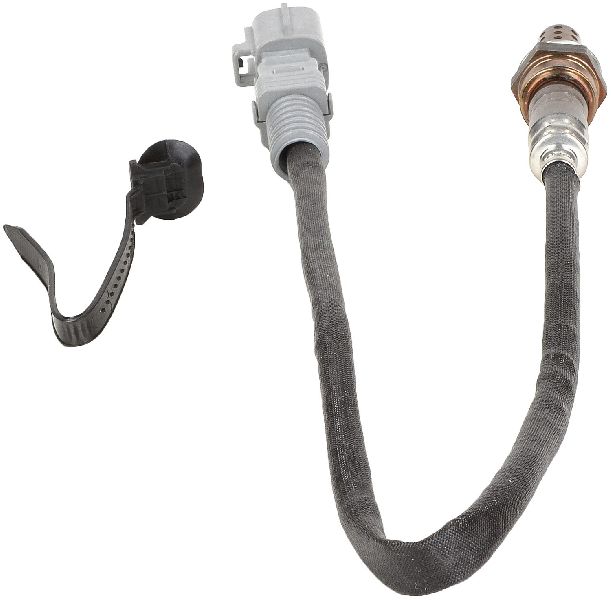
Typical fix: Replace the upstream Air/Fuel Ratio sensor located on the exhaust manifold. 🎬 See this video for a quick look at the sensor location. The recommended OEM part is Toyota P/N 89467-47070 or the equivalent Denso P/N 234-9096.
Est. part cost: $120-$180 - Damaged Wiring or Corroded Connector ⚪ Low Probability The wiring harness is located in the engine bay and can be susceptible to heat damage, abrasion against other components, or rodent activity.
How to confirm: Visually inspect the wiring harness leading to the A/F sensor for any signs of melting, fraying, or breaks. Check the connector (both sensor side and harness side) for corrosion, moisture, or bent pins. Use a multimeter to check for ~12V power and a good ground at the harness-side connector with the ignition on.
Typical fix: Repair the damaged section of the wiring harness or clean/replace the connector. Apply dielectric grease to the connector to prevent future moisture intrusion.
Est. part cost: $5-$50
Rare But Worth Checking
- Blown EFI Fuse or Relay: The sensor's heater circuit is protected by fuses (EFI MAIN and EFI No. 2) and the EFI MAIN Relay. While a shorted sensor is more likely to cause a fuse to blow than the other way around, it's a quick and easy check to perform before replacing parts. A blown fuse here would likely trigger other codes as well.
- Faulty Engine Control Module (ECM): → Shop Engine Control Module (ECM) In very rare cases, the driver circuit within the ECM that controls the sensor heater can fail and get stuck 'on', causing a persistent P0032 code even with a good sensor and wiring. This is confirmed by testing the control wire at the ECM harness; if it's shorted to power internally, the ECM is at fault. This should be the last item to consider.
Diagnosis Steps
- Read the code with an OBD-II scanner to confirm P0032 is present and note any other codes.
- Visually inspect the wiring and connector for the upstream A/F sensor (Bank 1, Sensor 1) on the exhaust manifold. Look for any signs of damage, melting, or corrosion.
- Check the related fuses in the engine bay fuse box, specifically 'EFI MAIN' and 'EFI No. 2'.
- If wiring and fuses are okay, disconnect the sensor. Use a multimeter set to Ohms to measure the resistance across the heater circuit pins on the sensor itself (terminals +B and HT). Compare the reading to the manufacturer's specification of 1.8 to 3.4 ohms. An out-of-spec reading (especially near zero or infinite) confirms a failed sensor.
- With the sensor still disconnected and the ignition ON (engine off), check for battery voltage (~12V) on the corresponding power pin of the vehicle's wiring harness connector.
- If power and ground are present and the sensor's resistance is out of spec, replace the Air/Fuel Ratio sensor. Clear codes and test drive.
- If the sensor and wiring test good, the issue may be a rare fault with the ECM. This requires more advanced diagnostics.
Parts You'll Likely Need
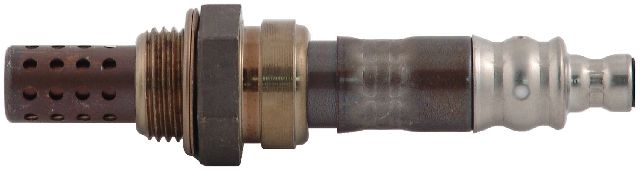
- Air/Fuel Ratio Sensor (Bank 1, Sensor 1)
(OEM #89467-47070)— This is the upstream sensor whose internal heater circuit is the subject of the P0032 code. The heater element shorting out is the most common cause.
Trusted brands: Denso (P/N: 234-9096)
OEM price range: $150-$180
Aftermarket price range: $120-$160
Platform-Specific Known Issues
- Accessing the upstream A/F sensor on the Gen 3 Prius requires removing the plastic cowl panel and the entire windshield wiper motor and linkage assembly 🎬 Watch: This walkthrough shows how to access the hidden sensor. to get enough clearance to work. This adds significant time and complexity compared to cars where the sensor is exposed.
- You will need an O2 sensor socket (a deep socket with a slit for the wire) to remove and install the sensor without damaging the wiring.
Mechanic-Grade Diagnostic Values
- A/F Sensor Heater Current — expected: 0.8 A to 10 A. Failure: Current exceeds 10 A for P0032. The ECM interprets this as a short circuit.
- A/F Sensor Live Data Voltage (AFS Voltage B1S1) — expected: Fluctuates around a 3.3V baseline. Should drop below 2.8V on acceleration (rich) and rise above 4.0V on deceleration (lean).. Failure: Voltage is stuck, does not respond to changes in engine load, or is consistently above 3.4V (lean) or below 3.1V (rich) when it shouldn't be.
- A/F Sensor Heater Control Duty Cycle — expected: The ECM applies full power (high duty cycle) for ~20 seconds on startup, then varies the duty cycle to maintain temperature.. Failure: A scope will show the signal is stuck high (100% duty) or low (0% duty) when it should be modulating, pointing to an ECM or wiring fault.
- Harness Connector Voltage (KOEO, Sensor Unplugged) — expected: Approximately 3.0V on the AF- wire and 3.3V on the AF+ wire (signal circuit reference voltages from ECM).. Failure: Missing or incorrect voltages point to a wiring issue between the connector and the ECM, or an internal ECM fault.
Hidden / Shadow Codes Worth Checking
- Mode $06, TID $07, CID $81: This refers to the monitor for 'Maximum A/F sensor heater current'. Viewing this data with an advanced scan tool can show the raw current value that the ECM is reading, which can help confirm if it is truly exceeding the maximum threshold. (see via Advanced OBD-II scan tool with Mode $06 functionality.)
- P101D: An information code for 'heater current is higher than the specified value while the heater is not operating'. If this code is present with P0032, it strongly suggests a short to power in the wiring or a failed ECM driver that is active when it should be off. (see via Toyota Techstream or equivalent professional scan tool.)
Scan Tool Commands That Help
- Toyota Techstream: Active Test: Control the Injection Volume for A/F Sensor — Use this to manually force the engine rich or lean while monitoring the 'AFS Voltage B1S1' data PID. If the voltage does not change in response to your commands, it confirms the sensor is unresponsive, assuming the wiring is intact.
- Toyota Techstream: Utility: All Readiness — After a repair, you can input the DTC (P0032) into this utility to check the monitor's status. This can confirm if the fix was successful (result: NORMAL) without needing to perform a full, lengthy drive cycle.
Wiring & Ground Locations
- EB — Engine bay, on the right side of the fender apron.. This is a primary chassis ground point in the engine bay. A poor connection here can cause various electrical issues and unstable voltage references for sensors and the ECM.
- EC — At the rear of the engine block.. This is a critical engine block ground. Since the A/F sensor is mounted to the exhaust manifold (and thus the engine), a poor ground at this location could affect the sensor's operation and heater circuit performance.
- A5 / A6 — The electrical connector for the upstream Air/Fuel Ratio sensor itself.. This is the primary connection point to test the sensor's resistance and check for power/ground from the harness side.
- E4 / E5 — The main electrical connectors at the Engine Control Module (ECM).. These connectors are where you would perform continuity checks on the A/F sensor wiring harness to isolate a break or short between the sensor and the ECM.
Real Owner Repair Stories
- YouTube - TJ Mimse (Toyota Prius (year not specified, but Gen 3 implied)) — P0032 code returned immediately after replacing the A/F sensor.
❌ Tried (didn't work) Replacing the Air/Fuel Ratio sensor., Checking wiring harness continuity from the sensor to the ECM.
✅ What actually fixed it The Engine Control Module (ECM) was faulty. The original shorted A/F sensor had damaged the internal driver circuit in the ECM. The fix was to replace the ECM. The diagnosis was confirmed by using a test light on the heater control wire at the sensor connector; the light failed to illuminate with the key on, indicating the ECM was not providing the ground signal.
OEM Part Supersession History
89467-47070→89467-47070— This part number appears to be stable for the entire 2010-2015 generation.
Heads up: Do not use A/F sensors from other Prius generations, such as P/N 89467-47010 from the Gen 2, as they are not compatible.
Model Year Variations Within This Range
- 2014-2015: Models from mid-2014 onward received updated piston rings to reduce oil consumption issues common in earlier Gen 3 models. This does not affect the P0032 diagnosis but is a key difference in engine longevity.
- 2012-2015: A mid-cycle refresh occurred in 2012, resulting in different front bumper covers and tail lights. The core powertrain and A/F sensor system related to P0032 remained the same.
Diagnostic Flowchart
Other Known Issues on This Vehicle
Issues unrelated to this code that are worth knowing about as an owner of this generation:
- Excessive Oil Consumption 🔴 High — Common in 2010-2014 models, especially over 100k miles, due to piston ring design. Can be 1 quart per 1,200 miles or more. (Ref: T-SB-0168-16 (Inspection) and T-SB-0169-16 (Repair) detail the issue and fix, which involves replacing pistons and rings.)
- Clogged EGR Cooler, Valve, and Intake Manifold Passages 🔴 High — Very common, typically between 100k-150k miles. Carbon buildup restricts flow, causing engine knock, rough idle, and potential head gasket failure. (Ref: While owners widely discuss cleaning, no specific recall exists, but it's a well-known maintenance item.)
- Brake Actuator / Booster Pump Assembly Failure 🔴 High — Affects many 2010+ models, leading to a loss of braking assist, warning lights, and a buzzing noise. Can be intermittent at first. (Ref: Multiple recalls and customer support programs (e.g., for 2010 models) have been issued to address cracks or internal malfunctions.)
- Head Gasket Failure 🔴 High — Often occurs in higher mileage (150k+) vehicles and is frequently linked to a clogged EGR system causing engine overheating and knocking. Symptoms include a rough, rattling startup. (Ref: Toyota issued TSB T-SB-0129-19 for some models, but this is a widely recognized failure point for the Gen 3 Prius.)
- Hybrid Inverter Failure 🟠 Medium — A known issue, particularly on earlier Gen 3 models. Can cause the car to shut down while driving. (Ref: Toyota issued a customer support program (extended warranty) for this component after a recall to update the software.)
Used vs. New Parts: Buying Guide for This Vehicle
When a used part is the smart pick: A used Engine Control Module (ECM) from a reputable auto recycler is a cost-effective choice if the original is diagnosed as faulty. A section of a used wiring harness can also be practical for repairing localized damage.
Donor-vehicle mileage cap: roughly under 150000 miles for the part to have meaningful remaining life.
What to inspect on the donor part:
- For an ECM, verify the part number matches your original exactly.
- Inspect the donor part for any signs of physical damage, corrosion, or water intrusion.
- Ensure the donor vehicle was not involved in a fire or flood.
OEM-only on this vehicle (don't cheap out):
- Air/Fuel Ratio Sensor (Bank 1 Sensor 1)
Aftermarket brands forum-validated for this vehicle:
- Denso (P/N: 234-9096) - This is the Original Equipment Manufacturer and is the most reliable replacement.
Brands owners have reported issues with on this vehicle:
- Unbranded or generic 'white-box' sensors are frequently reported on forums to have incorrect resistance values, causing the code to persist or return quickly.
Real Owner Stories
Aggregated from forums and TSBs cited above. Mileages and costs reflect what owners reported in those sources.
2011 Prius — 215000 miles
Symptoms: Check Engine Light was on with code P0032 and sometimes P0038. After clearing the codes, the light would stay off for 50 to 100 miles before returning.
What fixed it: The user did not report a final fix in the thread. They had previously replaced the sensor without a permanent resolution and were considering other possibilities.
Source hint: PriusChat - P0032 - 2011 Prius
2011 Prius
Symptoms: Check Engine Light on with code P0032.
What fixed it: Community members confirmed that the most common fix is replacing the failed Bank 1 Sensor 1 and emphasized that using a Denso brand replacement part is critical to resolving the issue.
Source hint: PriusChat.com thread titled 'P0032 - 2011 Prius'
Related OBD-II Codes
Frequently Asked Questions
Where is the sensor for code P0032 located, and is it difficult to access on my 2010-2015 Prius?
What is the recommended replacement part for the Air/Fuel Ratio sensor on my Prius?
How can I test the sensor myself to confirm it's the cause of the P0032 code?
Are there any special tools required to replace this sensor?
Could a blown fuse cause the P0032 code?
Does this P0032 information also apply to my Lexus CT200h?
My Prius is burning a lot of oil. Is this related to the P0032 code?
Helpful Videos


We Have This Part in Stock


The information in this article is provided for general reference and educational purposes only. Vehicle specifications, procedures, and part compatibility can vary by production date, trim level, and region. Always consult your vehicle's factory service manual and verify part numbers before purchasing or performing repairs. Safety-critical components such as airbags, seat belts, and braking systems should be installed by a qualified professional.
- Toyota Prius:
- 🧭 Diagnostic Flowchart
- 🎬 Helpful Videos
- 🛍️ Shop This Part
- What's Unique About the 2010-2015 Toyota Prius
- Symptoms You May Notice
- Most Likely Causes
- Rare But Worth Checking
- Diagnosis Steps
- Parts You'll Likely Need
- Platform-Specific Known Issues
- Mechanic-Grade Diagnostic Values
- Hidden / Shadow Codes Worth Checking
- Scan Tool Commands That Help
- Wiring & Ground Locations
- Real Owner Repair Stories
- OEM Part Supersession History
- Model Year Variations Within This Range
- Other Known Issues on This Vehicle
- Used vs. New Parts: Buying Guide for This Vehicle
- Real Owner Stories
- 2011 Prius — 215000 miles
- 2011 Prius
- Related OBD-II Codes
- Frequently Asked Questions
- 🎟️ Get 5% Off