
P0037 on 2005-2015 Suzuki Grand Vitara: Heater Circuit Low Causes and Fixes
P0037 on a Suzuki Grand Vitara almost always means the downstream oxygen sensor (Bank 1, Sensor 2) has failed. The most common fix is to replace the sensor itself. Before replacing, check the fuse for the O2 sensor heater (often labeled 'A/F heater' or 'O2 HTR' and typically 15A or 20A) in the engine bay fuse box.
- P0037 points to a problem with the heater in the downstream O2 sensor on Bank 1 (passenger side for V6s).
- The most common cause is the sensor itself failing. Confirm by testing resistance between the two black wires; it should be 5-15 Ohms.
- Before replacing the sensor, always check the O2 heater fuse in the engine bay fuse box.
- Engine type (2.5L, 2.7L, 2.4L, 3.2L) is critical for selecting the correct replacement part number.
What's Unique About the 2005-2015 Suzuki Grand Vitara
The 2005-2015 Suzuki Grand Vitara spans two distinct generations with different engines, which is the most critical factor for this code. The 2005 model is the last of the second generation, while 2006-2015 models are the third generation. This means the specific oxygen sensor part number and its location vary significantly depending on whether you have a 2.5L V6 (2005), 2.7L V6 (2006-2008), a 2.4L 4-cylinder (2009-2015), or the less common 3.2L V6 (2009-2010). Always verify the engine type before ordering parts, as even the wire harness length can differ.
Generation note: The specified year range covers two generations. The 2005 model year is the end of the second generation (1999-2005). The 2006-2015 model years belong to the third generation (JT). Engine options and therefore O2 sensor part numbers differ between these generations and even within the third generation. For example, the 2.7L V6 (2006-2008) and 2.4L I4 (2009-2015) use different sensors.
Symptoms You May Notice
- Check Engine Light (Malfunction Indicator Lamp) is on
- Failure to pass a state emissions or smog test
- Potentially reduced fuel economy
- Rough idling or hesitation in some cases
- Replacing the wrong oxygen sensor (e.g., replacing the upstream Sensor 1 instead of the downstream Sensor 2, or replacing the sensor on Bank 2 instead of Bank 1 on V6 models).
- Replacing the sensor when the actual problem is a blown fuse or a damaged wire.
Most Likely Causes
- Failed Oxygen Sensor Heater Element 🔴 High Probability → Shop Oxygen Sensor The internal heater element of an O2 sensor is a common failure point on most vehicles due to constant, extreme heat cycles and exhaust system vibrations. This is the most reported failure for this code on Suzuki forums.
How to confirm: Disconnect the sensor and use a multimeter set to Ohms (Ω). Measure the resistance across the two heater circuit pins (on Denso sensors for this vehicle, these are typically two black wires). A good sensor should have a resistance between 5 - 15 Ohms at room temperature. A reading of infinity (open circuit) or zero (short circuit) confirms the heater has failed.
Typical fix: Replace the Bank 1, Sensor 2 oxygen sensor. It is often necessary to use a special slotted O2 sensor socket to remove and install the sensor due to the wiring.
Est. part cost: $60-$150 - Blown O2 Sensor Heater Fuse 🟡 Medium Probability → Shop Oxygen Sensor A short in the sensor's heater element or its wiring can cause the protective fuse to blow. This is a common secondary effect of a failed sensor.
How to confirm: Locate the main fuse box in the engine compartment. Check the fuse labeled for the O2 sensor heater (may be marked 'O2 HTR', 'A/F heater', or similar, typically 15A or 20A). Visually inspect if the fuse is blown or test for continuity with a multimeter. If the fuse is good, check the associated relay if one is present.
Typical fix: Replace the blown fuse. If the new fuse blows immediately, it indicates a persistent short circuit in the wiring or the sensor itself that must be found and repaired before proceeding.
Est. part cost: $1-$5 - Damaged Wiring or Connector ⚪ Low Probability The sensor wiring is routed under the vehicle near the hot exhaust system and is exposed to road debris, salt, and moisture, making it susceptible to melting, chafing, or corrosion over time.
How to confirm: Visually inspect the entire wiring harness from the O2 sensor to where it connects to the main engine harness. Look for any signs of melting, frayed wires, or breaks. Unplug the connector and check for corrosion, moisture, or pushed-out pins. With the key on, engine off, you can use a multimeter to check for 12V power at the harness-side connector to confirm the circuit is live.
Typical fix: Repair the damaged section of wiring or clean/replace the connector. Use heat-shrink tubing for a durable, weather-resistant repair.
Est. part cost: $10-$50
Rare But Worth Checking
- Faulty Engine Control Module (ECM): → Shop Engine Control Module (ECM) This is very rare. The ECM's internal driver for the heater circuit can fail. This should only be considered after all other possibilities (sensor, fuse, wiring) have been definitively ruled out through proper testing.
Diagnosis Steps
- Scan for Codes: Use an OBD-II scanner to confirm P0037 is present. 🎬 Watch: How to fix the P0037 heater control circuit code Note any other codes, as they may be related.
- Check the Fuse: Locate the fuse box in the engine bay and inspect the fuse for the oxygen sensor heater (often 15A or 20A, labeled 'O2 HTR' or 'A/F heater'). Replace if blown.
- Inspect Wiring: Safely raise the vehicle. Visually inspect the wiring harness and connector for the Bank 1, Sensor 2 O2 sensor. It is located on the exhaust pipe after the catalytic converter. 🎬 See this video to help locate your oxygen sensor Look for obvious signs of damage, such as melting, chafing, or corrosion.
- Test the Heater Circuit at the Connector: Disconnect the sensor. With the ignition on (engine off), use a multimeter to check for 12V power on the supply wire in the harness-side connector. This confirms power is reaching the sensor.
- Test the Sensor's Heater Resistance: Use a multimeter set to Ohms (Ω). Measure the resistance between the two heater pins on the sensor itself (usually the two same-colored wires, typically black for Denso). A good sensor should read between 5-15 Ohms. An infinite reading (OL) means the heater element is broken and the sensor is bad.
- Check for Ground: Verify the ground circuit from the sensor connector back to the ECM has continuity (near zero Ohms resistance). A bad ground can also cause this code.
- Replace the Sensor: If the fuse and wiring are good but the sensor's heater circuit has failed the resistance test, 🎬 Watch this diagnostic walkthrough for low voltage heater circuit codes replace the oxygen sensor. Apply anti-seize to the threads before installation.
- Clear Code and Test Drive: After the repair, clear the code with your scanner and perform a test drive to ensure the Check Engine Light does not return.
Parts You'll Likely Need
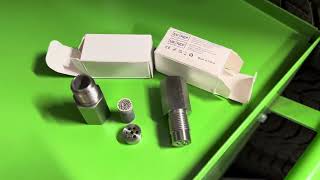
- Downstream Oxygen Sensor (2.4L I4, 2009-2013)
(OEM #18213-78K10)— This is the correct downstream (rear) sensor for the 2.4L 4-cylinder engine found in 2009-2013 models. The internal heater element is the most common failure point for code P0037.
Trusted brands: Denso (234-4300), NGK/NTK, Bosch
OEM price range: $150-$250
Aftermarket price range: $70-$140 - Downstream Oxygen Sensor (2.7L V6, 2006-2008)
(OEM #18213-66J11)— This is the correct downstream sensor for the 2.7L V6 engine used in the early third-generation models. The code P0037 points directly to a failure in this part's heater circuit. This part is confirmed to cross-reference with Denso 234-4387.
Trusted brands: Denso (234-4387), Walker Products, Delphi
OEM price range: $160-$260
Aftermarket price range: $80-$150 - Downstream Oxygen Sensor (2.5L V6, 2005) — For the second-generation 2005 model with the V6 engine, this downstream sensor is the primary cause of P0037. Part numbers can vary, so confirming with VIN is recommended.
Trusted brands: Denso (234-4080), Bosch, Walker Products
OEM price range: $140-$220
Aftermarket price range: $60-$120
Related Codes That Often Appear With This One
- P0038 (HO2S Heater Control Circuit High)
- P0137 (O2 Sensor Circuit Low Voltage)
- P0138 (O2 Sensor Circuit High Voltage)
Mechanic-Grade Diagnostic Values
- HO2S (Bank 1, Sensor 2) Heater Element Resistance — expected: 5 - 6.4 Ω at 20°C (68°F). Failure: A reading of infinity (Open Loop) or near zero ohms (short circuit). Some forum users report failure at thousands of ohms.
- HO2S Heater Relay Power Supply — expected: 12V+ (Battery Voltage) at the HO2S heater relay with ignition ON.. Failure: No voltage indicates a problem upstream, likely with the 'O2 HTR' fuse (20A) or wiring from the fuse box.
- ECM Ground Terminals Voltage — expected: Below 0.3V. Failure: Voltage significantly higher than 0.3V indicates a poor ground connection for the ECM, which can cause numerous sensor faults.
Scan Tool Commands That Help
- Suzuki Scan Tool (SDT-II) or equivalent professional scanner: Heater Circuit Active Test / Bidirectional Control — After verifying the sensor and wiring are good, this command can be used to manually activate the heater circuit. If the heater turns on with the scan tool but not during normal operation, it points towards a potential ECM logic issue or a problem with the enabling conditions. If it doesn't turn on, it confirms a fault in the ECM driver circuit (very rare).
Wiring & Ground Locations
- O2 HTR Fuse (20A) — In the main fuse box in the engine compartment, typically labeled 'O2 HTR' or 'A/F heater'.. This is the primary fuse providing power to the HO2S heater relay. A blown fuse is a common cause for the P0037 code.
- HO2S Heater Relay — For the 2009 2.4L model, this is located in the engine compartment fuse/relay box.. This relay, controlled by the ECM, switches 12V power to the oxygen sensor's heater element. A faulty relay will prevent the heater from activating.
- ECM Connector C37 (J24B 2.4L Engine) — One of the main connectors at the ECM, which is located on the left side of the engine compartment.. This connector contains the primary ground pins for the ECM. A poor connection here can cause erratic behavior across multiple systems, including sensor circuits. Pins 15, 29, and 30 are grounds.
- ECM Connector E23 (J24B 2.4L Engine) — The other main connector at the ECM, located on the left side of the engine compartment.. This connector contains the main power feeds for the ECM. Pins 1, 2, 16, and 29 are positive power inputs. The control signal for the HO2S heater originates from a pin on one of these connectors.
- Ground Point G5 — At the left rear of the engine (for the 2.4L model).. This is a major engine ground point. While the O2 sensor heater is typically grounded through the ECM, a poor engine-to-chassis ground can create voltage offsets and cause various electrical issues.
When the Usual Fixes Don't Work
- While a failed sensor is the most common cause, there are documented cases where the P0037 code persists after sensor replacement. In these instances, the root cause is often a secondary issue that was not found during the initial diagnosis. This could be a hairline crack in a wire that only opens when hot, a faulty heater relay, a poor ground connection at the ECM, or a new fuse that blows immediately due to a persistent short. If the code returns, it is critical to re-test the entire circuit from the fuse to the ECM, not just the sensor itself.
Model Year Variations Within This Range
- 2008 vs. 2009: The 2008 model year primarily used the 2.7L V6 (H27A engine), while the 2009 model year introduced the 2.4L I4 (J24B engine) as the standard. The oxygen sensors, wiring harnesses, and ECM pinouts are completely different between these two engines. Always confirm the engine before ordering parts.
Diagnostic Flowchart
Used vs. New Parts: Buying Guide for This Vehicle
When a used part is the smart pick: For this repair, using a used oxygen sensor is almost never a smart choice. O2 sensors are wear items with a finite lifespan, and their performance degrades over time. The cost savings are minimal compared to the risk of installing a part that is already near the end of its life or will fail shortly after installation.
Donor-vehicle mileage cap: roughly under 50000 miles for the part to have meaningful remaining life.
What to inspect on the donor part:
- Not recommended, but if absolutely necessary, source from a vehicle with the lowest possible mileage.
- Ensure the donor vehicle did not have a catastrophic engine failure (which can contaminate sensors).
- Inspect the wiring and connector for any signs of melting, brittleness, or corrosion.
- The part should be from the exact same engine and model year range.
Aftermarket brands forum-validated for this vehicle:
- Denso: Widely considered the OEM supplier for many Japanese vehicles, including Suzuki. This is the most recommended brand for fit and performance.
- NGK/NTK: Another top-tier OEM supplier with a strong reputation for sensor quality and reliability.
Brands owners have reported issues with on this vehicle:
- Universal Sensors: While cheaper, these require cutting and splicing wires, which introduces a potential failure point. Given the hostile environment under the vehicle, a factory-style connector is strongly preferred.
- Bosch: While a major OEM for European brands, forum consensus suggests that for Japanese vehicles, Bosch aftermarket sensors can sometimes have a shorter lifespan or slightly different response characteristics compared to Denso or NTK. It's best to stick with the Japanese brands for this application.
Real Owner Stories
Aggregated from forums and TSBs cited above. Mileages and costs reflect what owners reported in those sources.
2006 Suzuki Grand Vitara
Symptoms: The owner reported a Check Engine Light was on and a scanner showed code P0037. They asked for help diagnosing the sensor.
What fixed it: The issue was confirmed to be a failed sensor heater element. A multimeter test across the two black heater wires showed a resistance in the thousands of KOhms (an open circuit), indicating the internal heater was broken. Replacing the Bank 1, Sensor 2 oxygen sensor resolved the code.
Source hint: Club Suzuki Vitara (Russia) - 'ошибка P0037 (датчик кислорода)'
Related OBD-II Codes
Frequently Asked Questions
Where is the Bank 1, Sensor 2 oxygen sensor located on my 2005-2015 Grand Vitara?
What resistance reading should I get when testing the O2 sensor heater on my Suzuki?
I'm getting code P0037. Besides the sensor itself, what is the first thing I should check?
Is it common for the wiring to be the cause of P0037 on this vehicle?
My Grand Vitara has an LPG conversion and is showing both P0037 and P0031. What could that mean?
What special tool might I need to replace the oxygen sensor?
Helpful Videos


The information in this article is provided for general reference and educational purposes only. Vehicle specifications, procedures, and part compatibility can vary by production date, trim level, and region. Always consult your vehicle's factory service manual and verify part numbers before purchasing or performing repairs. Safety-critical components such as airbags, seat belts, and braking systems should be installed by a qualified professional.
- Suzuki Grand Vitara:
- 🧭 Diagnostic Flowchart
- 🎬 Helpful Videos
- What's Unique About the 2005-2015 Suzuki Grand Vitara
- Symptoms You May Notice
- Most Likely Causes
- Rare But Worth Checking
- Diagnosis Steps
- Parts You'll Likely Need
- Related Codes That Often Appear With This One
- Mechanic-Grade Diagnostic Values
- Scan Tool Commands That Help
- Wiring & Ground Locations
- When the Usual Fixes Don't Work
- Model Year Variations Within This Range
- Used vs. New Parts: Buying Guide for This Vehicle
- Real Owner Stories
- 2006 Suzuki Grand Vitara
- Related OBD-II Codes
- Frequently Asked Questions
- 🎟️ Get 5% Off