
Ultimate P0056 Guide: HO2S Heater Control Circuit Malfunction (Bank 2, Sensor 2)
The Definitive Guide to Diagnosing and Fixing OBD-II Trouble Code P0056
- P0056 indicates an electrical failure in the heater circuit of the Bank 2, Sensor 2 oxygen sensor, located downstream of the catalytic converter.
- Test the 'O2 HTR' fuse and measure the sensor's internal resistance (typically 8-10 Ohms) before spending $150+ on a replacement part.
- Driving with P0056 causes an automatic emissions test failure and reduces fuel economy by 2-5% during engine warm-up.
- Always install an OEM or premium aftermarket sensor (like Bosch or Denso), as cheap universal sensors frequently trigger recurring P0056 codes due to incorrect resistance values.
What Does P0056 Mean?
P0056 indicates the Powertrain Control Module (PCM) detected an electrical fault in the heater control circuit of the Bank 2, Sensor 2 oxygen sensor. This sensor sits in the exhaust stream after the catalytic converter. Its internal heater brings the sensor to its 750°F operating temperature quickly after a cold start. This rapid warm-up allows the PCM to monitor catalytic converter efficiency and control emissions accurately. The PCM uses a pulse-width modulated (PWM) signal to control the heater; detecting an open circuit, short, or abnormal current draw triggers P0056.
Technical definition: The SAE/OBD-II definition for P0056 is "HO2S Heater Control Circuit Bank 2 Sensor 2". This specifies an electrical malfunction within the heater circuit for the downstream oxygen sensor on the engine side without cylinder #1.
Can I Drive With P0056?
Yes, But With Caution. Yes, you can drive, but address the issue promptly. Driving with P0056 causes an automatic emissions test failure. While short-term driving (under 200 miles) won't cause immediate drivability issues, prolonged neglect damages the catalytic converter due to imbalanced air-fuel mixtures during warm-up, turning a minor issue into a $1,000 to $4,000 repair.
Common Causes
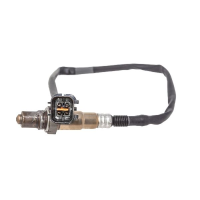
- Faulty Bank 2, Sensor 2 Oxygen Sensor (Very Common) — The internal heating element is a thin wire that operates under extreme temperatures and burns out or breaks over time, creating an open circuit. This is the most frequent cause of P0056.
- Blown Fuse or Faulty Relay (Common) — The O2 sensor heater circuits are protected by a fuse (typically 10-15A) and sometimes controlled by a relay. A blown fuse or a malfunctioning relay interrupts power to the heater, immediately triggering the code.
- Damaged Wiring or Corroded Connectors (Common) — The wiring harness leading to the sensor is vulnerable to road debris, moisture, and extreme exhaust heat. Melted wires or corroded connector pins lead to high resistance or a complete loss of electrical connection.
- Aftermarket or Incorrect Parts (Less Common) — Using 'universal' or low-quality aftermarket oxygen sensors triggers this code. These parts often have different internal resistance values that do not match the OEM specifications the PCM expects.
- Faulty Powertrain Control Module (PCM) (Very Rare) — The internal driver circuit within the PCM that controls the sensor's heater fails in rare instances. This is a last-resort diagnosis considered only after exhaustively ruling out all wiring and sensor issues.
Symptoms
- Check Engine Light (MIL) is On — This is the most common, and often the only, symptom. The light illuminates as soon as the PCM's continuous monitor detects the heater circuit fault.
- Failed Emissions Test — With the heater inoperative, the vehicle's emissions control system cannot function correctly at startup, leading to a guaranteed failure of any state-mandated smog check.
- Decreased Fuel Economy — The engine remains in an inefficient 'open-loop' fuel control state for longer than intended, causing a reduction in fuel economy, typically in the 2-5% range.
- Rough Idle or Hesitation on Cold Starts — In colder climates, the engine runs rough or hesitates for the first few minutes after starting because the PCM is not receiving accurate data to manage the cold-start fuel mixture.
Diagnostic Flowchart
Tap your situation to follow the diagnostic path that matches what you're seeing on this code.
Common Fixes & Costs
- Replace Bank 2, Sensor 2 Oxygen Sensor — Parts: $50-$250, Labor: $100-$300, ~0.8 hr book time (DIY)
- Replace Blown Fuse or Relay — Parts: $5-$30, Labor: $0-$50, ~0.2 hr book time (Beginner)
- Repair Damaged Wiring or Connector — Parts: $10-$60, Labor: $100-$250, ~1.5 hr book time (Intermediate)
- Replace Powertrain Control Module (PCM) — Parts: $600-$1200, Labor: $150-$300, ~1.5 hr book time (Professional)
DIY vs Professional
- Replace Bank 2, Sensor 2 Oxygen Sensor 🟢 Beginner
Tools: Jack and jack stands, penetrating oil, O2 sensor socket (22mm), ratchet, torque wrench. - Replace Blown Fuse or Relay 🟢 Beginner
Tools: Fuse puller (often included in the fuse box), owner's manual. - Repair Damaged Wiring or Connector 🟢 Beginner
Tools: Soldering iron, heat shrink tubing, wire strippers, multimeter, quality electrical tape. - Replace Powertrain Control Module (PCM) 🟢 Beginner
Tools: Socket set, professional scan tool for programming.
Used vs. New Parts: Buying Guide
When a used part is worth it: It almost never makes sense to buy a used oxygen sensor. They are a wear-and-tear component with a finite lifespan, and it's impossible to know the remaining life of a used one. The labor to install the part is often more than the part itself, making it a poor risk.
Donor-vehicle mileage cap: roughly under 10000 miles for the part to have meaningful remaining life.
Donor quality checklist:
- Avoid used sensors entirely. They are prone to failure from contamination, heat cycles, and internal heater burnout.
- Even 'New Old Stock' (NOS) is a gamble, as older sensor designs degrade on the shelf.
- A used sensor may have been removed from a vehicle that had other engine problems (like burning oil or coolant) that already contaminated the sensor.
Decision logic:
- If The part is an oxygen sensor → Buy new from a reputable brand (OEM, Denso, Bosch, NTK). The cost savings of a used or cheap no-name part are not worth the risk of premature failure and repeated labor costs.
- If The part is a wiring harness connector or fuse box → A used part from a low-mileage, non-corroded donor vehicle is an acceptable and cost-effective option.
Warranty tradeoff: Used sensors typically have no warranty. Cheap aftermarket sensors from online marketplaces often have a high failure rate. Reputable new aftermarket and OEM parts carry warranties ranging from 1 year to limited lifetime.
Worst-case if a used part fails: $150-$300 if a used or cheap sensor fails shortly after installation, requiring a second repair job (repeated labor cost + cost of a quality new part).
What Happens If You Wait — Timeline
- 0-2 weeks: The P0056 code is set, and the Check Engine Light is on. The heater circuit is inoperative, but there are often no noticeable driving symptoms. The vehicle automatically fails an OBD-II emissions test. (MPG impact: 0-2%% · Added cost: $0)
- 2 weeks - 3 months: The engine remains in 'open-loop' mode for longer after cold starts. This causes a subtle decrease in fuel economy and a slight increase in emissions. In cold weather, a rough idle is noticeable for the first few minutes of driving. (MPG impact: 2-5%% · Added cost: $20-$60 in wasted fuel.)
- 3-12 months: The consistently incorrect air-fuel mixture during warm-up begins to negatively affect the catalytic converter. The engine runs slightly rich, leading to carbon buildup on the catalyst substrate, reducing its efficiency and triggering a P0430 code. (MPG impact: 5-10%% · Added cost: $50-$200 in wasted fuel, risk of catalyst contamination begins.)
- 12+ months: Sustained rich running conditions overheat and permanently damage the catalytic converter's internal structure, causing it to melt or break apart. This leads to a major loss of power, a significant drop in fuel economy, and requires a costly catalytic converter replacement. (MPG impact: 10-20%% · Added cost: $1000-$4000 for catalytic converter replacement.)
Cost of Not Fixing It
- 0-3 months: Guaranteed failure of emissions/smog test. A decrease in fuel economy by 2-5% as the engine stays in open-loop mode longer. (Added cost: $10-$50 in extra fuel costs.)
- 3-12 months: The engine running consistently rich leads to premature aging and contamination of the catalytic converter. Fuel economy decreases by up to 10%. (Added cost: $50-$200 in extra fuel costs.)
- 12+ months: Sustained rich fuel mixture overheats and destroys the catalytic converter, leading to a much more expensive repair. In severe cases, it contributes to spark plug fouling and misfires. (Added cost: $1000-$4000 for catalytic converter replacement.)
Diagnosis Steps
- Verify Code and Review Freeze Frame Data
Use an OBD-II scanner to confirm P0056 is active and check for related codes (e.g., P0057, P0058). Review the freeze-frame data to see the engine conditions when the code was set.
Tools: OBD-II Scanner (Beginner) - Check the Heater Circuit Fuse and Relay
Consult the owner's manual to locate the fuse for the oxygen sensor heater circuit (often labeled 'O2 HTR' or 'A/F HEATER'). Visually inspect the fuse and replace it if blown. Swap the relay with an identical one from a non-critical circuit to test its function.
Tools: Owner's Manual, Fuse Puller (Beginner) - Perform a Detailed Visual Inspection
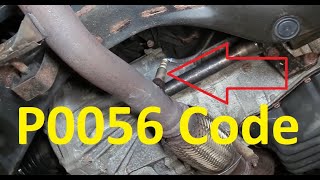
Locate the Bank 2, Sensor 2 O2 sensor (after the catalytic converter on the engine side without cylinder #1). Thoroughly inspect the sensor's wiring harness and connector for melting, chafing, corrosion, or unsecured routing near moving parts.
Tools: Flashlight, Safety Glasses, Mechanic's Mirror (Beginner) - Test Sensor Heater Circuit Resistance
Disconnect the sensor and use a multimeter set to Ohms (Ω). Measure the resistance between the two heater circuit pins on the sensor side (typically the two wires of the same color). A good sensor reads between 2 and 30 Ohms. An infinite resistance reading (OL) confirms the internal heater element is open, and the sensor must be replaced.
Tools: Multimeter, O2 Sensor Pinout Diagram (Intermediate) - Test for Power and Ground at the Harness Connector
With the sensor unplugged and the ignition key in the 'On' position (engine off), use a multimeter to verify battery voltage (approximately 12.6V) is present at the power supply pin on the harness-side connector. Check for a good ground on the corresponding ground pin (resistance to chassis ground should be less than 0.5 Ohms). Lack of voltage points to a wiring issue upstream.
Tools: Multimeter, O2 Sensor Pinout Diagram (Intermediate) - Pro Tip: Heater Circuit Load Test (Bulb Method)
Connect a small 12V bulb (like a tail light bulb) to the power and ground terminals on the harness-side connector. Start the engine. The bulb illuminates brightly if the circuit can handle the necessary current load. If it doesn't light up or is very dim, a high-resistance wiring or power supply issue exists.
Tools: 12V Test Light or Bulb with Wires (Intermediate) - Pro Tip: Heater Circuit Amperage Draw Test
Use a scan tool that displays live data for the O2 sensor heater circuit. With the engine running, observe the amperage parameter for Bank 2, Sensor 2. A properly functioning heater circuit shows a current draw between 0.5 and 2.0 amps. A reading of 0 amps indicates an open circuit, while an abnormally high reading suggests a short.
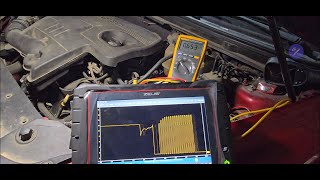
Tools: Advanced OBD-II Scan Tool with Live Data (Advanced) - Pro Tip: Analyze the Heater Control Signal with an Oscilloscope
Connect an oscilloscope to the heater control wire and ground. When the PCM commands the heater on, you see a square wave (a PWM signal). A flat line at 0V indicates no command from the PCM or an open circuit. A flat line at battery voltage indicates a short to power or a failed PCM driver.
Tools: Oscilloscope, Back-probe Connectors (Advanced)
When This Code Triggers (Freeze-Frame Conditions)
- Engine Coolant Temp: 149-210°F (Engine warmed up, but not necessarily at full operating temperature.)
- RPM: 500-3000 (Idle to steady cruise. The test runs across a wide range of normal driving conditions.)
- Engine Load: 20-50% (Light to moderate acceleration or steady cruising.)
- System Voltage: 10-18V (Ensures the electrical system is stable enough to run diagnostics.)
Related Codes
- P0057 — Indicates 'HO2S Heater Control Circuit Low,' suggesting a short to ground. While P0056 often points to an open circuit (like a burned-out heater), P0057 is triggered by a continuous ground connection. A multimeter test on the control circuit shows continuity to ground, confirming P0057.
- P0058 — Indicates 'HO2S Heater Control Circuit High,' typically caused by a short to power. To differentiate, test the control circuit wire for voltage with the key on. Finding constant battery voltage where there shouldn't be confirms a short to power (P0058), whereas P0056 is usually a lack of connection or an open.
- P0036 — This is the identical fault code but for the other side of the engine: 'HO2S Heater Control Circuit (Bank 1, Sensor 2)'. If both P0036 and P0056 appear together, suspect a common cause like a shared fuse, relay, or power/ground source for both heater circuits.
- P0161 — This code is for 'HO2S Heater Performance Bank 2 Sensor 2'. While P0056 is a pure electrical circuit code, P0161 is a performance code, meaning the PCM determined the sensor is not warming up quickly enough, even if the circuit appears electrically intact. This almost always points to a degraded but not completely failed sensor.
Climate & Environmental Factors
- Cold Climates: The heater element is most critical during cold starts. Vehicles in colder regions experience more frequent and intense thermal cycling, which stresses the heater element and leads to premature failure.
- High Humidity / Road Salt: Moisture and road salt accelerate corrosion on wiring connectors and ground straps. A corroded connection increases resistance in the heater circuit, which is sufficient for the PCM to flag a fault.
- High Altitude: Altitude itself does not directly cause P0056, as this is an electrical code. However, engine performance changes at altitude exacerbate underlying issues with the emissions system.
How to Talk to a Mechanic About This Code
Say this: "I have a P0056 code for the Bank 2, Sensor 2 oxygen sensor heater circuit. I'd like to book a diagnostic appointment to confirm the cause. Please check the sensor's resistance, the wiring, and the associated fuse before recommending a part replacement."
This signals you have done your research and understand the specific components involved. It directs the technician to perform a logical diagnostic sequence (fuse, wiring, sensor) rather than just replacing the most likely part, which saves you money if the cause is simple, like a blown fuse.
Avoid saying:
- 'My check engine light is on, can you look at it?' (This is too vague and invites a broad, potentially expensive diagnostic process).
- 'Just fix whatever's wrong' (This gives the shop a blank check to perform repairs without your approval).
- 'I think I need a new oxygen sensor' (While likely, this encourages part replacement without proper diagnosis, and you pay for the part even if it wasn't the problem).
Questions to ask before authorizing the repair:
- What were the results of the diagnostic tests? Specifically, what was the resistance reading on the sensor's heater circuit?
- Did you check the 'O2 HTR' fuse and verify power and ground at the sensor connector?
- Can I get a written estimate that breaks down the cost of parts and labor?
- What is the warranty on the parts and the labor for this specific repair?
Where to Take It: Dealer vs Independent vs Chain
- Dealer:
Best for: Vehicles still under a powertrain or emissions warranty., Complex, manufacturer-specific electrical issues or known TSBs (Technical Service Bulletins)., Newer vehicles (less than 5 years old) where specialized software is required.
Downsides: Significantly higher labor rates, often 1.5x to 2x that of an independent shop., May be quicker to replace parts than to diagnose intricate wiring problems. (Typical cost: +50% vs. baseline) - Independent Shop:
Best fit. P0056 is a routine electrical fault that any competent independent shop diagnoses and repairs effectively, usually at a much lower cost than a dealership.
Best for: Out-of-warranty vehicles where cost is a major factor., Common diagnostic codes like P0056 that don't typically require brand-specific tools., Building a long-term relationship with a trusted mechanic.
Downsides: Quality and expertise vary widely; it's crucial to vet the shop through reviews and ASE certifications., May not have access to the very latest manufacturer software updates. (Typical cost: +0% vs. baseline) - Chain Shop:
Acceptable, with caution. A chain shop replaces the sensor easily, but if the problem is wiring or a blown fuse that points to a short, you are better served by a dedicated diagnostic shop.
Best for: Simple, straightforward part replacements when you are certain the sensor itself is the failure., Basic maintenance like oil changes and tires.
Downsides: Technicians are often under high pressure to meet sales quotas, leading to upselling of unnecessary services., Diagnostic skill for electrical issues is inconsistent. (Typical cost: -10% vs. baseline)
When to Walk Away From the Repair
If the estimated repair cost exceeds 40-50% of your car's private-party value (from a source like Kelley Blue Book), you should seriously consider not doing the repair.
- Car worth $4000, fix is $2000: Borderline. The repair cost is 50% of the car's value. Get a second opinion before authorizing, as other age-related repairs are likely imminent.
- Car worth $12000, fix is $500: Fix it. The repair is less than 5% of the vehicle's value and is a wise investment in its reliability and emissions compliance.
- Car worth $2500, fix is $1500: Walk away. The repair cost is 60% of the car's value. It is not a sound financial decision to invest this much into an aging vehicle.
What Scan Tool You Need for This Code
Minimum: A scanner that reads and clears codes, shows freeze frame data, and displays live data streams for the O2 sensor heater circuit.
A basic $20 reader only gives you the P0056 code. It won't let you view the live heater circuit amperage or sensor voltage to confirm if the fault is in the wiring, fuse, or the sensor itself, leading to guesswork and wasted money on unneeded parts.
Budget: BlueDriver Pro (~$100) — Connects to your smartphone via Bluetooth. It reads the P0056 code, shows freeze frame data, and graphs live data for the O2 sensor circuit, which is enough to help differentiate a sensor failure from a wiring issue. It also checks for emissions readiness.
Mid-range: Foxwell NT510 Elite (~$180) — A handheld unit that provides manufacturer-specific software. It offers more detailed live data and performs active tests (bi-directional control) on certain circuits, giving more definitive diagnostic power than a simple reader.
Professional: Autel MaxiCOM MK808 (~$500) — A professional-level tablet scanner that offers full system diagnostics, comprehensive live data graphing, and full bi-directional control to command the heater circuit on and off. This provides the most thorough diagnostic capability outside of a dealership tool.
Rent vs buy: If this is a one-time repair, use the AutoZone 'Loan-A-Tool' program. You pay a deposit for a scanner, which is fully refunded when you return the tool within 90 days, making the rental effectively free. Buy a scanner only if you plan to perform your own diagnostics more than once a year.
How to Clear the Code After You Fix It
- Use an OBD-II scan tool to clear the trouble code.
- Perform a complete drive cycle to allow the vehicle's readiness monitors to reset.
- Rescan the vehicle to ensure the P0056 code does not return.
Drive cycle (~30 minutes): A generic drive cycle includes a cold start (sitting for 8+ hours), 2-3 minutes of idling, 10-15 minutes of steady highway driving (around 55 mph), followed by 10-15 minutes of stop-and-go city driving.
Readiness monitors affected: Catalyst monitor, O2 sensor monitor, O2 sensor heater monitor
Before emissions retest: drive at least 50 miles to fully set monitors.
Watch out for:
- Simply disconnecting the battery clears the code, but it also resets all readiness monitors, which causes an automatic failure at an emissions testing station.
- Not completing the full, specific drive cycle for the vehicle leaves some monitors in a 'Not Ready' state.
- If the underlying fault (e.g., a wiring short) is not properly fixed, the code returns as soon as the monitor runs again.
Will This Fail Emissions / State Inspection?
Yes — this code typically fails an OBD-II emissions inspection.
- California: An active P0056 code is an automatic failure. After repair, a full drive cycle must be completed to set the O2 sensor and catalyst readiness monitors to 'Ready' before a retest is possible.
- New York: The NYS DMV emissions inspection includes an OBD-II scan. An illuminated Check Engine Light for P0056 results in an automatic test failure.
- Texas: In counties requiring emissions testing (like those around Houston, DFW, Austin, and El Paso), an active P0056 code is an automatic failure. In 'safety only' counties, it is not checked.
Most Commonly Affected Vehicles
- Ford F-150, Explorer (2015-2023) — On 4x4 models, the B2S2 wiring harness is routed too close to the front driveshaft and is frequently chafed or severed, causing an open or short circuit. Always inspect this area carefully.
- Chevrolet / GMC Silverado, Suburban, Sierra, Acadia (2016-2023) — Heater elements in the original sensors are a known failure point, especially in cold climates. On some models, the PCM sets the code if the heater current is outside a specific range (e.g., less than 0.43A or more than 2.90A).
- Dodge / Ram Ram 1500, Durango (2017-2023) — While sensor failure is common, intermittent issues are sometimes traced to PCM software glitches. Check for any available Technical Service Bulletins (TSBs) related to emissions system updates.
- Jeep Grand Cherokee, Wrangler (2015-2023) — Off-road use increases the risk of damage to the sensor and its wiring. Connectors are particularly susceptible to corrosion from water and mud intrusion.
- Toyota Tundra, Sequoia, Camry (2014-2022) — Always check the 'A/F HEATER' fuse first. On some models like the 2012 Camry, this is fuse #33 in the engine bay fuse box and is protected by a relay as well.
- BMW 3-Series (E46), 5-Series, X3, X5 (1998-2006) — Extremely common on the M54 6-cylinder engine. Bank 2 corresponds to cylinders 4-6, and the code almost always points to a failed post-cat O2 sensor. The original part number was superseded by a more robust version.
- Hyundai Santa Fe (2010-2012) — The ECM in these vehicles uses a duty cycle to control the heater and sets the code if the measured current falls below a specific threshold for a set period.
Manufacturer-Specific Notes
- Ford: On F-150s and Explorers with 4WD, the wiring harness for the Bank 2 Sensor 2 is notoriously routed where it rubs against the front driveshaft. Always inspect this harness for chafing before replacing any parts. Some intermittent issues on 2018+ models are resolved by a PCM software update.
- General Motors (Chevy/GMC): The PCM on these vehicles actively monitors heater amperage. A scan tool showing 0 amps or an out-of-spec reading (e.g., >2.9A) is a definitive sign of a fault in the sensor or wiring, not just a generic error.
- Toyota: Before any other diagnosis, locate and test the 'A/F HEATER' or 'O2 HTR' fuse and its associated relay in the engine bay fuse box. A blown fuse is a very frequent and simple fix for this code on many Toyota models.
- BMW: On E46 models with the M54 engine, this code is a rite of passage. It almost invariably means the post-cat oxygen sensor for cylinders 4-6 (Bank 2) failed. It is rarely a wiring or PCM issue on these specific models.
- Ram: While there are no specific recalls for P0056, the Federal Emissions Performance Warranty covers the cost of repairs needed to pass an emissions test for 2 years/24,000 miles. The broader Powertrain Limited Warranty typically excludes sensors like O2 sensors unless the failure is a direct result of a covered component.
Real Owner Stories
2015 Ford F-150 with recurring P0056
Check Engine Light appeared. Found wiring for Bank 2 Sensor 2 was rubbing on the 4x4 driveshaft and had worn through.
What they tried:
- Replaced the O2 sensor and zip-tied the new harness out of the way. Code returned.
- Cleaned connector with dielectric grease. Code returned.
- Traced wiring into the engine bay, cleaned all related connectors and grounds. Code still returned intermittently.
Outcome: The issue became more complex, with other codes appearing for the ignition switch and headlamps, suggesting a deeper wiring short or possible PCM issue caused by the initial wiring damage. The owner took the vehicle to a dealership.
Lesson: On Ford 4x4 trucks, wiring damage near the driveshaft is a known cause. If the code returns after fixing the obvious damage and replacing the sensor, a more widespread short in the harness or a fault in the PCM is the culprit, requiring advanced diagnostics.
2007 Chevy Suburban with P0036 and P0056
Check Engine Light on with codes for both downstream (Sensor 2) O2 heater circuits.
What they tried:
- Checked fuses and found the one responsible for the downstream sensor heaters was blown.
- Replacing the fuse worked temporarily, but it blew again, indicating a short circuit.
- Unplugged one sensor to isolate the short, then performed a resistance test on both sensors.
- Visual inspection under the vehicle to check for wiring rubbing against the exhaust or chassis.
Outcome: The diagnostic process correctly identified that a recurring blown fuse meant a deeper issue than just the fuse itself. The high resistance found in both sensors pointed toward either sensor failure or a wiring problem causing the short.
Lesson: When both downstream sensor heater codes (P0036 and P0056) appear together, check the shared fuse first. If the fuse is blown, and a replacement blows again, it confirms a short circuit in the wiring or one of the sensors, not a PCM problem.
BMW E46 (M54 Engine) with P0056
Check Engine Light came on immediately at startup. Code P0056 was present.
What they tried:
- Cleared the code, but it returned instantly.
- Used a scan tool to view live data for both downstream O2 sensors (Bank 1 Sensor 2 and Bank 2 Sensor 2).
- Observed that the Bank 1 sensor was showing active voltage changes, while the Bank 2 sensor's voltage was flat and unresponsive, even after the engine warmed up.
Outcome: The live data comparison was definitive. The lack of activity from the Bank 2, Sensor 2 sensor confirmed it was faulty. The sensor was replaced, which resolved the code.
Lesson: On many BMWs, especially the E46 with the M54 engine, P0056 is almost always a failed sensor. Before replacing, confirm this with a scan tool by comparing the live voltage readings of the B1S2 and B2S2 sensors. A sensor that remains inactive (flat voltage) is bad.
How to Prevent This Code From Triggering
- Apply dielectric grease to O2 sensor connectors (When replacing a sensor or performing related exhaust work) — Dielectric grease seals the electrical connector pins from moisture, road salt, and dirt. This prevents corrosion, which creates high resistance in the heater circuit and triggers a P0056 code.
- Perform periodic visual inspections of wiring (During every oil change) — Routinely checking the O2 sensor harnesses for signs of melting, chafing against driveshafts or suspension components, or rodent damage catches a problem before the wire fails and sets a code.
- Ensure exhaust heat shields are intact (During undercarriage inspections) — Missing or damaged heat shields allow extreme exhaust temperatures to radiate directly onto the O2 sensor wiring harness, melting the insulation and causing short circuits.
Frequently Asked Questions
Where is Bank 2, Sensor 2 located?
Bank 2 is the side of the engine that does NOT contain cylinder #1. On V-engines, this is often the passenger side. Sensor 2 is the downstream sensor located in the exhaust pipe after the catalytic converter.
What is the difference between Sensor 1 and Sensor 2?
Sensor 1 (upstream) sits before the catalytic converter and controls the engine's air-fuel ratio. Sensor 2 (downstream) sits after the catalytic converter and monitors the converter's efficiency.
What is the most common mistake when diagnosing P0056?
The most common mistake is immediately replacing the oxygen sensor without performing basic electrical tests. The problem is often a blown $5 fuse, a corroded connector, or damaged wiring. Always check the fuse and wiring first.
Can a P0056 code clear itself?
No. P0056 indicates a hard electrical fault that requires a physical repair to the sensor, wiring, or fuse before the code can be cleared with a scan tool.
My P0056 code came back after replacing the sensor. Now what?
If a new OEM sensor doesn't fix the code, the fault lies in the wiring or PCM. Re-inspect the harness for intermittent shorts or opens, especially at the connector. If wiring tests show no power or ground, take the vehicle to a diagnostic shop.
Can I replace the oxygen sensor myself?
Yes, this is a common DIY repair requiring basic hand tools and a 22mm oxygen sensor socket. The biggest challenge is removing the old sensor, which seizes in the exhaust pipe due to rust and heat cycles. Apply penetrating oil liberally before attempting removal.
Why did my check engine light turn on for a heater circuit?
Federal emissions regulations mandate that the vehicle's computer monitors all components impacting emissions. The O2 sensor heater is critical for enabling accurate emissions control shortly after startup. The PCM considers a heater circuit fault serious enough to illuminate the Check Engine Light.
Key Takeaways
- P0056 indicates an electrical failure in the heater circuit of the Bank 2, Sensor 2 oxygen sensor, located downstream of the catalytic converter.
- Test the 'O2 HTR' fuse and measure the sensor's internal resistance (typically 8-10 Ohms) before spending $150+ on a replacement part.
- Driving with P0056 causes an automatic emissions test failure and reduces fuel economy by 2-5% during engine warm-up.
- Always install an OEM or premium aftermarket sensor (like Bosch or Denso), as cheap universal sensors frequently trigger recurring P0056 codes due to incorrect resistance values.
Helpful Videos


Shop the Parts Behind P0056
Below are the parts most often responsible for code P0056, ranked by how frequently each one is the actual culprit (per the diagnosis above). Tap any to see what we have for your vehicle.


The information in this article is provided for general reference and educational purposes only. Vehicle specifications, procedures, and part compatibility can vary by production date, trim level, and region. Always consult your vehicle's factory service manual and verify part numbers before purchasing or performing repairs. Safety-critical components such as airbags, seat belts, and braking systems should be installed by a qualified professional.
- 🧭 Diagnostic Flowchart
- 🎬 Helpful Videos
- 🛍️ Shop This Part
- What Does P0056 Mean?
- Can I Drive With P0056?
- Common Causes
- Symptoms
- Common Fixes & Costs
- DIY vs Professional
- Used vs. New Parts: Buying Guide
- What Happens If You Wait — Timeline
- Cost of Not Fixing It
- Diagnosis Steps
- When This Code Triggers (Freeze-Frame Conditions)
- Related Codes
- Climate & Environmental Factors
- How to Talk to a Mechanic About This Code
- Where to Take It: Dealer vs Independent vs Chain
- When to Walk Away From the Repair
- What Scan Tool You Need for This Code
- How to Clear the Code After You Fix It
- Will This Fail Emissions / State Inspection?
- Most Commonly Affected Vehicles
- Manufacturer-Specific Notes
- Real Owner Stories
- 2015 Ford F-150 with recurring P0056
- 2007 Chevy Suburban with P0036 and P0056
- BMW E46 (M54 Engine) with P0056
- How to Prevent This Code From Triggering
- Frequently Asked Questions
- Where is Bank 2, Sensor 2 located?
- What is the difference between Sensor 1 and Sensor 2?
- What is the most common mistake when diagnosing P0056?
- Can a P0056 code clear itself?
- My P0056 code came back after replacing the sensor. Now what?
- Can I replace the oxygen sensor myself?
- Why did my check engine light turn on for a heater circuit?
- Key Takeaways
- 🎟️ Get 5% Off