
P0106 on 2006-2010 Ford Explorer: MAP Sensor Causes and Fixes
This code usually points to a faulty Manifold Absolute Pressure (MAP) sensor, or more commonly, a cracked vacuum line leading to it. On these Explorers, the MAP sensor is integrated with the EGR valve, making vacuum leaks in the associated brittle plastic hoses the most likely culprit. Before replacing parts, carefully inspect all vacuum lines for cracks.
- Before buying any parts, thoroughly inspect all small vacuum hoses connected to the intake manifold and EGR valve for cracks. This is the most common and cheapest fix.
- Understand that on your 2006-2010 Explorer, the MAP sensor is likely part of the EGR valve assembly, not a separate sensor bolted to the manifold.
- Symptoms like rough idle, stalling, and hesitation are directly caused by the incorrect air-fuel mixture resulting from the bad sensor signal.
- Do not confuse the MAP (Manifold Absolute Pressure) sensor with the MAF (Mass Airflow) sensor; they are different parts, and P0106 specifically relates to the MAP sensor circuit.
What's Unique About the 2006-2010 Ford Explorer
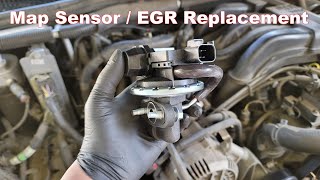
On the 4.0L V6 and 4.6L V8 engines in this generation of Explorer, the MAP sensor is not a standalone part. It is integrated into the top of the EGR valve assembly. This design makes the small, brittle vacuum hoses connected to the EGR assembly a common failure point, often causing a P0106 code. Many owners and even some mechanics mistakenly look for a separate MAP sensor, leading to confusion and misdiagnosis.
🎬 Watch: How to locate the integrated MAP sensor and EGR.Symptoms You May Notice
- Check Engine Light is on
- Rough or erratic idle
- Hesitation or stumbling during acceleration
- Reduced engine power
- Decreased fuel economy
- Engine stalling, especially when coming to a stop
- Black smoke from the exhaust
- Backfiring due to sensor disagreement
- Replacing the Mass Airflow (MAF) sensor. P0106 is specific to the MAP sensor circuit, not the MAF sensor. This is a common point of confusion.
- Replacing the Throttle Position Sensor (TPS). While symptoms can be similar, P0106 points directly to a pressure rationality issue.
Most Likely Causes
- Cracked or Leaking Vacuum Hoses 🔴 High Probability → Shop Vacuum Hose The small plastic vacuum lines that connect to the intake manifold, EGR valve, and fuel pressure sensor become brittle with age and heat, leading to cracks and vacuum leaks. The elbow connectors are especially prone to failure.
How to confirm: Visually inspect all vacuum lines connected to the intake manifold and the EGR/MAP assembly. Listen for a hissing sound at idle. You can also spray a small amount of brake cleaner or starting fluid near suspected hoses; a change in engine idle indicates a leak.
Typical fix: Replace the damaged vacuum hose or the entire vacuum harness. A specific vacuum harness runs from the intake to the EGR and fuel pressure sensor and is a common replacement part.
Est. part cost: $20-$70 - Faulty MAP Sensor (as part of the EGR Assembly) 🟡 Medium Probability → Shop Manifold Absolute Pressure Sensor As mentioned, the MAP sensor is part of the EGR valve assembly on these engines. The sensor itself can fail internally, providing incorrect voltage readings to the PCM.
How to confirm: After confirming vacuum lines and wiring are intact, use a scan tool to monitor MAP sensor voltage. With the key on and engine off, the reading should be close to the barometric pressure (BARO) reading. At idle, voltage should be low (1-1.5V), and it should increase smoothly to ~4.5V at wide-open throttle. If the readings are stuck or erratic, the sensor is likely bad.
Typical fix: Replace the entire EGR valve assembly. 🎬 See this step-by-step EGR and MAP sensor replacement walkthrough. It is sold as a single unit that includes the new MAP sensor.
Est. part cost: $70-$200 - Dirty or Contaminated MAP Sensor Port 🟡 Medium Probability → Shop Manifold Absolute Pressure Sensor Oil vapor from the PCV system and carbon from the EGR system can build up and clog the small port for the MAP sensor, preventing it from reading pressure accurately.
How to confirm: Remove the EGR/MAP assembly and inspect the port where it measures pressure. If it is clogged with carbon or oil residue, it needs to be cleaned.
Typical fix: Carefully clean the sensor's port and the corresponding passage in the intake manifold or EGR assembly using electrical parts cleaner or a suitable solvent. Ensure no debris falls into the intake.
Est. part cost: $5-$15 - Damaged Wiring or Electrical Connector ⚪ Low Probability
How to confirm: Visually inspect the MAP sensor's electrical connector (on the EGR valve) for corrosion, bent pins, or loose wires. Use a multimeter to check for a 5-volt reference signal, a good ground, and a changing signal voltage with the engine running. 🎬 Watch: A helpful guide to diagnosing and fixing P0106 codes.
Typical fix: Repair the damaged section of the wiring harness or replace the connector pigtail.
Est. part cost: $15-$50
Rare But Worth Checking
- Clogged Catalytic Converter: A severely restricted exhaust can create excessive backpressure, which can affect intake manifold pressure readings and trigger a P0106 code. This is usually accompanied by a severe loss of power and potentially other exhaust-related codes.
- Faulty Powertrain Control Module (PCM): This is extremely rare and should only be considered after all other possibilities (sensor, wiring, vacuum leaks) have been exhaustively ruled out.
Diagnosis Steps
- Connect an OBD-II scanner to confirm P0106 is the active code and check for any other codes like P0108, P0109, or P0401.
- Perform a thorough visual inspection of the engine bay, focusing on the vacuum hoses connected to the intake manifold and the EGR valve assembly. Pay close attention to the red and black plastic lines and their rubber elbow connectors for cracks or breaks.
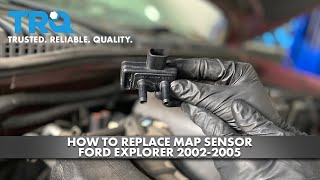
- Locate the MAP sensor, which is the electrical component on top of the EGR valve, situated at the back of the engine near the passenger-side firewall.
- Inspect the MAP sensor's electrical connector for damage, corrosion, or loose pins.
- With the engine running, listen for audible vacuum hissing sounds near the intake and EGR valve.
- If a scan tool with live data is available, monitor the MAP sensor PID. The reading should be low at idle (high vacuum, ~1-1.5V) and increase as you open the throttle (low vacuum, ~4.5V). Compare this to the BARO (barometric pressure) reading with the key on, engine off; they should be nearly identical.
- If vacuum leaks are suspected but not visible, carefully spray short bursts of brake cleaner or starter fluid around the base of the EGR valve and vacuum line connections. A change in engine idle speed will confirm a leak.
- If no vacuum leaks are found, remove the EGR/MAP assembly and inspect its port for carbon or oil contamination. Clean if necessary.
- If the issue persists, test the sensor's wiring for the correct 5V reference, ground, and signal voltage.
- If all wiring and vacuum systems are good, the integrated MAP sensor is likely faulty, and the entire EGR valve assembly should be replaced.
Parts You'll Likely Need
- Vacuum Harness / Hoses
(OEM #6L2Z-9E498-A)— The plastic vacuum lines are the most common failure point for this code on this vehicle due to becoming brittle over time.
Trusted brands: Motorcraft, Dorman
OEM price range: $40-$80
Aftermarket price range: $20-$50 - EGR Valve with Integrated MAP Sensor
(OEM #Motorcraft CX2102 (supercedes 5L2Z-9D475-A, 4L2Z-9D475-A))— If the sensor itself has failed, it must be replaced as part of the entire EGR valve assembly on these engines.
Trusted brands: Motorcraft, Standard Motor Products (SMP), Delphi
OEM price range: $120-$240
Aftermarket price range: $70-$150
Related Codes That Often Appear With This One
- P0401 — Stands for 'EGR Flow Insufficient'. Since the MAP sensor is integrated with or connected to the EGR valve, a fault in the EGR system or its vacuum supply can trigger both codes.
- P0108 — Stands for 'MAP Circuit High Input'. This code can appear with P0106 if there is an electrical short or a severe sensor failure causing the signal to be stuck high.
- P0109 — Stands for 'MAP Circuit Intermittent'. This often appears alongside P0106, indicating the signal is not just out of range, but also dropping out, reinforcing the likelihood of a wiring or sensor issue.
Technical Service Bulletins (TSBs) & Recalls
- TSB 08-9-7: While not for the Explorer specifically, this TSB for 2005-2007 Ford models with the 3.0L engine addresses P0106 codes caused by moisture freezing in the MAP sensor line in cold temperatures, highlighting Ford's awareness of MAP sensor line issues.
- TSB 15-0178: Pertains to newer 2.0L GTDI engines in 2012-2014 Explorers, but it shows that P0106 can also be caused by wiring splice issues, which is a relevant diagnostic path if sensor and vacuum checks fail.
- Bulletin #SSM 50156: Notes that some Ford vehicles may exhibit an illuminated MIL with DTC P0106 stored in the PCM after key-off transportation of the vehicle to higher altitudes.
- Bulletin #SSM 49446: Describes a condition where vehicles may exhibit a P0106 code while in transport mode, especially in higher altitudes, requiring the technician to clear the DTCs.
Platform-Specific Known Issues
- Hidden Vacuum Line Failure: A common failure point is the vacuum line elbow that connects to the rear of the intake manifold. It is difficult to see and access, often requiring removal of the upper intake for proper replacement. This hidden leak is a frequent cause of a persistent P0106 code after more obvious parts have been checked.
Mechanic-Grade Diagnostic Values
- MAP Sensor Signal Voltage (Key On, Engine Off) — expected: ~4.5V (should be close to BARO reading). Failure: Voltage significantly different from BARO, or stuck at 0V or 5V.
- MAP Sensor Signal Voltage (Engine at Idle) — expected: 1.0V to 1.5V. Failure: Voltage is high at idle (e.g., above 2.0V) or does not change with engine RPM.
- MAP Sensor 5V Reference Wire — expected: 4.8V to 5.2V with key on, engine off.. Failure: Voltage is below 4.8V or above 5.2V, indicating a PCM or wiring issue.
- MAP Sensor Ground Wire — expected: Less than 0.10V (100 millivolts).. Failure: Voltage higher than 0.1V indicates a poor ground connection.
- Live Data: MAP vs BARO (Key On, Engine Off) — expected: MAP pressure reading should be nearly identical to the Barometric Pressure (BARO) reading.. Failure: A significant difference between MAP and BARO readings (e.g., MAP reading 115 kPa when BARO is 93 kPa) points to a faulty sensor.
Hidden / Shadow Codes Worth Checking
- Mode 6, Test ID $81: On many Ford CAN-bus systems, this test ID relates to MAP sensor rationality and performance checks. Monitoring the values can sometimes reveal intermittent issues before a hard P0106 code is set. (see via Professional scan tool with Mode 6 data capability.)
Scan Tool Commands That Help
- Ford IDS / FDRS: Datalogger — Use to record live data streams for MAP, throttle position, and engine RPM during a test drive. This data can be analyzed to see if the MAP sensor readings are correlating correctly with engine load, which is essential for diagnosing an intermittent P0106.
Wiring & Ground Locations
- G104 — Engine support ground, typically on the engine block or cylinder head, connected to the chassis.. A poor engine ground can cause erratic sensor readings, including the MAP sensor which is grounded through the PCM. Ensuring G104 is clean and tight is a critical step in diagnosing electrical-related P0106 issues.
- G100 — LH rear corner of the engine compartment, at the fender apron.. This is a primary chassis ground point. While not a direct engine ground, corrosion or looseness here can contribute to overall electrical system noise and intermittent sensor faults.
- PCM Connector — Mounted through the firewall, typically on the passenger side of the engine bay.. The MAP sensor signal, reference voltage, and ground wires all terminate at the PCM. Inspecting the connector pins for corrosion or damage is necessary if wiring is suspected as the cause.
Real Owner Repair Stories
- YouTube channel 'The G Automotive and More' (2010 Ford Explorer 4.0L SOHC V6) — Check Engine Light with code P0106.
❌ Tried (didn't work) Searching for a standalone MAP sensor (it's integrated with the EGR valve).
✅ What actually fixed it The black plastic vacuum line that runs from a vacuum junction to the EGR/MAP assembly was broken where it made a sharp bend. The technician replaced the broken plastic section with a rubber hose, which resolved the P0106 code. - YouTube channel 'el panin el de la tool' (Ford Explorer (generation consistent with 2006-2010)) — Vehicle jerking/stumbling, hesitation, P0106 and P0193 codes.
❌ Tried (didn't work) Initial inspection of sensors.
✅ What actually fixed it After performing other repairs (valve cover gaskets), the technician found a broken vacuum line. He notes that these plastic lines become very brittle and toasted ('se tostan') over time and break easily. Replacing the broken vacuum line fixed the issue.
Documented NHTSA Reports
- NHTSA ODI #10967364: An owner reported that the check engine light came on with codes P0106 and P0401. Upon inspection, they discovered plastic tubing had failed by breaking or disintegrating in the vicinity of the sensor.
- NHTSA ODI #10787972: Describes a condition where vehicles experience hesitation, loss of idle RPM, difficulty in starting, and lack of power associated with diagnostic trouble codes P0106 and P0236.
OEM Part Supersession History
4L2Z-9D475-A, 4L2Z-9D475-HA→5L2Z-9D475-A— Standard part revision and consolidation by Ford.
Heads up: The part was later superseded by Motorcraft CX2102. While physically similar, using an incorrect revision for a different model year (e.g., a pre-2004 valve) could cause calibration issues even if it fits. Always verify fitment by VIN.
Diagnostic Flowchart
Other Known Issues on This Vehicle
Issues unrelated to this code that are worth knowing about as an owner of this generation:
- 4.0L SOHC Timing Chain Cassette Failure 🔴 High — Very common, often presents as a metallic rattle on startup between 75,000 and 150,000 miles. If ignored, can lead to catastrophic engine failure. (Ref: While no recall was issued, numerous TSBs exist for prior model years, and the problem is widely documented for this generation.)
- Cracked Plastic Thermostat Housing (4.0L V6) 🟠 Medium — A frequent source of coolant leaks. The plastic housing, especially the seam, is prone to cracking with age and heat cycles.
- 5R55S Automatic Transmission Failures 🔴 High — Common issues include harsh shifting, delayed engagement, or complete failure, often related to the solenoid body or internal servo bores. Problems can appear at various mileages. (Ref: Ford issued TSBs for related models regarding shift quality and solenoid pack updates.)
- Cracked Rear Liftgate Applique Panel 🟡 Low — Extremely common cosmetic issue where the plastic trim panel below the rear window cracks, usually near the handle. It allows water intrusion, which can damage the latch mechanism. (Ref: No recall was issued for the 2006-2010 models, though earlier generations had a similar, well-documented problem.)
- Failing Blend Door Actuators 🟡 Low — A common failure causing a clicking/ticking noise from the dashboard and an inability to control cabin temperature.
Used vs. New Parts: Buying Guide for This Vehicle
When a used part is the smart pick: A used EGR/MAP assembly from a junkyard is a risky choice. The sensor electronics can have intermittent failures that are not obvious, and the diaphragm in the EGR valve itself can be worn. The primary failure, brittle vacuum lines, is best fixed with new parts. A used part is not recommended for this repair.
Donor-vehicle mileage cap: roughly under 60000 miles for the part to have meaningful remaining life.
What to inspect on the donor part:
- If considering a used part, look for one from a vehicle with the lowest possible mileage.
- Inspect the electrical connector pins for any signs of corrosion or damage.
- Avoid parts that show heavy external corrosion or signs of being exposed to the elements for a long time.
OEM-only on this vehicle (don't cheap out):
- EGR Valve with Integrated MAP Sensor
Aftermarket brands forum-validated for this vehicle:
- Motorcraft (OEM)
- Standard Motor Products (SMP)
- Delphi
Brands owners have reported issues with on this vehicle:
- Unbranded, 'white-box' parts from online marketplaces are frequently cited in forums as failing quickly or being dead-on-arrival. Given the labor to access the part, it's not worth the risk.
Real Owner Stories
Aggregated from forums and TSBs cited above. Mileages and costs reflect what owners reported in those sources.
2006-2010 Ford Explorer 4.0L V6
Symptoms: The owner replaced the EGR valve to fix a P0106 code, but the light returned shortly after.
What fixed it: Replacing the entire vacuum harness that connects the intake, EGR, and fuel pressure sensor, which had become brittle and was leaking.
Source hint: An owner on YouTube with a P0106 code
2009 Ford Explorer
Symptoms: Check engine light on with code P0106; the owner replaced the EGR sensor as advised by a mechanic but the light returned.
What fixed it: The source illustrates that the root cause is often a vacuum leak rather than the sensor itself, specifically pointing to the small plastic vacuum lines.
Source hint: 2CarPros.com - '2009 Ford Explorer Check Engine on Code P0106'
2006-2010 Ford Explorer 4.0L V6 / 4.6L V8
Symptoms: Persistent P0106 code after checking obvious vacuum lines and parts.
What fixed it: Replacing the vacuum line elbow that connects to the rear of the intake manifold, which often requires removing the upper intake to access.
Source hint: vehicle_specific_issues - 'Hidden Vacuum Line Failure'
Related OBD-II Codes
Frequently Asked Questions
Where is the MAP sensor located on my 2006-2010 Ford Explorer 4.0L V6?
Can I just replace the MAP sensor alone if it fails?
Does TSB 08-9-7 apply to my Explorer's P0106 code?
I replaced my EGR valve but the P0106 code came back. What should I check next?
Is there a specific vacuum part I should look for to fix this?
Could my P0106 code be caused by a wiring issue instead of a part failure?
Helpful Videos
We Have This Part in Stock


The information in this article is provided for general reference and educational purposes only. Vehicle specifications, procedures, and part compatibility can vary by production date, trim level, and region. Always consult your vehicle's factory service manual and verify part numbers before purchasing or performing repairs. Safety-critical components such as airbags, seat belts, and braking systems should be installed by a qualified professional.
- Ford Explorer:
- 🧭 Diagnostic Flowchart
- 🎬 Helpful Videos
- 🛍️ Shop This Part
- What's Unique About the 2006-2010 Ford Explorer
- Symptoms You May Notice
- Most Likely Causes
- Rare But Worth Checking
- Diagnosis Steps
- Parts You'll Likely Need
- Related Codes That Often Appear With This One
- Technical Service Bulletins (TSBs) & Recalls
- Platform-Specific Known Issues
- Mechanic-Grade Diagnostic Values
- Hidden / Shadow Codes Worth Checking
- Scan Tool Commands That Help
- Wiring & Ground Locations
- Real Owner Repair Stories
- Documented NHTSA Reports
- OEM Part Supersession History
- Other Known Issues on This Vehicle
- Used vs. New Parts: Buying Guide for This Vehicle
- Real Owner Stories
- 2006-2010 Ford Explorer 4.0L V6
- 2009 Ford Explorer
- 2006-2010 Ford Explorer 4.0L V6 / 4.6L V8
- Related OBD-II Codes
- Frequently Asked Questions
- 🎟️ Get 5% Off