
P0117 on 2008-2019 Ford Taurus 3.5L: Engine Coolant Temperature Circuit Low Causes and Fixes
P0117 on a Ford Taurus with the 3.5L V6 is almost always a failed Cylinder Head Temperature (CHT) sensor. The PCM interprets the sensor circuit's low voltage as an extremely high temperature, triggering fail-safe modes. The sensor is buried under the upper and lower intake manifolds, making replacement a difficult and expensive 4-6 hour job. Shop costs range from $500-$800, primarily for labor, as the part itself is under $60.
- P0117 on a 3.5L Taurus points to an electrical short in the temperature sensor circuit, most often the sensor itself.
- This is not a simple DIY repair. The sensor is located under the intake manifold, requiring 4-6 hours of professional labor.
- Due to the high labor cost, use a high-quality OEM (Motorcraft) or premium aftermarket sensor to avoid repeat repairs.
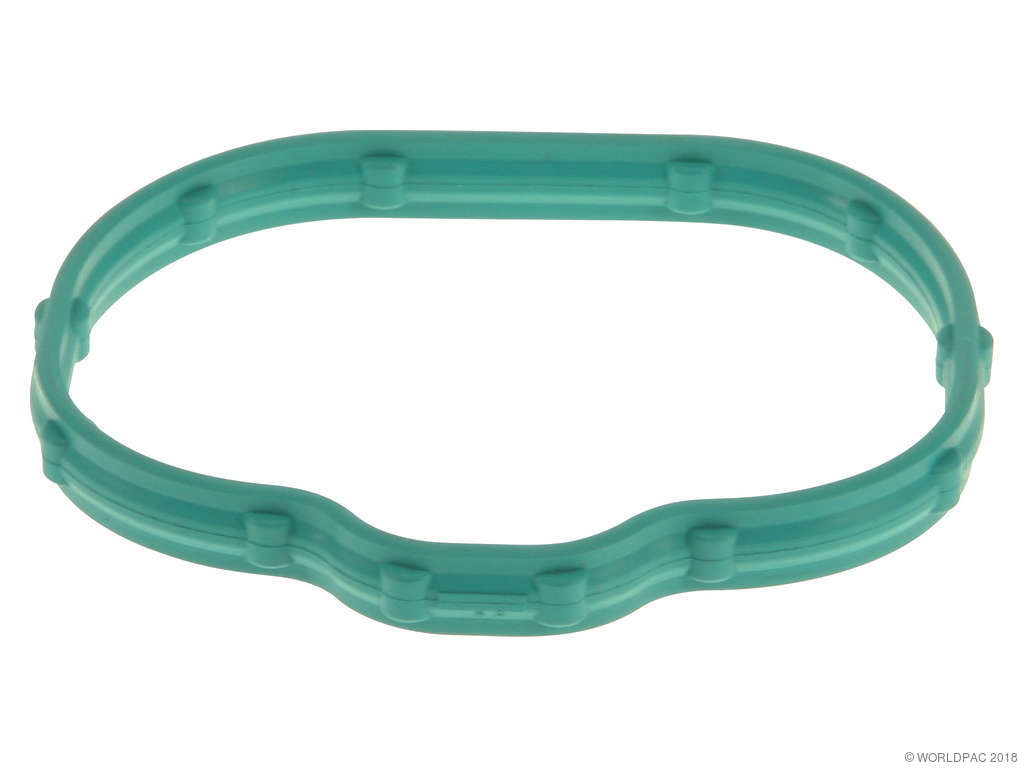
- Always replace the upper and lower intake manifold gaskets when performing this job.
- Do not confuse this with a thermostat issue (P0128); P0117 is an electrical fault.
What's Unique About the 2008-2019 Ford Taurus
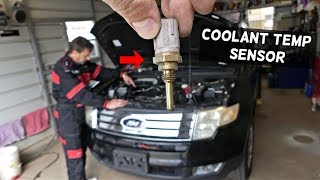
The defining issue for this code on the 3.5L Cyclone V6 is the location of the temperature sensor. Instead of an easily accessible Engine Coolant Temperature (ECT) sensor, Ford uses a Cylinder Head Temperature (CHT) sensor that performs the same function but is located in the valley between the cylinder banks, underneath the upper and lower intake manifolds. This turns a simple sensor replacement into a major, labor-intensive repair requiring hours of disassembly. 🎬 Watch this detailed walkthrough of the labor-intensive sensor replacement. Because of the high labor cost, misdiagnosis is costly, and it is crucial to rule out other possibilities before committing to the teardown. This design is shared across many Ford and Lincoln vehicles with the transverse 3.5L/3.7L engine.
Generation note: This guide covers the fifth generation (2008-2009) and sixth generation (2010-2019) Ford Taurus. Both generations used the 3.5L Cyclone V6 engine, and the difficult location of the Cylinder Head Temperature (CHT) sensor under the intake manifold is the same for both.
🎬 See exactly where the sensor is hidden under the manifold.Symptoms You May Notice
- Check Engine Light is on
- Engine cooling fans run constantly, even when the engine is cold
- Temperature gauge may behave erratically or show maximum heat
- "Engine Coolant Over Temperature" warning on the dash display
- Reduced fuel economy
- Engine may be hard to start, especially when cold
- Rough or hesitant running, particularly before the engine warms up
- Engine may enter a reduced-power "limp mode"
- Replacing the thermostat. A faulty thermostat typically causes the engine to warm up too slowly, which sets a P0128 code. It does not cause the P0117 electrical circuit fault.
Most Likely Causes
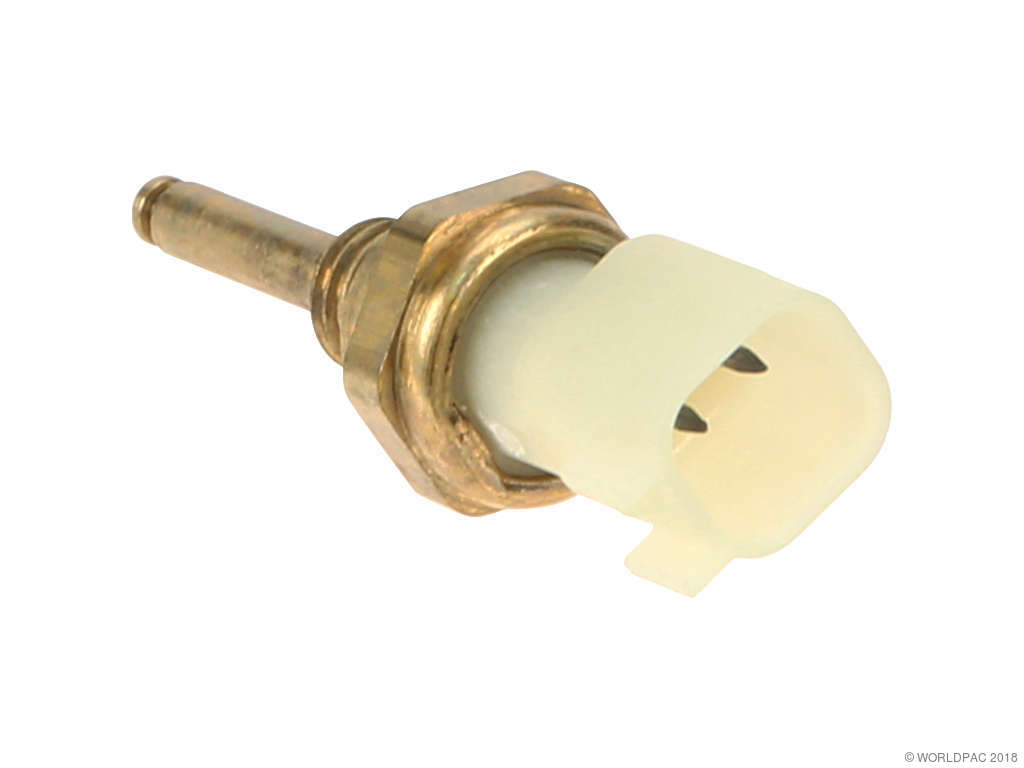
- Faulty Cylinder Head Temperature (CHT) Sensor 🔴 High Probability → Shop Engine Cylinder Head The sensor is a common failure point. Due to its location deep within the engine valley, it is subjected to significant heat cycles which can cause it to fail by shorting out internally.
How to confirm: The most definitive test is to measure the sensor's resistance after accessing it. At room temperature (20°C / 68°F), a good sensor should have a resistance between 2,200 and 3,000 ohms. Since this requires removing the intake manifold, most technicians will replace the sensor based on the code alone after ruling out external wiring issues. A diagnostic shortcut is to test the circuit at the PCM connector; if the wiring tests good, the sensor is condemned.
Typical fix: Replace the CHT sensor and the required upper and lower intake manifold gaskets.
Est. part cost: $25-$60 - Shorted Sensor Wiring or Connector 🟡 Medium Probability The wiring harness runs in a hot, tight space under the intake manifold. Over time, insulation can become brittle and crack, or wires can be damaged by rodents or during other engine repairs, leading to a short to ground.
How to confirm: Visually inspect the wiring harness for any signs of damage, melting, or corrosion after removing the intake manifold. Check for continuity to ground on the signal wire between the PCM connector and the sensor connector. A short to ground will cause the P0117 code.
Typical fix: Repair the damaged section of the wiring harness or replace the sensor connector pigtail.
Est. part cost: $15-$45 for a connector pigtail - Low Engine Coolant ⚪ Low Probability → Shop Engine Coolant / Antifreeze While P0117 is an electrical code, severe overheating from a coolant leak can potentially damage the sensor or its wiring. The 3.5L V6 is known for potential water pump leaks, which are internal to the engine and can contaminate the oil. An overheating event caused by a leak could theoretically damage the CHT sensor, but it's more likely to cause other codes first.
How to confirm: Check the coolant level in the reservoir. If it is low, top it off and check for leaks. Note that this is more likely to cause an actual overheating condition or a P0128 code, not a P0117, unless the sensor itself is damaged by the heat.
Typical fix: Find and repair the coolant leak. If the water pump has failed, it is a major, timing-chain-driven repair. Refill and bleed the cooling system.
Est. part cost: $20-$2000+ depending on the source of the leak
Rare But Worth Checking
- Faulty Powertrain Control Module (PCM): → Shop Engine Control Module (ECM) This is very rare. The PCM is the last item to suspect after the sensor and wiring have been thoroughly checked. A faulty PCM might fail to correctly interpret the sensor's signal or have an internal short on the CHT circuit.
Diagnosis Steps
- Verify the code with an OBD-II scanner. Note any other codes present.
- Check the coolant level to rule out a severe low-coolant condition. Ensure the engine is cold before opening the radiator cap.
- With a scan tool, observe the live data for the CHT sensor. A P0117 code will typically show a reading pegged at a very high temperature (e.g., 280°F or higher), even with a cold engine.
- Test the circuit before disassembly. Disconnect the PCM connector and locate the two pins for the CHT sensor circuit. Measure the resistance between them. A reading between 2,200 and 3,000 ohms on a cold engine indicates the wiring and sensor are likely okay, pointing towards a PCM issue. An open circuit (infinite resistance) would set a P0118. A short (very low resistance) confirms the P0117 fault is in the wiring or sensor. 🎬 Watch: How to test and replace a coolant temperature sensor.
- Prepare for intake manifold removal. This is a significant job requiring careful labeling of bolts and connectors.
- Once the upper and lower intake manifolds are removed, carefully inspect the wiring harness leading to the CHT sensor for any signs of melting, chafing, or rodent damage.
- Disconnect the sensor and inspect the connector for damage or corrosion. Test the sensor directly with a multimeter. Resistance should be ~2.5kΩ at 20°C (68°F).
- Given the high labor cost to access the sensor, it is highly recommended to replace the CHT sensor (and its connector if damaged) regardless of whether a wiring issue is found. It's cheap insurance.
- It is mandatory to replace the upper and lower intake manifold gaskets during reassembly. Consider replacing spark plugs and coils at the same time as they are also accessible.
- After reassembly, clear the codes and perform a test drive, monitoring the CHT/ECT data on the scan tool to ensure it reads correctly as the engine warms up.
Parts You'll Likely Need
- Cylinder Head Temperature (CHT) Sensor
(OEM #9L8Z-6G004-E)— This is the most common cause of the P0117 code on this engine. It fails by shorting internally. This part number supersedes 9L8Z-6G004-B.
Trusted brands: Motorcraft, NGK, Standard Motor Products
OEM price range: $35-$60
Aftermarket price range: $20-$45 - Upper and Lower Intake Manifold Gasket Set — These gaskets must be replaced anytime the intake manifold is removed to access the CHT sensor. They are one-time use.
Trusted brands: Motorcraft, Fel-Pro (Lower Set: MS 96688, Upper Set: MS 96168), Mahle
OEM price range: $50-$90
Aftermarket price range: $30-$60 - CHT Sensor Connector Pigtail
(OEM #WPT-984)— If the wiring inspection reveals a damaged or corroded connector, the pigtail will need to be spliced in. The locking tab often becomes brittle and breaks during removal.
Trusted brands: Motorcraft, Standard Motor Products, Dorman
OEM price range: $35-$50
Aftermarket price range: $15-$30
Related Codes That Often Appear With This One
- P0118 — If there is an intermittent short and open in the CHT circuit, you may see both P0117 (Circuit Low) and P0118 (Circuit High) codes logged.
- P0128 — If the vehicle also has a failing thermostat that is stuck open, it's possible to have a P0128 code stored alongside the P0117, though the P0117 fault is the more immediate electrical issue.
Technical Service Bulletins (TSBs) & Recalls
- While no TSBs directly address P0117 on the Taurus specifically, several Special Service Messages (SSMs) for platform mates like the Ford Edge (SSM 48991, SSM 47791) highlight issues with the CHT/ECT sensor wiring and connectors, reinforcing the need to inspect this area carefully.
Platform-Specific Known Issues
- While-you're-in-there Maintenance: Due to the extensive labor required to remove the intake manifold, it is highly recommended to perform other maintenance tasks at the same time. This includes replacing all six spark plugs and ignition coils, and thoroughly cleaning the throttle body.
Mechanic-Grade Diagnostic Values
- CHT Sensor Resistance (Cold Engine) — expected: ~58,750 Ω at 50°F (10°C), ~37,000 Ω at 68°F (20°C).. Failure: Near-zero resistance indicates a shorted sensor, which is the direct cause of P0117. Infinite resistance (open circuit) would cause P0118.
- CHT Sensor Resistance (Hot Engine) — expected: ~1,180 Ω at 212°F (100°C).. Failure: Resistance that does not decrease smoothly as the engine warms, or a value that is drastically different, indicates a faulty sensor.
- CHT Sensor Signal Voltage at PCM — expected: Approximately 3.5V on a cold engine, dropping to around 0.3V on a fully hot engine.. Failure: The PCM will set code P0117 when it sees a voltage below approximately 0.20V - 0.25V, as this signals an impossibly high temperature (short circuit).
- Scan Tool Live Data (Cold Engine) — expected: The CHT/ECT temperature reading should be very close to the Intake Air Temperature (IAT) and ambient air temperature after the vehicle has been sitting for several hours.. Failure: An immediate reading of 250°F (121°C) or higher on a cold engine confirms the fault condition for P0117.
Scan Tool Commands That Help
- Ford IDS, FORScan, or other professional scan tool: Live Data Monitoring (CHT PID) — This is the primary first step. Observing the CHT temperature reading in real-time reveals the fault. A P0117 will typically show the temperature pegged at its maximum value (e.g., 280°F+) instantly, even on a cold engine.
- Ford IDS or equivalent: KOEO (Key On, Engine Off) and KOER (Key On, Engine Running) Self-Tests — After addressing the primary P0117 code, running these self-tests can help identify other related but non-active fault codes that may be stored in memory, potentially indicating intermittent wiring issues.
- N/A - Manual Test: Disconnect CHT Sensor Connector — With the scan tool displaying live data, unplugging the sensor should cause the temperature reading to drop to its lowest possible value (e.g., -40°F) and may set a P0118 (Circuit High) code. If the temperature reading does *not* change, it confirms the signal wire is shorted to ground somewhere between the PCM and the connector.
Wiring & Ground Locations
- CHT Sensor Connector — In the engine valley, between the cylinder heads, underneath the lower intake manifold.. This is the primary connection point for the sensor. The connector itself or the wiring leading to it can be damaged by extreme heat, causing a short to ground.
- PCM Connector C175B — At the Powertrain Control Module (PCM), located at the center rear of the engine compartment on the firewall.. The two wires from the CHT sensor terminate here. Testing for resistance across the CHT pins at this connector can determine if the fault is in the sensor/wiring or the PCM itself without first removing the intake manifold.
- G104 / G105 — G104 is on the right side of the engine compartment. G105 is on the top right side/rear of the engine.. These are primary engine and PCM ground points. While less common for a P0117, a corroded or loose connection at these grounds can cause erratic voltage and faulty signals for various sensors, including the CHT sensor.
Real Owner Repair Stories
- Ford Edge Forum (similar 3.5L engine) (2011 Ford Edge 3.5L) — Check engine light with P0117 and cooling fans running constantly after recent engine work.
❌ Tried (didn't work) Initial assumption was the new CHT sensor installed during other work was faulty.
✅ What actually fixed it The wiring harness for the Intake Manifold Runner Control (IMRC) actuator had been incorrectly routed and was rubbing against the CHT sensor's wiring harness. The constant friction wore through the insulation, causing the CHT signal wire to short to ground. Properly re-routing and securing the harness away from any moving parts and repairing the damaged wire resolved the P0117 code.
"I Checked Everything" — The Actual Cause
- For this electrical code, the equivalent of a 'smoke test clean' scenario is when the wiring harness tests good for shorts with a multimeter while the engine is off and cold. However, the short circuit may only occur intermittently when the engine is running due to vibration or thermal expansion. A technician may need to 'wiggle test' the harness while monitoring voltage to find a subtle short that only appears under specific conditions.
OEM Part Supersession History
9L8Z-6G004-B→9L8Z-6G004-E— Revision to improve sensor reliability and longevity.WPT-815→WPT-984— Revision of the CHT sensor connector pigtail.
Heads up: WPT-984 is the current service part for repairing a damaged connector.
Model Year Variations Within This Range
- 2008-2019: While the core issue of the CHT sensor location is the same across the 2008-2009 (Gen 5) and 2010-2019 (Gen 6) models, the PCM connectors and specific pin locations may vary. Technicians must always consult the correct wiring diagram for the specific year of the vehicle before performing diagnostic tests at the PCM.
Diagnostic Flowchart
Other Known Issues on This Vehicle
Issues unrelated to this code that are worth knowing about as an owner of this generation:
- Internal Water Pump Failure 🔴 High → Shop Engine Water Pump — Common after 80,000-120,000 miles. Failure can be catastrophic, as it leaks coolant directly into the engine oil, destroying the engine. (Ref: No recall, but subject of multiple class-action lawsuits.)
- Electronic Throttle Body Failure 🟠 Medium — Common failure item, often occurring between 60,000 and 100,000 miles. Causes sudden limp mode, stalling, and various throttle-related codes (P2111, P2112). (Ref: TSB 10-21-6 was issued for some 2010 models; Customer Satisfaction Program 13N03 existed but has expired.)
- Stretched Timing Chains 🔴 High — More common on early (pre-2011) 3.5L engines and often exacerbated by the internal water pump leaking coolant into the oil, which degrades chain guides and tensioners. (Ref: TSB 15-0131 addresses a related cold start rattle on EcoBoost versions.)
- EVAP Canister Purge Valve Failure 🟡 Low — A very common failure causing a check engine light for code P1450 and sometimes affecting fuel trim. The part is inexpensive and easy to replace. (Ref: TSB 14-0213 covers this issue for 2012-2013 models.)
Used vs. New Parts: Buying Guide for This Vehicle
When a used part is the smart pick: For this specific repair, using used parts is not recommended for the sensor or gaskets. A used wiring harness section or a used intake manifold could be considered if the original part is physically broken, but this is rare.
Donor-vehicle mileage cap: roughly under 80000 miles for the part to have meaningful remaining life.
What to inspect on the donor part:
- For a wiring harness: check for any signs of brittleness, cracking, or previous repairs (splices).
- For an intake manifold: ensure all mounting points are intact and there are no cracks, especially around gasket surfaces.
OEM-only on this vehicle (don't cheap out):
- Cylinder Head Temperature (CHT) Sensor: Due to the 4-6 hours of labor required for access, installing a lower-quality aftermarket sensor is a significant risk. A premature failure would require repeating the entire expensive job. Using an OEM Motorcraft sensor is strongly advised.
Aftermarket brands forum-validated for this vehicle:
- Gaskets: Fel-Pro is a widely trusted aftermarket brand for intake manifold gaskets.
- Sensors: Standard Motor Products (SMP) is generally considered a reliable Tier 1 aftermarket supplier, often manufacturing parts for OEMs or re-boxing OEM parts. If Motorcraft is unavailable, SMP is a viable alternative.
Brands owners have reported issues with on this vehicle:
- Avoid generic, unbranded, or 'economy' line sensors. For a part this difficult to access, the small upfront cost savings are not worth the risk of premature failure.
Real Owner Stories
Aggregated from forums and TSBs cited above. Mileages and costs reflect what owners reported in those sources.
2008-2019 Ford Taurus 3.5L V6
Symptoms: Owners reported the check engine light coming on and receiving quotes for repairs involving the difficult sensor location under the intake manifold.
What fixed it: Replacement of the CHT sensor located under the intake manifold.
Cost: $600-$900
Source hint: TaurusClub.com forum threads
Related OBD-II Codes
Frequently Asked Questions
Why are my cooling fans running constantly even when I first start my Ford Taurus in the morning?
Can I replace the CHT sensor on my 2010 Taurus without removing the intake manifold?
Is there a TSB for P0117 on the Ford Taurus?
Could a water pump failure cause a P0117 code on my 3.5L Cyclone engine?
What should the resistance of the CHT sensor be if it is working correctly?
How much does it typically cost to fix P0117 on this vehicle?
Helpful Videos

Used OEM Parts in Stock
New Aftermarket Parts Available


The information in this article is provided for general reference and educational purposes only. Vehicle specifications, procedures, and part compatibility can vary by production date, trim level, and region. Always consult your vehicle's factory service manual and verify part numbers before purchasing or performing repairs. Safety-critical components such as airbags, seat belts, and braking systems should be installed by a qualified professional.
- Ford Taurus:
- 🧭 Diagnostic Flowchart
- 🎬 Helpful Videos
- 🛍️ Shop This Part
- What's Unique About the 2008-2019 Ford Taurus
- Symptoms You May Notice
- Most Likely Causes
- Rare But Worth Checking
- Diagnosis Steps
- Parts You'll Likely Need
- Related Codes That Often Appear With This One
- Technical Service Bulletins (TSBs) & Recalls
- Platform-Specific Known Issues
- Mechanic-Grade Diagnostic Values
- Scan Tool Commands That Help
- Wiring & Ground Locations
- Real Owner Repair Stories
- "I Checked Everything" — The Actual Cause
- OEM Part Supersession History
- Model Year Variations Within This Range
- Other Known Issues on This Vehicle
- Used vs. New Parts: Buying Guide for This Vehicle
- Real Owner Stories
- 2008-2019 Ford Taurus 3.5L V6
- Related OBD-II Codes
- Frequently Asked Questions
- 🎟️ Get 5% Off