
P0133 on 2010-2015 Lexus RX350: Slow A/F Sensor Causes and Fixes
On a 2010-2015 Lexus RX350, code P0133 is almost always caused by a failing Bank 1, Sensor 1 Air/Fuel Ratio sensor. This sensor is located on the rear exhaust manifold against the firewall, making it a difficult DIY job. Expect to pay $150-$250 for an OEM-quality Denso sensor and $200-$400 in labor due to the poor access. Before replacing the sensor, a visual check for exhaust manifold leaks is highly recommended.
- P0133 on your RX350 points directly to the Air/Fuel Ratio sensor on the rear exhaust manifold (Bank 1).
- The most likely cause is simply an old, worn-out sensor that needs to be replaced.
- Due to the sensor's location against the firewall, this is a difficult and labor-intensive job. Getting a quote from a trusted independent shop is recommended.
- Always use a high-quality replacement sensor from Denso (the OEM supplier, part #234-9096) or NGK/NTK to ensure proper performance and longevity.
- Before replacing the expensive sensor, perform a careful inspection for exhaust leaks at the manifold, as this is a common alternative cause for this code.
What's Unique About the 2010-2015 Lexus RX350
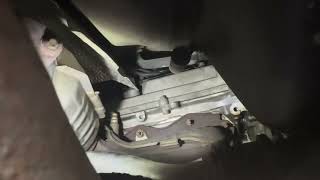
The key challenge with this code on the RX350 is not the diagnosis, but the repair. The Bank 1 Air/Fuel sensor is notoriously difficult to access, tucked between the engine and the firewall. While the front sensor (Bank 2) is an easy DIY job, this rear sensor often requires special tools like a 7/8" offset or flexible head oxygen sensor socket, long extensions, and significant labor. Some mechanics access it from below, which may require removing a small exhaust pipe section for clearance. For this reason, what might be a simple sensor swap on another vehicle becomes a more involved and costly repair on the RX350.
Symptoms You May Notice
- Check Engine Light is on
- VSC (Vehicle Stability Control) light is on (a common occurrence on Lexus/Toyota when a CEL is triggered)
- Reduced fuel economy
- Rough or unstable idle
- Hesitation or sluggish acceleration
- Black smoke from the exhaust if the mixture becomes too rich
- Replacing the wrong sensor. Many people mistakenly replace the more accessible Bank 2 (front) sensor or the downstream (Sensor 2) oxygen sensor, which will not fix this code.
- Replacing the sensor without checking for exhaust leaks first. If a leak is present, a new sensor will not solve the root problem and the code will likely return.
- Immediately replacing the sensor after a battery change without further diagnosis. The code could be a temporary result of the ECU reset.
Most Likely Causes
- Failing Bank 1 Air/Fuel Ratio Sensor 🔴 High Probability → Shop Oxygen Sensor Air/Fuel ratio sensors are consumable parts that degrade over time from extreme heat and exhaust contaminants. With mileage typically over 100,000, the internal heating element can fail or the sensing element can become contaminated, slowing its response time.
How to confirm: A technician can use a scan tool to graph the sensor's voltage or current. A healthy A/F sensor will show rapid, active switching. A slow, lazy, or flat waveform confirms the sensor is failing. 🎬 Watch: How to test and replace an upstream air fuel sensor A good sensor should switch from lean (~0.1V) to rich (~0.9V) very quickly.
Typical fix: Replace the Bank 1, Sensor 1 (Upstream, Rear) Air/Fuel Ratio Sensor.
Est. part cost: $150-$285 - Exhaust Leak 🟡 Medium Probability Exhaust manifold gaskets can fail over time, allowing unmetered outside air to be drawn into the exhaust stream before the sensor. This extra oxygen makes the sensor's readings appear slow or biased lean.
How to confirm: Perform a visual inspection of the exhaust manifold and gaskets for black soot trails, which are a definitive sign of a leak. A smoke test, where smoke is forced into the exhaust system, is the most effective way to pinpoint the exact location of a leak. Listening for a ticking or puffing sound when the engine is cold can also indicate a leak.
Typical fix: Replace the leaking exhaust manifold gasket or repair the crack in the manifold.
Est. part cost: $20-$100 - Damaged Wiring or Connector ⚪ Low Probability The wiring harness is close to hot exhaust components and can become brittle, melted, or damaged over time. Rodents can also chew on the wiring, causing an open or short in the circuit.
How to confirm: Visually inspect the wiring harness leading to the sensor for any signs of melting, chafing, or corrosion at the connector. A multimeter can be used to check for continuity and proper voltage at the connector according to the vehicle's wiring diagram.
Typical fix: Repair the damaged section of the wiring harness or clean/replace the connector.
Est. part cost: $10-$50
Rare But Worth Checking
- Vacuum Leak: A significant vacuum leak from a cracked hose or bad intake manifold gasket can alter the air-fuel mixture enough to cause the sensor to read incorrectly, though this would typically set other codes as well, like P0171 or P0174.
- Low Fuel Pressure: A failing fuel pump or clogged filter can cause a lean condition that might contribute to this code, but it's an unlikely primary cause without other symptoms or codes.
- False Code After Battery Replacement: Sometimes, a P0133 code can appear immediately after disconnecting and reconnecting the vehicle's battery. This can happen because the ECU's learned fuel trims are reset, and it runs a strict self-test that flags a borderline sensor. It's often recommended to check for a small exhaust leak before replacing the sensor in this specific scenario.
Diagnosis Steps
- Connect an OBD-II scanner and confirm that P0133 is the primary code present. Note any other codes.
- Using the scanner's live data function, graph the signal for 'Bank 1, Sensor 1'. Get the engine to operating temperature. A healthy A/F sensor should show rapid, active switching. If the waveform is slow, lazy, or flatlined, the sensor is likely bad.
- Perform a thorough visual inspection for exhaust leaks, especially when the engine is cold. Look for black soot marks around the rear exhaust manifold gasket. A professional smoke test is the most definitive method.
- Carefully inspect the wiring harness and connector for the Bank 1, Sensor 1. Check for any signs of melting, fraying, corrosion, or rodent damage.
- If the sensor waveform is slow and there are no visible exhaust leaks or wiring damage, the A/F sensor itself is the most probable cause and should be replaced. 🎬 See this walkthrough for replacing the bank 1 upstream sensor
- If the code appeared immediately after a battery replacement, give special attention to the possibility of a small, pre-existing exhaust leak that the reset ECU is now sensitive to.
Parts You'll Likely Need
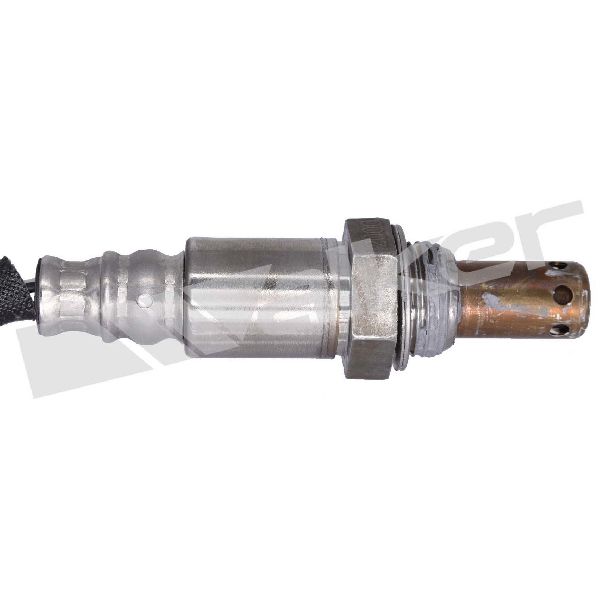
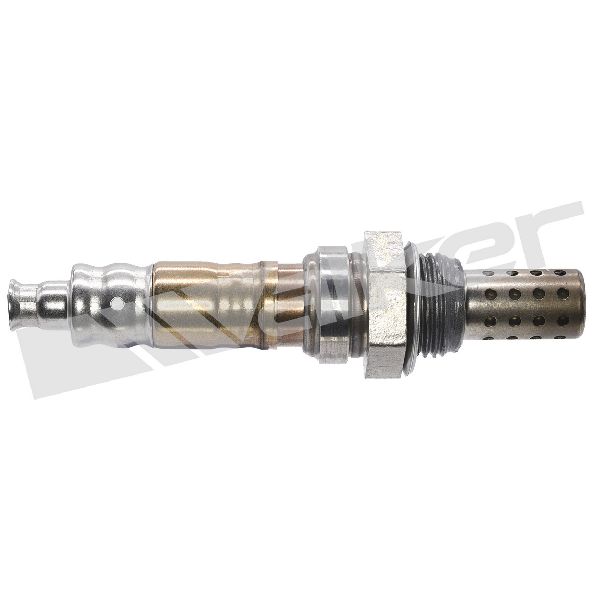
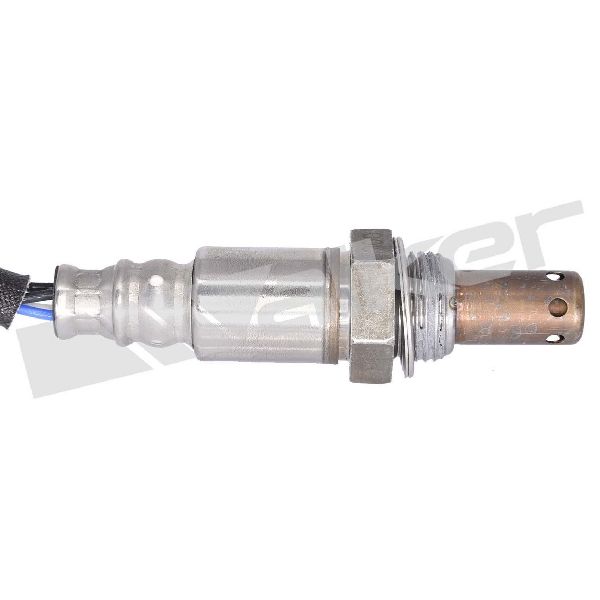
- Air/Fuel Ratio Sensor (Bank 1, Sensor 1)
(OEM #89467-0E030)— This is the sensor identified by the code P0133. It is the most common failure point for this code due to age and heat exposure.
Trusted brands: Denso (OEM Supplier), NGK/NTK
OEM price range: $250-$380
Aftermarket price range: $150-$220
Related Codes That Often Appear With This One
- P0171 — If an exhaust leak or vacuum leak is the root cause, the system may run lean, triggering a 'System Too Lean (Bank 1)' code alongside P0133.
- P2195 — This code means 'O2 Sensor Signal Stuck Lean (Bank 1, Sensor 1)'. It's a related fault that can occur if the sensor is failing or if there's a severe exhaust/vacuum leak. A user with a 2007 RX350 reported this code for a failed Bank 1 Sensor 1. 🎬 Watch: A real-world replacement on a similar Lexus RX model
Platform-Specific Known Issues
- The primary vehicle-specific issue is the extremely difficult access to the Bank 1 (rear) A/F sensor, which significantly increases labor time and cost compared to the easily accessible Bank 2 (front) sensor.
- Special tools, such as a 7/8" (22mm) offset or flex-head O2 sensor socket, are almost mandatory for DIY replacement to work around the tight clearances.
- Some owners and mechanics report that accessing the sensor from underneath the vehicle is the only viable method, and may involve removing a section of the exhaust Y-pipe to create enough room to work.
Mechanic-Grade Diagnostic Values
- A/F Sensor Heater Resistance — expected: 1.8 to 3.4 Ω at 20°C (68°F). Failure: Resistance outside this range indicates a faulty internal heater element, which will cause slow sensor warm-up and trigger P0133.
- A/F Sensor Insulation Resistance — expected: 10 kΩ or higher. Failure: Resistance lower than 10 kΩ between terminals HA1A and A1A- indicates an internal short circuit.
- A/F Sensor Live Data Voltage (Techstream) — expected: Approximately 3.3V at idle. Failure: A lazy or non-responsive voltage reading when the engine is revved or when using the 'A/F Control' active test confirms a slow sensor.
- Mode $06 Test ID $81, Component ID $11 — expected: Value should be below the maximum threshold specified in the scan tool.. Failure: A test value exceeding the maximum limit indicates that the Bank 1 Sensor 1 response time from rich-to-lean is too slow.
Scan Tool Commands That Help
- Toyota Techstream: Active Test: 'A/F Control' — This is a definitive bidirectional test to confirm a slow sensor. The software commands the engine to run rich (+25% fuel) and lean (-12.5% fuel). Graphing the A/F sensor's voltage during this test will show if it responds quickly to these commands. A sluggish response directly confirms the P0133 condition.
- Toyota Techstream: Utility: 'Reset Memory' — After replacing the A/F sensor, this function should be used to clear the learned fuel trim values from the ECM. This forces the computer to relearn the fuel strategy with the new, properly functioning sensor, preventing potential driveability issues or the code returning incorrectly.
Wiring & Ground Locations
- ECM (Engine Control Module) — Located in the engine compartment, on the left side (driver's side in LHD vehicles), housed within the Engine Room R/B assembly.. This is the computer that receives the signal from the A/F sensor. All wiring checks for the sensor circuit will terminate at one of the ECM's connectors (specifically connectors E6, E7, E8, or E9).
- Air Fuel Ratio Sensor (Bank 1 Sensor 1) Connector — The connector is clipped to a bracket on the rear of the engine, near the top of the transmission bell housing, close to the firewall. It is difficult to see and reach from above.. This connector is a common point for inspection. Technicians need to access it to perform resistance and voltage checks directly at the sensor's pigtail. Its difficult location contributes to the high labor cost of diagnosis and repair.
- ECM Terminals for B1S1 — A1A+ (A/F Sensor Signal +), A1A- (A/F Sensor Signal -), +B (Heater Power), HA1A (Heater Control) at the ECM connectors.. These are the specific pins at the ECM that must be tested for continuity and voltage when diagnosing a wiring fault between the sensor and the computer.
OEM Part Supersession History
89467-48230→89467-0E030— Standard part number consolidation and potential minor internal revisions by the manufacturer.
Model Year Variations Within This Range
- 2010-2012: The primary OEM part number listed is 89467-0E030.
- 2013-2015: While 89467-0E030 is often cited for the whole generation, some parts catalogs show different numbers for later years, potentially related to build location (Japan 'J' VIN vs. Canada '2' VIN). Always confirm the part number with the vehicle's VIN.
Diagnostic Flowchart
Other Known Issues on This Vehicle
Issues unrelated to this code that are worth knowing about as an owner of this generation:
- Rupturing Engine Oil Cooler Lines 🔴 High — Common on 2010-2012 models equipped with the tow package. The original rubber hoses can burst, leading to rapid oil loss and potential engine seizure. (Ref: A warranty enhancement program was issued (expired), but no formal recall. The fix is to replace the rubber lines with an all-metal line (part #15767-31020).)
- VVT-i Oil Line Rupture 🔴 High — Primarily affects earlier 2GR-FE engines (pre-2010), but some early 2010 models may still have the problematic rubber section on the Bank 2 (front) VVT-i oil line. Failure leads to catastrophic oil loss. (Ref: A technical service bulletin and warranty extension were issued. The fix is to replace the line with an all-metal version (part #15772-31030).)
- Melting / Sticky Dashboard 🟡 Low — Very common in vehicles exposed to heat and humidity, affecting the plastic on the dashboard and door panels. (Ref: Lexus issued a Warranty Enhancement Program (ZLD/ZLZ) to replace affected dashboards, but the program has since expired for most vehicles.)
- Power Liftgate Malfunction 🟡 Low — The power liftgate can fail to operate or require 're-initialization', often after a battery disconnect.
- Transmission Shifting Issues 🟠 Medium — Some owners report issues with rough or delayed gear changes. This can sometimes be addressed with a fluid change or software update, but can occasionally indicate internal wear.
Used vs. New Parts: Buying Guide for This Vehicle
When a used part is the smart pick: For this specific repair, using a used part is NOT recommended for the Air/Fuel Ratio sensor itself. However, if the cause is a cracked exhaust manifold, a used manifold from a low-mileage donor vehicle is a viable and cost-effective option.
Donor-vehicle mileage cap: roughly under 80000 miles for the part to have meaningful remaining life.
What to inspect on the donor part:
- For an exhaust manifold: Check for any visible cracks, especially around the welds and flange.
- Ensure all mounting studs are intact and not broken off.
- Look for excessive rust or pitting on the mating surfaces where the gaskets seal.
OEM-only on this vehicle (don't cheap out):
- Air/Fuel Ratio Sensor
Aftermarket brands forum-validated for this vehicle:
- Denso (OEM supplier)
- NGK/NTK
Brands owners have reported issues with on this vehicle:
- Bosch (known compatibility issues with some Toyota/Lexus models)
- Unbranded or generic 'white-box' sensors from online marketplaces (high rate of out-of-box failure and incorrect calibration)
Real Owner Stories
Aggregated from forums and TSBs cited above. Mileages and costs reflect what owners reported in those sources.
2007 Lexus RX350 2GR-FE
Symptoms: The owner was dealing with a P2195 code (related to the A/F sensor) and noted the sensor was located near the firewall with very difficult access.
What fixed it: Replacement of the Bank 1 Sensor 1 (upstream) sensor.
Source hint: YouTube.com video titled '2007 Lexus RX 350 Bank 1 sensor 1 replacement'
2010-2015 Lexus RX350 2GR-FE — ~100000 miles
Symptoms: The owner found that accessing the rear sensor from above was nearly impossible and had to attempt the repair from below the vehicle.
What fixed it: Replacement of the Bank 1 Sensor 1 using a video guide to navigate the difficult access from below.
Source hint: ClubLexus.com thread titled 'How to replace O2 sensor bank 1 sensor 1 upstream for Lexus and Toyota'
2001-2006 Lexus LS (General 2GR-FE/Toyota context)
Symptoms: Multiple O2 sensor codes including P0130, P0133, P0150, and P0153 appearing simultaneously.
What fixed it: Repairing an exhaust leak, which was the root cause for the multiple sensor codes.
Source hint: ClubLexus.com thread titled 'P0130, P0133, P0150, P0153 codes'
Related OBD-II Codes
Frequently Asked Questions
Why is my VSC (Vehicle Stability Control) light on along with the Check Engine Light for code P0133?
I just replaced my battery and now P0133 appeared. Is the sensor definitely bad?
Which specific sensor do I need to replace for a P0133 code on my RX350?
Is there a specific part number to fix the common oil leak issue on 2010-2012 models?
Can I replace the Bank 1 Sensor 1 myself, or is it too difficult?
Is the sticky dashboard on my 2010 RX350 still covered by Lexus?
Helpful Videos


We Have This Part in Stock


The information in this article is provided for general reference and educational purposes only. Vehicle specifications, procedures, and part compatibility can vary by production date, trim level, and region. Always consult your vehicle's factory service manual and verify part numbers before purchasing or performing repairs. Safety-critical components such as airbags, seat belts, and braking systems should be installed by a qualified professional.
- Lexus RX350:
- 🧭 Diagnostic Flowchart
- 🎬 Helpful Videos
- 🛍️ Shop This Part
- What's Unique About the 2010-2015 Lexus RX350
- Symptoms You May Notice
- Most Likely Causes
- Rare But Worth Checking
- Diagnosis Steps
- Parts You'll Likely Need
- Related Codes That Often Appear With This One
- Platform-Specific Known Issues
- Mechanic-Grade Diagnostic Values
- Scan Tool Commands That Help
- Wiring & Ground Locations
- OEM Part Supersession History
- Model Year Variations Within This Range
- Other Known Issues on This Vehicle
- Used vs. New Parts: Buying Guide for This Vehicle
- Real Owner Stories
- 2007 Lexus RX350 2GR-FE
- 2010-2015 Lexus RX350 2GR-FE — ~100000 miles
- 2001-2006 Lexus LS (General 2GR-FE/Toyota context)
- Related OBD-II Codes
- Frequently Asked Questions
- 🎟️ Get 5% Off