
P0133 on 2005-2010 Scion tC: Slow A/F Sensor Response Causes and Fixes
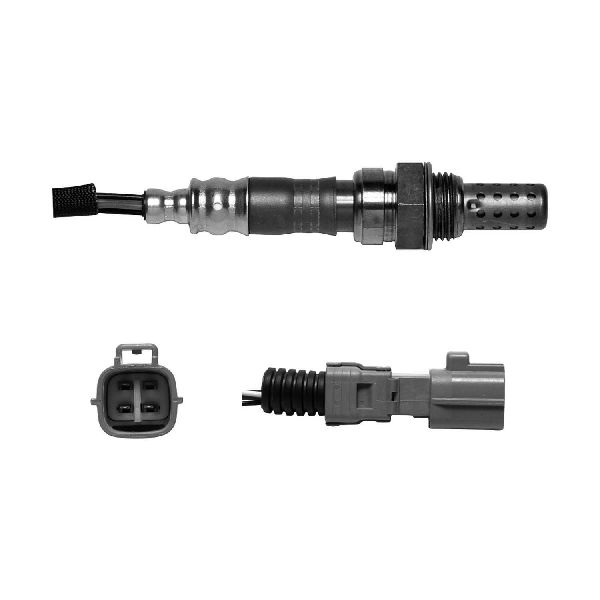
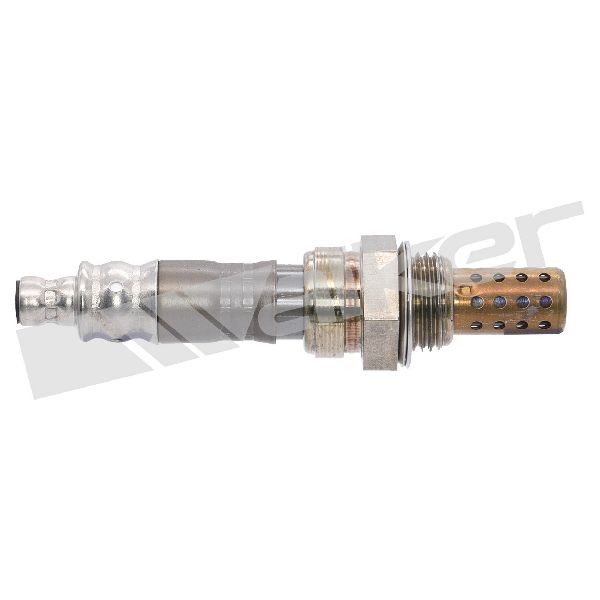
For the 2005-2010 Scion tC, code P0133 almost always means the upstream Air/Fuel Ratio (A/F) sensor is old and needs replacement, typically after 100,000 miles. The most common and reliable fix is installing a new Denso sensor (part #234-9041), which is the OEM supplier. This costs around $120-$160 for the part and is a straightforward DIY job requiring an O2 sensor socket.
- P0133 on a 2005-2010 Scion tC points directly to a slow upstream Air/Fuel Ratio sensor.
- The most likely fix is replacing the sensor. Don't confuse it with the cheaper downstream O2 sensor.
- The recommended aftermarket replacement is the Denso #234-9041, which is the OEM supplier. Using other brands may not resolve the issue.
- Before replacing, perform a quick visual check for obvious exhaust leaks (soot marks) or damaged wiring near the sensor.
- This is a DIY-friendly repair that can save you money on labor and improve your gas mileage, typically requiring a special O2 sensor socket.
What's Unique About the 2005-2010 Scion tC
On many vehicles, this sensor is a traditional Oxygen (O2) sensor. However, Toyota and Scion vehicles of this era, including the tC with the 2AZ-FE engine, use a more sophisticated and faster-reacting 'wideband' Air/Fuel Ratio sensor in the upstream position. While the code's definition is generic, the part itself is specific. The overwhelming consensus among owners and mechanics is that these sensors have a finite lifespan and simply wear out from age and contamination, making replacement the most common and direct fix. Forum discussions consistently show that using the OEM brand (Denso) is critical, as some aftermarket brands like Bosch can cause the code to return.
Symptoms You May Notice
- Check Engine Light is on
- Decreased fuel economy (MPG)
- Rough or unstable idle
- Slight hesitation or slower acceleration
- Black smoke from the exhaust in some cases
- Replacing the downstream (rear) oxygen sensor. P0133 specifically refers to Sensor 1, which is the upstream (front) sensor. The downstream sensor (Sensor 2) has a different function, part number, and is not the cause.
- Assuming the sensor is bad without checking for exhaust leaks first. An exhaust leak before the sensor can mimic the symptoms of a failed sensor.
Most Likely Causes
- Failing Upstream Air/Fuel Ratio Sensor 🔴 High Probability → Shop Oxygen Sensor The sensor is a known wear item. After 100,000+ miles, contamination from combustion byproducts, oil, or coolant can foul the sensing element, causing it to become less responsive, which is the direct trigger for a 'slow response' code.
How to confirm: Use an OBD-II scanner with live data capability. Graph the voltage of 'Bank 1 Sensor 1'. A healthy sensor's voltage will fluctuate rapidly. A slow sensor will show lazy, slow swings or a nearly flat line. Given the high probability on vehicles over 100k miles, many owners opt to replace it based on mileage and age alone, especially if the sensor is original.
Typical fix: Replace the upstream Air/Fuel Ratio sensor located in the exhaust manifold. Using the Denso brand (part #234-9041) is highly recommended as it is the OEM supplier and ensures compatibility.
Est. part cost: $120-$200 - Exhaust Leak 🟡 Medium Probability Gaskets on the exhaust manifold can degrade over time. A leak before the A/F sensor introduces outside oxygen, which skews the sensor's readings and can cause it to appear slow or faulty.
How to confirm: Visually inspect the exhaust manifold and the gasket between it and the cylinder head for black soot trails, which indicate a leak. Listen for a 'ticking' or 'puffing' sound from the engine bay, especially when the engine is cold. A shop can use a smoke machine to pinpoint leaks.
Typical fix: Replace the leaking gasket or repair the cracked manifold.
Est. part cost: $15-$50 for a gasket - Damaged Sensor Wiring or Connector ⚪ Low Probability
How to confirm: Visually inspect the wiring harness leading to the A/F sensor. Look for any signs of melting, chafing against engine components, or corrosion on the connector pins. High resistance in the wiring (even >0.5 Ω) can dampen the signal and trigger the code. Test for continuity and resistance using a multimeter if a visual inspection is inconclusive.
Typical fix: Repair the damaged section of the harness or clean/replace the connector terminals.
Est. part cost: $5-$30 for wiring repair supplies
Rare But Worth Checking
- Dirty or Faulty Mass Airflow (MAF) Sensor: → Shop Fuel Injection Air Flow Meter An incorrect airflow reading can throw off the entire air/fuel calculation, making the A/F sensor appear to be the problem. Cleaning the MAF sensor with a dedicated cleaner is cheap and easy, making it a worthwhile check before replacing more expensive parts.
- Engine Vacuum Leak: A leak in a vacuum hose or intake manifold gasket introduces unmetered air, which can confuse the ECU and lead to various fuel trim-related codes, including P0133.
Diagnosis Steps
- Read the code with an OBD-II scanner to confirm P0133 is the primary code. Check for any other related codes.
- Visually inspect the exhaust manifold for any signs of cracks or leaks (black soot trails). Listen for ticking noises when cold.
- Inspect the A/F sensor wiring harness for obvious damage, such as melting on the exhaust pipe, frayed wires, or corrosion in the connector.
- If you have a scanner with live data, observe the Bank 1 Sensor 1 voltage or current. It should fluctuate rapidly. If it's slow, flat, or unresponsive, the sensor has likely failed.
- Given the vehicle's age, if it has over 100,000 miles, the most probable cause is a worn-out A/F sensor. Prepare to replace it.
- To remove the sensor, first disconnect the battery. Let the exhaust cool partially (warm is ideal for removal). Apply penetrating oil to the sensor threads and wait. Use a 22mm or 7/8" slotted oxygen sensor socket to remove it.
- Apply anti-seize compound to the threads of the new sensor (most new sensors come with it pre-applied). Install the new sensor and torque to specification. Reconnect the wiring harness and battery.
- After replacement, clear the code with the scanner and perform a drive cycle to ensure the Check Engine Light does not return.
Parts You'll Likely Need
- Upstream Air/Fuel Ratio Sensor
(OEM #89467-06030)— This is the sensor (Bank 1, Sensor 1) that the code directly identifies as having a slow response. It is a known wear item and the primary cause of P0133 on this vehicle. The OEM part number 89467-06030 replaces the previous number 89467-33080.
Trusted brands: Denso (OEM Supplier), NGK/NTK
OEM price range: $190-$280
Aftermarket price range: $120-$160
Technical Service Bulletins (TSBs) & Recalls
- TSB EG045-07 (July 16, 2007): While primarily for code P0171 (System Too Lean), this TSB for some 2AZ-FE equipped vehicles (including Camry and Solara) also lists P0133 as a potential secondary code. The issue relates to the ECM logic for detecting lean conditions in sub-freezing ambient temperatures. The fix is an ECM calibration update. This is a rare cause for P0133 on a tC but is worth noting if the code only appears in very cold weather.
Platform-Specific Known Issues
- Real-world Repair Story: A Reddit user with a 2010 Scion tC reported a P0133 code. The community advised that it was the upstream O2 sensor and that using a Denso-branded replacement is critical for these cars, as other brands can be problematic. The user was pointed to Denso part #234-9049 (Note: this part number may be for a different emissions spec, 234-9041 is more commonly cited) and advised to check the wiring first, but that sensor failure is the most likely cause.
Mechanic-Grade Diagnostic Values
- A/F Sensor Heater Resistance — expected: 1.8 to 3.4 Ω at 20°C (68°F). Failure: Resistance outside of this range indicates a faulty heater element within the sensor.
- A/F Sensor Signal Voltage at ECM (A1A+) — expected: 3.3 V (approx.) with ignition switch ON, engine off.. Failure: Significant deviation from this reference voltage can indicate a wiring or ECM issue.
- A/F Sensor Signal Voltage at ECM (A1A-) — expected: 3.0 V (approx.) with ignition switch ON, engine off.. Failure: Significant deviation from this reference voltage can indicate a wiring or ECM issue.
- A/F Sensor Heater Voltage at ECM (HA1A) — expected: 9 to 14 V (Battery Voltage) with ignition switch ON; Below 3.0 V at idle.. Failure: No voltage or low voltage with key on suggests a problem with the EFI relay or wiring. Voltage not dropping at idle could indicate an ECM driver issue.
Hidden / Shadow Codes Worth Checking
- Mode $06, TID $01, CID $01-$02: This refers to the On-Board Diagnostic self-test results for the Bank 1 A/F sensor. A technician can view the raw test values and compare them against the manufacturer's acceptable minimum and maximum limits. A value that is passing but very close to the failure threshold can indicate a sensor that is becoming slow but has not yet consistently failed enough to trigger P0133. This is a proactive way to confirm a degrading sensor. (see via A professional scan tool capable of displaying Mode $06 (sometimes called Mode 6) data.)
Wiring & Ground Locations
- ECM Connector E7, E8 (2005-2006) / B30 (2007+) — Behind the right side of the dashboard, accessible by removing the glove box.. This is where the A/F sensor signals terminate. Probing the correct pins here (e.g., A1A+, A1A-, HA1A) allows a technician to test the entire circuit from the sensor to the computer without cutting any wires.
- Ground Point ED — On the left rear of the engine.. This is a primary engine ground point. A corroded or loose connection here can create a floating ground, causing erratic voltage readings for multiple sensors, including the A/F sensor, potentially mimicking a sensor failure.
- Ground Point EB — On the right front of the engine compartment, near the engine room J/B (fuse box).. This is another critical chassis and engine ground. Verifying it is clean and tight is a key step in diagnosing any electrical issue, as poor grounding can add resistance to sensor circuits, directly causing a 'slow response' condition.
OEM Part Supersession History
89467-33080→89467-06030— Standard part number update and consolidation by Toyota.Denso 234-9049→Denso 234-9041— Part number clarification. While some parts catalogs show 234-9049 as compatible, 234-9041 is the more commonly cited and confirmed correct direct-fit part for the 2005-2010 tC. The 234-9049 has a longer wire harness (20.08 inches) and may be intended for other 2AZ-FE applications (like Camry or RAV4) where the sensor is located further from the connector.
Heads up: Using 234-9049 may result in excess wiring that needs to be carefully secured away from exhaust heat, but it is electrically compatible. For a guaranteed fit, 234-9041 is the preferred choice.
Model Year Variations Within This Range
- 2007-2010: The ECM connectors changed starting with the 2007 model year. While the engine and sensor are the same, the pin locations on the ECM for testing are different. 2005-2006 models use a 5-connector ECM, while 2007-2010 models use a 4-connector ECM. This is critical for anyone performing advanced diagnostics at the computer.
Diagnostic Flowchart
Real Owner Stories
Aggregated from forums and TSBs cited above. Mileages and costs reflect what owners reported in those sources.
2010 Scion tC 2.4L
Symptoms: Check Engine Light illuminated with a P0133 code.
What fixed it: Community advised checking the wiring first, then replacing the upstream O2 sensor with a Denso-branded replacement (part #234-9049 or #234-9041) sourced from RockAuto.
Source hint: Reddit r/SciontC thread titled 'How do I fix this code on my 2010 scion tc?' (May 2026)
First-Gen Scion tC 2.4L
Symptoms: Check Engine Light on with a P0420 code (often diagnosed alongside or confused with upstream sensor codes).
What fixed it: Users helped diagnose the issue by identifying the exact locations of the two O2 sensors on the first-gen tC: the upstream sensor in the header/manifold and the downstream sensor in the s-pipe.
Source hint: ScionLife.com thread titled 'O2 sensor issues' (2010)
Related OBD-II Codes
Frequently Asked Questions
Does TSB EG045-07 apply to my Scion tC for code P0133?
What brand of upstream Air/Fuel Ratio sensor should I use for my 2005-2010 Scion tC?
At what mileage does the upstream A/F sensor typically fail on the 2.4L 2AZ-FE engine?
Can an exhaust leak cause a P0133 code on my tC?
What tools do I need to replace the upstream A/F sensor on my Scion tC?
We Have This Part in Stock


The information in this article is provided for general reference and educational purposes only. Vehicle specifications, procedures, and part compatibility can vary by production date, trim level, and region. Always consult your vehicle's factory service manual and verify part numbers before purchasing or performing repairs. Safety-critical components such as airbags, seat belts, and braking systems should be installed by a qualified professional.
- Scion tC:
- 🧭 Diagnostic Flowchart
- 🛍️ Shop This Part
- What's Unique About the 2005-2010 Scion tC
- Symptoms You May Notice
- Most Likely Causes
- Rare But Worth Checking
- Diagnosis Steps
- Parts You'll Likely Need
- Technical Service Bulletins (TSBs) & Recalls
- Platform-Specific Known Issues
- Mechanic-Grade Diagnostic Values
- Hidden / Shadow Codes Worth Checking
- Wiring & Ground Locations
- OEM Part Supersession History
- Model Year Variations Within This Range
- Real Owner Stories
- 2010 Scion tC 2.4L
- First-Gen Scion tC 2.4L
- Related OBD-II Codes
- Frequently Asked Questions
- 🎟️ Get 5% Off