
P0134 on 2000-2006 Chevrolet Suburban V8: Causes and Fixes for O2 Sensor Inactivity
This code almost always means the driver's side upstream oxygen sensor (Bank 1, Sensor 1) has failed. Replacing this sensor is the most common fix. Expect to pay $40-$70 for an aftermarket sensor or $80-$120 for an OEM part. It's a DIY-friendly job for most.
- P0134 on your Suburban almost always points to a bad oxygen sensor on the driver's side, before the catalytic converter.
- Before buying parts, check the O2 sensor fuse and visually inspect the sensor's wiring for any obvious damage.
- Use a scanner to watch the live data for the Bank 1 Sensor 1; a flat, unchanging voltage reading confirms the problem.
- Replacing the sensor is a manageable DIY job with an O2 sensor socket, but ensure the exhaust is cool before starting.
- Always choose a 'direct-fit' sensor from a reputable brand like ACDelco, Denso, or Bosch for best results.
What's Unique About the 2000-2006 Chevrolet Suburban
On the GMT800 platform, which includes the 2000-2006 Suburban, this code is a straightforward and common issue, almost always pointing to the sensor itself. The V8 engine layout makes accessing the Bank 1 (driver's side) upstream sensor relatively easy compared to more compact vehicles. While wiring issues can occur, the sensors on these trucks are exposed to harsh conditions and simply wear out over time, making sensor failure the most probable cause by a large margin. Owners on forums frequently report this code appearing after 100,000 miles as a common maintenance item.
Symptoms You May Notice
- Check Engine Light is on
- Reduced fuel economy
- Rough or unstable idle
- Engine hesitation or sluggish acceleration
- Failing an emissions test
- A fuel or sulfur-like smell from the exhaust
- Replacing the wrong oxygen sensor (e.g., the downstream sensor or the sensor on the passenger side).
- Replacing the catalytic converter when the issue is only an inactive sensor.
- Ignoring a blown fuse or wiring short, causing the new sensor to fail immediately.
Most Likely Causes
- Failed Bank 1, Sensor 1 Oxygen Sensor 🔴 High Probability → Shop Oxygen Sensor The sensor is exposed to extreme heat and contaminants in the exhaust stream and has a finite lifespan of around 100,000 miles. The internal heating element, which is critical for proper operation, is a common failure point. Contamination from oil or coolant leaks can also destroy the sensor.
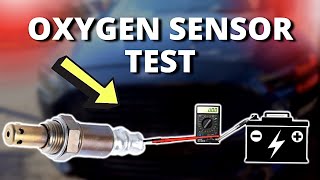
How to confirm: Use an OBD-II scanner to monitor the live data for 'O2S B1S1'. The voltage should fluctuate rapidly between approximately 0.1V and 0.9V on a warm engine. If it's stuck at a constant voltage (often around 0.45V) or shows 0V, 🎬 See this guide on how to test an oxygen sensor. the sensor is inactive.
Typical fix: Replace the Bank 1, Sensor 1 (driver's side, upstream) oxygen sensor.
Est. part cost: $40-$120 - Damaged Wiring or Connector 🟡 Medium Probability The wiring harness runs close to hot exhaust components and can become brittle, melted, or chafed over time. A common issue is the harness making contact with the driveshaft on 4WD models or the exhaust manifold itself, causing a short.
How to confirm: Visually inspect the entire wiring harness from the O2 sensor to where it joins the main loom. Check for melted plastic, bare wires, or physical damage. Unplug the connector and check for corrosion or bent pins. Use a multimeter to check for 12V at the heater circuit wires with the key on.
Typical fix: Repair the damaged section of wire or replace the connector pigtail.
Est. part cost: $10-$30 - Blown O2 Sensor Heater Fuse ⚪ Low Probability → Shop Oxygen Sensor A short in the heater circuit of any of the O2 sensors can blow the shared fuse, causing one or more sensors to stop working. This is often caused by damaged wiring or a failed sensor.
How to confirm: Locate the fuse box in the engine bay. Check the 15A fuse labeled 'O2 B' (for Bank 1 and 2 sensors). If the fuse is blown, it confirms a circuit issue.
Typical fix: Replace the fuse. If it blows again immediately, you have a short circuit in the wiring or in one of the O2 sensors that needs to be diagnosed and repaired before replacing the fuse again.
Est. part cost: $1-$5 - Exhaust Leak ⚪ Low Probability Exhaust manifold gaskets or collector donut gaskets can fail over time, creating leaks. Rust can also cause cracks or holes in the exhaust pipes or, more commonly, broken exhaust manifold bolts at the cylinder head.
How to confirm: Listen for a ticking or puffing sound from the engine bay, especially when the engine is cold. You can also use a smoke machine to introduce smoke into the exhaust system and look for where it escapes. A visual inspection may reveal black soot trails around the leak.
Typical fix: Replace the leaking gasket or repair the damaged section of the exhaust pipe. Broken manifold bolts require extraction and replacement.
Est. part cost: $20-$150
Rare But Worth Checking
- Faulty Powertrain Control Module (PCM): → Shop Engine Control Module (ECM) This is extremely rare. Before condemning the PCM, all other possibilities (sensor, wiring, fuses, leaks) must be exhaustively ruled out by a professional. A forum user with dozens of simultaneous sensor codes considered this, which is a more likely scenario for PCM failure than a single code.
Diagnosis Steps
- Connect an OBD-II scanner and confirm P0134 is the active code.
- Access live data on the scanner and observe the 'B1S1' O2 sensor voltage. On a warm, running engine, it should fluctuate rapidly (0.1V-0.9V). If it is flat, stuck (around 0.45V), or zero, this confirms the 'no activity' condition.
- Turn off the engine and allow the exhaust to cool.
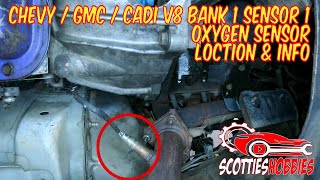
- Locate the Bank 1 Sensor 1 O2 sensor on the driver's side exhaust manifold or downpipe, before the catalytic converter. 🎬 Watch: Locate your Bank 1 Sensor 1 and check codes.
- Inspect the sensor's wiring harness and connector for any signs of melting, chafing, or corrosion. Ensure the connector is securely plugged in and trace it as far back as possible.
- Locate the under-hood fuse block. Check the fuse labeled 'O2 B' (typically a 15A fuse). Visually inspect it to see if it's blown.
- If wiring and fuse are okay, use a multimeter to check for ~12V at the heater power wire on the sensor's connector (with key on, engine off). Check for continuity to ground on the ground wire.
- If power and ground are present but the sensor is inactive, the O2 sensor itself is the most likely culprit and should be replaced.
- After replacement, clear the codes with the scanner and perform a drive cycle to ensure the code does not return.
Parts You'll Likely Need
- Oxygen Sensor (Bank 1, Sensor 1)
(OEM #ACDelco AFS109)— This is the upstream sensor on the driver's side. It is the most common failure point for code P0134. Using OEM or high-quality aftermarket parts is highly recommended for these trucks to avoid compatibility issues.
Trusted brands: ACDelco (OEM), Denso (234-4651), NTK (21537), Bosch (15284)
OEM price range: $80-$120
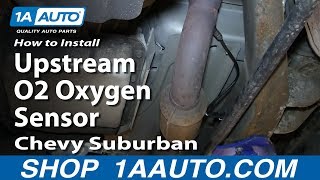
Aftermarket price range: $40-$70 - Oxygen Sensor Socket — A special slotted socket (usually 7/8" or 22mm) is required to remove and install the sensor without damaging its wire. It is considered an essential tool for this job. 🎬 Watch: Step-by-step upstream O2 sensor replacement walkthrough.
Trusted brands: Lisle, OEMTOOLS, GearWrench
Aftermarket price range: $10-$25
Related Codes That Often Appear With This One
- P0135 — P0135 indicates a fault in the heater circuit for the same sensor (Bank 1, Sensor 1). They often appear together when the sensor's internal heater fails, which is a prerequisite for the sensor to become active.
- P0300 — A Random Misfire code can be triggered because the PCM cannot properly adjust the fuel mixture due to the lack of a signal from the O2 sensor, leading to an imbalanced condition that can cause misfires.
- P0171 — A System Too Lean (Bank 1) code can occur if an exhaust leak before the sensor is drawing in outside air, making the PCM think the engine is running lean. This is a common misdiagnosis where the sensor is replaced, but the real problem is the leak.
Technical Service Bulletins (TSBs) & Recalls
- TSB #20-NA-065: While not specific to P0134, this GM bulletin for multiple fuel and O2 sensor codes advises technicians to check for intake vacuum leaks or exhaust leaks as a potential cause before replacing sensors.
- Manufacturer TSB Bulletin #PIT5336 notes that a technician may find an open Emission 1 Fuse in conjunction with several diagnostic trouble codes, including P0134 and P0154.
- No specific TSB for P0134 on this platform is widely reported, as it is typically considered a standard component failure. However, some bulletins exist regarding the importance of using OEM sensors to avoid setting false codes.
Platform-Specific Known Issues
- On the GMT800 platform, owners strongly recommend using original ACDelco or Denso sensors. Some forum threads describe issues with cheaper, no-name brand sensors either failing quickly or not working correctly out of the box, causing the P0134 code to return.
- A user on TahoeYukonForum.com with a 2000 Yukon XL reported getting P0134, replaced the sensor, and the code was resolved, confirming the common failure pattern for this platform.
- Due to the age of these vehicles, the original sensor is often rusted into the exhaust pipe. Generous use of penetrating fluid (like PB Blaster) and allowing it to soak is highly recommended before attempting removal. In some cases, heating the exhaust bung with a torch may be necessary.
Mechanic-Grade Diagnostic Values
- O2 Sensor Heater Element Resistance — expected: 4-25 Ohms when cold. Failure: A reading of 0 Ohms indicates a shorted heater, while an infinite (OL) reading indicates an open/burned-out heater.
- O2 Sensor Heater Circuit Voltage — expected: ~12V (battery voltage) at the power feed wire on the harness-side connector with the key on.. Failure: Near 0V indicates a blown fuse (check 'O2 B' fuse), a faulty relay, or an open in the power wire.
- PCM Bias Voltage on Signal Wire — expected: ~450 mV (0.45V) on the signal wire with the sensor unplugged and key on.. Failure: This voltage is supplied by the PCM to test circuit integrity. If you ground the signal wire with a test light, the voltage on a scan tool should drop to near zero. If it doesn't, there is an open in the signal wire between the connector and the PCM.
- Heater Ground Circuit Control (Tech 2 / Oscilloscope) — expected: The PCM controls the ground side of the heater circuit with a pulse-width modulated (PWM) signal. On an oscilloscope, this appears as a square wave.. Failure: A constant ground or no ground signal from the PCM when the heater should be active points to a PCM driver issue, though this is rare.
Scan Tool Commands That Help
- GM Tech 2 / GDS2: O2 Sensor Response Test — After confirming basic wiring integrity, this function allows the technician to observe the sensor's voltage response during a controlled test. The Tech 2 can graph the voltage to see if it is switching properly or flat-lining, confirming the 'No Activity' fault.
- GM Tech 2 / GDS2: Snapshot — This allows you to capture data before and after a specific trigger event. For an intermittent P0134, you could set the trigger for when the O2 voltage drops out to capture all related engine parameters at that exact moment, helping to distinguish between a sensor, wiring, or fuel delivery issue.
- Advanced Scan Tool (e.g., iCarsoft CR MAX): Active Test / A/F Control — This bidirectional command allows the technician to force the engine to run rich or lean. While commanding a rich mixture, the B1S1 voltage should spike to ~0.9V. When commanding lean, it should drop to ~0.1V. If the voltage does not respond, it confirms the sensor or its immediate circuit is non-responsive.
Wiring & Ground Locations
- G103 — On the left front (driver's side) of the engine block. It is part of the main negative battery cable harness.. This is a primary engine block ground. A poor connection here can cause erratic behavior in multiple sensors, including the oxygen sensors, as the PCM and its sensors rely on a stable ground reference. While not a direct cause of a single P0134, it can lead to intermittent signal issues that are difficult to diagnose.
- PCM Ground — A specific ground wire for the PCM is often located on the back of the driver's side cylinder head.. This is the most critical ground for all sensor inputs. If this ground is corroded or loose, the PCM gets noisy and unreliable sensor readings. Technicians report this ground being a common source of difficult-to-diagnose electrical issues, including phantom sensor codes.
- B1S1 Connector Pinout (Typical 4-wire) — At the sensor connector.. Pin A (Tan): Low Signal. Pin B (Purple): High Signal. Pin C (Pink): Heater Power (+12V). Pin D (Black): Heater Ground (PCM controlled). Knowing the pinout is essential for performing accurate voltage and resistance tests at the connector without guessing.
Real Owner Repair Stories
- Forum user on ChevroletForum.com (2002 Chevrolet Silverado (Similar GMT800 platform)) — P0300 (Random Misfire) and P0134.
❌ Tried (didn't work) Replacing spark plugs and wires, Replacing coil packs, Replacing the Bank 1 Sensor 1 O2 sensor
✅ What actually fixed it The root cause was a leaking intake manifold gasket. The unmetered air entering the intake caused a lean condition that the PCM could not correct for, leading to misfires and confusing the O2 sensor readings, eventually setting the P0134 code. Replacing the intake manifold gaskets resolved all codes.
OEM Part Supersession History
Varies by exact year→ACDelco AFS109— Part consolidation and design updates.
Heads up: The ACDelco AFS109 is the widely accepted GM Original Equipment replacement for this application. While many aftermarket brands exist, forum users and technicians strongly advise against using ultra-cheap, no-name sensors, as they are frequently reported to be dead-on-arrival or fail within a few months, causing the P0134 code to return.
Model Year Variations Within This Range
- 2003-2006 vs 2000-2002: Starting in 2003, GM switched to a more advanced Powertrain Control Module (PCM) with a larger memory capacity (1MB vs 512KB). The connectors also have different keying, preventing a direct swap. This means diagnostic strategies and software capabilities can differ slightly. A PCM from a 2002 model cannot be used in a 2004 model, even if programmed, as it will not physically connect to the harness.
Diagnostic Flowchart
Real Owner Stories
Aggregated from forums and TSBs cited above. Mileages and costs reflect what owners reported in those sources.
2000 Chevrolet Suburban 2500 6.0 Gas
Symptoms: Check engine light with codes P0134 and P0154 for both upstream O2 sensors indicating insufficient flow.
What fixed it: The owner did not report a final fix. The problem persisted after replacing both upstream O2 sensors twice (the second time with GM factory parts), fixing an EGR tube gasket vacuum leak, updating the ECM, and replacing the ECM.
Source hint: Reddit r/MechanicAdvice
2003 Chevrolet Suburban
Symptoms: Experienced codes P0300, P0134, and P0135 simultaneously.
What fixed it: Replacing the O2 sensors resulted in no change. The root cause was found to be faulty ignition coils causing a misfire, which in turn triggered the O2 sensor codes.
Source hint: TahoeYukonForum.com - 'P0300, P0134, P0135'
2000 GMC Yukon XL
Symptoms: Check engine light illuminated with code P0134.
What fixed it: Replaced the Bank 1 Sensor 1 oxygen sensor, which resolved the code and confirmed the common failure pattern for the GMT800 platform.
Source hint: TahoeYukonForum.com
Related OBD-II Codes
Frequently Asked Questions
Should I use aftermarket O2 sensors to fix P0134 on my 2000-2006 Suburban?
Is there a specific TSB for the P0134 code on this generation of Suburban?
How difficult is it to remove the Bank 1 Sensor 1 oxygen sensor on these vehicles?
Where should I check for wiring damage on my Suburban for this code?
Is there a fuse that can cause the P0134 code on my Suburban?
Can a broken exhaust manifold bolt cause a P0134 code on my V8 engine?
Helpful Videos
We Have This Part in Stock


The information in this article is provided for general reference and educational purposes only. Vehicle specifications, procedures, and part compatibility can vary by production date, trim level, and region. Always consult your vehicle's factory service manual and verify part numbers before purchasing or performing repairs. Safety-critical components such as airbags, seat belts, and braking systems should be installed by a qualified professional.
- Chevrolet Suburban:
- 🧭 Diagnostic Flowchart
- 🎬 Helpful Videos
- 🛍️ Shop This Part
- What's Unique About the 2000-2006 Chevrolet Suburban
- Symptoms You May Notice
- Most Likely Causes
- Rare But Worth Checking
- Diagnosis Steps
- Parts You'll Likely Need
- Related Codes That Often Appear With This One
- Technical Service Bulletins (TSBs) & Recalls
- Platform-Specific Known Issues
- Mechanic-Grade Diagnostic Values
- Scan Tool Commands That Help
- Wiring & Ground Locations
- Real Owner Repair Stories
- OEM Part Supersession History
- Model Year Variations Within This Range
- Real Owner Stories
- 2000 Chevrolet Suburban 2500 6.0 Gas
- 2003 Chevrolet Suburban
- 2000 GMC Yukon XL
- Related OBD-II Codes
- Frequently Asked Questions
- 🎟️ Get 5% Off