
P0134 on 2013-2019 Ford Escape: Causes and Fixes for O2 Sensor Inactivity
On a 2013-2019 Ford Escape, code P0134 almost always means the upstream oxygen sensor (Bank 1, Sensor 1) has failed. This sensor is a critical wear-and-tear part. Replacing it is the most common fix. Before replacement, check fuse #33 in the under-hood fuse box and inspect the sensor's wiring for heat damage. Expect to pay $60-$150 for the part, with DIY difficulty rated at 2/5.
- P0134 on your Escape means the front oxygen sensor (before the catalytic converter) is not sending a signal.
- The most likely cause is a failed oxygen sensor, which is a standard maintenance part that wears out over time.
- Before buying a new sensor, always check fuse #33 in the under-hood fuse box and perform a quick visual check of the wiring and connector for obvious heat damage or fraying.
- You can continue to drive with this code, but you will experience poor fuel mileage and risk damaging your expensive catalytic converter over time.
- Using an OEM (Motorcraft) or high-quality aftermarket (NTK, Denso) sensor is recommended to avoid compatibility issues.
What's Unique About the 2013-2019 Ford Escape
The 2013-2019 Ford Escape uses inline-four-cylinder engines (1.5L/1.6L/2.0L EcoBoost, 2.5L Duratec). Because these engines have only one cylinder bank, the 'Bank 1' designation applies to all of them, simplifying diagnosis. The code P0134 specifically points to the upstream sensor (Sensor 1). The most common reason for this code on this platform is simply the failure of the sensor due to age and wear, rather than a more complex systemic issue. The sensor wiring is routed near high-heat components, making it susceptible to damage which should be inspected.
Symptoms You May Notice
- Check Engine Light is on
- Reduced fuel economy
- Rough or hesitant idle
- Engine running rich (you may smell fuel or see black smoke)
- Failure to pass an emissions test
- Engine stalling at low RPM
- Replacing the downstream (Sensor 2) oxygen sensor instead of the upstream (Sensor 1) sensor.
- Replacing the catalytic converter when the issue is only a non-responsive sensor.
- Using cheap, universal aftermarket sensors. Some owners report that aftermarket sensors, particularly for the heater circuit, can fail quickly or not work at all, causing the code to return.
Most Likely Causes
- Failed Upstream Oxygen Sensor (Bank 1, Sensor 1) 🔴 High Probability → Shop Oxygen Sensor Oxygen sensors are wear-and-tear items that degrade over time from heat and contaminants. It is the most common failure point for this code, as the internal heating element or sensing element simply wears out.
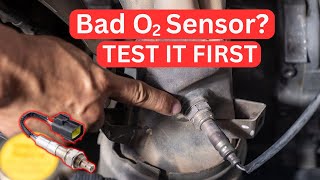
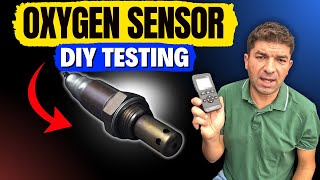
How to confirm: Using a scan tool, watch the live data for the 'O2S11' (or similar) voltage. A healthy sensor's voltage will fluctuate rapidly between approximately 0.1 and 0.9 volts. If the voltage is flat, stuck (often around 0.45V), or shows no reading, the sensor is bad.
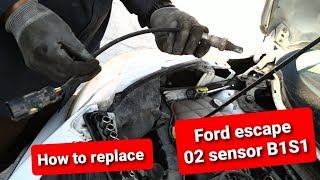
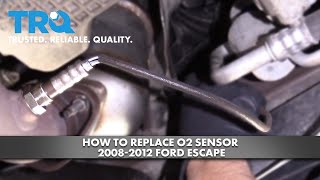
Typical fix: Replace the Bank 1, Sensor 1 oxygen sensor. This sensor is located on the exhaust manifold (or on the turbocharger outlet on EcoBoost models) before the catalytic converter.
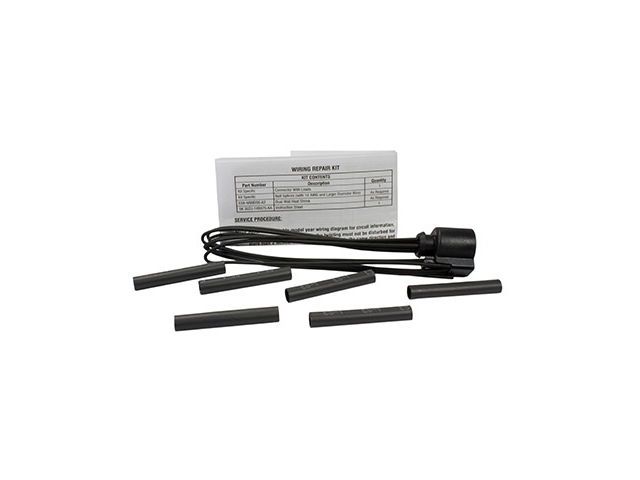
Est. part cost: $60-$150 - Damaged Wiring or Loose Connector 🟡 Medium Probability The wiring harness to the O2 sensor is exposed to high engine and exhaust heat and road debris. This can cause wires to melt, fray, or break, especially where the harness is secured to the engine block or other components. The connector can also become loose or corroded.
How to confirm: Visually inspect the entire wiring harness from the sensor to the main engine harness. Look for any signs of melting, chafing, or broken wires. A common failure point is where the harness may rub against a sharp edge of the engine block. Check that the connector is securely plugged in and free of corrosion.
Typical fix: Repair the damaged section of wire or replace the connector pigtail. Ensure the harness is properly secured away from hot exhaust components using zip ties or factory clips.
Est. part cost: $10-$40 - Blown Fuse for O2 Sensor Heater Circuit ⚪ Low Probability → Shop Oxygen Sensor A short in the heater element of the O2 sensor or its wiring can cause the corresponding fuse to blow. Without the heater, the sensor won't reach its required operating temperature (around 600°F) and will not produce a signal, leading to the 'no activity' code.
How to confirm: Locate the under-hood fuse box. The fuse for the O2 sensor heaters is typically Fuse #33, a 15A fuse. Visually inspect the fuse to see if it is blown. Test for 12V power at the heater circuit wires on the sensor connector with the key on.
Typical fix: Replace the blown fuse. If the new fuse blows immediately, it indicates a short circuit in the wiring or the sensor itself that must be diagnosed and repaired.
Est. part cost: $1-$5
Rare But Worth Checking
- Exhaust Leak: An exhaust leak before the O2 sensor can allow outside air into the exhaust stream. While this usually causes a lean code (like P0171), a very large leak could potentially disrupt sensor readings enough to be interpreted as 'no activity'. Check for audible ticking noises or visible soot trails near the exhaust manifold gasket.
- Faulty Powertrain Control Module (PCM): → Shop Engine Control Module (ECM) This is extremely rare. The PCM's internal driver for the O2 sensor circuit can fail. Before condemning the PCM, all other possibilities (sensor, wiring, fuses, exhaust leaks) must be exhaustively ruled out. This typically requires professional diagnosis.
Diagnosis Steps
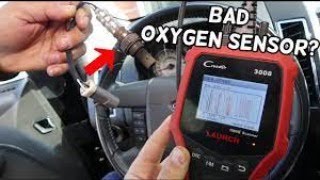
- Connect an OBD-II scanner and confirm that P0134 is the primary code. Note any other codes present, especially heater circuit codes like P0135 or P0030.
- Use the scanner's live data function to monitor the voltage of 'O2S11' (Oxygen Sensor Bank 1, Sensor 1). A healthy sensor will show rapidly fluctuating voltage between ~0.1V and ~0.9V. A flat line, especially one stuck near 0.45V, confirms the 'no activity' fault.
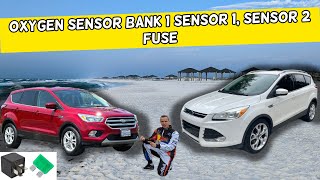
- Check the O2 sensor heater fuse. In the under-hood fuse box, locate fuse #33 (15A) and verify it is not blown. 🎬 See this video to find your O2 sensor fuse location.
- Perform a visual inspection. With the engine off and cool, locate the upstream O2 sensor on the exhaust manifold. Inspect its electrical connector for looseness, corrosion, or damage.
- Follow the sensor's wiring harness as far as you can, looking for any signs of melting, chafing, or breaks. Pay close attention to where the harness is routed near sharp edges or hot surfaces.
- If the fuse and wiring are intact, the oxygen sensor itself is the most likely cause of the problem.
- After replacing the sensor, clear the codes with the scanner and perform a test drive, ensuring the engine reaches operating temperature to confirm the fault does not return.
Parts You'll Likely Need
- Upstream Oxygen Sensor (Bank 1, Sensor 1)
(OEM #Motorcraft DY1157 (for 2.0L EcoBoost), CV6Z-9G444-B (for 1.6L EcoBoost), 8A6Z-9G444-A (for 2.5L Duratec). Part numbers can vary by model year, confirm with VIN.)— This sensor is the primary component responsible for the signal the PCM is missing. It is a common wear item and the most frequent fix for P0134.
Trusted brands: Motorcraft, Bosch, Denso, NGK/NTK
OEM price range: $100-$180
Aftermarket price range: $60-$120
Related Codes That Often Appear With This One
- P0135 — P0135 indicates a fault in the heater circuit for the same sensor. A failed heater will prevent the sensor from working, which can lead to the P0134 'no activity' code being set as well.
- P0171 — If an exhaust leak is the root cause, the PCM might intermittently see a very lean condition (P0171) before the sensor fails or gives up entirely, logging P0134.
- P0030 — Similar to P0135, this code also points to a problem with the heater control circuit for Bank 1, Sensor 1. It often appears alongside P0134 if the heater failure is the root cause of the sensor's inactivity.
Platform-Specific Known Issues
- Access on 2.0L EcoBoost: On the 2.0L EcoBoost engine, the upstream O2 sensor is located at the back of the engine on the turbocharger outlet. Access is tight and may require removing the cowl panel and wiper arms for better access from above.
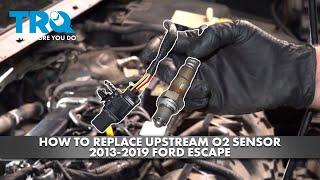
- Access on 1.5L/1.6L EcoBoost: On the 1.5L and 1.6L engines, the upstream sensor is located on the front of the engine on the exhaust manifold, making it relatively easier to access from the front of the vehicle after removing some air intake ducting. 🎬 Watch this step-by-step guide to replacing the upstream sensor.
- Aftermarket Sensor Compatibility: Some owners have reported issues with non-OEM sensors, particularly Bosch, causing heater circuit codes to persist even after replacement. Using a Motorcraft or NTK/Denso sensor is often recommended to avoid compatibility problems.
Mechanic-Grade Diagnostic Values
- Upstream O2 Sensor (HO2S B1S1) Heater Element Resistance — expected: 3 to 30 Ohms when measured cold across the two same-colored wires on the sensor connector. More specifically, 3 to 20 Ohms for the 1.5L EcoBoost.. Failure: A reading of OL (infinite resistance) indicates an open circuit, while a reading near 0 Ohms indicates a short. Both mean the sensor has failed.
- Heater Circuit Power Supply Voltage (at harness connector) — expected: 10.5V or higher with Key On, Engine Off (KOEO).. Failure: Voltage below 10.5V indicates a problem in the power supply circuit, likely a blown fuse (F33) or a wiring fault.
- HO2S Signal Circuit to VPWR/VREF Resistance (PCM disconnected) — expected: Greater than 10,000 Ohms.. Failure: Resistance less than 10,000 Ohms indicates a short to power in the harness, which can damage the PCM.
Scan Tool Commands That Help
- FORScan: Actuation Test for Oxygen Sensor Heater (e.g., O2S11) — This bidirectional command allows you to manually turn the O2 sensor heater on and off from your scan tool. It is used to verify the integrity of the heater control circuit (wiring, fuse, relay, and PCM driver) without having to manually probe wires. If the command works and the heater turns on, but the sensor still shows no activity when the engine is running, it points more strongly to an internal sensor failure rather than a circuit problem.
- FORScan / Advanced Scan Tool: Live Data Graphing (PID: O2S11) — While the base diagnosis is to check for a flatline voltage, observing the graph during a drive can reveal a 'lazy' sensor. A lazy sensor may not be completely dead (and thus not always set P0134 immediately) but will have slow, delayed voltage swings that don't cross the 0.45V threshold quickly. This confirms sensor degradation before a total failure.
Wiring & Ground Locations
- HO2S B1S1 Connector — On the engine wiring harness, connecting to the upstream O2 sensor pigtail. Location varies by engine: front of engine on 1.5L/1.6L, rear of engine near turbo on 2.0L.. This is the primary point for testing voltage, ground, and resistance. The two same-colored wires (often white) are for the heater circuit. The other two are for the sensor signal and signal ground.
- PCM Connector Pin 60 (Zetec example) — At the Powertrain Control Module (PCM).. In some older wiring diagrams for similar Ford engines (e.g., Zetec), Pin 60 is listed as the input from HO2S #11. This is the final destination for the sensor's signal. Testing for continuity between the sensor connector and this pin can rule out a broken signal wire. Exact pin numbers for the 2013-2019 Escape require a model-year specific wiring diagram.
Real Owner Repair Stories
- Ford Owners Club forum user 'Bar72' (Ford Focus (similar powertrain logic)) — Running rich, poor fuel economy, no check engine light initially.
❌ Tried (didn't work) Initial scan showed no codes.
✅ What actually fixed it The user identified that the upstream O2 sensor was 'lazy' and 'tired' using FORScan live data, even though it hadn't failed completely to trigger a code. The voltage was flatlining at 0.45v under certain conditions. Replacing the sensor brought short-term and long-term fuel trims back to normal single-digit values, confirming the fix.
OEM Part Supersession History
CV61-9G444-AC→CV6Z-9G444-B (Motorcraft DY-1189)— Part revision and update by the manufacturer.
Heads up: CV6Z-9G444-B is specified for the 1.6L and 2.0L engines from 2013-2016. Always verify fitment with VIN as there are variations.
Model Year Variations Within This Range
- 2017-2019: For the 2017 model year, Ford replaced the 1.6L EcoBoost with a 1.5L EcoBoost engine. While the function is the same, this can lead to different part numbers for the upstream O2 sensor. For example, Denso 234-5174 and NGK 24325 are listed specifically for the 1.5L engine. Always confirm the correct part for the specific engine.
Diagnostic Flowchart
Other Known Issues on This Vehicle
Issues unrelated to this code that are worth knowing about as an owner of this generation:
- 1.5L/1.6L EcoBoost Coolant Intrusion 🔴 High — Common issue where a flawed engine block design allows coolant to leak into the cylinders, often causing misfires and eventual engine failure. (Ref: TSB 19-2375, Recall 17S09, Customer Satisfaction Program 21N12)
- 6F35 Transmission Failure/Shudder 🔴 High — Widespread complaints of shuddering, slipping, harsh shifts, and premature failure, often before 100,000 miles. Problems are attributed to torque converter issues and internal component wear. (Ref: Multiple class-action lawsuits filed.)
- Door Latch Failure 🟠 Medium — A component within the door latch mechanism can break, preventing the door from closing securely or causing it to open while driving. (Ref: Ford Safety Recall 16S30)
- Engine Overheating (1.6L EcoBoost) 🔴 High — Risk of localized engine head overheating can cause the cylinder head to crack, leading to a pressurized oil leak and potential for engine fire. (Ref: Ford Safety Recall 13S12)
- 2.0L EcoBoost Coolant Intrusion 🔴 High — Similar to the smaller EcoBoost engines, the 2.0L can also suffer from coolant leaking into the cylinders, leading to white smoke and engine damage. (Ref: TSB 19-2346)
Used vs. New Parts: Buying Guide for This Vehicle
When a used part is the smart pick: For this repair, a used part is almost never a smart choice. The primary failure component, the oxygen sensor, is a wear-and-tear item with a finite lifespan. Installing a used sensor from a junkyard is likely to result in the same code returning in a short amount of time.
Donor-vehicle mileage cap: roughly under 20000 miles for the part to have meaningful remaining life.
What to inspect on the donor part:
- If forced to use a used part, source it from a very low-mileage vehicle that was clearly wrecked due to collision, not due to engine or running issues.
- Inspect the sensor tip for heavy carbon deposits, white ash (coolant contamination), or oil fouling. A clean tip is preferred.
- Ensure the wiring pigtail and connector are completely intact with no signs of melting, fraying, or corrosion.
OEM-only on this vehicle (don't cheap out):
- Oxygen Sensor
Aftermarket brands forum-validated for this vehicle:
- Motorcraft (OEM)
- NTK/NGK
- Denso
Brands owners have reported issues with on this vehicle:
- Bosch (Some forum users report compatibility issues and premature failures with heater circuits on this specific platform)
- Unbranded, 'universal fit' sensors that require splicing wires
Real Owner Stories
Aggregated from forums and TSBs cited above. Mileages and costs reflect what owners reported in those sources.
Ford Escape (Engine not specified)
Symptoms: The owner experienced a P0134 code and attempted to fix it with multiple aftermarket Bosch sensors, but the sensors were found to be faulty out of the box.
What fixed it: Testing for voltage at the connector and discovering the need for OEM-spec parts rather than the faulty aftermarket Bosch units.
Source hint: Ford Truck Enthusiasts Forum: 'Escape has me wanting to Escape'
2014 Ford Escape
Symptoms: Owner was struggling to diagnose an O2 sensor issue and could not find information regarding the specific fuse location for the heater circuit.
What fixed it: Locating and checking the O2 sensor heater fuse in the under-hood fuse box.
Source hint: Reddit r/MechanicAdvice: 'Is there a O2 sensor fuse '14 ford escape...'
Related OBD-II Codes
Frequently Asked Questions
Where is the O2 sensor fuse located on a 2013-2019 Ford Escape?
I have a 2.0L EcoBoost Escape; why is the upstream O2 sensor so hard to find?
Which brand of replacement oxygen sensor should I use for my Ford Escape?
Is the P0134 code easier to fix on the 1.5L or 1.6L EcoBoost models?
Could a blown fuse be the only reason for my P0134 'no activity' code?
Can I just clean the wiring harness to fix P0134?
Helpful Videos
We Have This Part in Stock

The information in this article is provided for general reference and educational purposes only. Vehicle specifications, procedures, and part compatibility can vary by production date, trim level, and region. Always consult your vehicle's factory service manual and verify part numbers before purchasing or performing repairs. Safety-critical components such as airbags, seat belts, and braking systems should be installed by a qualified professional.
- Ford Escape:
- 🧭 Diagnostic Flowchart
- 🎬 Helpful Videos
- 🛍️ Shop This Part
- What's Unique About the 2013-2019 Ford Escape
- Symptoms You May Notice
- Most Likely Causes
- Rare But Worth Checking
- Diagnosis Steps
- Parts You'll Likely Need
- Related Codes That Often Appear With This One
- Platform-Specific Known Issues
- Mechanic-Grade Diagnostic Values
- Scan Tool Commands That Help
- Wiring & Ground Locations
- Real Owner Repair Stories
- OEM Part Supersession History
- Model Year Variations Within This Range
- Other Known Issues on This Vehicle
- Used vs. New Parts: Buying Guide for This Vehicle
- Real Owner Stories
- Ford Escape (Engine not specified)
- 2014 Ford Escape
- Related OBD-II Codes
- Frequently Asked Questions
- 🎟️ Get 5% Off