
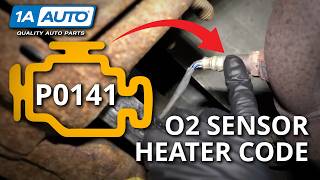
P0135 on 2002-2009 Chevrolet Trailblazer 4.2L: O2 Sensor Heater Circuit Causes and Fixes
On a 2002-2009 Trailblazer 4.2L, code P0135 almost always means the upstream oxygen sensor's internal heater has failed. Before replacing the sensor, check fuse #29 (15A) in the under-hood fuse box. A quality replacement sensor costs $40-$90 and is a common DIY fix with the right socket.
- First, check fuse #29 (15A) in the under-hood fuse box; it's a simple check that could save you money.
- The most likely cause of P0135 on your Trailblazer is a failed upstream (Bank 1, Sensor 1) oxygen sensor.
- Use a quality replacement sensor from brands like ACDelco (OEM P/N: 213-4527), Denso, or NTK to avoid compatibility issues.
- The sensor can be tight; use penetrating oil and a proper 22mm O2 sensor socket for removal.
What's Unique About the 2002-2009 Chevrolet Trailblazer
For the Trailblazer's inline-six LL8 engine, there is only one exhaust manifold and therefore only one bank of cylinders, so 'Bank 1' is the only bank. 'Sensor 1' is the upstream sensor located in the exhaust manifold, before the catalytic converter. The most common cause of P0135 is simply the O2 sensor's heater element failing from age and countless heat cycles. Owners on forums like GMTNation and TrailVoy frequently report that replacing the sensor resolves the issue, but strongly advise checking the dedicated O2 sensor fuse first as a crucial first step.
Symptoms You May Notice
- Check Engine Light (or Service Engine Soon light) is on
- Slightly reduced fuel economy
- Vehicle may fail an emissions test
- Possible rough idle on a cold start that improves as the engine warms up
- A "Reduced Propulsion" message may appear on the dash in some GM vehicles alongside this code, as noted in NHTSA ODI #11632222.
- Replacing the downstream (post-catalyst) O2 sensor. This code specifically points to Sensor 1, which is the upstream sensor.
- Replacing the catalytic converter. This code is for an electrical circuit fault, not catalyst efficiency.
- Assuming the sensor is good without testing resistance. The sensor can still read oxygen levels correctly while the heater circuit is broken.
Most Likely Causes
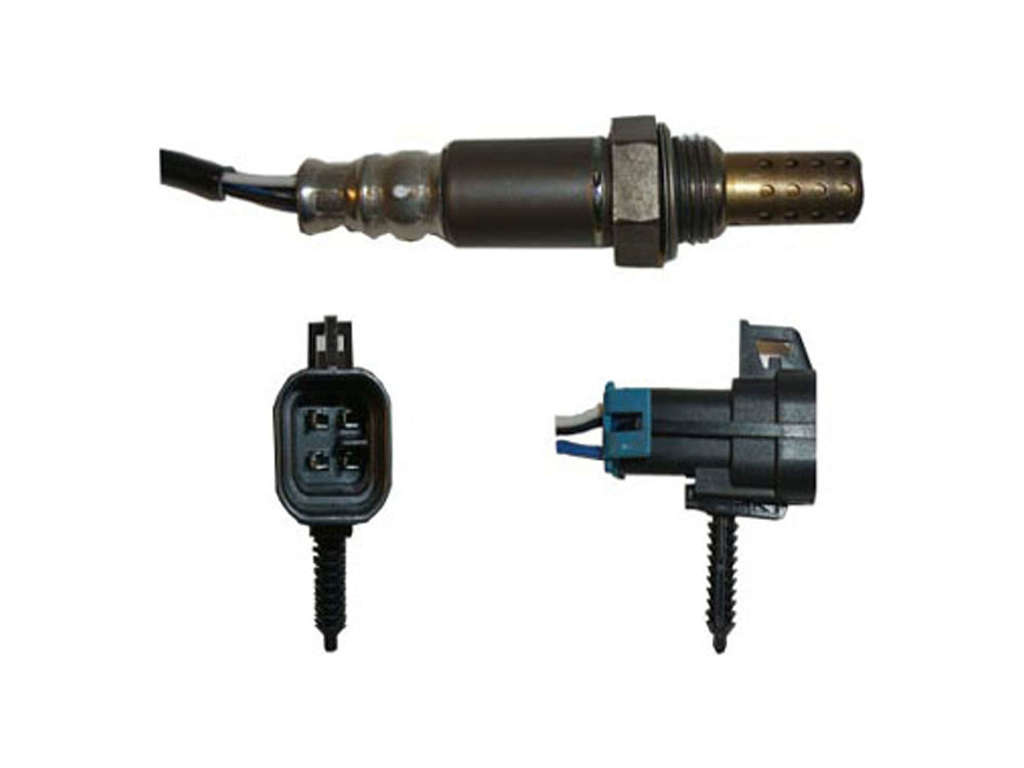
- Failed Upstream (Bank 1, Sensor 1) Oxygen Sensor 🔴 High Probability → Shop Oxygen Sensor The internal heater element is a common failure point due to age and extreme temperature cycles. It is considered a wear-and-tear item, typically lasting 60,000 to 100,000 miles.
How to confirm: Disconnect the sensor and measure the resistance between the two heater wires (usually the two wires of the same color, often black) with a multimeter. A good sensor will have a resistance between 3-20 Ohms. A reading of 'OL' (Open Loop) or infinite resistance confirms the heater has failed.
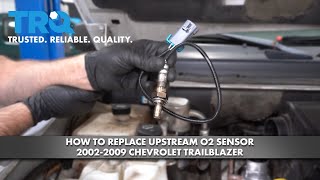
Typical fix: Replace the upstream oxygen sensor. A special 22mm (7/8-inch) oxygen sensor socket 🎬 Watch: Step-by-step guide to replacing the upstream oxygen sensor is highly recommended for removal. Apply penetrating oil liberally before attempting removal as the sensor often seizes in the manifold.
Est. part cost: $40-$90 - Blown O2 Sensor Heater Fuse 🟡 Medium Probability → Shop Oxygen Sensor An electrical short in the sensor's heater element or its wiring harness can cause the protective fuse to blow. This is a common secondary effect of a failed sensor or damaged wiring. NHTSA ODI #11632222 describes a case where a blown fuse was linked to multiple codes including P0135.
How to confirm: Locate the fuse box in the engine compartment on the driver's side. 🎬 See this video to quickly locate your fuse box Check fuse #29, a 15A mini fuse, often labeled 'O2 SENS' or similar. Visually inspect if the fuse is blown or test for continuity.
Typical fix: Replace the 15A fuse. If the new fuse blows immediately, it indicates a persistent short circuit in the wiring or the O2 sensor itself that needs to be diagnosed before proceeding.
Est. part cost: $1-$5 - Damaged Wiring or Connector ⚪ Low Probability The sensor wiring is routed near the hot exhaust manifold and can become brittle, melted, or frayed over time. The harness can also be damaged by road debris or improper servicing.
How to confirm: Visually inspect the entire length of the wiring harness from the O2 sensor to its main connection point. Look for any signs of melting, chafing against the engine block or frame, corrosion in the connector pins, or breaks in the wires. One owner on GMTNation documented running new wires to rule out a harness break.
Typical fix: Repair the damaged section of wiring or replace the connector pigtail. Ensure the repaired harness is properly secured away from heat sources.
Est. part cost: $10-$30
Rare But Worth Checking
- Faulty Powertrain Control Module (PCM): → Shop Engine Control Module (ECM) This is extremely rare. Only consider this after you have definitively ruled out the sensor, fuse, and wiring. A failed driver circuit inside the PCM can prevent it from properly controlling or monitoring the heater. A detailed forum thread on GMTNation shows a user diagnosing a no-current situation at the sensor, ultimately pointing to a bad PCM driver after all other possibilities were exhausted.
Diagnosis Steps
- Retrieve the trouble code with an OBD-II scanner to confirm P0135 is the active code.
- Open the under-hood fuse box on the driver's side and inspect fuse #29 (15A). Replace it if it is blown and re-test. If it blows again, suspect a short.
- If the fuse is good, locate the upstream oxygen sensor. It is screwed into the side of the exhaust manifold, before the catalytic converter. You may need to remove a heat shield to access it.
- Carefully inspect the sensor's wiring harness and electrical connector for any signs of melting, fraying, or corrosion.
- If the wiring appears intact, disconnect the sensor.
- Set a multimeter to measure resistance (Ohms). Probe the two pins on the sensor side of the connector that correspond to the heater circuit (typically the two same-colored wires, often black).
- A reading between 3 and 20 Ohms indicates a good heater element. A reading of 'OL' or infinite resistance means the heater is broken and the sensor must be replaced.
- If the sensor's resistance is good, check for 12V power on the pink wire of the vehicle-side connector with the key in the 'On' position. If there is no power, there is a wiring issue between the fuse box and the connector.
- If power is present, check the tan wire on the vehicle-side connector for a proper ground signal from the PCM. This requires a more advanced diagnostic approach, but confirms the wiring integrity back to the computer.
Parts You'll Likely Need
- Upstream Oxygen Sensor (Bank 1, Sensor 1)
(OEM #ACDelco 213-4527 (supercedes 213-1574, 213-3908))— This is the most common failure point for code P0135. The internal heater element burns out over time.
Trusted brands: ACDelco (OEM), Denso (e.g., 234-4331), NTK/NGK
OEM price range: $80-$150
Aftermarket price range: $40-$90
Technical Service Bulletins (TSBs) & Recalls
- While not a specific TSB for P0135, a known GM Technical Service Bulletin warns against using incorrect or low-quality aftermarket oxygen sensors, which can cause stalling or stumbling on this platform.
Platform-Specific Known Issues
- The upstream oxygen sensor can be very difficult to remove due to seizing in the exhaust manifold. It is highly recommended to apply penetrating oil and let it soak before attempting removal with a 22mm (7/8-inch) O2 sensor socket. Some owners have success warming the engine slightly first, but be cautious of working on a hot exhaust.
- Some owners in enthusiast forums report compatibility issues with Bosch-branded oxygen sensors on this platform, sometimes causing the P0135 code to return or new performance issues to arise. A GM service bulletin also warns against using incorrect or low-quality aftermarket sensors. Sticking with OEM (ACDelco) or trusted OE-supplier brands like Denso or NTK is strongly recommended.
- The small heat shield covering the sensor is often rusted and the bolts may break during removal. Be prepared to deal with rusted fasteners.
Mechanic-Grade Diagnostic Values
- O2 Sensor Heater Current Draw (B1S1) — expected: 0.65A to 2.0A (when commanded on by PCM). Failure: A reading of 0A indicates an open circuit (wiring, sensor, or PCM driver). A reading > 3.0A indicates a short circuit. The PCM sets P0135 if current is below ~0.25A or above ~3.15A.
- B1S1 Heater Resistance — expected: 3 to 20 Ohms (measured at sensor connector, engine cold). Failure: Infinite resistance (OL) indicates a burned-out heater element. Near zero resistance indicates an internal short.
- Heater Power Supply at Connector — expected: Battery Voltage (~12V) with key on, engine off. Failure: 0V indicates a blown fuse (#29), a bad fuse box terminal, or a break in the pink power wire.
- PCM Ground Control at PCM Connector — expected: Continuity (near 0 Ohms) between sensor connector (Dark Green wire) and PCM connector C2, Pin 31.. Failure: Infinite resistance (OL) indicates a break in the ground control wire.
Hidden / Shadow Codes Worth Checking
- Mode $06, OBDMID $41, TID $85: This refers to the Oxygen Sensor Heater Monitor for Bank 1, Sensor 1. It specifically monitors the heater temperature during the diagnostic test. (see via An advanced scan tool capable of displaying Mode $06 data. A failure in this test is a strong indicator of a heater circuit problem and is what ultimately leads to the P0135 code being set.)
Scan Tool Commands That Help
- GM Tech II (or equivalent high-end scanner): Live Data > Powertrain > O2 Sensor Heater Current (B1S1) — This is the definitive test after verifying the fuse, sensor resistance, and wiring are good. It directly shows the amperage the PCM is seeing on the circuit. If you have 12V power and a good sensor, but this reads 0A, it strongly points to a failed PCM driver.
- GM Tech II (or equivalent high-end scanner): Special Functions > Output Controls > HO2S Heater ON/OFF — This bidirectional command allows you to manually turn the heater circuit on and off while monitoring voltage or current, which helps to isolate whether the fault is with the PCM's command or the circuit itself.
Wiring & Ground Locations
- PCM Connector C2 (Black) — At the Powertrain Control Module (PCM), located on the driver's side of the engine bay.. This connector contains the heater control wire. Pin 31 (Dark Green wire) is the ground control circuit for the Bank 1 Sensor 1 heater. Testing continuity from the O2 sensor connector to this pin verifies the control wire integrity.
- Under-hood Fuse Block — Driver's side of the engine bay.. Contains Fuse #29 (15A), which provides 12V power to the O2 sensor heater circuit via a Pink wire. A loose or corroded terminal at this fuse location can cause an open circuit even if the fuse is intact.
- G103 — On the left front of the engine compartment, typically on the radiator support or inner fender near the washer fluid reservoir.. This is a primary engine and chassis ground. While the O2 heater is ground-side controlled by the PCM, a poor connection at G103 can cause unstable voltage and grounding for the PCM itself, leading to a variety of erratic electrical faults, including false sensor codes.
Real Owner Repair Stories
- GMTNation forum user 'JayArr' (2005 GMC Envoy XL 4.2L (GMT360 platform)) — Persistent P0135 and P0053 codes.
❌ Tried (didn't work) Replaced the upstream O2 sensor., Ran a complete new set of four wires from the O2 sensor connector directly to the PCM and fuse box to bypass the factory harness.
✅ What actually fixed it Diagnosis with a Tech II scanner revealed 0A current draw on the B1S1 heater circuit, while the B1S2 heater worked correctly (~0.65A). With the sensor, fuse, and wiring confirmed good, the root cause was identified as a failed heater driver circuit (FET) inside the Powertrain Control Module (PCM). The final fix was to replace the PCM.
Documented NHTSA Reports
- NHTSA ODI #11681144 notes that P0135 is part of a cluster of common failure codes in certain GM propulsion systems that can trigger a Check Engine Light.
- An owner reported in NHTSA ODI #11448862 that P0135 appeared alongside other codes, eventually leading to a message stating the engine was offline.
- NHTSA ODI #10207750 describes a situation where a technician used an OBDII scanner to identify a failure associated with P0135, though the owner mistakenly attributed the code to a crank position sensor.
- In NHTSA ODI #10156207, a dealer checked for code P0135 and found that while the system codes were present, the items tested good according to the trouble tree, illustrating the intermittent nature of some circuit faults.
OEM Part Supersession History
ACDelco 213-1574→ACDelco 213-4527— Standard part lifecycle update, likely for minor improvements in materials or manufacturing.
Heads up: No known incompatibilities; the newer part is the correct service replacement for all years. However, GM warns that heavily consolidated aftermarket sensors that claim to replace multiple OEM numbers may have incorrect heater resistance or wire lengths, causing issues.
Model Year Variations Within This Range
- 2008-2009: The LL8 engine received updates in its later years. While the fundamental P0135 diagnosis remains the same, be aware that some engine components and wiring harnesses may differ slightly from earlier 2002-2007 models, though the O2 sensor function and circuit design are consistent.
Diagnostic Flowchart
Other Known Issues on This Vehicle
Issues unrelated to this code that are worth knowing about as an owner of this generation:
- Cracked Exhaust Manifold 🟠 Medium — Common, especially on 2008-2009 models, but can occur on any year. Often presents as a ticking noise when cold that may disappear as the engine warms up. (Ref: GM offered a special coverage adjustment for some 2008-2009 models (up to 120,000 miles), but the issue is widespread across other years.)
- Failed Electronic Fan Clutch 🔴 High — Very common failure. Can fail by locking on (sounding like a jet engine) or not engaging at all (causing overheating). Often triggers code P0495.
- Erratic or Failed Fuel Level Sensor 🟡 Low — Extremely common. The fuel gauge will read empty after a fill-up, jump around, or be generally inaccurate. The sensor on the fuel pump module is the culprit. (Ref: GM had a special service policy for some 2005-2007 models, covering 50% of the repair cost up to 10 years/120,000 miles.)
- Faulty Ignition Switch 🔴 High — Part of a massive GM recall. The switch can move out of the 'run' position while driving, shutting off the engine and disabling airbags. (Ref: NHTSA Recall #14V047000. It is critical to ensure this recall has been performed.)
- Worn Front Sway Bar End Links 🟡 Low — A very common wear item, leading to clunking or rattling noises from the front suspension when going over bumps.
- Failed Instrument Cluster Stepper Motors 🟡 Low — Common across many GM vehicles of this era. Gauges (speedometer, tachometer, etc.) can become stuck, read incorrectly, or stop working entirely.
Used vs. New Parts: Buying Guide for This Vehicle
When a used part is the smart pick: For this code, a used part is NOT recommended for the oxygen sensor itself, as it is a wear item with a finite lifespan. A used part is a viable option for a faulty PCM or a damaged under-hood fuse block, provided it's from a reputable source.
Donor-vehicle mileage cap: roughly under 150000 miles for the part to have meaningful remaining life.
What to inspect on the donor part:
- For a used PCM or fuse box, inspect for any signs of water damage, heavy corrosion on the casing or pins, or melted plastic.
- Ensure the donor vehicle was not involved in a front-end collision or fire.
- Whenever possible, source from a vehicle that was running prior to being dismantled.
OEM-only on this vehicle (don't cheap out):
- While not strictly 'OEM-only', using an ACDelco (OEM) or a known OE supplier (Denso, NTK) for the oxygen sensor is strongly advised to prevent compatibility problems that are common with generic or some aftermarket brands like Bosch on this platform.
Aftermarket brands forum-validated for this vehicle:
- Denso
- NTK (NGK)
Brands owners have reported issues with on this vehicle:
- Bosch (some owners report persistent codes or performance issues after installation on this specific platform)
Real Owner Stories
Aggregated from forums and TSBs cited above. Mileages and costs reflect what owners reported in those sources.
2002-2009 Chevrolet Trailblazer 4.2L I6 — ~80000 miles
Symptoms: Check engine light on with code P0135; the internal heater element failed due to age and extreme temperature cycles.
What fixed it: Replacement of the upstream oxygen sensor using a 22mm socket and penetrating oil to handle the seized threads in the manifold.
Cost: $40-$90
Source hint: common_causes section regarding Failed Upstream Oxygen Sensor
2002-2009 Chevrolet Trailblazer 4.2L I6
Symptoms: Persistent P0135 code; owner performed advanced diagnostics including checking the pink wire for 12V power and the tan wire for a ground signal from the PCM.
What fixed it: After checking wiring and sensor resistance, the owner concluded the PCM was at fault.
Source hint: gmtnation.com/threads/p0135.21553/
2002-2009 Chevrolet Trailblazer 4.2L I6
Symptoms: Check engine light; code P0135 present. Owner needed to clear the code to pass a vehicle inspection.
What fixed it: Replacing the upstream O2 sensor with a quality brand (ACDelco/Denso) and verifying fuse #29.
Source hint: trailvoy.com and gmtnation.com/threads/need-help-check-engine-light-blues.13537/
Related OBD-II Codes
Frequently Asked Questions
Which fuse should I check for a P0135 code on my Trailblazer?
Is there a specific brand of oxygen sensor recommended for the 4.2L I6 engine?
Where is the Bank 1, Sensor 1 oxygen sensor located on the LL8 engine?
Can a cracked exhaust manifold cause issues related to the O2 sensor on my 2008 Trailblazer?
What size tool do I need to remove the O2 sensor?
How can I test if the sensor itself is bad using a multimeter?
Helpful Videos

We Have This Part in Stock

The information in this article is provided for general reference and educational purposes only. Vehicle specifications, procedures, and part compatibility can vary by production date, trim level, and region. Always consult your vehicle's factory service manual and verify part numbers before purchasing or performing repairs. Safety-critical components such as airbags, seat belts, and braking systems should be installed by a qualified professional.
- Chevrolet Trailblazer:
- 🧭 Diagnostic Flowchart
- 🎬 Helpful Videos
- 🛍️ Shop This Part
- What's Unique About the 2002-2009 Chevrolet Trailblazer
- Symptoms You May Notice
- Most Likely Causes
- Rare But Worth Checking
- Diagnosis Steps
- Parts You'll Likely Need
- Technical Service Bulletins (TSBs) & Recalls
- Platform-Specific Known Issues
- Mechanic-Grade Diagnostic Values
- Hidden / Shadow Codes Worth Checking
- Scan Tool Commands That Help
- Wiring & Ground Locations
- Real Owner Repair Stories
- Documented NHTSA Reports
- OEM Part Supersession History
- Model Year Variations Within This Range
- Other Known Issues on This Vehicle
- Used vs. New Parts: Buying Guide for This Vehicle
- Real Owner Stories
- 2002-2009 Chevrolet Trailblazer 4.2L I6 — ~80000 miles
- 2002-2009 Chevrolet Trailblazer 4.2L I6
- 2002-2009 Chevrolet Trailblazer 4.2L I6
- Related OBD-II Codes
- Frequently Asked Questions
- 🎟️ Get 5% Off