
P0135 on 2011-2014 Chrysler 200 3.6L: O2 Sensor Heater Circuit Causes and Fixes
For a 2011-2014 Chrysler 200 with the 3.6L V6, code P0135 almost always points to a failed heater element inside the Bank 1, Sensor 1 oxygen sensor. This is the upstream sensor on the rear cylinder bank (firewall side). Access is extremely difficult, but the part itself costs about $40-$85 for a quality aftermarket replacement (NTK or Denso recommended) or $115-$190 for an OEM Mopar part. Before replacing, check the associated fuse as it is sometimes shared with the ignition coils.
- P0135 means the heater in your Bank 1, Sensor 1 O2 sensor has failed.
- On your 3.6L Chrysler 200, this is the upstream sensor on the rear cylinder bank, close to the firewall.
- The most common fix is to replace the sensor itself.
- Accessing this specific sensor is known to be difficult due to tight space.
- Before replacing the sensor, do a quick visual check of the wiring for melting and check the O2 heater fuse.
What's Unique About the 2011-2014 Chrysler 200
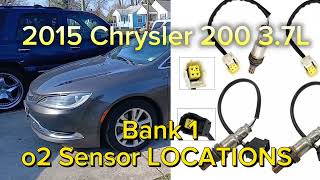
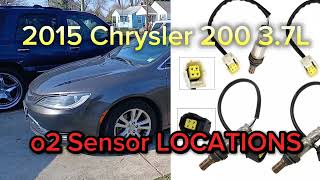
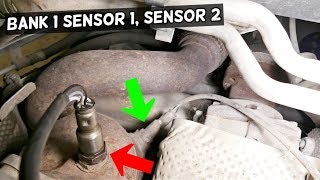
On the 3.6L Pentastar V6 engine mounted transversely in the Chrysler 200, 'Bank 1' is the rear cylinder bank, located near the firewall. 'Sensor 1' is the upstream sensor in that bank's exhaust manifold, before the catalytic converter. The primary challenge specific to this vehicle is the extremely difficult access to this rear sensor, which is tucked between the engine and firewall 🎬 See this walkthrough for reaching the sensor in tight spaces., often requiring special tools, patience, and removal of other components like the engine cover and potentially the intake plenum to gain access.
Symptoms You May Notice
- Check Engine Light is on
- Decreased fuel economy
- Rough running or hesitation, especially when the engine is cold
- Failing a vehicle emissions test
- Sluggish performance or poor acceleration
- Replacing the wrong oxygen sensor (e.g., Bank 2 Sensor 1 on the front/radiator side, or a downstream Sensor 2 after the catalytic converter). Always confirm you are working on Bank 1 🎬 Watch: This video shows exactly where Bank 1 is located. (rear/firewall side) and Sensor 1 (upstream/before the cat).
- Using a cheap, incompatible aftermarket sensor. Chrysler vehicles are notoriously sensitive to O2 sensor brands. Owners and mechanics strongly recommend using OEM Mopar or OEM-supplier brands like NTK or Denso to avoid persistent codes.
Most Likely Causes
- Failed O2 Sensor Heater Element 🔴 High Probability → Shop Oxygen Sensor The internal heater element is a common failure point on oxygen sensors as they age from constant heat cycles. It is the most frequent reason for a P0135 code.
How to confirm: Disconnect the sensor and use a multimeter to test the resistance between the two heater circuit wires (usually the two wires of the same color 🎬 Watch: A quick guide on how to test an O2 sensor.). A reading of 'OL' (open loop) or infinite resistance indicates a broken heater element. A normal reading for this platform is typically between 3 and 15 ohms.
Typical fix: Replace the Bank 1, Sensor 1 oxygen sensor.
Est. part cost: $40-$190 - Damaged Wiring or Connector 🟡 Medium Probability The wiring harness for the rear O2 sensor is routed in a high-heat area between the engine and firewall, making it susceptible to melting, chafing, or becoming brittle over time. Visual inspection is critical.
How to confirm: Visually inspect the entire wiring harness leading to the sensor for any signs of melting, fraying, or breaks. Check the electrical connector for corrosion, moisture, or pushed-out pins.
Typical fix: Repair the damaged section of the wiring harness or clean/replace the connector.
Est. part cost: $5-$50 - Blown Fuse ⚪ Low Probability The O2 sensor heater circuit is protected by a fuse, often shared with the ignition coils and powered by the Auto Shutdown (ASD) relay. While not a common failure, a short in the circuit or sensor can cause this fuse to blow. If the engine runs, the fuse is likely okay, but it's still a mandatory check.
How to confirm: Consult the owner's manual or the fuse box diagram to locate the fuse for the O2 sensor heaters (sometimes labeled 'O2 HTR', 'Automatic Shutdown', or similar) in the under-hood fuse box (TIPM). A common fuse to check on related platforms is F25 (20A). Visually inspect the fuse and replace it if it is blown. If the fuse blows again, a short circuit is present that must be diagnosed.
Typical fix: Replace the blown fuse after diagnosing the underlying short circuit.
Est. part cost: $1-$5
Rare But Worth Checking
- Powertrain Control Module (PCM) Fault: → Shop Engine Control Module (ECM) This is very rare. Before suspecting the PCM, all other possibilities (sensor, wiring, fuses) must be exhaustively ruled out. A PCM driver for the heater circuit can fail, but it is highly unlikely. Some 2011 models had a TSB (#18-059-16) for a PCM software update related to false O2 heater codes, so it's worth checking if your VIN is affected if a new sensor doesn't fix the issue.
Diagnosis Steps
- Read the code with an OBD-II scanner to confirm P0135 is present.
- Identify the correct sensor. On the 3.6L Chrysler 200, Bank 1 is the rear bank near the firewall, and Sensor 1 is the upstream sensor in the exhaust manifold.
- Visually inspect the sensor's wiring harness and connector for any obvious damage like melting, chafing, or corrosion.
- Check the fuse for the O2 sensor heater circuit in the main fuse box (TIPM). On many Chrysler products, this fuse is shared with the ignition coils, so if the car runs, the fuse is likely good, but it must be checked. A common location on related vehicles is fuse F25 (20A). Replace if blown.
- If the wiring and fuse are good, disconnect the sensor's electrical connector.
- With the key on and engine off, use a multimeter to verify that one pin in the vehicle-side harness connector has 12V power from the ASD relay.
- Use the multimeter to measure the resistance of the heater element across the two corresponding pins on the sensor itself. A reading outside the 3-15 ohm range (often open/infinite) confirms the sensor has failed.
- If the sensor's resistance is good but power is missing at the harness, there is a wiring issue between the fuse box and the sensor that needs to be traced.
Parts You'll Likely Need
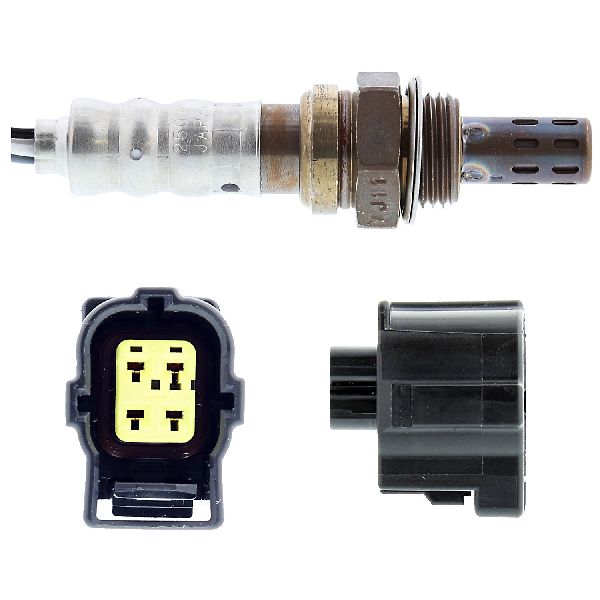
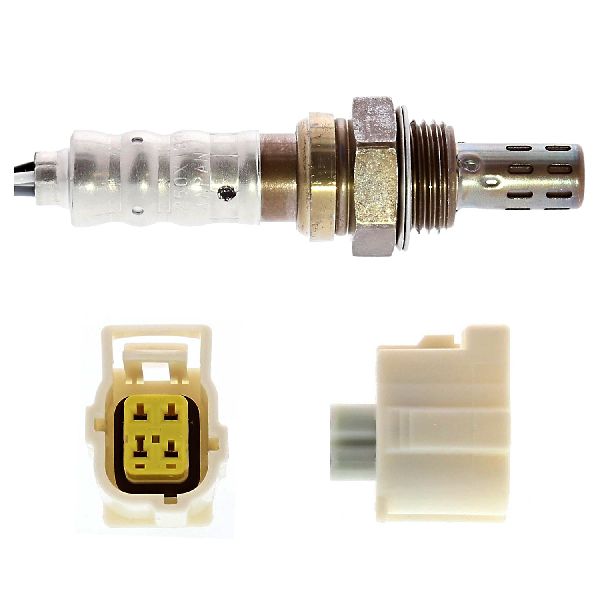
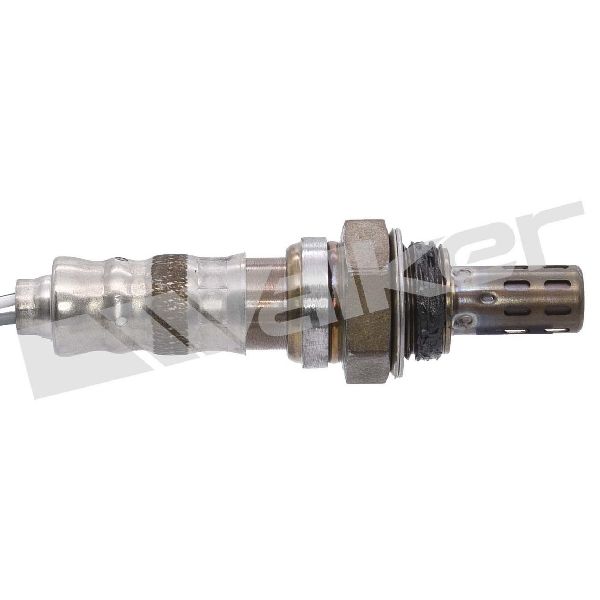
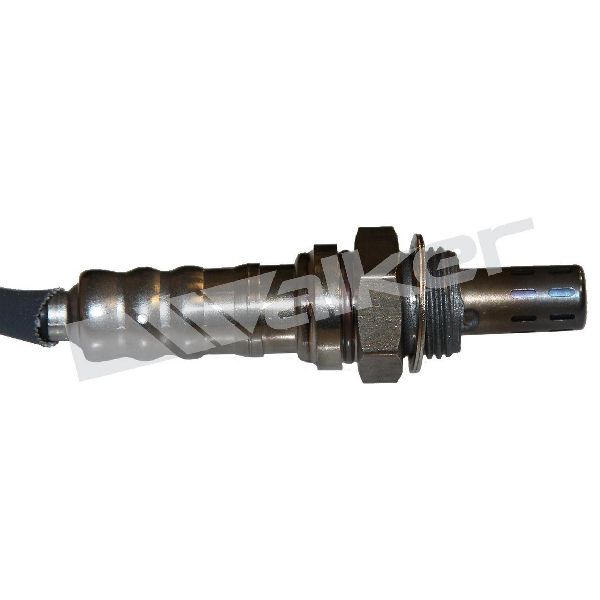
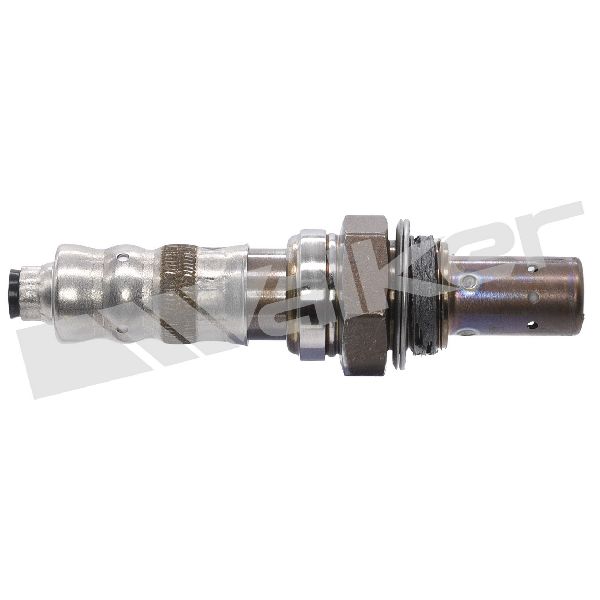
- Oxygen Sensor (Bank 1, Sensor 1)
(OEM #5149171AB)— The internal heater element fails, which is the direct cause of the P0135 code. This is the upstream sensor for the rear (firewall side) cylinder bank.
Trusted brands: Mopar (OEM), NTK (Often the OEM supplier), Denso
OEM price range: $115-$190
Aftermarket price range: $40-$85 - Oxygen Sensor Socket Set — A specialized 7/8" (22mm) socket with a cutout for the wire is often required to remove and install the sensor, especially given the tight access on this vehicle. A flexible or 'crow's foot' style socket is highly recommended.
Trusted brands: Lisle, OEMTOOLS, GearWrench
Aftermarket price range: $10-$40
Related Codes That Often Appear With This One
- P0155 — This is the identical heater circuit fault code but for Bank 2, Sensor 1 (front/radiator side). It's not uncommon for both upstream O2 sensor heaters to fail around the same time due to age and similar operating conditions.
- P0030 — This is a Chrysler-specific manufacturer code that is nearly identical to P0135, also pointing to the Bank 1, Sensor 1 heater control circuit. The diagnostic steps are identical.
- P0300, P0301, P0302, etc. — If the fuse for the O2 heater circuit is blown, it may also cut power to the ignition coils, as they often share a circuit on Chrysler vehicles. This would cause cylinder misfire codes to appear alongside P0135.
Technical Service Bulletins (TSBs) & Recalls
- TSB #18-059-16: Released May 21, 2016, this TSB for some 2011 models involves reprogramming the Powertrain Control Module (PCM) to correct logic that could falsely trigger various O2 sensor heater circuit codes. While not specifically for P0135, it addresses the family of codes and is worth checking with a dealer by VIN if a new sensor does not resolve the issue, especially if multiple heater codes are present.
Platform-Specific Known Issues
- The primary issue for this repair is the difficult access to the Bank 1, Sensor 1 O2 sensor. It is located in a very tight space between the rear of the engine and the firewall, making it challenging to reach and remove without the proper tools like universal joints and specialized O2 sensor sockets.
- Some owners and mechanics report that removing the upper intake manifold is the most effective way to gain sufficient access to the rear sensor, which adds significant time and complexity to the job.
Mechanic-Grade Diagnostic Values
- O2 Sensor Heater Element Resistance — expected: 3 to 15 Ohms at ambient temperature. Some Chrysler platforms specify a tighter range of 2-5 ohms.. Failure: A reading of 'OL' (infinite resistance) for an open circuit or near 0 Ohms for a shorted circuit.
- O2 Sensor Heater Power Supply Voltage (at harness connector) — expected: Battery voltage (approx. 12V) with Key On, Engine Off (KOEO).. Failure: Little to no voltage, which points to a problem with the fuse, Auto Shutdown (ASD) relay, or wiring.
- O2 Heater Control Circuit (at harness connector) — expected: On this platform, the PCM provides a pulse-width modulated 12V power signal to control the heater, while the ground side is constant. Testing with a multimeter may not be definitive; an oscilloscope is better for viewing the duty cycle.. Failure: No voltage or a static voltage may indicate a wiring issue or a failed PCM driver.
Scan Tool Commands That Help
- wiTECH (Chrysler Dealer Tool): O2 Heater Test / Actuator Test — Can be used to command the O2 sensor heater circuit on and off to verify PCM driver function and wiring integrity without having to run the engine. This helps isolate whether the fault is with the sensor, wiring, or PCM.
- wiTECH (Chrysler Dealer Tool): PCM Reset / Relearn — After replacing an O2 sensor, a PCM reset may be required. The O2 heater is a learned value, and a new sensor may still trigger a code until the PCM adapts. A simple method is to disconnect the battery for over 10 minutes.
Wiring & Ground Locations
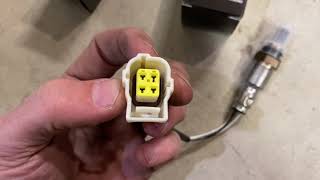
- Bank 1 Sensor 1 Connector — On the rear of the engine (firewall side), connected to the upstream O2 sensor in the exhaust manifold. It is a 4-pin connector.. This is the primary connection point for testing the sensor's heater element resistance and for checking power/ground from the vehicle harness.
- G302 — Located in the left kick panel area.. This is a common interior ground point. While not directly for the O2 sensor heater (which is often grounded through the PCM), a poor ground here can cause a variety of strange electrical issues with modules that communicate with the PCM, potentially leading to misdiagnosis.
- Engine Ground Strap — There are multiple ground straps. A key one often runs from the engine block or alternator bracket to the chassis frame rail or firewall.. A broken or corroded main engine ground strap can cause the O2 sensor heater circuit (and other sensors) to seek a ground path through the sensor body itself, leading to erratic readings and premature failure. It's a critical check for any electrical fault.
Real Owner Repair Stories
- Chrysler Forum user 'bcupac53' (2004 Chrysler Town & Country 3.8L (Similar platform behavior)) — Check Engine Light with a code for upstream O2 sensor, then P0135 after replacement.
❌ Tried (didn't work) Initial replacement of the O2 sensor.
✅ What actually fixed it The user was advised that the new sensor itself was likely faulty or an incompatible brand (like Bosch). Another user noted a TSB for older models where the required sensor resistance changed mid-year, highlighting the importance of using the correct OEM-spec part (NTK or Denso recommended). The implied fix was using the correct, high-quality sensor.
OEM Part Supersession History
68066160AA→5149171AA— Part number consolidation and revision by Mopar.5149171AA→5149171AB— Part number consolidation and revision by Mopar. This is the current, most updated part number.
Model Year Variations Within This Range
- 2011: Some 2011 models may be eligible for TSB #18-059-16, which involves a PCM software reflash to correct overly sensitive logic for O2 heater circuit faults. This should be investigated with a dealer by VIN before replacing parts if a new sensor does not fix the code.
Diagnostic Flowchart
Other Known Issues on This Vehicle
Issues unrelated to this code that are worth knowing about as an owner of this generation:
- Left Cylinder Head Failure (2011-2013 models) 🔴 High — Common on early Pentastar engines, typically presenting as a ticking noise and misfire codes (P0300, P0302, P0304, P0306) before 100,000 miles. (Ref: TSB #09-002-14 REV. B; Warranty Extension X56 (10 years/150,000 miles).)
- Cracked Oil Filter Housing/Cooler Assembly 🔴 High — Extremely common across all years. The plastic housing becomes brittle from heat cycles and cracks, causing significant oil and/or coolant leaks into the engine valley. Often noticed after 60,000 miles. (Ref: None, but it is a widely documented design flaw. No recall has been issued.)
- Rocker Arm / Cam Follower Failure 🟠 Medium — Widespread issue causing a 'ticking' sound from the valvetrain. Worn needle bearings in the rocker arms can lead to misfires and camshaft damage if ignored. (Ref: Various service bulletins exist, but no recall. Repair is typically out of pocket unless under warranty.)
- 62TE Transmission Problems 🟠 Medium — The 62TE automatic transmission used with the 3.6L V6 can suffer from harsh shifts, shuddering, delayed engagement, or slipping. Solenoid pack and torque converter issues are common. (Ref: Multiple internal design changes were made over the years, but no major recall.)
- Cooling System Component Failures 🟡 Low — Beyond the oil cooler, water pumps and radiators can fail prematurely, leading to overheating conditions.
Used vs. New Parts: Buying Guide for This Vehicle
When a used part is the smart pick: For this repair, a used part is almost never a smart choice. Oxygen sensors are wear items with a finite lifespan, and the heater element is the most common failure point. The labor involved, especially for the difficult-to-access Bank 1 sensor, makes it illogical to install a used sensor with unknown remaining life.
What to inspect on the donor part:
- Not applicable. Do not use a salvaged oxygen sensor for this repair.
OEM-only on this vehicle (don't cheap out):
- While not strictly 'OEM-only', Chrysler platforms are notoriously sensitive to the brand of oxygen sensor. Using a non-OEM-spec part can result in the code returning immediately. Stick to Mopar or the original equipment supplier.
Aftermarket brands forum-validated for this vehicle:
- NTK (often the original OEM supplier)
- Denso
Brands owners have reported issues with on this vehicle:
- Bosch (widely reported on forums to cause issues and repeat codes on Chrysler vehicles)
Real Owner Stories
Aggregated from forums and TSBs cited above. Mileages and costs reflect what owners reported in those sources.
2011-2014 Chrysler 200 3.6L V6
Symptoms: Check engine light on and stalling issues.
What fixed it: Replacing the upstream O2 sensor using a special socket.
Source hint: Chrysler Sebring / 200 Convertible Club (sebringclub.net) thread titled 'P0135 CODE can I fix this?'
2011 Chrysler 200 3.6L V6
Symptoms: P0135 code present; difficulty accessing the sensor due to the tight space between the engine and firewall.
What fixed it: Replacing the Bank 1, Sensor 1 oxygen sensor, potentially requiring removal of the upper intake manifold for access.
Source hint: Vehicle-specific issues section regarding Bank 1 Sensor 1 access
Related OBD-II Codes
Frequently Asked Questions
Where is the Bank 1 Sensor 1 oxygen sensor located on my 3.6L Chrysler 200?
Does TSB #18-059-16 apply to my 2011 Chrysler 200 for a P0135 code?
Is it true I have to remove the intake manifold to fix this code?
Which brand of oxygen sensor should I buy for my Chrysler 200?
Could a blown fuse cause my P0135 code?
What is the normal resistance for the O2 heater on this engine?
Helpful Videos

We Have This Part in Stock


The information in this article is provided for general reference and educational purposes only. Vehicle specifications, procedures, and part compatibility can vary by production date, trim level, and region. Always consult your vehicle's factory service manual and verify part numbers before purchasing or performing repairs. Safety-critical components such as airbags, seat belts, and braking systems should be installed by a qualified professional.
- Chrysler 200:
- 🧭 Diagnostic Flowchart
- 🎬 Helpful Videos
- 🛍️ Shop This Part
- What's Unique About the 2011-2014 Chrysler 200
- Symptoms You May Notice
- Most Likely Causes
- Rare But Worth Checking
- Diagnosis Steps
- Parts You'll Likely Need
- Related Codes That Often Appear With This One
- Technical Service Bulletins (TSBs) & Recalls
- Platform-Specific Known Issues
- Mechanic-Grade Diagnostic Values
- Scan Tool Commands That Help
- Wiring & Ground Locations
- Real Owner Repair Stories
- OEM Part Supersession History
- Model Year Variations Within This Range
- Other Known Issues on This Vehicle
- Used vs. New Parts: Buying Guide for This Vehicle
- Real Owner Stories
- 2011-2014 Chrysler 200 3.6L V6
- 2011 Chrysler 200 3.6L V6
- Related OBD-II Codes
- Frequently Asked Questions
- 🎟️ Get 5% Off