
P0135 on 2007-2014 Ford Edge 3.5L: O2 Sensor Heater Circuit Causes and Fixes
On a 2007-2014 Ford Edge, code P0135 almost always points to a failed upstream oxygen sensor on Bank 1 (the firewall side). The part itself costs between $50-$150, and replacement is DIY-possible but can be difficult due to tight access. Before replacing, check the O2 sensor fuse (Fuse #47 in the under-hood fuse box for 2011-2014 models; check owner's manual for 2007-2010).
- P0135 on a 2007-2014 Ford Edge points to the upstream O2 sensor on the firewall side of the engine (Bank 1).
- The most likely cause is a failed heater element inside the sensor itself.
- Before buying parts, always check Fuse #47 (15A) in the under-hood fuse box and inspect the wiring for visible damage.
- This repair is challenging for a DIYer due to the sensor's difficult-to-reach location; removing the intake manifold is a common strategy.
- Always confirm you are working on the correct sensor (Bank 1, Sensor 1) to avoid wasting time and money.
What's Unique About the 2007-2014 Ford Edge
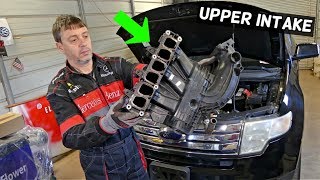
For the V6 Ford Edge, the key challenge with a P0135 code is vehicle-specific geography. Bank 1 is the cylinder bank located against the firewall, making the associated upstream O2 sensor (Sensor 1) significantly harder to access than its Bank 2 counterpart near the radiator. While the code itself is common across many vehicles, owners often find this specific repair more labor-intensive on the Edge due to the tight quarters. Many DIYers and professionals remove the upper intake manifold to gain the necessary clearance to reach the sensor from above.
🎬 See this walkthrough on removing the upper intake manifold for access.Generation note: The 2007-2014 model years all fall within the first generation of the Ford Edge. This generation received a significant facelift for the 2011 model year, but the 3.5L Duratec V6 engine and exhaust layout remained fundamentally the same, so the causes and fixes for P0135 are consistent across this entire year range. One key difference is the fuse location; on 2011-2014 models, the fuse is often #47 in the under-hood box, while 2007-2010 models have a different layout that must be checked in the owner's manual.
Symptoms You May Notice
- Check Engine Light is on
- Reduced fuel economy
- Rough idle, especially when the engine is cold
- Failing a vehicle emissions test
- Engine hesitation during acceleration before the engine is fully warmed up
- Replacing the wrong oxygen sensor. It is easy to mistakenly replace Bank 2 (front, by the radiator) instead of Bank 1 (rear, by the firewall), or the downstream sensor (Sensor 2) instead of the upstream one (Sensor 1).
Most Likely Causes
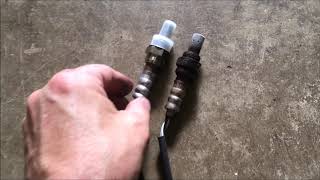
- Failed Bank 1, Sensor 1 Oxygen Sensor 🔴 High Probability → Shop Oxygen Sensor The internal heater element is a common failure point in oxygen sensors after many heat cycles and high mileage. It's a simple resistor that eventually burns out.
How to confirm: Using a multimeter, disconnect the sensor and test the resistance across the two heater circuit pins (typically the two wires of the same color, often black or white). A healthy sensor should read between 3 and 30 ohms. An open circuit (infinite resistance) or a dead short (near zero ohms) confirms the heater has failed.
Typical fix: Replace the Bank 1, Sensor 1 (upstream) oxygen sensor.
Est. part cost: $50-$150 - Damaged Wiring or Connector 🟡 Medium Probability The wiring harness is exposed to significant heat from the exhaust manifold and potential road debris, which can cause wires to become brittle, melt, or break over time. The connector itself can also corrode.
How to confirm: Visually inspect the wiring harness and connector leading to the sensor for any signs of melting, chafing, corrosion, or loose pins. Perform a continuity test on the harness if damage is suspected. If multiple O2 sensor heater codes appear at once (e.g., P0135, P0141, P0155), a wiring or fuse issue is much more likely than multiple sensors failing simultaneously.
Typical fix: Repair the damaged section of the wiring harness or replace the connector pigtail.
Est. part cost: $15-$40 - Blown Fuse ⚪ Low Probability A short in the heater circuit or its wiring can cause the corresponding fuse to blow as a protective measure.
How to confirm: Locate the fuse for the O2 sensor heater circuit in the under-hood fuse box (Battery Junction Box). For many 2011-2014 models, this is Fuse #47 (15A). For 2007-2010 models, consult the owner's manual as the fuse layout is different. Visually inspect the fuse. If it's blown, replace it.
Typical fix: Replace the blown fuse. If the new fuse blows immediately, it indicates a persistent short circuit in the wiring or the sensor itself that must be diagnosed and repaired.
Est. part cost: $1-$5
Rare But Worth Checking
- Faulty Powertrain Control Module (PCM): → Shop Engine Control Module (ECM) This is extremely rare. The PCM's internal driver for the heater circuit can fail, but this should only be considered after all other possibilities, including the sensor, wiring, and fuse, have been definitively ruled out.
Diagnosis Steps
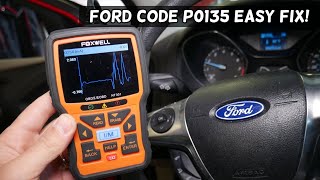
- Use an OBD-II scanner to confirm P0135 is the active code and check for any other related codes.
- Check the fuse for the O2 sensor heaters. In many 2011-2014 models, this is fuse #47 (a 15A fuse) in the fuse box under the hood. For 2007-2010 models, consult the owner's manual for the correct fuse number. If it's blown, replace it and see if the code returns.
- Locate Bank 1 on the engine. For the 3.5L V6 Edge, this is the cylinder bank against the firewall.
- Visually inspect the upstream O2 sensor's wiring harness and connector for any obvious damage like melting, fraying, or corrosion.
- If the wiring and fuse are okay, disconnect the sensor. Use a multimeter to test the resistance of the heater circuit on the sensor side (across the two same-colored wires). A reading between 3-30 ohms is good. Infinite resistance (OL) or zero resistance means the sensor is bad.
- With the key on and engine off, use a multimeter to verify that you have battery voltage (12V) on the power supply pin of the harness-side connector. Then, check for a PCM-supplied ground on the other heater circuit pin; some systems may show a bias voltage (e.g., ~4.4V) on the control side with the key on, which is normal.
- If voltage is present and the sensor's resistance test failed, replace the oxygen sensor.
- If voltage is not present at the harness, you must trace the wiring back from the connector to the fuse box to find the open or short circuit.
Parts You'll Likely Need
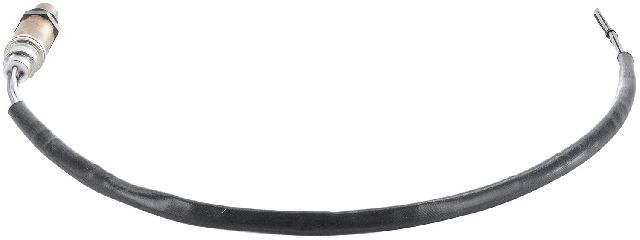
- Upstream Oxygen Sensor (Bank 1, Sensor 1)
(OEM #CT4Z-9G444-A)— This is the sensor identified by the P0135 code. Its internal heater element is the most common failure point. The provided part number is a common reference, but always verify with your vehicle's VIN. Note that aftermarket brands like NTK, which is often the original equipment manufacturer, will have their own part numbers (e.g., NTK 27014).
Trusted brands: Motorcraft (OEM), NTK/NGK, Bosch, Denso
OEM price range: $85-$140
Aftermarket price range: $50-$110 - Oxygen Sensor Socket Set — A special slotted socket is required to remove and install the oxygen sensor without damaging its wire. A 7/8" (22mm) crow's foot wrench can also work in tight spaces. Some sensors may require a 21mm socket.
Aftermarket price range: $15-$30
Technical Service Bulletins (TSBs) & Recalls
- TSB 11-10-16: This Technical Service Bulletin addresses some 2011-2012 Edge/MKX vehicles that may exhibit O2 sensor codes (P0130, P0133, P0150, P0153) after a PCM reprogramming. While not directly for P0135, it shows that PCM software can be related to O2 sensor diagnostics.
Platform-Specific Known Issues
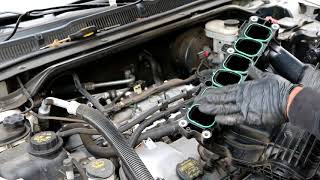
- Access to the Bank 1 (rear) upstream O2 sensor is notoriously difficult. The sensor is located on the exhaust manifold between the engine and the firewall. 🎬 Watch: How to reach and replace the rear oxygen sensor.
- Many owners and mechanics find it necessary to remove the upper intake manifold and cowl panel to gain adequate access from the top of the engine bay. This adds significant time to the repair but makes reaching the sensor much easier.
- Some owners have successfully replaced it from underneath the vehicle, but this requires working in a very tight space with limited leverage.
Mechanic-Grade Diagnostic Values
- O2 Sensor Heater Element Resistance — expected: 3 to 30 Ohms at ambient temperature. Many sources cite a tighter range of 4-10 Ohms for a good sensor.. Failure: Infinite resistance (Open Line) or near-zero resistance (short circuit) indicates a failed heater element.
- Heater Circuit Power Supply Voltage (at harness connector) — expected: 10V to 12V+ (Battery Voltage) with Key On, Engine Off (KOEO).. Failure: 0V indicates a blown fuse or an open circuit in the power supply wire from the fuse box.
- Heater Circuit Control (Ground) Side Voltage (at harness connector) — expected: The PCM provides a controlled ground. With KOEO, you may see a 'bias voltage' from the PCM, often around 4.4V, which is normal. When the heater is commanded on, this voltage should drop as the PCM provides a path to ground.. Failure: No voltage or an unexpected constant ground may indicate a wiring issue or a problem with the PCM driver.
Scan Tool Commands That Help
- Ford IDS (or equivalent high-end bidirectional scanner): HO2S Heater Output State Control / Actuation Test — This command allows a technician to manually toggle the O2 sensor heater on and off. It is the definitive way to test the entire circuit (power, ground, and PCM control) in real-time. By commanding the heater 'On', you can verify the PCM is capable of grounding the circuit and check for current draw, confirming the wiring and PCM driver are functional without having to replace the sensor first.
Wiring & Ground Locations
- G105 — Located on the left front of the engine compartment.. This is a primary engine compartment ground. While not exclusively for the O2 sensor, a poor connection at this major ground point can cause a variety of intermittent electrical issues and unstable voltages for engine sensors, potentially contributing to heater circuit fault codes.
- Bank 1 Sensor 1 Connector — On the wiring harness near the rear exhaust manifold, between the engine and the firewall.. This is the primary connector where all diagnostic tests for the sensor and harness-side circuit (power, ground, signal) are performed. It is exposed to high heat, making it a potential point of failure.
Real Owner Repair Stories
- Reddit user comment in /r/AskMechanics (2012 Ford Edge 3.5L) — Multiple circuit codes appearing at once, including P0135, P0155 (Bank 2 heater), P0443 (EVAP), and others.
❌ Tried (didn't work) The owner was asking where to start, implying no parts had been replaced yet.
✅ What actually fixed it Multiple technicians in the thread immediately pointed to a shared power or ground issue or rodent damage to a main wiring harness, as it is highly improbable for so many separate components to fail simultaneously. The consensus was to check for a common blown fuse or inspect the harness for physical damage before replacing any sensors.
OEM Part Supersession History
Unknown→CT4Z-9G444-A— Standard part evolution and updates.
Heads up: While this part is listed for the 3.5L, it is also listed for the 2.0L EcoBoost engine in some databases, but for the 'Lower' or 'Rear' (downstream) position. It is critical to verify the part by VIN for the specific engine and sensor position (Upstream Bank 1) to avoid confusion.
Model Year Variations Within This Range
- 2007-2010: The fuse for the O2 sensor heater is located in the passenger compartment fuse panel (Smart Junction Box) or the under-hood box, but the numbering is different from the 2011-2014 models. For example, on a 2008 Edge, the PCM power and sensor-related fuses are spread across multiple locations and do not have a single, easily identified 'O2 Heater' fuse like the later models. Owners must consult their specific year's manual.
- 2011-2014: The O2 sensor heater fuse is commonly identified as fuse #47 (15A) in the under-hood fuse box (Battery Junction Box). This is a more straightforward location to check compared to earlier models.
Diagnostic Flowchart
Other Known Issues on This Vehicle
Issues unrelated to this code that are worth knowing about as an owner of this generation:
- Internal Water Pump Failure 🔴 High — A well-documented and serious design flaw. The pump is driven by the timing chain, and when its seal fails, it leaks coolant directly into the engine oil, leading to catastrophic engine failure if not caught immediately. Repair is extremely labor-intensive, often costing over $2,000.
- Electronic Throttle Body (ETB) Failure 🔴 High — Widespread issue where contamination of internal contacts causes the vehicle to suddenly enter 'limp mode,' drastically reducing power. This was common enough that Ford initiated Customer Satisfaction Program 13N03 and 16B23 to extend the warranty and replace the part on affected vehicles. (Ref: Customer Satisfaction Program 13N03, 16B23)
- Power Transfer Unit (PTU) Failure (AWD Models) 🔴 High — The PTU (transfer case) is located near hot exhaust components and has a very small fluid capacity with no drain plug. The fluid overheats and breaks down, leading to gear and bearing failure. Symptoms include a burning oil smell and grinding noises. Preventative fluid changes every 30,000 miles are highly recommended by owners.
- Door Ajar Sensor Failure 🟠 Medium — A faulty microswitch inside the door latch assembly causes the 'Door Ajar' light to stay on, which can drain the battery and prevent the doors from locking. This is a very common annoyance. Ford issued TSB 18-2013 for a cleaning procedure, but replacement of the latch is often the only permanent fix. (Ref: TSB 18-2013)
Used vs. New Parts: Buying Guide for This Vehicle
When a used part is the smart pick: For this repair, using a used part is almost never a smart choice. The oxygen sensor is a wear-and-tear item with a finite lifespan determined by heat cycles and mileage. A used sensor from a junkyard has an unknown history and is likely to fail sooner rather than later, forcing you to do the difficult labor twice.
Donor-vehicle mileage cap: roughly under 20000 miles for the part to have meaningful remaining life.
What to inspect on the donor part:
- If forced to use a used sensor, source it from a very low-mileage vehicle that was wrecked due to collision, not due to engine or electrical failure.
- Inspect the sensor tip for heavy carbon deposits or white contamination, which indicates a poor-running donor engine.
- Ensure the wiring and connector are completely intact with no signs of melting or brittleness.
Aftermarket brands forum-validated for this vehicle:
- NTK/NGK (often the Original Equipment Manufacturer for Ford)
- Denso
- Bosch
Brands owners have reported issues with on this vehicle:
- Unnamed, no-brand 'white box' parts from online marketplaces are a significant gamble. They often have incorrect heater resistance or slow response times, which can cause the code to return or lead to poor fuel economy even if the check engine light stays off.
Real Owner Stories
Aggregated from forums and TSBs cited above. Mileages and costs reflect what owners reported in those sources.
2011-2014 Ford Edge 3.5L V6
Symptoms: Check Engine Light on with multiple O2 heater codes appearing at the same time.
What fixed it: Found a common power or ground issue, such as a blown fuse or wiring problem, rather than replacing individual sensors.
Source hint: fordedgeforum.com: 'p0010 p0020 ... p0135 p0141 p0155 p0161 p1000'
Ford Edge 3.5L V6 — 18000 miles
Symptoms: P0135 code along with P0132 and P2243.
What fixed it: Replacement of the Bank 1, Sensor 1 oxygen sensor unit.
Source hint: fordedgeforum.com: 'Bad O2 sensor at 18K miles'
Related OBD-II Codes
Frequently Asked Questions
Where is the Bank 1, Sensor 1 oxygen sensor located on my 3.5L V6 Edge?
Does TSB 11-10-16 mean I need a PCM update to fix my P0135 code?
Which fuse should I check for the O2 sensor heater on a 2011-2014 Ford Edge?
Why is the labor for replacing this sensor so high on the Edge?
If I have P0135, P0141, and P0155 all at once, do I need to replace all the sensors?
Can I use parts from a Lincoln MKX to fix my Ford Edge P0135 code?
Helpful Videos
We Have This Part in Stock

The information in this article is provided for general reference and educational purposes only. Vehicle specifications, procedures, and part compatibility can vary by production date, trim level, and region. Always consult your vehicle's factory service manual and verify part numbers before purchasing or performing repairs. Safety-critical components such as airbags, seat belts, and braking systems should be installed by a qualified professional.
- Ford Edge:
- 🧭 Diagnostic Flowchart
- 🎬 Helpful Videos
- 🛍️ Shop This Part
- What's Unique About the 2007-2014 Ford Edge
- Symptoms You May Notice
- Most Likely Causes
- Rare But Worth Checking
- Diagnosis Steps
- Parts You'll Likely Need
- Technical Service Bulletins (TSBs) & Recalls
- Platform-Specific Known Issues
- Mechanic-Grade Diagnostic Values
- Scan Tool Commands That Help
- Wiring & Ground Locations
- Real Owner Repair Stories
- OEM Part Supersession History
- Model Year Variations Within This Range
- Other Known Issues on This Vehicle
- Used vs. New Parts: Buying Guide for This Vehicle
- Real Owner Stories
- 2011-2014 Ford Edge 3.5L V6
- Ford Edge 3.5L V6 — 18000 miles
- Related OBD-II Codes
- Frequently Asked Questions
- 🎟️ Get 5% Off