
P0135 on 2007-2012 Hyundai Santa Fe: O2 Sensor Heater Failure Causes and Fixes
On a 2007-2012 Hyundai Santa Fe, code P0135 almost always means the upstream oxygen sensor (Bank 1, Sensor 1) has failed. Before replacing it, check the 15A 'SENSOR #2' fuse in the engine bay fuse box. A new sensor costs about $50-$100 for an aftermarket part or $150-$250 for OEM. On V6 models, this sensor is on the firewall side and is difficult to access.
- P0135 points directly to a problem with the heater inside the upstream oxygen sensor on Bank 1.
- The most likely fix is replacing the Bank 1, Sensor 1 O2 sensor.
- Before buying any parts, always check the 15A 'SENSOR #2' fuse in the engine bay fuse box.
- On V6 models, Bank 1 is the rear bank (by the firewall) and is significantly harder to access than the sensor on the 4-cylinder engine.
- Driving with this code will hurt your fuel economy and cause you to fail an emissions test.
What's Unique About the 2007-2012 Hyundai Santa Fe
For the 2007-2012 Santa Fe (CM generation), this code is a straightforward electrical fault. The key difference depends on your engine. On V6 models (2.7L, 3.3L, 3.5L), 'Bank 1' is the cylinder bank against the firewall, which makes the sensor notoriously difficult to access. On the 2.4L 4-cylinder engine, there is only one bank, making the sensor much easier to locate on the front of the exhaust manifold. The failure is almost always the sensor's internal heater element burning out from age and heat cycles, a very common issue on these vehicles.
Symptoms You May Notice
- Check Engine Light is on
- Decreased fuel economy
- Failing a vehicle emissions test
- Slightly rough idle or hesitation on a cold start
- Replacing the catalytic converter. P0135 is an electrical circuit code for the sensor's heater and has nothing to do with the efficiency of the catalytic converter itself.
- Replacing the wrong oxygen sensor (e.g., Bank 2 or Sensor 2). P0135 is specific to Bank 1, Sensor 1 (upstream, firewall side on V6).
Most Likely Causes
- Failed Upstream Oxygen Sensor (Bank 1, Sensor 1) 🔴 High Probability → Shop Oxygen Sensor The internal heating element of the oxygen sensor is a common wear-and-tear item that fails over time due to constant, extreme heat cycles. It is the most frequent point of failure for this code.
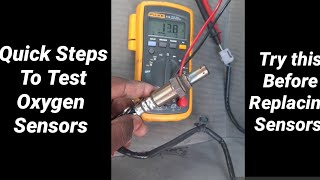
How to confirm: After confirming the fuse and wiring are intact, disconnect the sensor and measure the resistance across the two heater circuit pins (usually the two wires of the same color). An infinite resistance reading (open circuit) or a reading far outside the typical 8-11 ohm range confirms the internal heater has failed. 🎬 Watch: Quick steps to test your oxygen sensor with a multimeter
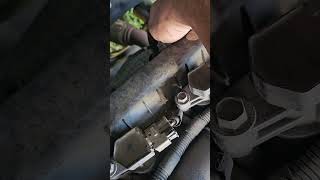
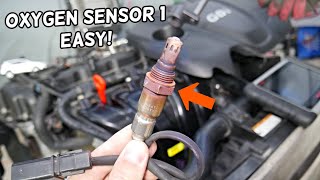
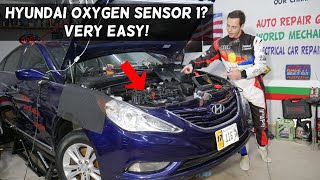
Typical fix: Replace the Bank 1, Sensor 1 oxygen sensor. For V6 engines, this is on the rear exhaust manifold (firewall side). For 4-cylinder engines, it is on the main exhaust manifold. 🎬 See this walkthrough for locating and replacing the upstream sensor
Est. part cost: $50-$250 - Blown O2 Sensor Heater Fuse 🟡 Medium Probability → Shop Oxygen Sensor A short circuit in the sensor's heater element or its wiring harness can cause the protective fuse to blow. This fuse often powers other sensors as well.
How to confirm: Locate the fuse box in the engine compartment. Inspect the 15A fuse labeled 'SENSOR #2'. A visual check or a continuity test with a multimeter will confirm if it's blown.
Typical fix: Replace the blown 15A fuse. If the new fuse blows immediately, it indicates a persistent short circuit in the wiring or the sensor itself that must be diagnosed before proceeding.
Est. part cost: $1-$5 - Damaged Wiring or Connector ⚪ Low Probability The wiring harness for the oxygen sensor is routed close to the hot exhaust system and can become melted, brittle, or chafed over time, causing a short or open circuit.
How to confirm: Visually inspect the entire wiring harness from the oxygen sensor to its connection point. Look for any signs of melting, exposed wires, or corrosion on the connector pins.
Typical fix: Repair the damaged section of wire or replace the connector pigtail. Ensure the repaired harness is secured away from hot exhaust components using zip ties.
Est. part cost: $10-$50
Rare But Worth Checking
- Faulty Powertrain Control Module (PCM): → Shop Engine Control Module (ECM) This is very rare. The internal driver circuit in the PCM that provides the ground for the heater can fail. This should only be considered after all other possibilities (sensor, fuse, wiring) have been definitively ruled out by a professional.
Diagnosis Steps
- Read the trouble codes with an OBD-II scanner to confirm P0135 is the primary code.
- Locate the Bank 1, Sensor 1 oxygen sensor. On V6 engines (2.7L, 3.3L, 3.5L), Bank 1 is the rear bank near the firewall. On 2.4L 4-cylinder engines, it's the upstream sensor on the exhaust manifold.
- Visually inspect the sensor's wiring harness and connector for any obvious damage, such as melted plastic, chafed wires, or corrosion.
- Open the fuse box in the engine compartment and locate the 15A fuse for the oxygen sensors, labeled 'SENSOR #2'. Check if it is blown.
- If the fuse is good, disconnect the oxygen sensor electrical connector.
- Use a multimeter to measure the resistance between the two heater pins on the SENSOR side of the connector (they are often two wires of the same color). A good heater should have a resistance between 8.1 and 11.1 ohms at room temperature (~70°F). An open circuit (infinite resistance) means the sensor has failed and must be replaced.
- If resistance is good, turn the ignition to 'ON' (engine off) and carefully test the HARNESS side of the connector. You should find ~12 volts on one of the heater circuit pins (power from the main relay). The other heater pin is the ground control wire from the PCM. If there is no voltage, there is a wiring issue between the fuse box and the sensor.
- If voltage is present and the sensor resistance is good, the issue may be in the ground control wire leading back to the PCM, or a rare PCM fault.
Parts You'll Likely Need
- Upstream Oxygen Sensor (Bank 1, Sensor 1)
(OEM #For 2.4L I4: 39210-2G100. For 2.7L/3.3L/3.5L V6: 39210-3E110 or 39210-3C200 (verify by VIN).)— This is the most common failure for code P0135, as the internal heater element burns out over time.
Trusted brands: Denso, Bosch, NGK/NTK, Mando
OEM price range: $150-$250
Aftermarket price range: $50-$100
Platform-Specific Known Issues
- V6 Rear Sensor Access Difficulty: On the 3.3L and 3.5L V6 engines, the Bank 1 Sensor 1 is located on the rear exhaust manifold against the firewall. Access is extremely limited. Many owners and mechanics report that the upper intake manifold must be removed to gain enough clearance to replace the sensor, which significantly increases labor time and cost from ~0.5 hours to 2-3 hours.
Mechanic-Grade Diagnostic Values
- O2 Sensor Heater Element Resistance — expected: 8.1 - 11.1 Ω (at 21°C / 70°F). Failure: A reading of 'OL' (Open Loop / infinite resistance) on a multimeter confirms a broken heater element.
- O2 Sensor Heater Current Draw (Live Data) — expected: 0.52 ± 0.1 Amps (at 13.5V with exhaust at 450°C/842°F). Failure: Current significantly below this threshold indicates an open or high-resistance circuit.
- Heater Circuit Power Supply (at harness connector) — expected: ~12 Volts (with ignition ON, engine OFF). Failure: 0 Volts indicates a problem with the fuse, main relay, or wiring from the fuse box.
Scan Tool Commands That Help
- Hyundai GDS (Global Diagnostic System): Live Data / Data Display: 'O2 Sensor Heater Duty Cycle' — Use this to verify if the PCM is actively attempting to command the heater on. If the duty cycle is active (e.g., >40%) but the sensor remains cold and the code is present, it strongly suggests a failed sensor or wiring, not a PCM failure.
- Hyundai GDS (or advanced generic scanner): Readiness Monitor Status / Drive Cycle Procedure — After replacing the sensor and clearing the code, the 'O2 Heater' and 'Catalyst' monitors must run to completion. If they remain 'Not Ready', a specific drive cycle must be performed to validate the repair and turn off the CEL permanently.
Wiring & Ground Locations
- Heater Power & Ground Wires — Within the 4-wire connector for the Bank 1, Sensor 1 O2 sensor.. The two heater wires often share the same color (e.g., two blue or two black wires). One receives ~12V from the main relay (powered by the 'SENSOR #2' fuse), and the other is the ground path, which is pulse-width modulated by the PCM to control heat. Testing for power and ground continuity on these specific wires is the core of diagnosing P0135. 🎬 Watch: How to fix the P0135 heater circuit malfunction
- GLG04 / GLG03 — GLG04 is listed at the rear of the engine; GLG03 is at the rear of the engine compartment (for 3.5L models).. These are main engine ground points. While not directly for the O2 sensor heater (which is PCM-grounded), a poor main engine or PCM ground can cause a variety of erratic electrical issues and fault codes. Verifying these grounds are clean and tight is a good practice when diagnosing any engine control electrical fault.
- PCM Connectors (e.g., C30-A, C30-B) — The Powertrain Control Module (PCM) is typically located in the engine bay or under the dash.. The ground control wire for the O2 heater terminates at a specific pin on one of the main PCM connectors. For a 2008 2.7L, these are identified as C30-A and C30-B. A wiring diagram is required to identify the exact pin to test for continuity back to the sensor connector if a wiring break is suspected.
Real Owner Repair Stories
- hyundai-forums.com user (Hyundai Santa Fe (year not specified, but CM generation)) — After replacing spark plugs, the O2 Heater and Catalyst readiness monitors would not set ('Not Ready' status), preventing the vehicle from passing an inspection.
❌ Tried (didn't work) Driving over 500 miles., Clearing codes with a scanner and starting over., Idling the car for 20 minutes as suggested by a dealer.
✅ What actually fixed it The user had replaced all four O2 sensors with aftermarket parts. The issue was only resolved after performing a very specific, multi-step Hyundai drive cycle. This involved specific speeds (e.g., drive at 53-60 MPH for 10 mins), idle periods, and coasting procedures to force the readiness monitors to run. This highlights that even after replacing the correct part for P0135, a specific drive cycle is often required to complete the repair.
OEM Part Supersession History
39210-3E110→39210-3C200 (and others, verify by VIN)— Part consolidation and updates over model years.
Heads up: The major change was the 2010 model year engine refresh. The 2.7L/3.3L V6 (2007-2009) and 3.5L V6 (2010-2012) use different Bank 1 upstream sensors. Using a sensor for the wrong engine will result in a persistent code, even if it physically fits. Always verify the part number with the vehicle's VIN.
Model Year Variations Within This Range
- 2007-2009: These models primarily used the 2.7L and 3.3L V6 engines. The Bank 1 Sensor 1 part number is typically 39210-3E110 or a compatible cross-reference like Denso 234-4429.
- 2010-2012: These models received a facelift and new engines: the 2.4L 'Theta II' I4 and the 3.5L 'Lambda II' V6. The Bank 1 Sensor 1 for the 2.4L is 39210-2G100. The Bank 1 Sensor 1 for the 3.5L V6 is 39210-3CCA0. The parts are not interchangeable between these engines or with the pre-2010 models.
Diagnostic Flowchart
Other Known Issues on This Vehicle
Issues unrelated to this code that are worth knowing about as an owner of this generation:
- Leaking Valve Cover Gasket (V6 Engines) 🔴 High — Very common, especially on the 3.3L V6. Oil leaks from the front valve cover gasket directly onto the alternator, causing alternator failure and potential stalling. (Ref: A recall was issued for 2007-2009 models to address this, but the issue persists and can reoccur even after the fix.)
- Faulty Fuel Level Sending Unit 🟠 Medium — Widespread on 2007-2009 models. Causes erratic and inaccurate fuel gauge readings, often showing empty when the tank is full.
- Crankshaft Position Sensor Failure 🟠 Medium — A known issue that can cause intermittent stalling or a no-start condition, sometimes without a check engine light.
- Automatic Transmission Shift Problems 🟡 Low — Some owners report harsh shifting or hesitation between gears.
- Clogged EGR Valve (2.4L and 2.7L) 🟡 Low — The EGR valve can become clogged with carbon, leading to a rough or erratic idle.
Used vs. New Parts: Buying Guide for This Vehicle
When a used part is the smart pick: Never. O2 sensors are a wear-and-tear item with a finite lifespan, typically 60,000-100,000 miles. Installing a used sensor is risky as its remaining life is unknown, and it may fail shortly after installation, forcing you to do the labor twice.
What to inspect on the donor part:
- Not applicable as used O2 sensors are not recommended.
OEM-only on this vehicle (don't cheap out):
- While not strictly 'OEM-only', using a sensor from an original equipment manufacturer (OEM) supplier is critical. Cheap, unbranded sensors are known to fail quickly or provide inaccurate readings, causing persistent codes.
Aftermarket brands forum-validated for this vehicle:
- Denso
- NGK / NTK
- Mando (often an OE supplier for Hyundai)
- Bosch (ensure it is a direct-fit, not universal)
Brands owners have reported issues with on this vehicle:
- Universal sensors that require cutting and splicing wires. The splice point is a common source of failure due to moisture and vibration.
- Unbranded, low-cost sensors from online marketplaces, which have a high failure rate.
Real Owner Stories
Aggregated from forums and TSBs cited above. Mileages and costs reflect what owners reported in those sources.
2008 Hyundai Santa Fe — 110000 miles
Symptoms: Check engine light with code P0135.
What fixed it: Replaced the Bank 1 Sensor 1 oxygen sensor with aftermarket part 392103E140.
Source hint: AliExpress Review for 392103E140 Oxygen Sensor
2010 Hyundai Santa Fe
Symptoms: Cracked cover allowed oil to drip onto the exhaust manifold, creating persistent smoke and a burning odor during warm-up; triggered a P0135 code due to carbon deposits.
What fixed it: Installed a new 22410 03080 cover with a fresh gasket to stop the leak at the source.
Source hint: AliExpress Review for 22410 03080 cover
2007-2012 Hyundai Santa Fe
Symptoms: Persistent P0135 and P0131 codes despite initial repair attempts.
What fixed it: Switching from an aftermarket Bosch sensor to an OEM-spec sensor and addressing wiring complexities.
Source hint: hyundai-forums.com: 'P0131 And P0135 Still Persist!'
Related OBD-II Codes
Frequently Asked Questions
Where is the Bank 1 Sensor 1 oxygen sensor located on my V6 Santa Fe?
Which fuse should I check for a P0135 code on a 2007-2012 Hyundai Santa Fe?
What is the correct resistance range for the O2 sensor heater on this vehicle?
Can I use a Bosch sensor to fix the P0135 code?
Is there a recall for the oil leak that might be fouling my sensors?
Does a P0135 code mean I need to replace my catalytic converter?
Helpful Videos

We Have This Part in Stock


The information in this article is provided for general reference and educational purposes only. Vehicle specifications, procedures, and part compatibility can vary by production date, trim level, and region. Always consult your vehicle's factory service manual and verify part numbers before purchasing or performing repairs. Safety-critical components such as airbags, seat belts, and braking systems should be installed by a qualified professional.
- Hyundai Santa Fe:
- 🧭 Diagnostic Flowchart
- 🎬 Helpful Videos
- 🛍️ Shop This Part
- What's Unique About the 2007-2012 Hyundai Santa Fe
- Symptoms You May Notice
- Most Likely Causes
- Rare But Worth Checking
- Diagnosis Steps
- Parts You'll Likely Need
- Platform-Specific Known Issues
- Mechanic-Grade Diagnostic Values
- Scan Tool Commands That Help
- Wiring & Ground Locations
- Real Owner Repair Stories
- OEM Part Supersession History
- Model Year Variations Within This Range
- Other Known Issues on This Vehicle
- Used vs. New Parts: Buying Guide for This Vehicle
- Real Owner Stories
- 2008 Hyundai Santa Fe — 110000 miles
- 2010 Hyundai Santa Fe
- 2007-2012 Hyundai Santa Fe
- Related OBD-II Codes
- Frequently Asked Questions
- 🎟️ Get 5% Off