
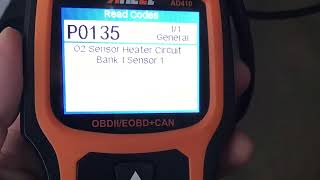
P0135 on 1998-2003 Toyota Sienna: O2 Sensor Heater Malfunction Causes and Fixes
This code almost always means the heater inside the Bank 1, Sensor 1 Air/Fuel Ratio (A/F) sensor has failed. Bank 1 is the cylinder bank against the firewall, making this sensor notoriously difficult to access. Expect to pay $70-$150 for a quality aftermarket sensor (like Denso 234-9021) and $180-$250 for an OEM part (Toyota 89467-48011).
- P0135 points to a failed heater in the Bank 1, Sensor 1 A/F sensor.
- Bank 1 is the rear cylinder bank (against the firewall), making this sensor difficult to reach from above or below.
- The most reliable diagnostic step is to measure the sensor's heater resistance; it should be between 11-16 Ohms.
- Ensure you are replacing the correct sensor; P0135 is for the upstream sensor on the firewall side.
- Using a Denso brand sensor (like 234-9021) is highly recommended as they are the Original Equipment Manufacturer.
What's Unique About the 1998-2003 Toyota Sienna
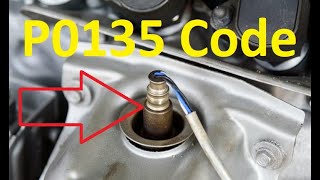
On the 1MZ-FE V6 engine in the Sienna, the engine is mounted transversely (sideways). This places 'Bank 1' at the rear of the engine bay, against the firewall. Consequently, 🎬 Watch: Locate the Bank 1 sensor on the 1MZ-FE engine. the Bank 1, Sensor 1 A/F sensor is notoriously difficult to access, often requiring the technician to work from underneath the vehicle and reach up behind the engine. While the code itself is straightforward, the location of the part makes the repair significantly more challenging and time-consuming than on many other vehicles, a common complaint in owner forums.
Symptoms You May Notice
- Check Engine Light is on.
- Decreased fuel economy.
- Rough idle or engine hesitation, especially when the engine is cold before it reaches operating temperature.
- Failing a vehicle emissions (smog) test.
- Replacing the wrong oxygen sensor. Many people mistakenly replace the sensor on Bank 2 (front, by the radiator) because it is easy to access, or they replace Sensor 2 (downstream, after the catalytic converter). P0135 specifically refers to Bank 1 (rear/firewall side), Sensor 1 (upstream/in the manifold).
Most Likely Causes
- Failed Air/Fuel Ratio Sensor (Bank 1, Sensor 1) 🔴 High Probability → Shop Oxygen Sensor The internal heater element is a very common failure point in oxygen sensors due to constant, rapid heat cycles over many years.
How to confirm: Disconnect the sensor and measure the resistance between the two heater pins (typically the two same-colored wires). For the 1MZ-FE engine, the specification is 11-16 Ohms at 68°F (20°C). An open circuit (infinite resistance) or a reading far outside this range confirms the heater has failed.
Typical fix: Replace the Bank 1, Sensor 1 Air/Fuel Ratio sensor. This sensor is located on the rear exhaust manifold against the firewall. Using penetrating oil and a specialized O2 sensor socket is highly recommended.
Est. part cost: $70-$250 - Blown Fuse or Faulty Relay ⚪ Low Probability
How to confirm: Check the fuse box in the engine compartment for a fuse labeled 'A/F HTR' or similar. It is often a 20A or 25A fuse. Inspect the fuse to see if it is blown. If the circuit uses a relay, it can be tested or swapped with an identical relay from a non-critical circuit (like the horn) for diagnosis.
Typical fix: Replace the blown fuse. If the fuse blows again immediately, it indicates a short circuit in the wiring or the sensor itself that must be diagnosed.
Est. part cost: $1-$20 - Damaged Wiring or Connector ⚪ Low Probability The wiring is located in a hot, tight area near the firewall and exhaust, making it susceptible to heat damage, melting, or abrasion over time. Rodents can also chew on the wires.
How to confirm: Visually inspect the wiring harness and connector leading to the Bank 1, Sensor 1 A/F sensor for any signs of melting, chafing, or corrosion on the pins. Check for 12-volt power at the harness connector (on the power wire) with the ignition on to verify the circuit is live.
Est. part cost: $15-$50
Rare But Worth Checking
- Faulty Engine Control Module (ECM): → Shop Engine Control Module (ECM) This is extremely rare and should only be considered a last resort. The ECM should only be suspected after all other possibilities, including the sensor, fuse, and wiring, have been definitively ruled out through testing.
Diagnosis Steps
- Confirm the code P0135 is present using an OBD-II scanner.
- Identify the location of the Bank 1, Sensor 1 A/F sensor. On the 1MZ-FE V6, this is the upstream sensor on the exhaust manifold against the firewall, accessible from underneath the vehicle.
- Inspect the sensor's wiring and connector for any visible damage, such as melting, frayed wires, or corrosion.
- Check the 'A/F HTR' fuse in the engine bay fuse box.
- If the fuse and wiring appear intact, disconnect the sensor's electrical connector. This can be difficult due to the location.
- Set a multimeter to measure resistance (Ohms). Probe the two pins on the sensor side of the connector that correspond to the heater circuit (usually two black wires).
- A reading between 11-16 Ohms at room temperature indicates a good heater element. A reading of 'OL' (Open Loop) or infinite resistance means the heater is burned out and the sensor must be replaced.
- If the sensor resistance is good, check for 12V power at the vehicle's harness connector with the key in the 'ON' position to ensure the circuit is receiving power from the relay and fuse.
Parts You'll Likely Need
- Air/Fuel Ratio Sensor (Bank 1, Sensor 1)
(OEM #89467-48011 (replaces 89467-48010))— This is the most common failure for code P0135, as the internal heater element burns out over time.
Trusted brands: Denso (OEM supplier), NGK/NTK
OEM price range: $180-$250
Aftermarket price range: $70-$150
Technical Service Bulletins (TSBs) & Recalls
- TSB EG017-02 (August 30, 2002): While not for P0135, this TSB addresses an engine surging issue on 2002 Camry models with the same 1MZ-FE engine via an ECM calibration update. It is relevant as it shows Toyota provided logic updates for drivability issues on this engine.
Platform-Specific Known Issues
- Access to the Bank 1 Sensor 1 is very restricted due to its location on the rear exhaust manifold against the firewall. Replacement requires working from underneath the vehicle. A long-handled ratchet with a slotted oxygen sensor socket is essential. Some owners report that the best angle of attack is to pass the ratchet handle out towards the passenger side wheel well to get enough leverage to break the sensor loose. Due to rust and heat seizure, soaking the sensor with penetrating oil 🎬 Watch: A walkthrough of the Bank 1 Sensor 1 replacement. beforehand is highly recommended.
Mechanic-Grade Diagnostic Values
- A/F Sensor Heater Resistance — expected: 11 - 16 Ω at 20°C (68°F). Failure: An open circuit (infinite resistance, 'OL' on multimeter) or a reading significantly outside the specified range.
- A/F Sensor Heater Current Draw — expected: Approximately 5 to 7 amps during initial warm-up (first ~20 seconds).. Failure: Current draw is too high (short) or too low/zero (open).
- Voltage at Harness Connector to Sensor — expected: Battery voltage (~12V) at the heater power supply wire with ignition ON.. Failure: No voltage indicates a problem upstream (fuse, relay, wiring).
Hidden / Shadow Codes Worth Checking
- P0125: Insufficient Coolant Temperature for Closed Loop Fuel Control. On these Toyota systems, this code is often misleading. It can be set if the A/F sensor has insufficient voltage activity within a specific time frame after startup, even if the sensor heater itself doesn't set a P0135. It often points to a lazy or failing A/F sensor rather than a cooling system issue. (see via Standard OBD-II scanner.)
Scan Tool Commands That Help
- Toyota Techstream: Active Test: 'Control the Injection Volume for A/F Sensor' — This test allows a technician to command a rich (+12.5%) or lean (-12.5%) mixture and observe the A/F sensor's lambda reading response. A healthy sensor should quickly and accurately report the change. This is more for testing the sensor's fuel-reading response rather than the heater, but it's a key professional diagnostic step for overall sensor health.
- Toyota Techstream: Active Test for Heater Circuit — While not explicitly detailed for P0135 in the search results, professional scan tools like Techstream often have an active test to command the A/F sensor heater ON. This allows a technician to check for voltage at the sensor and measure current draw with a low-amp probe without having to wait for the ECM to command it during a cold start, verifying the entire circuit from the ECM to the sensor.
Wiring & Ground Locations
- A/F HTR Fuse — In the engine compartment fuse box, typically on the driver's side. For a 2002 Sienna, it is a 20A fuse.. This fuse supplies the power for the A/F sensor's heater circuit. If it's blown, the heater will not operate and P0135 will be set.
- A/F Heater Relay — In the engine room R/B (Relay Block), located in the right front of the engine compartment for a similar 1MZ-FE platform.. This relay, controlled by the ECM, switches power on and off to the A/F sensor heater circuit. A faulty relay will prevent the heater from working.
- ECM Ground (E1 / E2) — The ECM's main sensor ground wires. A service manual hint suggests that if P0110 (IAT), P0115 (ECT), and P0120 (TPS) codes appear simultaneously, the E2 sensor ground circuit may be open.. While not directly for P0135, a bad ECM ground can cause a host of bizarre sensor issues. If multiple sensor codes are present with P0135, checking the main ECM grounds is a critical step.
OEM Part Supersession History
89467-48010→89467-48011— Standard part revision/update by the manufacturer.
Heads up: The new part number (89467-48011) is the correct and current replacement for the original.
Model Year Variations Within This Range
- 2001-2003: For the 2001 model year, the 1MZ-FE engine was updated with VVT-i (Variable Valve Timing with intelligence). While the P0135 code's meaning and primary cause (failed heater) remain the same, the engine management system is more complex. The A/F sensor part number (Denso 234-9021) covers these VVT-i years.
- 1998-2000: These earlier models use the non-VVT-i version of the 1MZ-FE engine. While the same Denso sensor is often listed, it's crucial to verify fitment as minor wiring or connector differences can exist in early production years.
Diagnostic Flowchart
Other Known Issues on This Vehicle
Issues unrelated to this code that are worth knowing about as an owner of this generation:
- Engine Oil Sludge Buildup 🔴 High — Common on 1997-2002 1MZ-FE engines, especially if oil change intervals were extended. Can lead to blocked oil passages, loss of oil pressure, and catastrophic engine failure. (Ref: Subject of a 2007 class-action lawsuit settlement where Toyota agreed to repair sludged engines for up to eight years from the in-service date. A preventative measure is to replace the rear valve cover with an updated design from the later 3MZ-FE engine.)
- Power Sliding Door Cable Failure 🟠 Medium — The steel cable that operates the power sliding door is known to fray and snap, disabling the power function and sometimes jamming the door.
- Sticking/Failing Idle Air Control (IAC) Valve 🟡 Low — The IAC valve can become clogged with carbon, leading to a rough idle, stalling when cold, or a high idle. It often requires periodic cleaning.
- Broken Exterior Door Handles 🟡 Low — The plastic exterior door handles, particularly on the sliding doors, are known to become brittle and break off.
Used vs. New Parts: Buying Guide for This Vehicle
When a used part is the smart pick: Almost never for the sensor itself. The heater element is a wear-and-tear item with a finite lifespan, similar to a spark plug or light bulb. A used sensor has unknown hours and heat cycles and may fail shortly after installation. A used part may be a viable option for a replacement connector pigtail if the original is damaged.
Donor-vehicle mileage cap: roughly under 50000 miles for the part to have meaningful remaining life.
What to inspect on the donor part:
- For a connector pigtail: Ensure the plastic is not brittle or cracked, and the locking tab is intact.
- Check for any signs of corrosion or damage on the electrical pins.
- Ensure there is enough wire length for splicing.
OEM-only on this vehicle (don't cheap out):
- Air/Fuel Ratio Sensor: While not strictly 'OEM-only', using the OEM supplier (Denso) is strongly recommended. Other brands may not perform correctly with the Toyota ECM.
Aftermarket brands forum-validated for this vehicle:
- Denso (OEM supplier)
- NTK
Brands owners have reported issues with on this vehicle:
- Bosch: Many Toyota owner forums report issues such as incorrect readings, premature failure, or incompatibility with the vehicle's computer system when using Bosch oxygen or A/F sensors, despite Bosch being a major sensor manufacturer.
Real Owner Stories
Aggregated from forums and TSBs cited above. Mileages and costs reflect what owners reported in those sources.
1997 Lexus ES300 1MZ-FE
Symptoms: Owner noted the extreme difficulty of reaching the rear sensor and its connector, and warned against the common mistake of replacing the easily accessible Bank 2 sensor by mistake.
What fixed it: Diagnosing and replacing the Bank 1 Sensor 1 (rear sensor).
Source hint: ClubLexus - 'ES300 P0135 O2 Oxygen Air/Fuel Ratio Sensor'
2003 Toyota Solara 1MZ-FE V6
Symptoms: P0135 code present.
What fixed it: Replacing the rear sensor with Denso part number 234-9021.
Source hint: SolaraGuy.com - 'P0135 code explanation?'
1998-2003 Toyota Sienna 1MZ-FE
Symptoms: Difficulty breaking the sensor loose due to rust and heat seizure; restricted access against the firewall.
What fixed it: Using penetrating oil and a long-handled ratchet passed toward the passenger side wheel well to gain leverage on the rear exhaust manifold sensor.
Source hint: vehicle_specific_issues
Related OBD-II Codes
Frequently Asked Questions
Where is the Bank 1 Sensor 1 located on my 1MZ-FE engine?
What is the correct resistance specification for the heater circuit on a 1998-2003 Sienna?
Does TSB EG017-02 specifically address the P0135 code?
Which fuse should I check for a P0135 code on this vehicle?
Is there a specific aftermarket part recommended by other 1MZ-FE owners for this fix?
Why is it so difficult to replace the Bank 1 Sensor 1 on the Sienna?
Helpful Videos


We Have This Part in Stock


The information in this article is provided for general reference and educational purposes only. Vehicle specifications, procedures, and part compatibility can vary by production date, trim level, and region. Always consult your vehicle's factory service manual and verify part numbers before purchasing or performing repairs. Safety-critical components such as airbags, seat belts, and braking systems should be installed by a qualified professional.
- Toyota Sienna:
- 🧭 Diagnostic Flowchart
- 🎬 Helpful Videos
- 🛍️ Shop This Part
- What's Unique About the 1998-2003 Toyota Sienna
- Symptoms You May Notice
- Most Likely Causes
- Rare But Worth Checking
- Diagnosis Steps
- Parts You'll Likely Need
- Technical Service Bulletins (TSBs) & Recalls
- Platform-Specific Known Issues
- Mechanic-Grade Diagnostic Values
- Hidden / Shadow Codes Worth Checking
- Scan Tool Commands That Help
- Wiring & Ground Locations
- OEM Part Supersession History
- Model Year Variations Within This Range
- Other Known Issues on This Vehicle
- Used vs. New Parts: Buying Guide for This Vehicle
- Real Owner Stories
- 1997 Lexus ES300 1MZ-FE
- 2003 Toyota Solara 1MZ-FE V6
- 1998-2003 Toyota Sienna 1MZ-FE
- Related OBD-II Codes
- Frequently Asked Questions
- 🎟️ Get 5% Off