
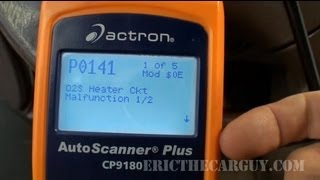
P0141 on 2005-2010 Chrysler 300: O2 Sensor Heater Fixes & Part Guide
This code means the heater inside the Bank 1, Sensor 2 oxygen sensor has failed. On this car, this is almost always a bad O2 sensor. The most likely fix is replacing the downstream O2 sensor on the correct side of the engine, which costs about $40-$90 for a quality aftermarket part. It is critical to identify Bank 1 correctly: it's the DRIVER'S side on V8s and the PASSENGER'S side on V6s.
- P0141 points to a failed heater in the downstream oxygen sensor on Bank 1.
- CRITICAL: Bank 1 is the DRIVER'S side on V8s, but the PASSENGER'S side on V6s. Verify your engine before locating the sensor.
- Before replacing the sensor, always check fuses and the ASD relay, especially if you have other O2 heater codes like P0161.
- The most likely fix is replacing the correct O2 sensor. Use a quality replacement from brands like Mopar, NTK, or Denso for best results, as these cars can be picky.
- The OEM Mopar part number is often 56029049AA, but always verify fitment with your vehicle's VIN.
What's Unique About the 2005-2010 Chrysler 300
The most critical detail for the 2005-2010 Chrysler 300 is correctly identifying 'Bank 1'. The location differs by engine. For V8 models (5.7L, 6.1L), Bank 1 is the DRIVER'S side of the engine, which is the bank containing cylinder #1 on Chrysler V8s. For V6 models (2.7L, 3.5L), Bank 1 is the PASSENGER'S side. Mistaking the bank is the most common error when diagnosing this code. 🎬 Watch: EricTheCarGuy explains how to diagnose O2 heater failure codes. Sensor 2 is always the downstream sensor, located after the catalytic converter on the specified bank.
Symptoms You May Notice
- Check Engine Light is on.
- Failing a vehicle emissions test.
- Slight decrease in fuel economy over time.
- Engine may take longer to enter 'closed-loop' operation, affecting efficiency during warm-up.
- Replacing the wrong sensor (e.g., replacing the Bank 2 sensor instead of Bank 1, or the upstream Sensor 1 instead of the downstream Sensor 2).
- Replacing the O2 sensor without first checking the associated fuse, especially if multiple heater codes are present.
- Using a cheap, 'universal' oxygen sensor. Owners and mechanics strongly recommend using OEM (Mopar) or high-quality direct-fit aftermarket brands like NTK or Denso, as Chrysler vehicles can be sensitive to off-brand sensors.
Most Likely Causes
- Failed Oxygen Sensor 🔴 High Probability → Shop Oxygen Sensor The internal heater element within the O2 sensor is a common failure point due to constant, extreme heat cycles and age. It's a consumable part that eventually burns out like a light bulb.
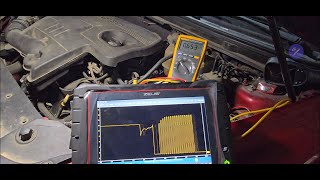
How to confirm: After confirming the fuse and wiring are good, test the resistance of the heater circuit at the sensor's connector using a multimeter. 🎬 See this guide on testing oxygen sensor heater circuits. The two same-colored wires are for the heater. A reading of 'OL' (over-limit) indicates a burned-out heater element. A typical good heater has a resistance between 4 and 10 ohms when cold.
Typical fix: Replace the Bank 1, Sensor 2 oxygen sensor. Soaking the old sensor threads with penetrating oil before removal is highly recommended, as they are often seized in the exhaust pipe.
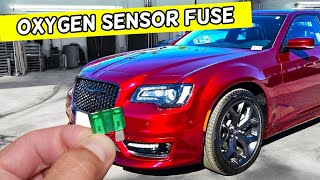
Est. part cost: $40 - $120 - Blown Fuse or Faulty Relay 🟡 Medium Probability The O2 sensor heaters are on a shared circuit, and a short in one sensor or its wiring can blow the fuse, disabling others. This is especially suspect if you have multiple O2 heater codes (e.g., P0141 and P0161) at the same time.
How to confirm: Check the fuses for the O2 sensor heaters. In the front fuse box (Totally Integrated Power Module, or TIPM, in the engine bay), inspect fuses related to the O2 sensors. 🎬 Watch: Locate and replace your Chrysler 300 O2 sensor fuse. While specific fuse numbers from forums are a good starting point, always verify with your owner's manual or the fuse box lid diagram. Also check the ASD (Auto Shutdown) relay, which powers the heater circuit.
Typical fix: Replace the blown fuse. If it blows again, investigate for a short circuit in the wiring to one of the O2 sensors. A common cause is a wire melting against the exhaust.
Est. part cost: $1 - $15 - Damaged Wiring or Connector ⚪ Low Probability The wiring harness runs under the vehicle and is exposed to road debris, heat, and moisture. Wires can get brittle, melt on the hot exhaust pipes, or chafe against the chassis or transmission housing, causing a short or open circuit.
How to confirm: Visually inspect the entire wiring harness leading to the Bank 1, Sensor 2 O2 sensor. Look for any signs of melting, chafing against the chassis or exhaust, or corrosion inside the connector pins. Pay close attention to where the harness is secured and where it might contact hot or moving parts.
Typical fix: Repair the damaged section of wire using heat-shrink butt connectors or solder. If the connector is damaged, replace the connector pigtail.
Est. part cost: $10 - $30
Rare But Worth Checking
- Faulty Powertrain Control Module (PCM): → Shop Engine Control Module (ECM) This is extremely rare. The PCM's internal driver for the heater circuit can fail, but this should only be considered after all other possibilities (sensor, wiring, fuses) have been exhaustively ruled out by a professional.
Diagnosis Steps
- Confirm Bank 1 Location: For V8 engines (5.7L/6.1L), Bank 1 is the DRIVER'S side. For V6 engines (2.7L/3.5L), Bank 1 is the PASSENGER'S side. Sensor 2 is always downstream (after) the catalytic converter.
- Scan for Other Codes: Check if other heater codes (P0135, P0155, P0161) are present. Multiple codes strongly point to a shared power/fuse issue rather than multiple failed sensors.
- Inspect Fuses and Relays: Check the front fuse box (TIPM in the engine bay) for fuses related to O2 sensors and the ASD relay. Consult your owner's manual for the exact locations as they can vary slightly.
- Visual Inspection: Safely raise the vehicle and locate the Bank 1, Sensor 2 O2 sensor. Meticulously inspect its wiring harness and connector for any obvious damage, melting on the exhaust, chafing, or corrosion.
- Test the Heater Circuit Resistance: Disconnect the sensor. Using a multimeter set to Ohms, measure the resistance across the two same-colored pins on the sensor side of the connector. A good sensor will read between 4-10 Ohms when cold. An infinite reading (OL) means the heater is broken and the sensor must be replaced.
- Check for Power at the Harness: With the sensor unplugged and the ignition key in the 'On' position (engine off), use a multimeter to check for 12V power at the corresponding pin on the vehicle's harness connector (the heater power wire). If there is no power, a wiring or fuse issue is confirmed.
- Check for Ground Control: The PCM provides a ground to activate the heater. This is harder to test statically. However, if you have 12V power and the sensor's resistance is good, but the code persists, it points towards a break in the ground wire back to the PCM or a rare PCM fault.
- Replace the Sensor: If the fuses are good, wiring appears intact, power is present at the harness, and the sensor's heater circuit has failed the resistance test, replace the oxygen sensor.
Parts You'll Likely Need
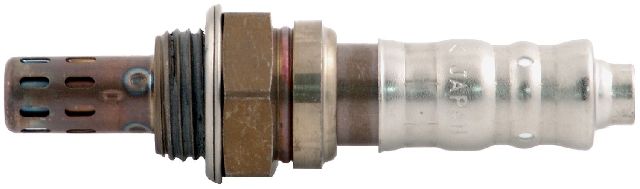
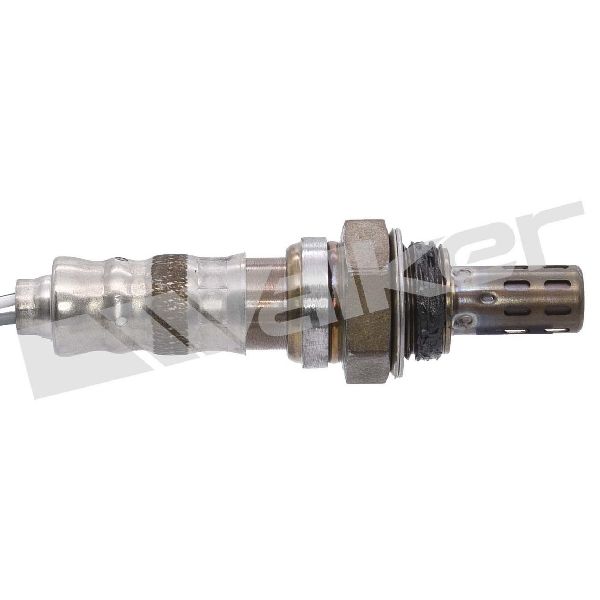
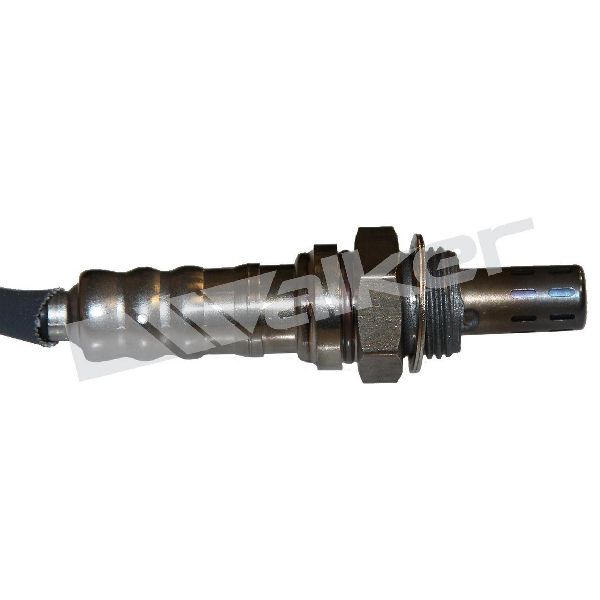
- Oxygen Sensor (Bank 1, Sensor 2)
(OEM #56029049AA (This is a common Mopar downstream sensor for this platform, but always verify with VIN))— This is the component that contains the heater element that most commonly fails and triggers the P0141 code. Note the specific location for your engine (V6 vs V8).
Trusted brands: Mopar, NTK (NGK), Denso, Bosch
OEM price range: $90-$180
Aftermarket price range: $40-$90
Related Codes That Often Appear With This One
- P0161 — P0161 is the same heater circuit fault but for Bank 2, Sensor 2. If both codes appear together, it strongly suggests a problem with a shared power source, like a blown fuse or faulty ASD relay that powers both downstream heaters.
- P0135 — P0135 is the heater circuit fault for the upstream sensor on Bank 1 (Sensor 1). Seeing it with P0141 could indicate a wiring issue common to that entire bank or a problem with the power feed to that bank's sensors.
Technical Service Bulletins (TSBs) & Recalls
- Chrysler TSB #18-050-22 REV. A: While this TSB is for a newer 2021 Chrysler Pacifica, it is highly relevant as it shows a precedent for Chrysler issuing PCM software updates to fix spurious O2 sensor heater circuit codes (P0031, P0037, etc.). This indicates that in some cases, the fault may lie in the PCM's monitoring logic, not the hardware.
- Chrysler TSB #08-008-05 & #18-010-05 Rev. A: These TSBs, referenced by NGK, apply to the 2005 model year and concern the *upstream* (Sensor 1) O2 sensors. They highlight a mid-year change in heater circuit strategy and the need for a potential PCM re-flash. While not directly for P0141 (Sensor 2), it establishes that this platform had evolving O2 sensor control logic that could be a factor in some diagnoses.
- Bulletin #68070702A: This manufacturer bulletin notes that before replacing a part due to a P0141 fault code, technicians should perform the normal diagnostic routine for this Diagnostic Trouble Code to ensure the sensor is actually at fault.
Platform-Specific Known Issues
- Owner Experience: The Importance of Quality Parts: A user on an online forum shared their experience of getting a recurring P0141 code after replacing the sensor with a cheap aftermarket part. The code only went away permanently after they installed a higher-quality NTK sensor. This highlights the sensitivity of the Chrysler PCM to sensor specifications.
- Real-World Repair Story: Fuse Was the Culprit: On 2CarPros.com, a user with a 2005 Chrysler 300 reported heater circuit codes for all four O2 sensors simultaneously. This was not four bad sensors, but a single root cause related to the power supply. While their issue was more complex, it serves as a strong reminder to check fuses whenever multiple heater codes appear together.
- Bosch vs. NTK/Denso Sensitivity: In a review for a 2012 Chrysler 300 (a newer but related platform), a user reported that a Bosch sensor (part #15510) caused misfires, which were resolved by switching to an NTK sensor. While not the exact vehicle, this suggests a general preference for NTK or Denso sensors on Chrysler platforms to avoid compatibility issues.
Mechanic-Grade Diagnostic Values
- O2 Sensor Heater Element Resistance — expected: 4 to 10 Ohms when cold. Some sources state up to 20 Ohms is acceptable.. Failure: A reading of OL (Over Limit / infinite resistance) indicates an open circuit (burned out heater). A reading near zero indicates a short circuit.
- Voltage at Heater Power Wire (Harness Side) — expected: 12 Volts (Battery Voltage) with key on, engine off.. Failure: Zero or low voltage indicates a problem with the fuse, ASD relay, or wiring from the TIPM.
- Heater Circuit Current Draw — expected: Between 0.25A and 1.5A.. Failure: Current outside this range will trigger the code. The PCM on some vehicles may detect a current draw of less than 0.25 amps or more than 1.375 amps as a fault.
Scan Tool Commands That Help
- Advanced Scan Tool (e.g., WiTech, Autel, Snap-on): O2 Heater Circuit Test / Actuation — After verifying wiring and sensor resistance, a bidirectional scan tool can command the heater circuit on and off. This directly tests the PCM's ability to control the ground side of the circuit, confirming if the PCM driver is functional.
Wiring & Ground Locations
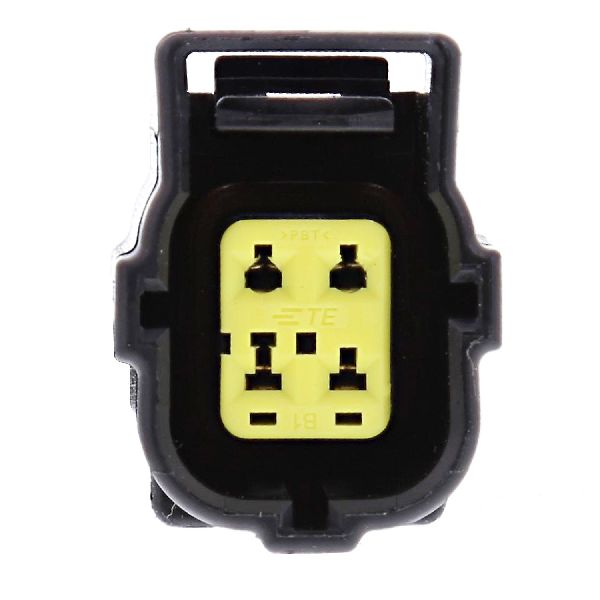
- O2 Sensor Heater Wires — On the 4-wire sensor connector, the two wires of the same color (often both black or both white) are for the heater circuit.. These are the specific wires to probe with a multimeter to test for resistance on the sensor side, and for 12V power and PCM-controlled ground on the harness side.
- G300 / G301 — G300 is located below the driver's side 'B' pillar. G301 is below the passenger's side 'B' pillar.. These are major body and chassis ground points. While the O2 sensor heater is typically grounded through the PCM, other related circuits rely on these grounds. A corroded or loose ground here can cause a host of difficult-to-diagnose electrical issues.
- Quick Test with Noid Light/Bulb — At the vehicle-side O2 sensor harness connector.. A noid light or a simple 194 bulb can be inserted into the two heater circuit pins on the harness connector. When the engine is started, the light should illuminate, confirming that the entire circuit (power from the fuse/relay, wiring integrity, and PCM ground control) is working. If the light works but the code returns with a new sensor, the sensor itself is faulty or incompatible. If the light does not work, it confirms the problem is in the vehicle wiring or PCM, not the sensor.
Real Owner Repair Stories
- 2CarPros.com Forum User (2005 Chrysler 300) — Heater circuit low codes for all four O2 sensors (P0031, P0037, P0051, P0057).
❌ Tried (didn't work) Replacing all four O2 sensors., Clearing the codes.
✅ What actually fixed it The user was advised that having all four heater codes simultaneously points to a common power supply or ground issue, not four failed sensors. The diagnosis path shifted to checking the main power feed (fuses, ASD relay) and grounds supplying the heater circuits, or a potential PCM failure as a last resort. - YouTube - The Flat Rate Mechanic (Chevy Truck (similar 4-wire O2 heater circuit design)) — P0141 and P0161 heater circuit codes.
❌ Tried (didn't work) Checking the O2 sensor fuses, which were found to be good.
✅ What actually fixed it A visual inspection revealed the O2 sensor wiring harness had been rubbing against the front driveshaft, wearing through the insulation and causing a short in the heater circuit wires. The fix was to replace the damaged O2 sensor and properly route the new wiring away from moving parts.
OEM Part Supersession History
56029049AA→05149171AA, 68144248AA (among others)— Standard part evolution, potential improvements in materials or manufacturing.
Heads up: While many part numbers are listed as compatible, it is critical to verify fitment with the vehicle's VIN. The physical length of the sensor wire harness is a key variation. The 56029049AA is noted as being approximately 12.75 inches long.
Diagnostic Flowchart
Used vs. New Parts: Buying Guide for This Vehicle
When a used part is the smart pick: For this repair, buying a used oxygen sensor is NEVER recommended. The heater element is a wear item with a finite lifespan, much like a spark plug or light bulb. A used sensor has an unknown number of heat cycles and could fail shortly after installation, wasting time and money.
What to inspect on the donor part:
- Not applicable as used sensors are not advised.
OEM-only on this vehicle (don't cheap out):
- While not strictly 'OEM-only', Chrysler platforms are notoriously sensitive to the electrical characteristics of sensors. Using a Mopar-branded sensor is the safest bet to avoid compatibility issues.
Aftermarket brands forum-validated for this vehicle:
- NTK (also known as NGK)
- Denso
Brands owners have reported issues with on this vehicle:
- Universal 'splice-in' sensors should be avoided at all costs.
- Some owners have reported issues with Bosch sensors on Chrysler platforms, even if they are listed as compatible. It's safer to stick with Mopar, NTK, or Denso.
Real Owner Stories
Aggregated from forums and TSBs cited above. Mileages and costs reflect what owners reported in those sources.
2005 Chrysler 300
Symptoms: Heater circuit codes for all four O2 sensors appeared simultaneously.
What fixed it: The root cause was not four bad sensors, but a single issue related to the power supply circuit (fuse/relay).
Source hint: Real-World Repair Story: Fuse Was the Culprit
2007 Chrysler 300
Symptoms: A recurring P0141 code persisted even after replacing the oxygen sensor with a cheap aftermarket part.
What fixed it: The code was permanently resolved only after installing a higher-quality NTK brand sensor.
Source hint: Owner Experience: The Importance of Quality Parts
2012 Chrysler 300
Symptoms: After installing a Bosch sensor (part #15510), the engine developed misfires.
What fixed it: The misfires were resolved by replacing the Bosch sensor with an NTK sensor.
Source hint: Bosch vs. NTK/Denso Sensitivity
Related OBD-II Codes
Frequently Asked Questions
Where is Bank 1, Sensor 2 located on my 2005-2010 Chrysler 300?
I have P0141 and P0161 at the same time. Do I need to replace two oxygen sensors?
What resistance reading should I get when testing the O2 sensor heater on my Chrysler 300?
Why did my P0141 code come back after installing a new, non-OEM oxygen sensor?
Are there any software updates or TSBs that could fix a P0141 code on my 2005 300?
How can I check if the O2 sensor is receiving power from the car?
Helpful Videos
We Have This Part in Stock


The information in this article is provided for general reference and educational purposes only. Vehicle specifications, procedures, and part compatibility can vary by production date, trim level, and region. Always consult your vehicle's factory service manual and verify part numbers before purchasing or performing repairs. Safety-critical components such as airbags, seat belts, and braking systems should be installed by a qualified professional.
- Chrysler 300:
- 🧭 Diagnostic Flowchart
- 🎬 Helpful Videos
- 🛍️ Shop This Part
- What's Unique About the 2005-2010 Chrysler 300
- Symptoms You May Notice
- Most Likely Causes
- Rare But Worth Checking
- Diagnosis Steps
- Parts You'll Likely Need
- Related Codes That Often Appear With This One
- Technical Service Bulletins (TSBs) & Recalls
- Platform-Specific Known Issues
- Mechanic-Grade Diagnostic Values
- Scan Tool Commands That Help
- Wiring & Ground Locations
- Real Owner Repair Stories
- OEM Part Supersession History
- Used vs. New Parts: Buying Guide for This Vehicle
- Real Owner Stories
- 2005 Chrysler 300
- 2007 Chrysler 300
- 2012 Chrysler 300
- Related OBD-II Codes
- Frequently Asked Questions
- 🎟️ Get 5% Off