
P0141 on 1998-2003 Dodge Durango 4.7L V8: O2 Heater Circuit Causes and Fixes
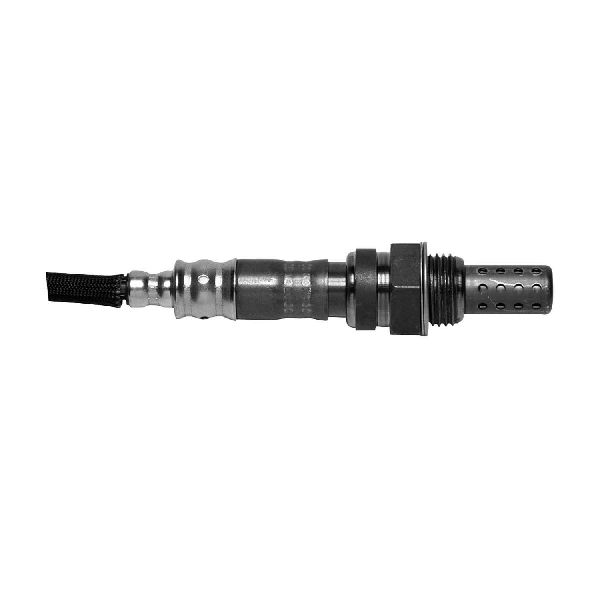
On a 1998-2003 Durango with the 4.7L V8, code P0141 almost always means the downstream oxygen sensor on the driver's side has failed. The most common fix is to replace the Bank 1, Sensor 2 O2 sensor. Expect to pay $40-$80 for an aftermarket part and $90-$140 for an OEM part. It's a DIY-friendly job with the right tool, though the sensor can be seized in the exhaust pipe.
- P0141 points to a bad heater in the O2 sensor on the driver's side, after the catalytic converter.
- Before buying a new sensor, take 10 minutes to check the fuse and inspect the wiring for obvious damage.
- Use a multimeter to test the old sensor's heater resistance. If it's open (OL) or shorted (0 ohms), you've confirmed the part is bad.
- When replacing, use a quality brand like Denso or NTK for best results with the Dodge engine computer.
- You will need a special O2 sensor socket (usually 7/8" or 22mm) to easily remove and install the sensor.
What's Unique About the 1998-2003 Dodge Durango
For the first-generation Dodge Durango with the 4.7L V8, this code is a straightforward electrical fault. Unlike some vehicles where this code can be triggered by exhaust leaks, on this platform, the issue is almost always isolated to the sensor's internal heater or its direct wiring. It's important to use a quality replacement sensor from a brand like Denso or NTK, as these Dodge PCMs can be sensitive to the resistance values of cheaper, off-brand sensors, sometimes causing the code to return even with a new part. Forum users across Dodge and Jeep platforms frequently report issues with Bosch sensors on this engine family, advising to stick with OEM or NTK/Denso.
Symptoms You May Notice
- Illuminated Check Engine Light is the most common and often only symptom.
- Failure to pass a state emissions inspection.
- Slightly reduced fuel economy over time, though it may not be noticeable to the driver.
- Rough idle in some rare cases.
- Replacing the wrong oxygen sensor. Many people confuse Bank 1 with Bank 2 (passenger side) or Sensor 2 (downstream) with Sensor 1 (upstream). P0141 is specifically the driver's side, post-catalytic converter sensor.
- Replacing the catalytic converter. A P0141 code is an electrical circuit fault and is not caused by a failing catalytic converter.
Most Likely Causes
- Failed O2 Sensor (Bank 1, Sensor 2) 🔴 High Probability → Shop Oxygen Sensor The internal heater element is a common failure point in oxygen sensors due to constant, rapid heat cycles and exposure to exhaust gases. After many years and miles, it simply burns out like a light bulb filament.
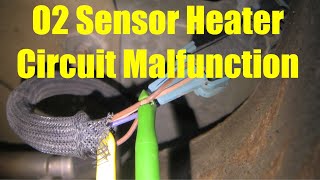
How to confirm: Disconnect the sensor and measure the resistance across the two heater circuit pins (usually the two same-colored wires, often white). A healthy sensor should have a resistance between 2.0 and 30.0 ohms when cool. 🎬 Watch: A step-by-step guide to testing oxygen sensor heater circuits. An open circuit (infinite resistance, or 'OL' on a multimeter) or a direct short (near zero resistance) confirms the sensor is bad.
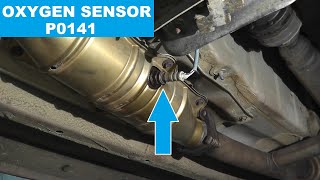
Typical fix: Replace the Bank 1, Sensor 2 oxygen sensor. This is the downstream sensor on the driver's side exhaust pipe. An O2 sensor socket is highly recommended for removal.
Est. part cost: $40-$140 - Damaged Wiring or Connector 🟡 Medium Probability The sensor wiring runs underneath the vehicle, where it is exposed to road debris, moisture, and extreme heat from the exhaust. Wires can become frayed, melted, or corroded over time. On 4x4 models, the harness can sometimes chafe against the front driveshaft. The plastic connector can also become brittle and break.
How to confirm: Visually inspect the wiring harness leading to the sensor for any signs of damage, melting on the exhaust pipe, or corrosion inside the connector pins. With the key on and engine off, use a multimeter to check for battery voltage (around 10-12V) at the power supply wire in the harness-side connector (often an Orange/Dark Green wire).
Typical fix: Repair the damaged section of wire or replace the connector pigtail. Ensure the wiring is properly secured away from the hot exhaust pipe and any moving parts.
Est. part cost: $10-$30 - Blown Fuse or Faulty Relay ⚪ Low Probability
How to confirm: Check the Power Distribution Center (fuse box) under the hood. While a specific fuse for only the O2 heaters is not always present on this model, the circuit is often shared with other powertrain components like the ignition coil. If other related codes are present (like P0135, P0161), a shared power source issue is more likely.
Typical fix: Replace the blown fuse. If the fuse blows again immediately, it indicates a short circuit in the wiring or in one of the O2 sensors that needs to be diagnosed.
Est. part cost: $1-$5
Rare But Worth Checking
- Faulty Powertrain Control Module (PCM): → Shop Engine Control Module (ECM) This is extremely rare. The PCM's internal driver for the O2 heater circuit can fail. This should only be considered after all other possibilities (sensor, wiring, fuses) have been exhaustively ruled out.
Diagnosis Steps
- Verify the code with an OBD-II scanner. Confirm P0141 is the active code.
- Locate the correct sensor: Bank 1, Sensor 2. On the 4.7L V8, this is on the driver's side exhaust pipe, after the catalytic converter.
- Inspect the wiring and connector. Look for any obvious signs of damage, such as melted wires, chafing, or corrosion in the connector pins. A broken connector clip was the direct cause in one documented case. Repair as needed.
- Check for power at the harness. Disconnect the sensor. Turn the ignition to the 'ON' position (engine off). Use a multimeter to verify there are ~12 volts at the power supply wire on the vehicle's harness connector (this is often an Orange/Dark Green wire on these models). If there is no power, check the O2 sensor fuse in the under-hood fuse box.
- Test the sensor's heater element. With the sensor still disconnected, switch your multimeter to measure resistance (Ohms). Probe the two heater pins on the sensor itself (typically the two wires that are the same color, usually white). A good sensor will read between 2.0 and 30.0 ohms. If it reads as an open loop (OL) or 0 ohms (short), the sensor is bad and must be replaced.
- If power is present and the sensor tests good, the final check is for the ground signal from the PCM. This is more advanced and involves checking for a pulsing ground signal while the engine is running. A failure here could indicate a wiring break between the sensor and the PCM, or a rare PCM fault.
- Replace the Bank 1, Sensor 2 O2 sensor if it failed the resistance test. This is the most likely outcome. Using a special O2 sensor socket will make removal much easier. Warming the engine for a couple of minutes can help loosen a stuck sensor. 🎬 Watch: How to test and replace a P0141 heated sensor.
- Clear the code with the scanner and perform a drive cycle to ensure the Check Engine Light does not return. Note that sometimes the light may not go out immediately and may require a day or so of driving to self-clear.
Parts You'll Likely Need
- Oxygen Sensor (Bank 1, Sensor 2)
(OEM #56041213AB)— The internal heater element fails from age and heat cycles, which is the direct cause of the P0141 code.
Trusted brands: Denso (e.g., 234-4215), NTK (e.g., 23158)
OEM price range: $90-$140
Aftermarket price range: $40-$80
Related Codes That Often Appear With This One
- P0135 — P0135 is the heater circuit code for the upstream sensor on the same bank (Bank 1, Sensor 1). If a wiring issue or fuse problem affects the entire bank, both codes might appear together.
- P0161 — P0161 is the heater circuit code for the other downstream sensor (Bank 2, Sensor 2). If both appear, it could point to a shared power or ground issue, like a blown fuse that supplies both heater circuits. 🎬 See how to diagnose multiple heater circuit codes at once.
Technical Service Bulletins (TSBs) & Recalls
- While no TSB is specific to P0141 on this exact vehicle, Chrysler has issued TSBs for other models (like RRT 13-014) that address various O2 sensor codes, sometimes requiring a wiring overlay harness due to known wiring integrity issues. This highlights the importance of a thorough wiring inspection.
Mechanic-Grade Diagnostic Values
- O2 Sensor Heater Element Resistance — expected: 2.0 to 30.0 ohms, measured at 70°F (21.1°C).. Failure: A reading of 'OL' (Open Loop/infinite resistance) or near 0 ohms (short circuit) indicates a failed sensor.
- Voltage at Harness Connector (Power Feed) — expected: 10 to 12 Volts DC with Key On, Engine Off (KOEO).. Failure: Significantly lower voltage or no voltage indicates a problem in the supply circuit (fuse, wiring).
- Scan Tool 'O2 Heater Test' Voltage — expected: Voltage should remain above 4.5 volts during the 2-minute test.. Failure: A voltage drop below 4.5 volts suggests a fault in the circuit or sensor.
- Heater Control Circuit Resistance (PCM to Connector) — expected: Below 0.5 ohms.. Failure: Higher resistance indicates a wiring issue between the PCM and the O2 sensor connector.
Scan Tool Commands That Help
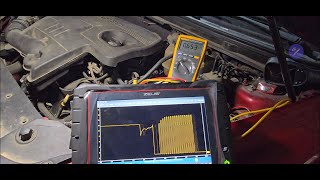
- DRB III or equivalent professional scan tool: O2 Heater Test — Use this bidirectional command with the engine off (KOEO) to force the PCM to activate the heater circuit. This allows for live testing of voltage and ground signals at the sensor connector without needing the engine to be running and cold.
Wiring & Ground Locations
- O2 Sensor 1/2 Power Wire — In the 4-pin harness-side connector for the Bank 1, Sensor 2 O2 sensor.. This wire, typically Orange with a Dark Green stripe (ORG/DK GRN), supplies the 12V power to the heater element. Verifying voltage here is the first step in diagnosing the circuit.
- O2 Sensor 1/2 Heater Control Wire — In the 4-pin harness-side connector, leading back to the PCM. Circuit designator is often K299.. This wire, often Tan with a White stripe (TAN/WHT), is what the PCM uses to provide a controlled, pulsed ground to activate the heater. A break in this wire will prevent the heater from working.
- G107 — On the right (passenger side) fender well in the engine bay.. This is a major chassis ground point. While not the only ground, owners have reported that corrosion or looseness at G107 caused multiple O2 heater codes. Cleaning this ground is a critical diagnostic step if multiple heater codes are present.
- PCM Connector C1 — This is one of the main connectors on the Powertrain Control Module (PCM).. The heater control wire for the O2 sensor terminates here. For a 2001 4.7L, the upstream O2 sensor control is at Pin 24. Checking for continuity from the sensor connector to the correct pin on this connector can confirm if the control wire is intact.
Real Owner Repair Stories
- RamForum.com user with a 2004 Ram 1500 4.7L (2004 Dodge Ram 1500 4.7L (NGC engine controller, similar to Durango)) — Check engine light with codes for all four O2 sensor heater circuits (P0135, P0141, etc.).
❌ Tried (didn't work) Replaced all four O2 sensors with new NGK (OEM equivalent) parts. The codes returned after two weeks.
✅ What actually fixed it Partial Fix & Deeper Diagnosis: The owner found and repaired a corroded ground connection at G107 on the passenger fender. This fixed the codes for the upstream sensors (Bank 1 Sensor 1, Bank 2 Sensor 1). However, the codes for both downstream sensors (including P0141) returned. Using a high-level scan tool to command the heaters on, he discovered the voltage at the downstream heater circuit was only 7.74V, not the expected battery voltage, indicating high resistance in the power feed or a potential PCM issue. The final fix was not posted, but the story is invaluable for showing that a ground issue can be a root cause and that measuring voltage under load is critical.
Model Year Variations Within This Range
- 1998-1999 vs 2000-2003: The 4.7L V8 engine was not available in the Dodge Durango until the 2000 model year. Therefore, this P0141 guide is only applicable to 2000, 2001, 2002, and 2003 model years. 1998-1999 models used the 5.2L and 5.9L V8 engines which have different engine management and potentially different wiring.
- 2000-2003: Vehicles built for California emissions standards were equipped with four oxygen sensors (two upstream, two downstream). Federal emissions vehicles of the same era may have only had two upstream sensors. The P0141 code for Bank 1, Sensor 2 will only appear on a vehicle equipped with four sensors.
Diagnostic Flowchart
Real Owner Stories
Aggregated from forums and TSBs cited above. Mileages and costs reflect what owners reported in those sources.
2000 Durango 4.7L V8 — 220000 miles
Symptoms: Check Engine Light was on with a multitude of codes, including P0141, P0138, and P0155. The engine still ran.
What fixed it: The owner cleared the codes to observe which ones reappeared; P0141 returned briefly. The final resolution was not detailed in the thread.
Source hint: DodgeForum.com thread titled 'P0300 and Injector A Circuit failures on all 8 cylindars - Dodge'
1999 Jeep Grand Cherokee (WJ) 4.7L V8
Symptoms: Experienced multiple O2 codes including P0141.
What fixed it: Other users recommended replacing all sensors due to age, specifically advising to use NTK sensors and avoid Bosch.
Source hint: Jeep Cherokee Forum thread 'Mil 7 codes for O2 sensors'
2004 Jeep Grand Cherokee 4.7L V8
Symptoms: Check Engine Light illuminated with P0141, P0155, and P0523 codes.
What fixed it: Found a broken wire right at the sensor connector, highlighting the importance of visual inspection over immediately replacing the sensor.
Source hint: YouTube video 'Jeep Grand Cherokee - Check Engine Light P0141 / P0155 / P0523'
Related OBD-II Codes
Frequently Asked Questions
Which specific oxygen sensor is Bank 1, Sensor 2 on my 4.7L Durango?
Are there any TSBs for the P0141 code on the 1998-2003 Durango?
What brand of replacement O2 sensor should I use for my 4.7L V8?
Where can I check the fuse for the O2 sensor heater on my Durango?
What color is the power supply wire for the O2 sensor harness?
What should the resistance be on a healthy O2 sensor for this vehicle?
Helpful Videos
We Have This Part in Stock


The information in this article is provided for general reference and educational purposes only. Vehicle specifications, procedures, and part compatibility can vary by production date, trim level, and region. Always consult your vehicle's factory service manual and verify part numbers before purchasing or performing repairs. Safety-critical components such as airbags, seat belts, and braking systems should be installed by a qualified professional.
- Dodge Durango:
- 🧭 Diagnostic Flowchart
- 🎬 Helpful Videos
- 🛍️ Shop This Part
- What's Unique About the 1998-2003 Dodge Durango
- Symptoms You May Notice
- Most Likely Causes
- Rare But Worth Checking
- Diagnosis Steps
- Parts You'll Likely Need
- Related Codes That Often Appear With This One
- Technical Service Bulletins (TSBs) & Recalls
- Mechanic-Grade Diagnostic Values
- Scan Tool Commands That Help
- Wiring & Ground Locations
- Real Owner Repair Stories
- Model Year Variations Within This Range
- Real Owner Stories
- 2000 Durango 4.7L V8 — 220000 miles
- 1999 Jeep Grand Cherokee (WJ) 4.7L V8
- 2004 Jeep Grand Cherokee 4.7L V8
- Related OBD-II Codes
- Frequently Asked Questions
- 🎟️ Get 5% Off