
P0141 on 2011-2015 Kia Optima 2.4L: O2 Sensor Heater Circuit Causes and Fixes
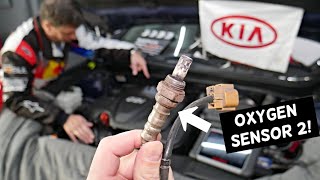
This code almost always means the downstream oxygen sensor (Bank 1, Sensor 2) has failed. The internal heater element, which helps the sensor work efficiently on startup, has burned out. Replacing the sensor is the typical fix, costing around $50-$100 for an aftermarket part and is a straightforward DIY job requiring an O2 sensor socket.
- P0141 on a 2011-2015 Optima 2.4L points directly to a problem with the heater inside the downstream (post-catalytic converter) oxygen sensor.
- The most likely fix is to replace the downstream O2 sensor (Bank 1, Sensor 2).
- Before buying a new sensor, check the 'SNSR 1' 15A fuse in the engine bay fuse box and visually inspect the wiring underneath the car for any obvious damage.
- This is a DIY-friendly repair that requires basic tools and an O2 sensor socket, which can be rented from most auto parts stores.
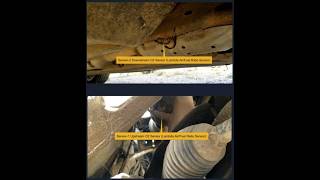
- Do not confuse this sensor with the upstream sensor (Sensor 1), which is located on the exhaust manifold before the catalytic converter.
What's Unique About the 2011-2015 Kia Optima
For the 2011-2015 Kia Optima (third generation, or TF) with the 2.4L GDI engine, the P0141 code is a very common and straightforward issue. The engine is shared with the Hyundai Sonata of the same era, which also frequently experiences this code. The exhaust layout is simple, with one upstream and one downstream oxygen sensor, making diagnosis easy. There are no widespread, unique design flaws that cause this code; it's typically just the result of the sensor's heating element failing after years of heat cycles. The downstream sensor is relatively easy to access from underneath the vehicle, just after the catalytic converter.
Symptoms You May Notice
- Check Engine Light is on.
- Failure to pass an emissions test.
- Slightly reduced fuel economy (though may not be noticeable).
- Potential for a rotten egg or sulfur smell from the exhaust if the issue persists and affects the catalytic converter.
- Replacing the wrong oxygen sensor (e.g., replacing the upstream Sensor 1 instead of the downstream Sensor 2). Always confirm the code specifies Sensor 2 🎬 Watch: Identify the exact locations of Sensor 1 and Sensor 2 before purchasing parts. Sensor 2 is always located after the catalytic converter.
Most Likely Causes
- Failed Downstream Oxygen Sensor (Bank 1, Sensor 2) 🔴 High Probability → Shop Oxygen Sensor The internal heater element within the sensor is a common failure point due to constant, intense heat cycles over many years and miles, causing the element to burn out like a light bulb filament.
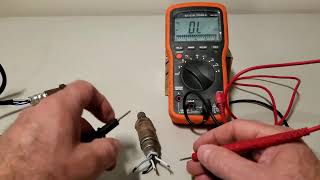
How to confirm: Unplug the sensor and use a multimeter set to Ohms (Ω) to test the resistance between the two heater circuit wires on the sensor's connector (they are typically the two wires of the same color, e.g., two white wires). 🎬 See how to test the heater element with a multimeter An open circuit (infinite resistance or 'OL') confirms the heater element has failed. A good sensor will typically have a resistance between 4 and 10 ohms when cold.
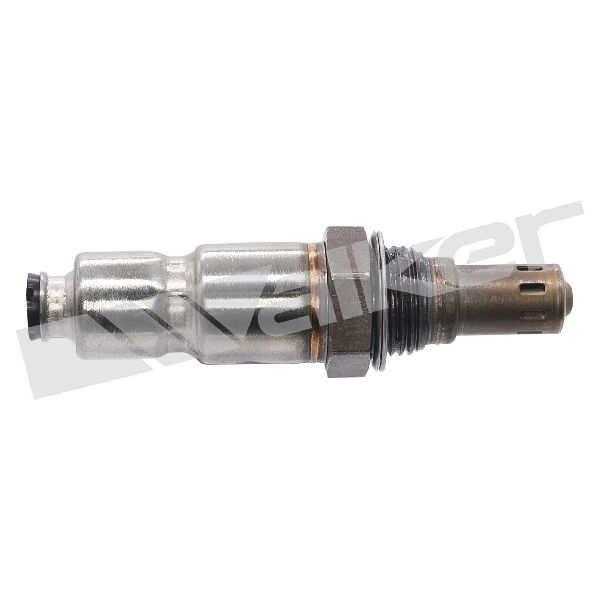
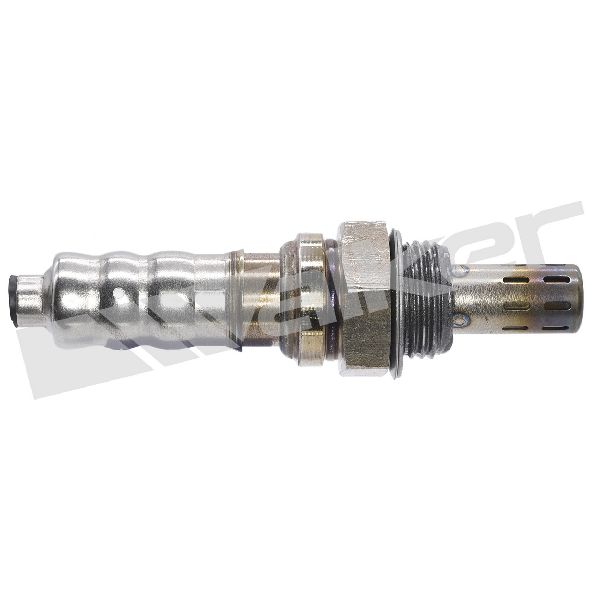
Typical fix: Replace the downstream oxygen sensor. This sensor is located on the exhaust pipe after the catalytic converter. Using penetrating oil on the old sensor's threads before removal can help if it is seized.
Est. part cost: $50 - $150 - Damaged Wiring or Connector 🟡 Medium Probability The sensor and its wiring are located under the vehicle, making them susceptible to damage from road debris, corrosion from road salt (especially in winter climates), or melting from proximity to the hot exhaust pipe if a retaining clip breaks.
How to confirm: Visually inspect the entire wiring harness leading to the downstream O2 sensor for any signs of fraying, melting, chafing, or corrosion in the connector pins. Ensure the connector is securely plugged in.
Typical fix: Repair the damaged section of wire or clean the connector pins with electrical contact cleaner. If the connector itself is damaged, it may need to be replaced.
Est. part cost: $5 - $25 - Blown Fuse ⚪ Low Probability
How to confirm: Check the fuse boxes for a fuse labeled for the O2 sensor heater. For 2011-2013 models, check the engine compartment fuse box for a 15A fuse labeled 'SNSR 1'. Consult your owner's manual for the specific fuse location for your model year, as labels can vary, especially on 2014-2015 facelift models.
Typical fix: Replace the blown fuse. If the fuse blows again immediately, it indicates a short circuit in the wiring or within the new sensor itself that must be diagnosed.
Est. part cost: $1 - $5
Rare But Worth Checking
- Faulty Engine Control Module (ECM): → Shop Engine Control Module (ECM) This is extremely rare. The ECM's internal driver for the heater circuit can fail, but this should only be considered after all other possibilities (sensor, wiring, fuses) have been exhaustively ruled out.
Diagnosis Steps
- Read the code with an OBD-II scanner to confirm P0141 is the primary or only code present.
- Visually inspect the downstream O2 sensor's wiring harness and connector for any obvious damage, melting, or corrosion. The sensor is located after the catalytic converter, accessible from under the car.
- Check the fuse panel in the engine bay for a blown fuse related to the oxygen sensor heater circuit (often labeled 'SNSR' or 'A/F heater').
- If the wiring and fuse are okay, disconnect the sensor's electrical connector.
- Using a multimeter set to Ohms, measure the resistance across the two pins for the heater circuit on the sensor side. These are typically the two wires of the same color. A reading of 'OL' or infinite resistance indicates a failed heater element. A good sensor will typically have a resistance between 4-10 ohms.
- To be thorough, check for 12V power at the heater circuit pin on the harness side of the connector (with the key on, engine off). You should have battery voltage on one pin and the other is the ground control from the ECM.
- If the sensor's heater element tests bad, replace the sensor. If the sensor tests good but there is no power at the harness, troubleshoot the wiring back to the ECM.
Parts You'll Likely Need
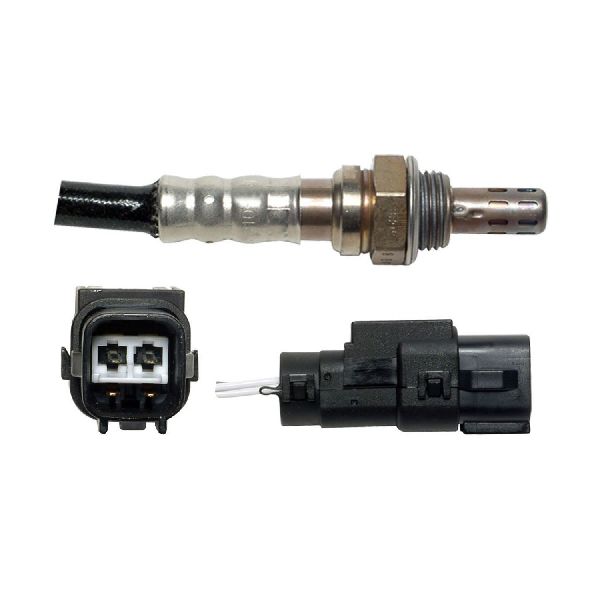
- Downstream Oxygen Sensor (Bank 1, Sensor 2)
(OEM #39210-2G200)— This is the most common cause of a P0141 code, as the internal heating element fails over time.
Trusted brands: Denso, Bosch, NGK/NTK, Walker
OEM price range: $120-$180
Aftermarket price range: $50-$100
Technical Service Bulletins (TSBs) & Recalls
- No specific TSBs were found directly addressing the P0141 code on this platform, as it is typically resolved by a standard component replacement rather than a software update or design flaw.
Platform-Specific Known Issues
- While not directly related to P0141, the 2.4L GDI engine in this Optima was subject to a major safety recall (SC147) for potential engine bearing failure. It is unrelated to the O2 sensor but is a critical issue for owners to be aware of.
Mechanic-Grade Diagnostic Values
- Downstream O2 Sensor Heater Resistance — expected: 4 - 10 Ohms at room temperature.. Failure: A reading of infinite resistance (OL) indicates an open circuit. A reading significantly outside the 4-10 Ohm range, even if not completely open, can be enough for the ECM to set the code.
- Harness Connector Voltage (Key On, Engine Off) — expected: ~12V (Battery Voltage) on the power supply pin.. Failure: No voltage indicates a problem with the fuse, relay, or wiring from the power source.
- Heater Circuit Current Draw (Using Test Light) — expected: A #7440 incandescent bulb, used as a test load in place of the sensor, should draw approximately 1.75A. This confirms the circuit's ability to handle the correct load.. Failure: If the test light does not illuminate, it confirms an open in the power or ground side of the circuit.
Scan Tool Commands That Help
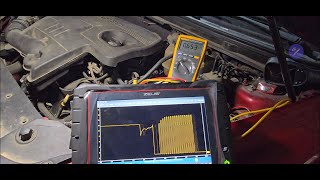
- Kia GDS (or advanced aftermarket scanner): Heater Circuit Activation Test / Actuation Test — This bidirectional command allows the technician to manually command the O2 sensor heater circuit on and off. It is used to verify that the ECM driver, wiring, and heater element are all working correctly without having to wait for a full drive cycle. It is the most efficient way to confirm a fix or diagnose an intermittent wiring issue.
- Kia GDS (or advanced aftermarket scanner): Reset Adaptive Values — After replacing the sensor and clearing the P0141 code, resetting the engine's adaptive values can be good practice to ensure the ECM starts with a clean slate for fuel trim and emissions monitoring calculations based on the new, functional sensor.
Wiring & Ground Locations
- Heater Circuit Wires — Within the 4-wire connector for the downstream O2 sensor.. The two heater circuit wires are typically the same color (e.g., two white wires or two black wires). Correctly identifying these two wires is essential for performing resistance and voltage tests. One wire receives 12V power, and the other is the ground, which is controlled (pulsed) by the ECM.
- ECM Ground Control — This is an internal function of the Engine Control Module (ECM), not a physical chassis ground point that can be cleaned.. The ECM provides the ground path for the heater circuit to complete. If the wiring between the sensor and the ECM on the ground control side is damaged (shorted or open), the heater will not function correctly, even with a good sensor and good power supply.
Real Owner Repair Stories
- Car Talk Community Forum (2014 Kia Soul with 126,xxx miles (uses a similar 2.0L engine and emissions components)) — Check Engine Light with code P0141.
❌ Tried (didn't work) The owner performed a resistance test on the downstream O2 sensor's heater circuit and got a reading of 11.1 ohms. The factory specification was approximately 9.0 ohms. The owner was unsure if this 2.1-ohm difference was enough to cause the fault.
✅ What actually fixed it Forum advice confirmed that this deviation was sufficient for the ECM to flag a fault. The high frequency of heater element failure on these models means that if the code is present and the resistance is even slightly out of spec, the correct fix is to replace the sensor.
Model Year Variations Within This Range
- 2014-2015: The Kia Optima received a facelift for the 2014 model year. While the 2.4L powertrain is fundamentally the same, the fuse box layout and labeling may differ from the 2011-2013 models. The 'SNSR 1' fuse explicitly mentioned for early models may have a different name or be consolidated under a different circuit on later models.
- 2011: An aftermarket part supplier notes a specific fitment for the '2011 GAS' model, separate from the 2012-2013 models, suggesting a potential minor variation in the sensor or connector for the first year of this generation that may require careful parts matching.
Diagnostic Flowchart
Real Owner Stories
Aggregated from forums and TSBs cited above. Mileages and costs reflect what owners reported in those sources.
2013 Kia Optima
Symptoms: Experienced a heater circuit failure code (specifically P0031 for the upstream sensor, but noted as the same principle/diagnostic process as the downstream P0141).
What fixed it: Performed a visual inspection and used a multimeter to check the heater circuit, ultimately replacing the oxygen sensor itself.
Source hint: Carly forum blog post titled 'Optima Oxygen Sensor Heater Failure'
Related OBD-II Codes
Frequently Asked Questions
Is there a TSB or recall for the P0141 code on my 2011-2015 Kia Optima?
Which fuse should I check for the O2 sensor heater on my Optima?
What is the OEM part number for the downstream oxygen sensor on the 2.4L engine?
How do I test the downstream O2 sensor heater element on my Optima?
Can a P0141 code cause my 2011-2015 Optima to fail an emissions test?
Helpful Videos

We Have This Part in Stock


The information in this article is provided for general reference and educational purposes only. Vehicle specifications, procedures, and part compatibility can vary by production date, trim level, and region. Always consult your vehicle's factory service manual and verify part numbers before purchasing or performing repairs. Safety-critical components such as airbags, seat belts, and braking systems should be installed by a qualified professional.
- Kia Optima:
- 🧭 Diagnostic Flowchart
- 🎬 Helpful Videos
- 🛍️ Shop This Part
- What's Unique About the 2011-2015 Kia Optima
- Symptoms You May Notice
- Most Likely Causes
- Rare But Worth Checking
- Diagnosis Steps
- Parts You'll Likely Need
- Technical Service Bulletins (TSBs) & Recalls
- Platform-Specific Known Issues
- Mechanic-Grade Diagnostic Values
- Scan Tool Commands That Help
- Wiring & Ground Locations
- Real Owner Repair Stories
- Model Year Variations Within This Range
- Real Owner Stories
- 2013 Kia Optima
- Related OBD-II Codes
- Frequently Asked Questions
- 🎟️ Get 5% Off