
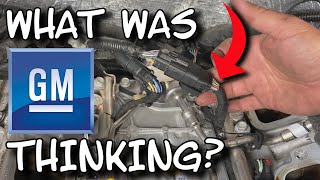
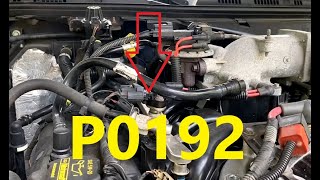
P0192 on 2014-2016 Chevrolet Corvette: Fuel Rail Pressure Sensor Circuit Low Causes and Fixes
P0192 on a C7 Corvette indicates the fuel rail pressure sensor is sending a lower-than-expected voltage to the computer, typically below 0.25V - 0.5V. The most common fix is replacing the fuel rail pressure sensor itself, as recommended by GM TSB PIP5279A when other diagnostics are inconclusive. Wiring issues or a weak battery, especially in conjunction with code P0641, are also strong possibilities.
- P0192 on your C7 Corvette points to a low voltage signal from the fuel rail pressure sensor.
- The most probable cause is a faulty fuel rail pressure sensor, as suggested by GM's own service bulletin (PIP5279A).
- Before replacing parts, check for other codes. A code like P0641 points towards a shared electrical circuit issue.
- Always check the health of your battery and its connections, as low voltage can cause numerous false codes on a C7 Corvette.
- Due to the high-pressure nature of the fuel system, professional diagnosis and repair are recommended if you are not experienced.
What's Unique About the 2014-2016 Chevrolet CORVETTE
The 2014-2016 C7 Corvette uses a sophisticated direct injection fuel system that operates at very high pressures, making the fuel rail pressure sensor a critical component for engine performance. GM has issued a Technical Service Bulletin (PIP5279A) that includes the P0192 code along with a host of other fuel pressure-related codes for this specific vehicle and its related engines (LT1, LT4). This indicates that a P0192 code may not be an isolated issue and could point to a more complex diagnostic situation involving the entire high-pressure fuel system, or as is common with this platform, an electrical issue on a shared sensor circuit.
Diagnostic Flowchart
Tap your situation to follow the diagnostic path that matches what you're seeing on this vehicle.
Symptoms You May Notice
- Check Engine Light is on
- Reduced Engine Power message on the driver information center
- Engine hesitation or stumbling during acceleration
- Rough idle
- Hard starting or long crank times
- Engine stalling, especially at low speeds or idle
- Crank but no-start condition
- Replacing the in-tank fuel pump when the issue is with the high-pressure system or, more likely, an electrical circuit fault.
- Replacing fuel injectors without confirming a fuel pressure problem first.
- Replacing the High-Pressure Fuel Pump (HPFP) when the root cause is a much cheaper sensor or wiring fault.
Most Likely Causes
- Faulty Fuel Rail Pressure Sensor (FRPS) 🔴 High Probability → Shop Fuel Pressure Sensor GM TSB #PIP5279A specifically recommends replacing the FRPS if diagnostics for other fuel system codes (P0089, P0193, P228C, etc.) are inconclusive, suggesting it's a known primary failure point.
How to confirm: Use a scan tool to monitor live fuel rail pressure voltage. With the key on and engine off, the voltage should be within a specific range (typically around 0.5V). If the voltage is near zero (e.g., below 0.25V) or stuck, the sensor is likely faulty. An internal 🎬 Watch: Common causes and fixes for the P0192 code failure can cause this low voltage reading even if actual fuel pressure is normal.
Typical fix: Replace the fuel rail pressure sensor.
Est. part cost: $50-$120 - Wiring or Connector Issue 🟡 Medium Probability The sensor wiring is part of the 5V Reference 1 Circuit. A short to ground on this circuit can trigger P0192 along with other codes like P0641. In one documented case on a similar GM V8, P0192 was caused by two main harness connectors being swapped after an engine replacement, which reversed the power and ground to the sensor.
How to confirm: Visually inspect the wiring harness and connector for the fuel rail pressure sensor for any signs of damage, corrosion, or loose pins. Use a multimeter to check for 5V reference, a good ground, and continuity on the signal wire between the sensor and the ECM. If P0641 is also present, this strongly points to a wiring issue on the shared circuit.
Typical fix: Repair the damaged wiring, clean/replace the connector, or ensure all harness connections are correctly seated.
Est. part cost: $5-$50 - Weak Battery or Poor Electrical Connection ⚪ Low Probability C7 Corvettes are known to exhibit various electrical gremlins and throw seemingly unrelated codes when the battery is weak or has a poor connection. A low battery state can cause the ECM's 5V reference circuits to become unstable, triggering faults.
How to confirm: Test the battery voltage; it should be above 12.4V after sitting. Check battery terminals and main ground connections for tightness and corrosion. A user on CorvetteForum reported that P0192 and P0641 appeared together due to a bad battery, and jumping the car provided a temporary fix by bypassing the connection issue.
Typical fix: Clean and tighten battery terminals or replace the battery.
Est. part cost: $150-$300
Rare But Worth Checking
- Failing High-Pressure Fuel Pump (HPFP): → Shop Fuel Pump While less common for a low *circuit* code, a failing HPFP can cause actual low pressure, which might lead to this code, especially in conjunction with performance codes like P0089 or P228C.
- Faulty Engine Control Module (ECM): → Shop Engine Control Module (ECM) An internal failure in the ECM's 5V reference circuit driver or its ability to read the sensor input can trigger P0192. This is rare and should only be considered after all other possibilities, especially wiring and sensor faults, have been exhaustively ruled out.
- Swapped or Crossed Wiring Harness Connectors: After major engine work, it is possible to cross-connect main harness plugs. On a similar GM V8, this resulted in sending ground to the 5V reference pin and voltage to the ground pin of the FRPS, causing P0192 and a no-start condition. 🎬 Watch: Troubleshooting a crank but no-start with code P0192 This is a human-error issue but critical to check if the fault appeared after a repair.
Diagnosis Steps
- Scan the ECM for all stored trouble codes. Note any other codes that appear alongside P0192, as they are crucial clues. The presence of P0641 is particularly important.
- Using a scan tool with live data, monitor the 'Fuel Rail Pressure Sensor Voltage'. With Key On, Engine Off, the reading should be stable (e.g., ~0.5V). A reading below 0.25V strongly suggests a circuit low fault.
- Inspect the wiring harness and connector at the fuel rail pressure sensor. Look for chafed wires, corrosion, loose pins, or signs of melting. On the LT1/LT4, the sensor is located on one of the fuel rails, under the intake manifold, requiring some disassembly to access.
- With the key on, engine off, disconnect the sensor. Use a multimeter to verify you have a 5V reference and a good ground at the connector pins. If 5V is missing, especially if P0641 is present, the issue is likely in the shared circuit.
- If P0641 is present, begin unplugging other sensors on the 5V Reference 1 circuit (e.g., A/C pressure sensor, camshaft position sensor) one by one. If the 5V reference returns after unplugging a specific sensor, that sensor is the source of the short. 🎬 See how to quickly inspect and fix code P0641
- If power and ground at the connector are good, the issue is likely the sensor itself or the signal wire to the ECM. At this point, following GM's TSB #PIP5279A, replacing the fuel rail pressure sensor is the recommended course of action.
- If the vehicle recently had major engine work, double-check that the main engine harness connectors are not swapped, as this can reverse polarity to the sensor and cause P0192.
Parts You'll Likely Need
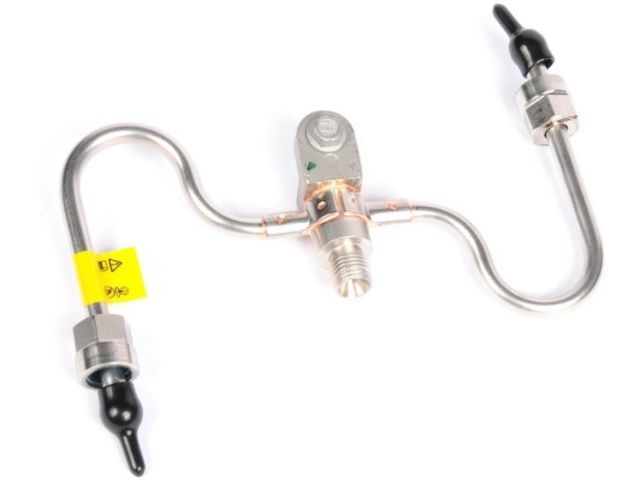
- Fuel Rail Pressure Sensor
(OEM #12679394)— This is the most frequent cause of P0192, as identified in TSBs and forum discussions. The sensor fails internally, sending a persistent low voltage signal.
Trusted brands: ACDelco, GM Genuine
OEM price range: $70-$120
Aftermarket price range: $50-$90
Related Codes That Often Appear With This One
- P0641 — Sensor Reference Voltage 'A' Circuit/Open. This is a very strong indicator of the root cause. The fuel rail pressure sensor shares the 5-volt reference circuit with the A/C pressure sensor, camshaft position sensor, and others. A short on this circuit will cause P0192 and P0641 simultaneously, and the engine may crank but not start.
- P0193 — Fuel Rail Pressure Sensor Circuit High Input. Seeing both P0192 and P0193 can indicate an intermittent wiring problem, a loose connector, or a failing sensor with erratic readings that swing from one extreme to the other.
- P0089 — Fuel Pressure Regulator 1 Performance. This code often appears with P0192 as they both relate to the regulation and sensing of fuel pressure. It is one of the codes listed in TSB #PIP5279A as being related to a faulty FRPS.
- P228C — Fuel Pressure Regulator 1 Control Circuit Low. This points to an electrical issue on the control side of the fuel pressure regulator, which is part of the same system. It's also listed in TSB #PIP5279A.
Technical Service Bulletins (TSBs) & Recalls
- PIP5279A: States that for an SES lamp with code
Platform-Specific Known Issues
- Technical Service Bulletin #PIP5279A was issued by GM for 2014-2015 Corvettes (among other models with LT1/LT4/L83/L86 engines) for a group of fuel rail pressure codes including P0192, P0193, P0089, and P228C. The bulletin advises technicians to follow standard diagnostics, but if the cause is not found, to replace the Fuel Rail Pressure Sensor (FRPS).
Mechanic-Grade Diagnostic Values
- Fuel Rail Pressure Sensor (FRPS) Voltage — expected: 0.5V to 4.5V with key on, engine running. A typical Key On, Engine Off (KOEO) reading is around 0.5V.. Failure: The ECM will set code P0192 if the voltage is less than 0.25V for more than 2.5 seconds.
- 5V Reference 1 Circuit Voltage — expected: 4.8V - 5.2V at the sensor connector with key on, engine off.. Failure: A reading of 0V, especially when code P0641 is present, indicates a short to ground on the circuit.
- Low-Side Fuel Pressure (In-tank pump) — expected: 50 - 76 PSI, depending on demand.. Failure: While not a direct cause of a circuit code, low pressure here can indicate a failing lift pump, which should be ruled out.
- High-Side Fuel Pressure (HPFP) — expected: Varies from ~290 PSI at idle to over 2,176 PSI under load.. Failure: Comparing the scan tool's pressure reading to the sensor voltage can help determine if the sensor is reading incorrectly or if there is a true pressure issue.
Scan Tool Commands That Help
- GM GDS2: Live Data Parameter: '5 Volt Reference 1 Status' — When P0192 is accompanied by P0641, monitoring this PID is critical. If the status changes from 'Active' to 'Fault', it confirms the ECM has detected a fault on the shared 5V circuit, pointing away from an isolated sensor failure.
- GM GDS2: Output Controls: Fuel System — A technician can command changes in fuel pressure to test the system's response. By commanding pressure up or down and watching the 'Fuel Rail Pressure Sensor Voltage' PID, you can verify if the sensor is responding to actual pressure changes. If pressure changes but voltage does not, the sensor or its signal wire is faulty. If pressure fails to change on command, the issue may be with the high-pressure fuel pump or its driver.
Wiring & Ground Locations
- Fuel Rail Pressure Sensor Connector — On the high-pressure fuel rail, located under the intake manifold on LT1/LT4 engines.. This is the primary connection point to test. For 2014-2016 models, it's a 4-pin connector. Pin 2 is the 5V Reference, Pin 1 is the Low Reference (ground), and Pin 3 is the signal wire to the ECM. Checking for 5V and ground here is the first electrical step.
- G103 — On the left (driver's) side of the engine block, often part of the main negative battery cable harness attachment point.. This is a major engine ground. While the sensor itself has a dedicated low-reference wire back to the ECM, a poor main engine ground can cause widespread electrical issues and unstable sensor readings across the system.
- ECM Connector X1 — On the Engine Control Module (ECM).. The 5V Reference 1 circuit originates here. The wire for the A/C pressure sensor (which shares the circuit) is on Pin 21 of connector X1. A wiring diagram is needed to trace the specific pin for the fuel rail pressure sensor for continuity checks back to the ECM.
- Engine Harness Bulk Connectors — On the LT-family of engines, there are often two large, identical harness connectors that bridge the engine harness to the main vehicle harness.. As documented in a real-world repair, these two connectors can be physically swapped by mistake during major engine work. This reverses the polarity to the fuel rail pressure sensor, sending ground to the 5V reference pin and voltage to the ground pin, immediately setting P0192 and causing a no-start.
Real Owner Repair Stories
- CorvetteForum user (2014 C7 Corvette) — Crank but no start, Reduced Engine Power message, codes P0192 and P0641.
❌ Tried (didn't work) Replacing the battery.
✅ What actually fixed it The owner diagnosed a short on the 5V Reference 1 circuit. By unplugging sensors on that circuit one-by-one, the short disappeared when the A/C Pressure Sensor was disconnected. The A/C Pressure Sensor had failed internally and was shorting the entire circuit to ground. Replacing the A/C Pressure Sensor resolved both P0192 and P0641. - ADVANCED LEVEL AUTO on YouTube (Chevrolet Truck with Gen V V8 (similar architecture)) — Crank but no start, codes P0192 and P127C (Fuel Rail Pressure Sensor 2 Circuit Low).
❌ Tried (didn't work) Initial diagnosis pointed towards a bad sensor or wiring.
✅ What actually fixed it A previous mechanic had swapped two identical main engine harness connectors during reassembly. This reversed the power and ground pins at the fuel rail pressure sensor connector, causing the 5V reference pin to be grounded and the ground pin to receive voltage. Correcting the connector positions restored the 5V reference and fixed the no-start condition.
OEM Part Supersession History
12679394→12712332— Standard part revision and improvement by the manufacturer.
Model Year Variations Within This Range
- 2014-2016: These model years use a 4-pin analog fuel rail pressure sensor. Starting in 2017, GM switched to a 3-pin digital sensor across the board for LT engines. The sensors and connectors are not interchangeable.
Helpful Videos
We Have This Part in Stock

The information in this article is provided for general reference and educational purposes only. Vehicle specifications, procedures, and part compatibility can vary by production date, trim level, and region. Always consult your vehicle's factory service manual and verify part numbers before purchasing or performing repairs. Safety-critical components such as airbags, seat belts, and braking systems should be installed by a qualified professional.
- Chevrolet CORVETTE:
- 🧭 Diagnostic Flowchart
- 🎬 Helpful Videos
- 🛍️ Shop This Part
- What's Unique About the 2014-2016 Chevrolet CORVETTE
- Symptoms You May Notice
- Most Likely Causes
- Rare But Worth Checking
- Diagnosis Steps
- Parts You'll Likely Need
- Related Codes That Often Appear With This One
- Technical Service Bulletins (TSBs) & Recalls
- Platform-Specific Known Issues
- Mechanic-Grade Diagnostic Values
- Scan Tool Commands That Help
- Wiring & Ground Locations
- Real Owner Repair Stories
- OEM Part Supersession History
- Model Year Variations Within This Range
- 🎟️ Get 5% Off