
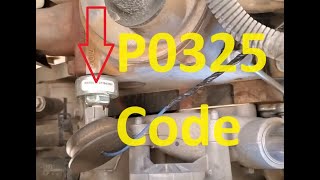
P0325 on 2002-2007 Jeep Liberty 3.7L: Knock Sensor Circuit Malfunction Causes and Fixes
P0325 on a 3.7L Jeep Liberty almost always means the Bank 1 (passenger side) knock sensor has failed or its wiring is damaged. Because the two sensors are buried under the intake manifold, the repair is labor-intensive. It is universally recommended to replace both sensors, the wiring sub-harness, and the intake gaskets at the same time. A shop will typically charge between $400 and $700 for the job.
- P0325 on the 3.7L Liberty points to a bad knock sensor or its wiring on the passenger side.
- The sensors are located under the intake manifold, making this a difficult and labor-intensive job (DIY Difficulty: 4/5).
- ALWAYS replace both knock sensors and the intake manifold gaskets at the same time to save on future labor costs.
- Use high-quality Mopar or reputable OEM-equivalent sensors (like NGK) to avoid having to do this job again soon.
- Carefully inspect the wiring harness for heat damage or crumbling insulation while the manifold is off.
What's Unique About the 2002-2007 Jeep Liberty
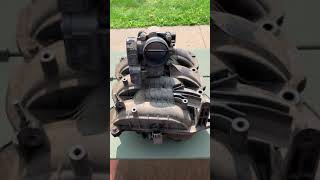
The defining characteristic of a P0325 fault on the 3.7L PowerTech V6 is the difficult location of the knock sensors. Unlike many engines where they are accessible on the side of the block, the Liberty's two knock sensors are located in the engine valley, underneath the entire upper intake manifold. This turns a simple sensor swap into a significant 3-4 hour labor-intensive repair. For this reason, owners and mechanics on forums like JeepKJ.com universally recommend replacing both sensors (for P0325 and P0330), the often-brittle wiring harness, and the intake manifold gaskets simultaneously to avoid paying for the same difficult labor twice.
Symptoms You May Notice
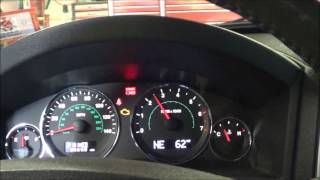
- Check Engine Light is on
- Reduced engine power and sluggish acceleration
- Decreased fuel economy
- Engine hesitation or jerking
- Audible engine pinging or knocking noise, especially under load (less common, as the PCM will default to a safe timing map)
- Vehicle enters 'limp mode'
- Replacing only one knock sensor. While this may fix the P0325 code temporarily, the second sensor is just as old and located in the same harsh environment. The high labor cost of removing the intake manifold makes it impractical not to replace both at once.
- Not replacing the wiring harness. The harness is a common point of failure due to heat degradation and is inexpensive. Skipping its replacement during the job risks having to do the entire labor-intensive repair again.
- Improper torque on the new sensor. The knock sensor mounting bolt must be torqued to a specific value, typically 15 ft-lbs (20 Nm), to function correctly. Over or under-tightening can lead to false signals or no signal at all.
Most Likely Causes
- Faulty Knock Sensor (Bank 1) 🔴 High Probability → Shop Ignition Knock (Detonation) Sensor The sensors are located in a high-heat area under the intake manifold, leading to failure from prolonged heat cycles and vibration over the vehicle's lifespan. They are essentially microphones that fail with age and heat.
How to confirm: After verifying the wiring is intact, the sensor itself is the most likely culprit. 🎬 Watch: Understanding common causes and fixes for the P0325 code Testing requires accessing the sensor by removing the intake manifold. At that point, replacement is the most practical step. A multimeter can be used to test resistance, but if you've done the labor to access it, replacement is recommended.
Typical fix: Replace the knock sensor. It is strongly recommended to replace both the Bank 1 and Bank 2 sensors at the same time due to the labor involved. Using high-quality OEM (Mopar) or OEM-equivalent (NGK/NTK) sensors is critical to avoid premature failure.
Est. part cost: $40-$90 per sensor - Damaged Wiring or Connector 🟡 Medium Probability The wiring harness that runs under the manifold is exposed to extreme heat. Over time, the plastic loom and wire insulation can become brittle, crack, and fall apart, causing a short or open circuit. Rodents are also known to chew on these wires.
How to confirm: Once the intake manifold is removed, visually inspect the entire length of the knock sensor harness for signs of crumbling insulation, exposed wires, melted plastic, or rodent damage. Check the connectors for corrosion or loose pins.
Typical fix: If the damage is minimal, the specific wire can be repaired. More often, the entire knock sensor sub-harness is replaced. Some owners add protective heat-reflective tape to the new harness to prevent future melting.
Est. part cost: $30-$60 for a new harness
Rare But Worth Checking
- Powertrain Control Module (PCM) Fault: → Shop Engine Control Module (ECM) This is very uncommon. Before condemning the PCM, all other possibilities, especially the sensors and wiring, must be exhaustively ruled out by testing the circuit for continuity from the sensor connector to the PCM connector.
Diagnosis Steps
- Use an OBD-II scanner to confirm P0325 is present and check for other codes, like P0330.
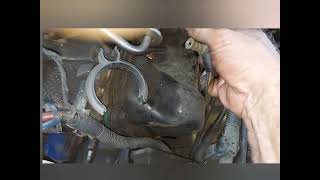
- Inspect the external wiring and connectors you can reach for any obvious signs of damage. Check firewall ground straps, as corroded grounds can cause multiple electrical issues.
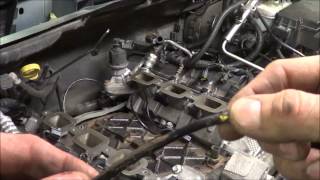
- Plan for the major step: removing the upper intake manifold 🎬 Watch: Step-by-step guide to removing the intake manifold to gain access to the engine valley. This is a 3-4 hour job for an experienced mechanic.
- Once the manifold is off, carefully inspect the knock sensor wiring harness for brittle, cracked, or melted wires. Check the connectors for corrosion.
- If wiring is damaged, replace the harness. If wiring is intact, the sensor is the presumed cause.
- Unbolt and remove the knock sensor(s). 🎬 See these pro tips for removing stubborn knock sensors The Bank 1 sensor is on the passenger side.
- Install the new sensor(s) and torque the mounting bolts to specification, which is critical for proper function. The correct torque is 15 ft-lbs (20 Nm). Do not over-tighten.
- While access is available, it is best practice to replace the intake manifold gaskets to prevent vacuum leaks.
- Reassemble all components in the reverse order of removal.
- Clear the trouble codes with the scanner and perform a test drive to ensure the code does not return.
Parts You'll Likely Need
- Knock Sensor
(OEM #56041679AC)— This is the primary component that fails, triggering the P0325 code. Due to high labor costs for access, using a high-quality part is essential.
Trusted brands: Mopar, NGK / NTK, Standard Motor Products (SMP)
OEM price range: $70-$110
Aftermarket price range: $40-$90 - Intake Manifold Gasket Set
(OEM #Mopar 53013561AB (set of 2))— The intake manifold must be removed to access the knock sensors. The gaskets are single-use and must be replaced to prevent vacuum leaks upon reassembly.
Trusted brands: Mopar, Fel-Pro (MS 96124), Mahle
OEM price range: $40-$60
Aftermarket price range: $20-$40 - Knock Sensor Wiring Harness
(OEM #56044378AC (Check fitment))— The original harness is highly susceptible to heat damage, becoming brittle and causing shorts. It is inexpensive and considered a 'while you're in there' must-replace part.
Trusted brands: Mopar, Dorman
OEM price range: $40-$70
Aftermarket price range: $25-$50
Related Codes That Often Appear With This One
- P0330 — P0330 is the code for the Bank 2 (driver's side) knock sensor. Since both sensors are the same age and live in the same harsh conditions, they often fail around the same time. It's common to see both codes together, and the repair procedure is identical.
Platform-Specific Known Issues
- The primary issue is the labor-intensive replacement due to the sensors being located under the intake manifold.
- The wiring harness in the engine valley is prone to heat degradation, causing insulation to become brittle and crumble, leading to shorts.
- Torque specification of 15 ft-lbs for the sensor bolt is critical. Incorrect torque will result in improper sensor function.
Technical Service Bulletins (TSBs) & Recalls
- TSB Bulletin #S2008000033 — While issued for the Wrangler, this bulletin notes the occurrence of the MIL lamp being on specifically due to DTC P0325 - Knock Sensor 1 Circuit.
- TSB Bulletin #18-086-24 — A manufacturer bulletin for the Grand Wagoneer highlights that P0325 (Knock/Combustion Vibration Sensor "A" Circuit) and P0330 (Knock/Combustion Vibration Sensor "B" Circuit) may appear alongside P0300 (Multiple Cylinder Misfire).
- TSB Bulletin #18-042-26 — This bulletin describes P0325-00 (Knock/Combustion Vibration Sensor 1 Circuit) in active or stored status, sometimes appearing with ambient air temperature sensor performance codes.
- TSB Bulletin #18-041-26 — Manufacturer records indicate that P0325-00 and P0330-00 can occur in conjunction with fuel rail pressure issues (P00C6-00) during engine cranking.
Mechanic-Grade Diagnostic Values
- Resistance to ground on shared 5-volt supply circuit — expected: Above 100 ohms. Failure: A resistance reading below 100 ohms indicates a short to ground in the circuit, which could affect multiple sensors including the knock sensor.
Wiring & Ground Locations
- PCM Connector C2 (Black/Orange) — The Powertrain Control Module (PCM) is located in the engine compartment. C2 is one of the four main connectors on later NGC-style PCMs.. This connector contains the specific pins for the knock sensor circuits. Probing these pins is essential for advanced electrical diagnosis.
- PCM C2 - Pin 21 — Pin 21 of the C2 connector at the PCM.. This is the 'Knock Sensor 1 Signal' wire, typically a Dark Blue/Light Green wire. Testing for continuity and shorts on this pin isolates the signal wire from the sensor to the PCM.
- PCM C2 - Pin 12 — Pin 12 of the C2 connector at the PCM.. This is the 'Common Sensor Return' (ground) wire for the knock sensors, typically a Dark Blue/Dark Green wire. A fault on this shared ground can cause issues with both knock sensors.
- G101 — Main engine compartment ground, typically located on the left side of the engine compartment.. A poor main engine or chassis ground can cause a wide range of floating voltages and sensor errors, including a P0325 code. This should be checked for corrosion and tightness before diagnosing individual components.
Real Owner Repair Stories
- Honda-Tech forum user (Honda CR-V (different vehicle, but same code and principle)) — Persistent P0325 code that would reappear after clearing, especially when revving above 2000 RPM.
❌ Tried (didn't work) Replacing the knock sensor with a new aftermarket part., Checking the wiring harness for continuity and shorts, which tested good., Replacing the ECU., Trying five different new knock sensors from various brands.
✅ What actually fixed it The issue was only resolved after installing a genuine OEM knock sensor from the dealer. The user noted that even reputable aftermarket brands did not solve the problem, highlighting the ECU's sensitivity to the exact sensor specifications. - YotaTech Forums user (2000 Toyota Tacoma 2.7L) — P0325 code persisted after replacing the sensor and pigtail.
❌ Tried (didn't work) Replacing the knock sensor., Wiring in a new pigtail connector., Testing the wire from the computer to the connector for continuity, which showed it was good.
✅ What actually fixed it The harness was found to be shorted to ground despite initial tests. The final fix was running a completely new shielded wire from the computer to the pigtail and using a genuine Toyota knock sensor.
OEM Part Supersession History
56041679AC→56041679AD— Part revision by manufacturer.
Model Year Variations Within This Range
- 2002-2004 vs 2005-2007: The PCM was changed from the JTEC (3-connector) to the NGC (Next Generation Controller, 4-connector) model. Furthermore, 2006-2007 models used a hybrid CAN/PCI data bus system. These changes affect diagnostic procedures and PCM compatibility.
- 2002-2004 vs 2005-2007: Significant changes were made to the engine's sensor systems, including the use of different crank and cam position sensor reluctor wheels (e.g., 16-tooth vs. 32-tooth). While the knock sensor itself may be similar, swapping an engine between these year groups requires swapping these related components to match the vehicle's PCM.
Diagnostic Flowchart
Other Known Issues on This Vehicle
Issues unrelated to this code that are worth knowing about as an owner of this generation:
- Power Window Regulator Failure 🔴 High — Extremely common. The plastic components within the regulator assembly break, causing the window to fall into the door. Often happens multiple times on the same vehicle. (Ref: Chrysler extended the warranty to 7 years for this issue, but no formal recall was issued. TSB 23-014-08 acknowledges the design flaw.)
- Front Lower Ball Joint Failure 🔴 High — Widespread enough to prompt a major safety recall. The ball joint can separate, causing a loss of steering control. (Ref: NHTSA Campaign ID 06V288000 (Chrysler Recall F23) was issued for 2002-2006 models, requiring dealers to replace both front lower ball joints.)
- Dropped Intake Valve Seats 🔴 High — A known weakness, especially if the engine has ever overheated. The valve seat can dislodge and fall into the cylinder, causing a major misfire and potential catastrophic engine damage.
- Fluid Leaks (Differential Pinion Seal, Transfer Case) 🟠 Medium — Commonly reported issue where seals on the differential or transfer case wear out, leading to fluid leaks. If not addressed, can cause bearing failure.
Used vs. New Parts: Buying Guide for This Vehicle
When a used part is the smart pick: For this specific repair, using a used knock sensor is almost never a smart choice. The part is an electronic sensor located in a high-heat, high-vibration environment, and the labor cost to access it is very high. The risk of a used part failing shortly after installation outweighs any potential cost savings.
What to inspect on the donor part:
- Not applicable, as used sensors are not recommended.
OEM-only on this vehicle (don't cheap out):
- Knock Sensor
Aftermarket brands forum-validated for this vehicle:
- NGK / NTK (often the OEM supplier)
- Standard Motor Products (SMP)
- Bosch
- Delphi
Brands owners have reported issues with on this vehicle:
- Unbranded, 'white-box' parts from online marketplaces. Forum and repair stories frequently cite persistent codes after using cheap aftermarket sensors, necessitating a complete re-do of the labor-intensive job.
Real Owner Stories
Aggregated from forums and TSBs cited above. Mileages and costs reflect what owners reported in those sources.
2002 Jeep Liberty 3.7L V6 — 217000 miles
Symptoms: Check Engine Light on with code P0325.
What fixed it: Replacement of the knock sensor located under the intake manifold.
Source hint: Jeep KJ and KK Liberty Forum thread titled 'P0325 code'
2005 Dodge Ram 1500 3.7L V6
Symptoms: Engine shut off while driving; chasing multiple codes including P0325 and issues with the camshaft position sensor.
What fixed it: The owner was investigating the knock sensor as part of a larger electrical/sensor troubleshooting process involving the 3.7L engine architecture.
Source hint: RamForum.com thread 'engine shut off while driving'
2002-2007 Jeep Liberty 3.7L V6
Symptoms: User reported having both P0325 and P0330 codes simultaneously.
What fixed it: Replacing sensors under the intake manifold and replacing the manifold gaskets.
Source hint: Reddit r/JeepLiberty thread titled 'Question regarding two codes'
Related OBD-II Codes
Frequently Asked Questions
Is there a recall for the knock sensor issue on my 2002-2007 Jeep Liberty?
Can I just replace the Bank 1 sensor since the code P0325 only specifies that side?
What is the specific torque for the knock sensor bolt on the 3.7L PowerTech V6?
Which brand of knock sensor should I use for my Jeep Liberty?
Are there any other parts I should replace while the intake manifold is off?
Does the 3.7L engine have any other major issues I should be aware of while fixing this?
Helpful Videos
We Have This Part in Stock


The information in this article is provided for general reference and educational purposes only. Vehicle specifications, procedures, and part compatibility can vary by production date, trim level, and region. Always consult your vehicle's factory service manual and verify part numbers before purchasing or performing repairs. Safety-critical components such as airbags, seat belts, and braking systems should be installed by a qualified professional.
- Jeep Liberty:
- 🧭 Diagnostic Flowchart
- 🎬 Helpful Videos
- 🛍️ Shop This Part
- What's Unique About the 2002-2007 Jeep Liberty
- Symptoms You May Notice
- Most Likely Causes
- Rare But Worth Checking
- Diagnosis Steps
- Parts You'll Likely Need
- Related Codes That Often Appear With This One
- Platform-Specific Known Issues
- Technical Service Bulletins (TSBs) & Recalls
- Mechanic-Grade Diagnostic Values
- Wiring & Ground Locations
- Real Owner Repair Stories
- OEM Part Supersession History
- Model Year Variations Within This Range
- Other Known Issues on This Vehicle
- Used vs. New Parts: Buying Guide for This Vehicle
- Real Owner Stories
- 2002 Jeep Liberty 3.7L V6 — 217000 miles
- 2005 Dodge Ram 1500 3.7L V6
- 2002-2007 Jeep Liberty 3.7L V6
- Related OBD-II Codes
- Frequently Asked Questions
- 🎟️ Get 5% Off