
P0325 on 2004-2013 Mazda 3: Knock Sensor Circuit Malfunction Causes and Fixes
This code almost always means the knock sensor has failed or its wiring is damaged. The sensor is located under the intake manifold, making replacement a labor-intensive job. Expect to pay $40-$100 for a quality aftermarket sensor and consider replacing the intake gaskets at the same time. A quality OEM replacement is highly recommended as cheap sensors are known to cause issues.
- P0325 on a Mazda 3 points to a problem with the knock sensor's electrical circuit, not necessarily active engine knock.
- The most likely culprit is the knock sensor itself failing due to heat exposure under the intake manifold.
- Accessing the sensor is difficult and requires removing the intake manifold, making this a challenging DIY job.
- When replacing the sensor, it is crucial to also replace the intake manifold gaskets to avoid future vacuum leaks.
- Always use a quality replacement sensor, as cheap parts are known to fail prematurely. Torque the new sensor to specification (16-24 Nm).
What's Unique About the 2004-2013 Mazda 3
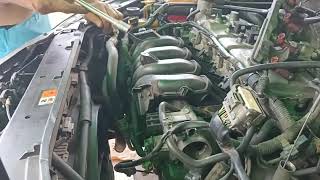
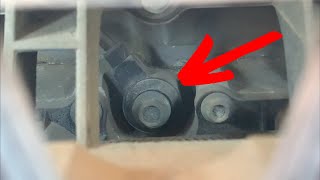
On these Mazda 3 engines (MZR LF-DE/LF-VE 2.0L and Z6 1.6L), the knock sensor is a common failure item due to its location. It's buried under the intake manifold, 🎬 Watch: Locate the knock sensor on first-gen models where it's exposed to constant high heat and vibration. This can cause the sensor's internal electronics to fail or its wiring to become brittle and crack over time. A well-documented failure mode on similar Mazda engines is the sensor's internal potting material melting and dripping down the engine block, which can be mistaken for an oil leak.
Generation note: This guide covers the first generation (BK, 2004-2009) and second generation (BL, 2010-2013) Mazda 3. The location of the knock sensor (under the intake manifold) and the common causes of failure are consistent across both generations for the 1.6L and 2.0L non-Skyactiv engines.
🎬 Watch: Find the knock sensor on 2010-2013 modelsSymptoms You May Notice
- Check Engine Light is on
- Reduced engine power and sluggish acceleration
- Decreased fuel economy
- Hesitation during acceleration
- In some cases, an audible engine pinging or knocking sound under load
- Jerky performance during acceleration
- Replacing spark plugs or ignition coils. While these can cause performance issues, they will not directly cause a P0325 circuit code.
- Mistaking a melted knock sensor for an oil leak. Before fixing a suspected oil leak from the back of the engine, check if the residue traces back to the knock sensor.
Most Likely Causes
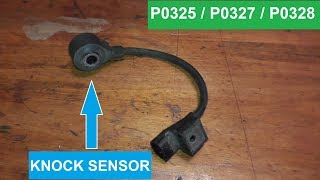
- Failed Knock Sensor 🔴 High Probability → Shop Ignition Knock (Detonation) Sensor The sensor is located in a high-heat area under the intake manifold, leading to premature failure of its internal components due to heat stress and vibration. On related engines, the internal potting material is known to melt, causing an internal short or open circuit.
How to confirm: Visually inspect the sensor (if accessible) for physical damage, cracks, or a black, oily residue dripping from it. The definitive test is to measure the sensor's resistance with a multimeter; a reading of infinity (open circuit) or far from the manufacturer's specification indicates failure. A common reference value for similar sensors is ~560 kΩ.
Typical fix: Replace the knock sensor. It is highly recommended to use a high-quality OEM or reputable aftermarket brand (e.g., NGK/NTK, Denso) as cheap sensors are known to fail quickly or be out of specification from the factory.
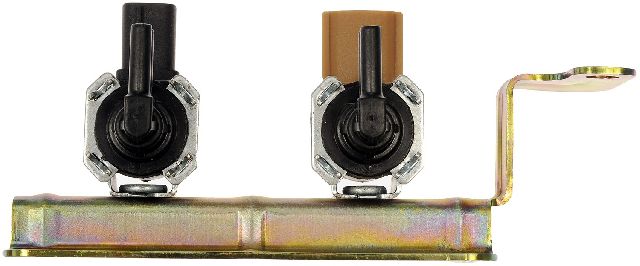
Est. part cost: $40-$120 - Damaged Wiring or Connector 🟡 Medium Probability The wiring harness runs in a hot environment near the engine block, making it susceptible to becoming brittle, cracked, or melted over time. Oil leaks from components like the valve cover gasket can also saturate the wiring, leading to corrosion and signal loss.
How to confirm: Visually inspect the wiring leading to the knock sensor for any signs of cracking, chafing, melting, or oil saturation. Check for corrosion inside the connector pins. Perform a continuity test with a multimeter from the sensor connector back to the PCM to check for opens or shorts in the circuit.
Typical fix: Repair the damaged section of wire or replace the connector pigtail if it is corroded or broken. Ensure the repaired harness is routed away from heat sources and sharp edges.
Est. part cost: $15-$30
Rare But Worth Checking
- Loose Knock Sensor: → Shop Ignition Knock (Detonation) Sensor The sensor is a microphone that detects specific frequencies. If it is not torqued correctly to the engine block, it cannot 'hear' properly, which the PCM may interpret as a circuit fault. Always tighten to the manufacturer's torque specification (typically 16-24 Nm or 12-17 ft-lbs).
- Powertrain Control Module (PCM) Fault: → Shop Engine Control Module (ECM) This is extremely rare. The PCM is the last item to suspect after the sensor and wiring have been thoroughly tested and confirmed to be good.
Diagnosis Steps
- Scan the vehicle for any other trouble codes. Address other codes first if they are present, as a misfire or other engine issue can sometimes be related.
- Perform a thorough visual inspection of the knock sensor and its wiring harness, which requires access under the intake manifold. Look for obvious damage like cracked wires, corrosion on the connector, or signs of the sensor itself melting.
- If wiring looks good, disconnect the sensor and test its internal resistance with a multimeter. Compare the reading to the manufacturer's specification. An open circuit (infinite resistance) is a definitive sign of failure.
- Test the wiring harness for continuity between the sensor connector and the PCM. On some models, this involves checking continuity to PCM terminals 57 and 59. Check for shorts to ground or power.
- If the sensor and wiring test good, ensure the sensor is properly torqued to the engine block. The correct torque is critical for proper function.
- If all other tests pass, the issue may be with the PCM, but this is highly unlikely and requires professional diagnosis.
Parts You'll Likely Need
- Knock Sensor
(OEM #LF02-18-921 (for 2.0L non-Skyactiv), ZJ01-18-921 (for 1.6L))— This is the most common failure point for a P0325 code, typically due to heat-related degradation.
Trusted brands: Mazda (OEM), NGK/NTK, Denso, Standard Motor Products
OEM price range: $90-$150
Aftermarket price range: $40-$100 - Intake Manifold Gasket Set — Replacement is required to access the knock sensor. It is critical to replace the gaskets to prevent a vacuum leak after the repair.
Trusted brands: Fel-Pro, Mahle, Victor Reinz
OEM price range: $30-$50
Aftermarket price range: $15-$30
Platform-Specific Known Issues
- Owner Experience: Melted Sensor: A user on Mazdas247.com reported getting a P0325 code and finding that the back side of their knock sensor was physically melting. This corroborates the common knowledge that heat degradation is the primary cause of failure for this part on these engines.
- Repair Story: DIY Replacement: A Reddit user with a P0325 code was quoted $400-$800 for a professional repair due to the labor involved in removing the intake manifold. This highlights the high labor cost and the potential savings for a DIY-inclined owner, though the job is difficult.
Mechanic-Grade Diagnostic Values
- Knock Sensor Internal Resistance — expected: ~560 kΩ (kilo-ohms). Note: Some sources show much higher MΩ readings for similar engines, but 560 kΩ is a widely cited value for the related FS-DE engine family.. Failure: A reading of infinity (Open Loop) or near zero ohms (short) indicates a failed sensor.
- Knock Sensor Harness Voltage (at connector, KOEO) — expected: One pin should show a reference voltage of approximately 3.2V, while the other (signal return) should be near 0.0V.. Failure: No voltage or significantly lower voltage may indicate a wiring issue or a problem with the PCM's 5V reference circuit.
- Knock Sensor Signal Voltage (back-probed at sensor, engine running) — expected: A low-level AC voltage that increases with RPM. Approximately 0.1V AC at idle, rising to 0.5V AC or more at 3000 RPM.. Failure: No AC voltage signal or a static DC voltage indicates a non-responsive sensor.
- Knock Sensor Mounting Bolt Torque — expected: 16–24 Nm (12–18 ft-lbs).. Failure: An incorrectly torqued sensor (either too loose or too tight) cannot properly detect engine vibrations, which the PCM may interpret as a circuit fault. This is a critical mechanical check.
Wiring & Ground Locations
- PCM Connector Pins — At the main Powertrain Control Module (PCM) connector.. To perform a definitive continuity test of the harness, you must check the wires from the sensor connector back to the PCM. For many models in this generation, the knock sensor signal wire goes to pin 57 and the sensor return/ground wire goes to pin 59.
- Harness Shield Ground — The ground for the shielded cable that wraps the knock sensor wires, typically grounded at the PCM.. The knock sensor wiring is shielded to prevent electrical noise. If this shield loses its ground, the wires can act as an antenna, picking up interference from ignition coils or injectors. The PCM may misinterpret this noise as a faulty sensor, even if the sensor and its two main wires test good.
Real Owner Repair Stories
- Toyota Tundra Forum user 'Chuck W.' (Toyota Tundra (different vehicle, but identical failure scenario)) — Check Engine Light with code P0325.
✅ What actually fixed it The user discovered a rodent had chewed the knock sensor wire right at the connector base. The dealer would only sell a full engine harness. The user found a compatible connector pigtail from a different Toyota model (Part No. 82219-35010) online for under $20 and spliced it in to complete the repair. This is a valuable strategy if the connector itself is the point of failure.
Diagnostic Flowchart
Other Known Issues on This Vehicle
Issues unrelated to this code that are worth knowing about as an owner of this generation:
- Failed Passenger-Side Engine Mount 🔴 High — Very common, especially on first-generation (BK) models. Causes excessive vibration at idle when in Drive or Reverse. (Ref: TSB 01-012/16 and 01-017/19 exist for later models but the issue is widespread on 2004+ models.)
- Failing Transmission Control Module (TCM) 🔴 High — A well-documented and widespread issue on models with automatic transmissions, typically occurring after 60,000 miles. Causes harsh shifting, getting stuck in gear, and AT/Check Engine lights. (Ref: No recall, but a high-failure part. Failure is often due to poor heat dissipation and weak internal solder joints.)
- Rear Suspension Rust and Component Failure 🟠 Medium — Common in rust-belt regions. Rear shock mounts can break, and sway bar links/bushings wear out, causing clunking or rattling from the rear.
- Thermostat Stuck Open (P0128) 🟡 Low — A common issue where the thermostat fails in the open position, leading to slow engine warm-up and a P0128 trouble code, but is not catastrophic.
- Timing Chain Noise/Wear 🟠 Medium — Less common than other issues, but can occur at higher mileage. Plastic timing chain guides can fail, causing a rattling noise on cold starts.
Used vs. New Parts: Buying Guide for This Vehicle
When a used part is the smart pick: For this specific repair, a used part is almost never a smart choice. The primary failure mode is internal electronic degradation from heat and vibration. A used sensor from a junkyard has an unknown amount of life left and may fail shortly after installation. Given the high labor cost of accessing the sensor (intake manifold removal), installing a used part is a significant risk.
What to inspect on the donor part:
- Not applicable, as a used part is not recommended.
OEM-only on this vehicle (don't cheap out):
- Knock Sensor
Aftermarket brands forum-validated for this vehicle:
- NGK/NTK
- Denso
- Standard Motor Products (SMP)
Brands owners have reported issues with on this vehicle:
- Unbranded, low-cost sensors from online marketplaces are frequently reported by owners to be out-of-spec from the factory or to have a very short service life, leading to a repeat of the labor-intensive repair.
Real Owner Stories
Aggregated from forums and TSBs cited above. Mileages and costs reflect what owners reported in those sources.
2005 Mazda 3 2.0L — 105000 miles
Symptoms: Check engine light came on, code P0325. Car runs fine, no noticeable issues.
What fixed it: Mechanic replaced the knock sensor, which required 3 hours of labor.
Source hint: mazda3forums.com
2004-2013 Mazda 3
Symptoms: P0325 code; found the back side of the knock sensor was physically melting.
What fixed it: Replacement of the melted knock sensor.
Source hint: Mazdas247.com (P0325 DTC Questions)
2004-2013 Mazda 3
Symptoms: Check Engine Light with P0325 code.
What fixed it: DIY replacement of the knock sensor; involved removing the intake manifold.
Cost: $400-$800
Source hint: Reddit r/MechanicAdvice
Related OBD-II Codes
Frequently Asked Questions
Where is the knock sensor located on the 2004-2013 Mazda 3 1.6L/2.0L?
Why does the knock sensor fail so frequently on this specific Mazda engine?
Is there a specific resistance value I should look for when testing the sensor?
Should I use an aftermarket knock sensor for my Mazda 3?
Are there any TSBs for engine vibrations that might be confused with knock issues on the Mazda 3?
Can water entry cause the P0325 code on older Mazda models?
Helpful Videos
We Have This Part in Stock


The information in this article is provided for general reference and educational purposes only. Vehicle specifications, procedures, and part compatibility can vary by production date, trim level, and region. Always consult your vehicle's factory service manual and verify part numbers before purchasing or performing repairs. Safety-critical components such as airbags, seat belts, and braking systems should be installed by a qualified professional.
- Mazda 3:
- 🧭 Diagnostic Flowchart
- 🎬 Helpful Videos
- 🛍️ Shop This Part
- What's Unique About the 2004-2013 Mazda 3
- Symptoms You May Notice
- Most Likely Causes
- Rare But Worth Checking
- Diagnosis Steps
- Parts You'll Likely Need
- Platform-Specific Known Issues
- Mechanic-Grade Diagnostic Values
- Wiring & Ground Locations
- Real Owner Repair Stories
- Other Known Issues on This Vehicle
- Used vs. New Parts: Buying Guide for This Vehicle
- Real Owner Stories
- 2005 Mazda 3 2.0L — 105000 miles
- 2004-2013 Mazda 3
- 2004-2013 Mazda 3
- Related OBD-II Codes
- Frequently Asked Questions
- 🎟️ Get 5% Off