
P0328 on 2019-2025 Audi A8: Knock Sensor Circuit High Causes and Fixes
P0328 on a 2019-2025 Audi A8 indicates the engine computer is receiving an abnormally high voltage signal from the knock sensor on Bank 1. This is most often caused by a faulty sensor or a wiring issue. Replacement is complex as the sensors are located in the engine 'V' under the intake manifold and charge air cooler, requiring significant labor.
- P0328 on your Audi A8 means there is a high voltage fault in the Bank 1 knock sensor circuit.
- The most likely cause is a failed knock sensor, followed by damaged wiring, often due to the high-heat 'hot V' engine design.
- This is not a simple DIY fix. The sensor is buried under the intake manifold and charge air cooler, and replacement requires several hours of skilled labor.
- Continued driving can lead to poor performance and fuel economy, and potentially masks a real, damaging engine knock condition.
- A manufacturer TSB exists for this issue, confirming it is a known problem for this engine family.
What's Unique About the 2019-2025 Audi A8
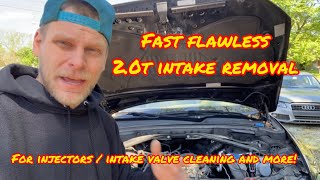
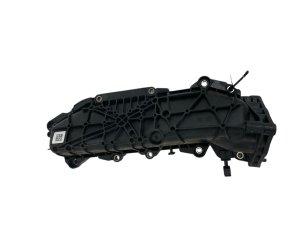
On the Audi A8 with the 3.0L V6 TFSI (engine code: EA839), the engine is turbocharged with a 'hot V' configuration, placing the turbocharger within the V of the engine. The knock sensors are located deep in this valley, underneath the intake manifold and charge air cooler assembly. This makes access significantly more difficult and labor-intensive than on simpler engines. The EA839 engine family is also known for other issues like rocker arm failures, and while not directly related, it highlights the complexity and tight packaging of components in the engine valley.
Diagnostic Flowchart
Tap your situation to follow the diagnostic path that matches what you're seeing on this vehicle.
Symptoms You May Notice
- Check Engine Light is on
- Reduced engine power and sluggish acceleration
- Decreased fuel economy
- Engine pings or knocks, especially under load (though less common as the ECM will try to compensate)
- Rough or fluctuating idle
- Engine running hotter than normal
- Replacing spark plugs or ignition coils. While these can cause performance issues, they do not directly cause a 'circuit high' fault for the knock sensor.
- Using the wrong fuel octane. While low octane fuel can cause real engine knock, it typically won't cause a P0328 circuit fault unless the knocking is so severe and constant that it damages the sensor.
Most Likely Causes
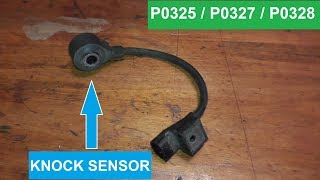
- Faulty Knock Sensor (Bank 1) 🔴 High Probability → Shop Ignition Knock (Detonation) Sensor The sensor is subjected to intense heat and vibration in the engine valley, leading to internal failure of the piezoelectric element over time. Coolant leaks from plumbing in the 'V' can also drip onto the sensor and its wiring, causing failure.
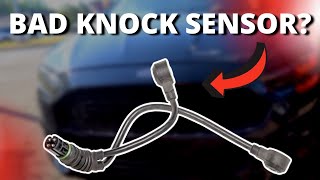
How to confirm: After checking wiring, test the sensor's resistance with a multimeter (if specifications are available) or use an advanced scan tool to monitor its live voltage data. A static high voltage reading (stuck near 5V) that doesn't change with engine RPM points to a bad sensor. 🎬 See this walkthrough on how to test and replace sensors.
Typical fix: Replace the knock sensor for Bank 1. Due to the extensive labor involved in accessing the sensors, it is highly recommended to replace both Bank 1 and Bank 2 sensors at the same time, along with the necessary intake manifold gaskets.
Est. part cost: $70-$160 - Wiring Harness or Connector Damage 🟡 Medium Probability The 'hot V' engine design creates a high-heat environment. Wiring insulation can become brittle and crack, or rodents can cause damage, leading to a short circuit that causes a high voltage signal. The wiring is often cited as a failure point in TSBs for this engine family.
How to confirm: Visually inspect the wiring harness leading to the knock sensor for any signs of fraying, melting, or rodent damage. Check the connector for corrosion, backed-out pins, or signs of coolant contamination. When repairing, only gold-plated terminals should be used for the knock sensor connector.
Typical fix: Repair the damaged section of the wire or replace the connector pigtail. In severe cases, a portion of the engine harness may need replacement. One user on Audi-Sport.net fixed a P0328 code by rewiring the sensor directly back to the ECU.
Est. part cost: $20-$100
Rare But Worth Checking
- Engine Control Module (ECM) Fault: → Shop Engine Control Module (ECM) This is rare, but if the sensor and wiring are confirmed to be good, the ECM's internal circuit for processing the knock sensor signal may have failed. This should be the last item to check after all other possibilities are exhausted.
- Severe Mechanical Engine Issues: An actual, severe internal engine problem, such as piston slap or bearing failure, could theoretically produce enough noise to max out the sensor's reading. However, this would typically be accompanied by other serious symptoms, audible noises, and potentially other diagnostic codes.
- Improperly Torqued Knock Sensor: → Shop Ignition Knock (Detonation) Sensor If the sensor was recently replaced and not torqued to the exact manufacturer specification, it can either be too sensitive or not sensitive enough, potentially leading to circuit high or low codes. The mounting bolt torque is critical for proper function.
Diagnosis Steps
- Read the trouble codes with an OBD-II scanner and confirm P0328 is present.
- Use a scan tool to view live data for the Knock Sensor 1 voltage. A reading that is stuck at a high value (e.g., 5 volts) with the engine off or running is a strong indicator of a circuit issue or bad sensor.
- Visually inspect the engine bay for any obvious signs of damage, especially rodent activity or coolant leaks around the intake manifold.
- Locate the knock sensor for Bank 1 (passenger side on North American vehicles). This will require removing the engine covers, air intake piping, and the entire intake manifold/charge air cooler assembly. 🎬 Watch: A master tech demonstrates fast intake manifold removal.
- Once access is gained, inspect the sensor's wiring harness and connector for any damage, corrosion, or loose connections. Pay close attention to signs of coolant contamination from leaking lines in the valley.
- If wiring looks good, disconnect the sensor. Check for continuity and shorts to ground/power on the harness side. Test the sensor's internal resistance with a multimeter (if specifications are available).
- If the sensor and wiring test good, the final step is to suspect a fault within the Engine Control Module (ECM), which requires professional diagnosis and potentially replacement.
Parts You'll Likely Need
- Knock Sensor
(OEM #06L905376F)— This is the most common failure point for code P0328, as the sensor's internal piezoelectric element fails from heat and vibration. The part number may have revisions.
Trusted brands: Bosch, OEM
OEM price range: $100-$160
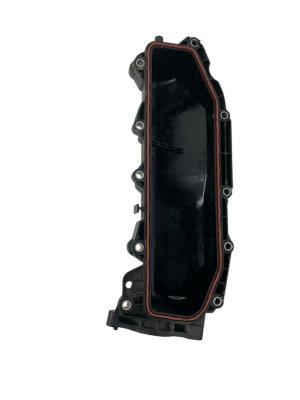
Aftermarket price range: $50-$90 - Intake Manifold Gasket Set
(OEM #06M129717F)— These are single-use gaskets that must be replaced anytime the intake manifold is removed to access the knock sensors.
Trusted brands: Victor Reinz, Elring, OEM
OEM price range: $40-$60
Aftermarket price range: $20-$40 - Knock Sensor Connector — If the wiring inspection reveals a damaged or corroded connector, replacing the pigtail is necessary to ensure a solid connection.
Trusted brands: OEM, Various aftermarket
OEM price range: $30-$50
Aftermarket price range: $15-$30
Related Codes That Often Appear With This One
- P0333 — This is the code for 'Knock Sensor 2 Circuit High (Bank 2)'. If both appear, it strongly points to a systemic issue like a wiring harness problem common to both sensors, a coolant leak in the engine valley affecting both, or an ECM fault.
- P0327 — This is 'Knock Sensor 1 Circuit Low'. Seeing opposite codes (high and low) for the same sensor could indicate an intermittent wiring short, a failing sensor, or a failing ECM.
Technical Service Bulletins (TSBs) & Recalls
- TSB_2081342_1: Provides information for a Drive System Malfunction warning related to knock sensor DTCs P0327, P0332, P0328, and P0333 on V6 TFSI engines.
Platform-Specific Known Issues
- Incorrect Engine Type in Common Knowledge: Many online resources incorrectly state the 3.0T engine in the 2019+ models is supercharged. It is in fact a single-turbo 'hot V' engine, codenamed EA839. This is a critical distinction for locating components, as the knock sensors are under an intake manifold and charge air cooler, not a supercharger.
- Known TSB for Knock Sensor Faults: → Shop Ignition Knock (Detonation) Sensor Audi has issued Technical Service Bulletin 2081342_1 which addresses DTCs P0327, P0328, P0332, and P0333 related to the Drive System Malfunction warning on V6 TFSI engines, confirming this is a recognized issue by the manufacturer.
- Coolant Leaks in Engine Valley: A common failure point on V-engines with components in the valley is coolant leaks from various hoses or the thermostat housing. Leaked coolant can pool around the knock sensors and their wiring harnesses, causing corrosion and short circuits that lead to P0328.
Mechanic-Grade Diagnostic Values
- Knock Sensor Mounting Bolt Torque — expected: 20 Nm (15 ft-lb). Failure: Over-torquing can make the sensor overly sensitive, causing false high signals. Under-torquing can prevent it from detecting real knock.
- Knock Sensor Live Data Voltage (Scan Tool) — expected: Typically 0.5V - 4.5V, fluctuating with engine operation.. Failure: A static reading that is stuck high, at or above 5.0V, confirms a 'Circuit High' condition.
- Knock Sensor Wiring Harness Resistance — expected: Max 1.0-1.5 Ohms. Failure: A reading significantly higher than 1.5 Ohms indicates excessive resistance or an open circuit in the wiring between the sensor connector and the ECM.
Scan Tool Commands That Help
- VCDS (VAG-COM) or equivalent (ODIS): Read Measuring Value Blocks (MVB), Groups 020-028 — These blocks are used to monitor knock control in real-time. Group 026 shows the live voltage from each knock sensor, which is critical for diagnosing P0328. Groups 020-025 show ignition timing retardation per cylinder, indicating if the ECM is actively compensating for perceived knock. Group 028 can be used to run a system self-test.
Wiring & Ground Locations
- Engine Harness Ground Points — On older Audi V-engines, ground wire terminal connectors are often located on the side or rear of the intake manifold. There is also a main engine ground cable from the body/frame rail to an engine mount bracket.. A poor ground connection for the engine harness or the knock sensor's shielded cable can cause a floating ground, leading to an incorrect high voltage reading by the ECM. Checking these ground points for corrosion or looseness is a key diagnostic step.
- Knock Sensor Connector Pinout (Typical) — At the sensor body, under the intake manifold.. For manual testing: Pin 1 is typically Ground, Pin 2 is the Signal wire, and Pin 3 is for the shielding. Continuity checks should be performed from these pins back to the corresponding pins at the ECM connector.
Real Owner Repair Stories
- Audi-Sport.net user 'tuffty' (Audi (model not A8, but relevant 1.8T with same code logic)) — Persistent, intermittent P0328 - Knock Sensor 1 (G61): Signal too High.
❌ Tried (didn't work) Swapping the Bank 1 and Bank 2 knock sensors to see if the fault code moved to the other bank (it did not, suggesting the sensor itself was not the issue).
✅ What actually fixed it The problem was ultimately determined to be a wiring fault. The user was advised to check continuity from the sensor connector directly to the ECU connector pins to identify the break or short in the harness.
OEM Part Supersession History
06K905376, 06K905377→06K905377E— Part revision and consolidation. The letter at the end of a VAG part number indicates the revision level; a higher letter is a newer version.
Heads up: While the base part numbers are similar, it's critical to use the exact part number specified for the vehicle's VIN and engine code. Using an incorrect revision may lead to improper knock detection.
Model Year Variations Within This Range
- 2019-2021 vs 2022-2025: A facelift occurred for the 2022 model year. While the 3.0L V6 TFSI engine (EA839) remained the standard powertrain in the US A8L, there may be minor software or component revisions. The core location and function of the knock sensors are expected to be identical.
Helpful Videos
We Have This Part in Stock

The information in this article is provided for general reference and educational purposes only. Vehicle specifications, procedures, and part compatibility can vary by production date, trim level, and region. Always consult your vehicle's factory service manual and verify part numbers before purchasing or performing repairs. Safety-critical components such as airbags, seat belts, and braking systems should be installed by a qualified professional.
- Audi A8:
- 🧭 Diagnostic Flowchart
- 🎬 Helpful Videos
- 🛍️ Shop This Part
- What's Unique About the 2019-2025 Audi A8
- Symptoms You May Notice
- Most Likely Causes
- Rare But Worth Checking
- Diagnosis Steps
- Parts You'll Likely Need
- Related Codes That Often Appear With This One
- Technical Service Bulletins (TSBs) & Recalls
- Platform-Specific Known Issues
- Mechanic-Grade Diagnostic Values
- Scan Tool Commands That Help
- Wiring & Ground Locations
- Real Owner Repair Stories
- OEM Part Supersession History
- Model Year Variations Within This Range
- 🎟️ Get 5% Off