
P0331 on 2016-2020 Buick Envision 2.0L Turbo: Knock Sensor Circuit Fault Causes and Fixes
On the 2.0L Turbo Envision, code P0331 is very often caused by loose intake manifold bolts, not a bad knock sensor. Before buying parts, check and tighten the intake bolts to 12 N.m (106 lb-in) as per GM TSB #PIP5529. This TSB has several revisions (A, B, etc.), with later versions adding the requirement to use threadlocker. This simple check can save you from a more expensive and unnecessary repair.
- For a P0331 code on a 2016-2020 Buick Envision with the 2.0L Turbo, **always check for loose intake manifold bolts first.**
- The correct torque for the intake manifold bolts is 12 N.m (106 lb-in). Use threadlocker when re-tightening.
- Do not immediately buy a new knock sensor. The repair might be as simple as tightening bolts, saving significant time and money.
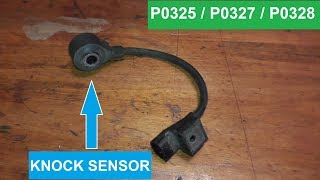
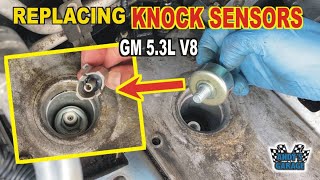
- If the sensor does need replacement, it is located under the intake manifold, and the manifold gasket should be replaced as part of the job.
What's Unique About the 2016-2020 Buick Envision
On the 2.0L LTG turbo engine used in the Envision and many other GM vehicles, P0331 has a very common and non-obvious cause. A widely documented issue, covered in multiple revisions of GM Technical Service Bulletin #PIP5529, shows that loose intake manifold bolts can create vibrations or a vacuum leak. The knock sensor picks up this noise and the ECM misinterprets it as a sensor fault, triggering the P0331 code. Checking these bolts before replacing any parts is critical for this specific engine.
Symptoms You May Notice
- Check Engine Light is on
- Reduced engine power and sluggish acceleration
- Engine may hesitate or stall, especially at idle.
- Audible engine pinging or knocking, especially under load (though not always present)
- Decreased fuel economy
- Rough or unstable idle.
- Replacing the knock sensor without first checking for loose intake manifold bolts. This is the most common mistake on this engine, leading to an unnecessary and more labor-intensive repair.
Most Likely Causes
- Loose Intake Manifold Bolts 🔴 High Probability → Shop Engine Intake Manifold This is a well-documented issue on GM's LTG engines, addressed in TSB #PIP5529 and its revisions (A, B, etc.). Vibrations can cause the bolts to back out over time, creating a condition the knock sensor misreads as a fault. This affects numerous vehicles with this engine, including the Cadillac ATS and Chevy Camaro.
How to confirm: Check the torque of the intake manifold mounting bolts. If they are loose, this is the likely cause. The correct torque is 12 N.m or 106 lb-in. This is often seen with a combination of other codes like P0101, P0106, P0171, P0326, or P0506.
Typical fix: Remove each intake manifold bolt one at a time, apply a drop of medium-strength (blue) threadlocker, and re-torque it to specification. The TSB states that replacing the gasket is typically not necessary unless a leak is confirmed after torquing.
Est. part cost: $5-$15 for threadlocker - Faulty Knock Sensor 2 🟡 Medium Probability → Shop Ignition Knock (Detonation) Sensor The sensor is exposed to constant engine heat and vibration, which can cause it to fail electronically over time. However, this should only be considered after verifying the intake bolts are tight.
How to confirm: If the intake manifold bolts are tight, the next step is to test the sensor circuit. This involves checking for proper voltage/resistance at the sensor connector and verifying continuity of the wiring to the ECM. A good GM knock sensor should have an internal resistance between 93k and 110k Ohms. If the wiring is good, the sensor itself is the likely culprit.
Typical fix: Replace Knock Sensor 2. Since the sensor is located under the intake manifold on the LTG engine, the manifold must be removed for access. The intake manifold gasket should be replaced at the same time as a best practice. The knock sensor retaining bolt must be torqued to exactly 25 N.m (18 lb ft).
Est. part cost: $30-$80 - Damaged Wiring or Connector ⚪ Low Probability The wiring harness in the engine bay is exposed to heat and oil, which can make it brittle or cause corrosion in the connectors over time. On some GM platforms, wiring is known to chafe against brackets or other components.
How to confirm: Visually inspect the wiring harness leading to Knock Sensor 2 for any signs of cracking, melting, or chafing. Check the connector for corrosion, moisture, or bent pins. A continuity test from the sensor connector to the ECM connector can confirm a wiring break.
Typical fix: Repair the damaged section of wire or clean/replace the connector. Pigtail connectors are available if the original is damaged.
Est. part cost: $10-$50 for wiring repair supplies
Rare But Worth Checking
- Engine Control Module (ECM) Fault: → Shop Engine Control Module (ECM) This is very rare. The ECM is a robust component. This should only be considered after all other possibilities, including the TSB for loose intake bolts and sensor/wiring checks, have been thoroughly exhausted.
- Internal Engine Mechanical Problem: An actual mechanical issue, like a worn rod bearing or a cracked piston (a known issue on the LTG engine per TSB PI1178F), can create excessive engine noise. The knock sensor will correctly report this, but the signal may be so far out of the expected range that it triggers a performance code. This would typically be accompanied by significant audible engine noise or a misfire (P0300).
Diagnosis Steps
- Scan for any other stored trouble codes. Note if a combination of codes like P0326, P0106, P0171, or P0101 are present, as this strongly points to the TSB issue.
- CRITICAL FIRST STEP: Inspect and check the torque of the intake manifold bolts per TSB #PIP5529. The specification is 12 N.m (106 lb-in). If they are loose, this is almost certainly the cause.
- If bolts are found to be loose, remove them one by one, apply medium-strength (blue) threadlocker, and reinstall to the correct torque. Clear codes and perform a test drive to confirm the fix.
- If the bolts are tight, proceed with electrical diagnosis. Locate Knock Sensor 2 (under the intake manifold).
- Inspect the sensor's electrical connector and wiring for any visible damage, corrosion, or loose connections. Check for chafing against engine components.
- If a scan tool with live data is available, monitor the Knock Sensor 2 signal to see if it is providing a rational voltage reading that changes with engine RPM. Also monitor 'Knock Retard' to see if the ECM is actively pulling timing.
- Test the sensor's internal resistance using a multimeter. Disconnect 🎬 Watch: How to test and replace a faulty knock sensor the sensor and measure between the pin and the sensor body. A good sensor should read between 93,000 and 110,000 Ohms (93k-110k Ω). An open loop (OL) reading indicates a failed sensor.
- Check the circuit's bias voltage. With the key on and engine off, backprobe the sensor connector (while connected). You should see a DC voltage of approximately 2.5V. Unplugging the sensor should cause the voltage to rise to near 5V.
- If the sensor and wiring test good, the fault may lie within the ECM, but this is extremely unlikely.
Parts You'll Likely Need
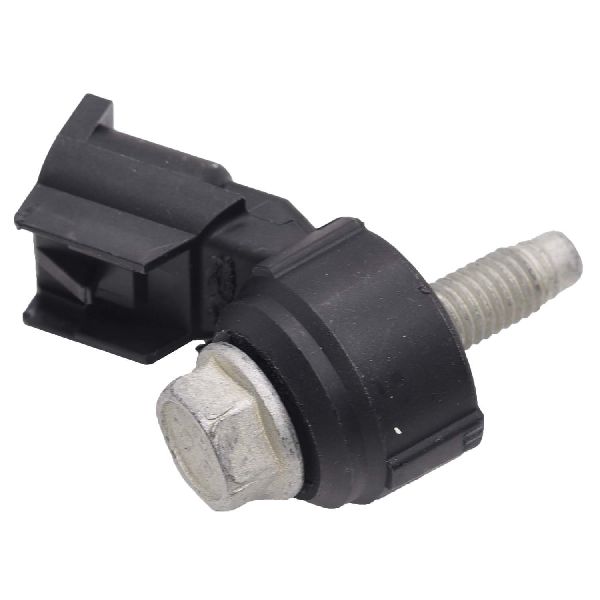
- Ignition Knock (Detonation) Sensor
(OEM #12653995)— This is the sensor that triggers the code if it fails electronically. It's the second most likely cause after checking for loose intake bolts. Note that part number 12623095 is also associated with this engine; always verify the correct part with your vehicle's VIN.
Trusted brands: ACDelco (OEM), Bosch, Delphi, NTK
OEM price range: $50-$90
Aftermarket price range: $25-$60 - Intake Manifold Gasket
(OEM #12677899)— This should be replaced if the intake manifold is removed to access the knock sensors to prevent vacuum leaks. TSB PIP5529A notes not to replace it for the bolt-tightening procedure unless a leak is confirmed after torquing.
Trusted brands: ACDelco (OEM), Fel-Pro, Mahle
OEM price range: $20-$40
Aftermarket price range: $15-$30 - Medium-Strength Threadlocker — Required by later versions of TSB #PIP5529 to secure the intake manifold bolts and prevent them from loosening again, which is the most common cause of the P0331 code.
Trusted brands: Permatex, Loctite
OEM price range: $10-$15
Aftermarket price range: $5-$10
Related Codes That Often Appear With This One
- P0326 — This code is for Knock Sensor 1 Circuit Range/Performance. It's common for both sensors to be affected by the same root cause, such as the vibrations from loose intake manifold bolts.
- P0106 — Manifold Absolute Pressure (MAP) Sensor Performance. A loose intake manifold creates a vacuum leak, which directly affects the MAP sensor reading and can trigger this code alongside P0331, as noted in TSB PIP5529.
- P0171 — System Too Lean (Bank 1). A vacuum leak from a loose intake manifold allows unmetered air into the engine, causing a lean condition. This is another code explicitly mentioned in the TSB for this issue.
- P0101 — Mass Air Flow (MAF) Sensor Performance. This code is also listed in TSB PIP5529 as being potentially caused by the vacuum leak from loose intake bolts, as the unmetered air causes a discrepancy between MAF readings and engine operation.
Technical Service Bulletins (TSBs) & Recalls
- PIP5529B: Addresses multiple diagnostic trouble codes, including P0331, that can be caused by loose intake manifold bolts on various GM engines including the 2.0L LTG.
- PIP5529A: An earlier revision that also identifies loose intake bolts as the cause and specifies a labor time of 0.4 hours for the re-torque procedure.
- PI1178F: Addresses cracked pistons on the 2.0L LTG engine, which can be a rare mechanical cause for knock sensor codes.
- 21-NA-074: Details the issue of moisture collecting in the charge air cooler, a separate common problem on this engine that can cause misfires and other codes.
Platform-Specific Known Issues
- GM TSB #PIP5529 (and revisions A, B, etc.): This Technical Service Bulletin is the most critical document for this issue. It specifically calls out that loose intake manifold bolts can cause P0331, often along with a wide array of other codes like P0101, P0106, and P0171.
Mechanic-Grade Diagnostic Values
- Knock Sensor Internal Resistance — expected: 93,000 to 110,000 Ohms (93k-110k Ω). Failure: An open loop (OL) reading or a value significantly outside this range indicates a faulty sensor.
- Knock Sensor Circuit Bias Voltage (DC) — expected: Approx. 2.5V with sensor connected (KOEO). Voltage should rise to approx. 5V when the sensor is unplugged.. Failure: No voltage indicates a wiring or ECM issue. Voltage that does not change when unplugging the sensor may indicate a short or an issue with the sensor's internal bleed resistor.
- Knock Sensor Signal (AC Tap Test) — expected: A small AC voltage that increases when the engine block is tapped firmly near the sensor. A good sensor may produce over 1 volt.. Failure: No AC voltage or a very low reading (e.g., under 10 millivolts) when tapping indicates a dead sensor.
- Knock Sensor Bolt Torque — expected: 25 N.m (18 lb ft). Failure: Incorrect torque can cause the sensor to be either too sensitive or not sensitive enough, leading to false codes or missed knock events. This is a critical specification.
- Intake Manifold Bolt Torque — expected: 12 N.m (106 lb-in). Failure: Bolts found to be looser than this specification are the likely cause of P0331 as per TSB PIP5529.
- Total Knock Retard (GDS2 Scan Tool) — expected: Should remain below 6.0 degrees during normal operation.. Failure: A value that stays above 6.0 degrees for more than 5 seconds while holding RPMs between 1800-2000 under load can indicate a problem.
Hidden / Shadow Codes Worth Checking
- P0101, P0106, P0171, P0326, P0506: While not true 'shadow codes', the presence of any of these codes alongside P0331 acts as a strong diagnostic pointer. GM TSB PIP5529 explicitly states that these codes are commonly triggered together by the single root cause of loose intake manifold bolts. (see via Any standard OBD-II scanner. Their combined appearance is the key indicator.)
Scan Tool Commands That Help
- GDS2 (GM Global Diagnostic System 2): Knock Sensor Learn Reset — After replacing a knock sensor or performing major engine repairs. This function resets the learned baseline noise profile of the engine, which is necessary if the engine's acoustic signature has changed, helping to prevent false knock readings.
Wiring & Ground Locations
- G100 / G102 — Common GM engine block ground points. G100 is often on the lower side of the engine, while G102 is often at the rear of the engine.. The ECM relies on clean ground connections for accurate sensor readings. A corroded or loose engine block ground can introduce electrical noise into the knock sensor circuit, potentially triggering a P0331 code.
- Knock Sensor Connector — On the knock sensor itself, located underneath the intake manifold on the 2.0L LTG engine.. This connector is in a high-heat, high-vibration area. The plastic can become brittle and the pins can corrode, leading to an intermittent or poor signal that causes the P0331 code.
Real Owner Repair Stories
- CobaltSS.net forum user (Chevrolet Cobalt with 2.0L Turbo (LNF, predecessor to LTG) with an aftermarket tune running ~23 psi of boost.) — P0331 code appeared intermittently with a small loss of power after running fine for two months post-tune.
❌ Tried (didn't work) Using octane booster and water remover additives in fuel., Visual inspection of wiring and knock sensor (both appeared fine)., Testing the knock sensor (it tested within spec).
✅ What actually fixed it Replacing the stock spark plugs with one step colder plugs (NGK LTR6IX-11). The higher cylinder pressures from the tune were likely causing minor pre-detonation that the stock heat range plugs couldn't handle, which the knock sensor correctly identified, but was outside the normal operating parameters.
"I Checked Everything" — The Actual Cause
- The most common cause for P0331 on the 2.0L LTG engine—loose intake manifold bolts—will often not present as a leak during a smoke test. The issue described in TSB PIP5529 is frequently caused by the *vibration* of the loose manifold against the cylinder head, which creates a rhythmic noise that the highly sensitive knock sensor picks up and misinterprets as engine knock. While a vacuum leak can also occur and trigger other codes, the P0331 is often due to the noise itself, which a smoke test cannot detect.
OEM Part Supersession History
12653995→N/A— This is a primary part number for the knock sensor. However, other part numbers like 12623095 are also listed for the 2.0L LTG engine in this vehicle's year range.
Heads up: There appear to be multiple valid part numbers depending on specific application and production date. It is critical to verify the correct part number using the vehicle's VIN before ordering to ensure compatibility.
Model Year Variations Within This Range
- 2019-2020: For the 2019 model year refresh, the 2.0L LTG engine was paired with a new 9-speed automatic transmission, replacing the 6-speed automatic used from 2016-2018. While this does not change the root cause of P0331 (loose intake bolts), it is a significant powertrain difference within the generation.
Diagnostic Flowchart
Other Known Issues on This Vehicle
Issues unrelated to this code that are worth knowing about as an owner of this generation:
- Cracked Pistons 🔴 High — Occurs in some stock engines, often presenting as a P0300 misfire with low compression on one cylinder. Can be exacerbated by aftermarket tuning or Low-Speed Pre-Ignition (LSPI). (Ref: PI1178F)
- Moisture Accumulation in Charge Air Cooler (CAC) 🟠 Medium — Common in humid or rainy climates. Water from the PCV system and humidity collects in the intercooler, then gets ingested during acceleration, causing a stumble, misfires (P0300), and underboost (P0299). (Ref: 21-NA-074, 18-NA-020)
- Timing Chain Stretch / Guide Wear 🟠 Medium — Less common than on the GM 3.6L V6, but can still occur, especially with extended oil change intervals or low oil levels. Often presents with a rattling noise on cold starts.
- Carbon Buildup on Intake Valves 🟡 Low — An inherent issue with all direct-injection engines. Over time, carbon deposits build up on the back of intake valves, restricting airflow and gradually reducing performance. Requires periodic cleaning (walnut blasting).
- Stuck/Failing Charge Air Bypass Valve 🟠 Medium — A common cause for turbo underboost code P0299. The valve can get stuck open, preventing the turbo from building proper boost pressure. (Ref: PIP5889A)
Used vs. New Parts: Buying Guide for This Vehicle
When a used part is the smart pick: For this repair, using used parts is not recommended. The primary fixes involve either re-torquing bolts with new threadlocker or replacing a sensor that is labor-intensive to access. The cost savings of a used part are negligible compared to the risk and labor.
OEM-only on this vehicle (don't cheap out):
- Ignition Knock (Detonation) Sensor: Due to the high labor cost of accessing the sensor (intake manifold removal), using a used or unverified aftermarket sensor is a significant gamble. A premature failure would require repeating the entire job. Stick with the OEM ACDelco part or a top-tier aftermarket equivalent.
Aftermarket brands forum-validated for this vehicle:
- ACDelco (OEM)
- Delphi
- NTK
- Bosch
Brands owners have reported issues with on this vehicle:
- No-name, unbranded sensors from online marketplaces. While tempting due to low cost, their reliability and accuracy are unproven, and a failure would be costly in terms of repeated labor.
Real Owner Stories
Aggregated from forums and TSBs cited above. Mileages and costs reflect what owners reported in those sources.
2017 Cadillac ATS 2.0L LTG
Symptoms: The Check Engine Light came on with multiple codes stored, including P0331, P0101, and P0171. The engine was running rough with noticeably reduced power.
What fixed it: The issue was resolved by following the TSB procedure: removing each intake manifold bolt one at a time, applying blue threadlocker, and re-torquing them to the correct specification of 12 N.m (106 lb-in).
Source hint: TSB #PIP5529B
2018 Chevrolet Camaro 2.0L LTG
Symptoms: Engine started misfiring badly and threw a P0300 code along with a knock sensor fault. A compression test showed one cylinder was very low compared to the others.
What fixed it: Further diagnosis based on the symptoms and TSB PI1178F revealed a cracked piston, which was the source of the mechanical noise triggering the knock sensor. The fix required major engine repair.
Source hint: TSB PI1178F
Related OBD-II Codes
Frequently Asked Questions
What is the absolute first thing I should check for a P0331 code on my 2.0L Turbo Envision?
My mechanic wants to replace the knock sensor for P0331. Is this the right move?
I have P0331 along with codes P0171 and P0106. Are these related?
If I find the intake manifold bolts are loose, do I need to replace the gasket?
How can I test the knock sensor myself to see if it's bad?
What is the estimated cost to fix the most common cause of P0331?
Helpful Videos
We Have This Part in Stock


The information in this article is provided for general reference and educational purposes only. Vehicle specifications, procedures, and part compatibility can vary by production date, trim level, and region. Always consult your vehicle's factory service manual and verify part numbers before purchasing or performing repairs. Safety-critical components such as airbags, seat belts, and braking systems should be installed by a qualified professional.
- Buick Envision:
- 🧭 Diagnostic Flowchart
- 🎬 Helpful Videos
- 🛍️ Shop This Part
- What's Unique About the 2016-2020 Buick Envision
- Symptoms You May Notice
- Most Likely Causes
- Rare But Worth Checking
- Diagnosis Steps
- Parts You'll Likely Need
- Related Codes That Often Appear With This One
- Technical Service Bulletins (TSBs) & Recalls
- Platform-Specific Known Issues
- Mechanic-Grade Diagnostic Values
- Hidden / Shadow Codes Worth Checking
- Scan Tool Commands That Help
- Wiring & Ground Locations
- Real Owner Repair Stories
- "I Checked Everything" — The Actual Cause
- OEM Part Supersession History
- Model Year Variations Within This Range
- Other Known Issues on This Vehicle
- Used vs. New Parts: Buying Guide for This Vehicle
- Real Owner Stories
- 2017 Cadillac ATS 2.0L LTG
- 2018 Chevrolet Camaro 2.0L LTG
- Related OBD-II Codes
- Frequently Asked Questions
- 🎟️ Get 5% Off