
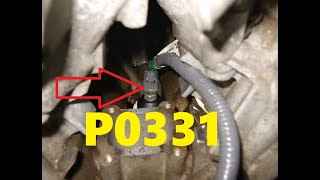
P0331 on 2010-2016 Hyundai Genesis Coupe 3.8L: Knock Sensor 2 Circuit Fixes
This code means there's a problem with the knock sensor on Bank 2 (driver's side). The most likely cause is a faulty sensor, followed by wiring issues. A new sensor is relatively inexpensive, but accessing it requires removing the upper and lower intake manifolds, a labor-intensive job. It is critical to replace both sensors, the sub-harness, and intake gaskets at the same time.
- P0331 on a 3.8L Genesis Coupe points to a fault with the knock sensor circuit on the driver's side (Bank 2).
- The most common fix is replacing the knock sensor itself, but the wiring should always be inspected for damage.
- This is a difficult DIY job due to the knock sensors being located under the upper and lower intake manifolds.
- It is strongly recommended to replace both knock sensors, the sub-harness, and all intake gaskets at the same time to prevent future issues and avoid repeating the labor.
- Always verify the correct part number for your specific model year (BK1 vs. BK2) before ordering parts.
What's Unique About the 2010-2016 Hyundai Genesis Coupe
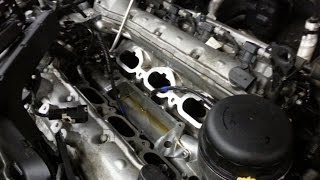
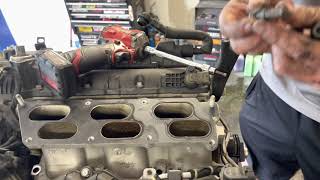
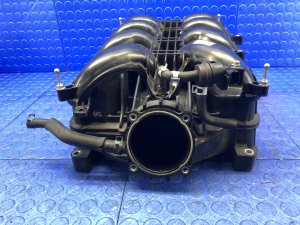
On the Lambda 3.8L V6 engine, the two knock sensors are located under the lower intake manifold 🎬 See: Lambda 3.8L knock sensor location and access in the valley of the V-shaped engine. This location protects them but makes replacement a more involved job requiring significant disassembly. While some other Hyundai/Genesis models using the same engine family are prone to rodent damage on knock sensor wiring due to soy-based insulation, this appears less documented for the Genesis Coupe specifically, though it remains a possibility. The key challenge for this platform is the labor involved in accessing the sensors, making a correct diagnosis important before starting the repair.
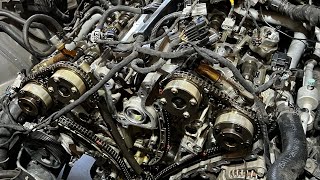
Generation note: The 2010-2016 range covers both the BK1 (2010-2012) and BK2 (2013-2016) generations. The 3.8L engine was updated from Multi-Port Injection (MPI) in the BK1 to Gasoline Direct Injection (GDI) for the BK2 🎬 Watch: 3.8L engine teardown to see internal components, which increased power to 348 hp. The fundamental design and location of the knock sensors remain similar under the intake manifold. However, part numbers for the sensors differ between generations, so it is crucial to verify the correct part for your specific year.
Symptoms You May Notice
- Check Engine Light is on
- Reduced engine power and acceleration
- Hesitation during acceleration
- Worse-than-usual fuel economy
- Audible engine pinging or knocking, especially under load (less common)
- Engine running rough or misfiring
- Replacing only one knock sensor. Given the significant labor to remove the intake manifold, it is poor practice not to replace both sensors and the harness while access is available.
- Replacing spark plugs or ignition coils. While these can cause performance issues, they will typically set their own specific trouble codes (e.g., P030x for misfires).
- Mistaking the code as a coincidence after other work. One owner reported the code appeared after a clutch change and catch can installation, but these events are almost certainly unrelated to a knock sensor circuit fault.
Most Likely Causes
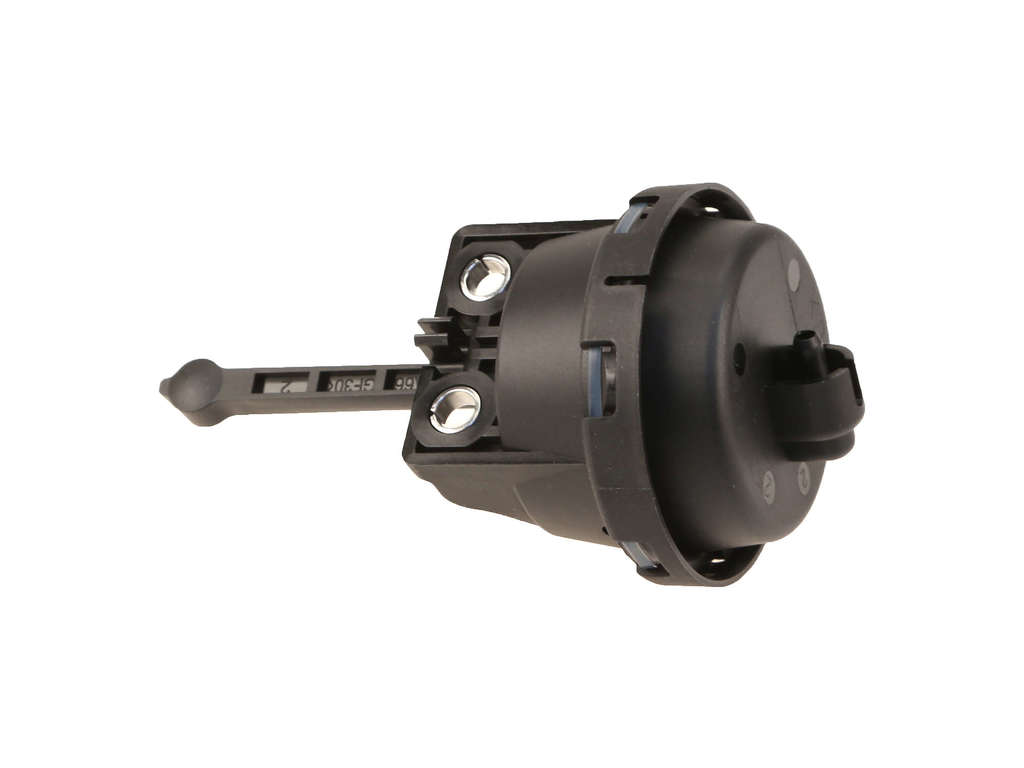
- Faulty Knock Sensor (Bank 2) 🔴 High Probability → Shop Ignition Knock (Detonation) Sensor The sensor is located in a high-heat area (engine valley) and is subjected to constant vibration, leading to eventual failure of its internal piezoelectric element. Age and heat cycles are the primary cause of failure.
How to confirm: After confirming the wiring is intact, the sensor itself is the most likely culprit. It can be tested with a multimeter for resistance or by checking for an AC voltage signal while tapping the engine block near the sensor, but most DIYers and shops proceed with replacement given the high labor cost to access it. A failed sensor will show no voltage when tapped or have infinite resistance (open circuit).
Typical fix: Replace the knock sensor. Since accessing the sensor requires removing the upper and lower intake manifolds, it is highly recommended to replace both knock sensors (Bank 1 and Bank 2) and the sub-harness at the same time to avoid repeating the labor-intensive job.
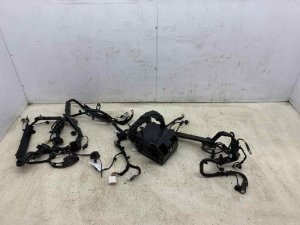
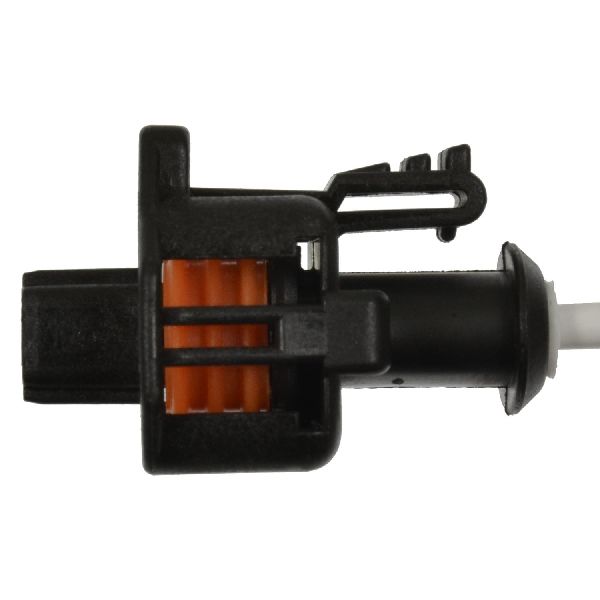
Est. part cost: $50-$110 - Wiring or Connector Issue 🟡 Medium Probability The wiring sub-harness for the knock sensors is located under the intake manifold and can become brittle from constant heat cycles. This can lead to cracked insulation or loose connections at the sensor connector.
How to confirm: Once the intake manifold is removed, visually inspect the entire length of the knock sensor harness for signs of cracking, melting, corrosion in the connectors, or evidence of being chewed by rodents. Check for continuity on each wire with a multimeter.
Typical fix: Repair the damaged section of wiring with solder and heat-shrink tubing, or replace the knock sensor sub-harness if it is brittle or extensively damaged. Wrapping the new or repaired harness in high-temperature protective tape is a good preventative measure.
Est. part cost: $20-$50 for a sub-harness
Rare But Worth Checking
- Powertrain Control Module (PCM) Fault: → Shop Engine Control Module (ECM) This is very rare. The PCM should only be considered a potential cause after the sensors and all related wiring have been thoroughly tested and confirmed to be good.
- Using Incorrect Fuel Octane: The GDI 3.8L V6 is designed for premium fuel to achieve its 348hp rating but features anti-knock technology that allows it to run on regular fuel with reduced performance. While using lower octane can cause real engine knock, it is unlikely to be the primary cause of a P0331 circuit fault but is worth considering if the engine is audibly knocking.
- Loose Mechanical Components: Extremely rare, but other loose or failing engine components could theoretically create vibrations that the PCM misinterprets as a sensor fault. A user on a forum wondered if a very loose timing chain could cause this, but it's considered highly unlikely.
Diagnosis Steps
- Confirm the presence of code P0331 with an OBD-II scanner. Scan for other codes like P0326 to see if the issue affects both banks.
- Listen for any audible engine knock or pinging during a test drive. The absence of noise often points towards a sensor/circuit issue rather than a mechanical problem.
- Prepare for disassembly. You will need to remove the engine cover, intake piping, throttle body, and the upper and lower intake manifolds to access the knock sensors in the engine valley.
- Once the intake manifold is removed, locate Knock Sensor 2 on the driver's side (Bank 2) of the engine block.
- Thoroughly inspect the wiring harness for both sensors. Look for any signs of damage, such as chewed wires, cracked insulation, or corrosion on the connector pins.
- If wiring looks good, it is highly recommended to replace both knock sensors and the connecting sub-harness.
- Ensure the new knock sensors are torqued to the manufacturer's specification. The correct torque is critical for proper sensor function. The spec for the Lambda V6 is 15.7 - 23.5 Nm (11.6 - 17.3 lb-ft). Improper torque will affect the sensor's reading and can cause the code to return.
- Reassemble the intake manifold using new gaskets. This is a mandatory step to prevent vacuum leaks.
- Clear the trouble code with the OBD-II scanner and perform a test drive to ensure the code does not return.
Parts You'll Likely Need
- Knock Sensor
(OEM #BK1 (2010-2012): 39320-3C700; BK2 (2013-2016): 39320-3C750)— This is the most common failure point. Part numbers differ by generation. It's best practice to replace both sensors (Bank 1 and Bank 2) at the same time. The Bank 1 (passenger side) sensor may have a different part number.
Trusted brands: Hyundai (OEM), Bosch, NTK, Standard Motor Products (SMP)
OEM price range: $80-$155
Aftermarket price range: $50-$90 - Knock Sensor Sub-Harness
(OEM #Part of main engine harness, no separate number widely available. Aftermarket pigtails or universal connectors are used for repair.)— The short harness connecting both knock sensors often becomes brittle and fails from heat. It is highly recommended to replace this during the job.
Trusted brands: Hyundai (OEM, if available), Pigtail connectors from Dorman, Standard Motor Products
OEM price range: $N/A
Aftermarket price range: $15-$30 per pigtail - Upper and Lower Intake Manifold Gaskets — These must be replaced whenever the intake manifold is removed to prevent vacuum leaks. They are single-use items.
Trusted brands: Hyundai (OEM), Fel-Pro, Mahle
OEM price range: $40-$60
Aftermarket price range: $20-$40
Related Codes That Often Appear With This One
- P0326 — This is the equivalent code for the Bank 1 knock sensor (P0326 Knock Sensor 1 Circuit Range/Performance). If the sub-harness is failing or if both sensors are failing due to age and heat exposure, it's common to see faults for both banks simultaneously.
Technical Service Bulletins (TSBs) & Recalls
- While no TSBs are specific to P0331 on the Genesis Coupe, Hyundai has issued TSBs (e.g., for campaign 966) for other models to update the Knock Sensor Detection System (KSDS) software to better detect engine bearing noise, which can sometimes be associated with knock sensor codes like P1326. This is generally not the direct cause for a P0331 circuit code.
Platform-Specific Known Issues
- Access to the knock sensors requires removal of the upper and lower intake manifolds, making this a labor-intensive repair relative to the cost of the parts.
- A Reddit user with a 2016 3.8L posted about getting code P0331 and asked for the location of sensor 2, confirming this is a known issue in the community.
Mechanic-Grade Diagnostic Values
- Knock Sensor Signal Voltage (Live Data) — expected: Fluctuating between 0.2V (no knock) and 4.5V (severe knock) with engine RPM and load changes.. Failure: Voltage is stuck at a specific value, shows 0V, or is consistently outside the 0.2V-4.5V range.
- Knock Sensor Internal Resistance — expected: Approximately 93 - 110 ohms for many Hyundai/Kia platforms.. Failure: Infinite resistance (open circuit) or near-zero resistance (short circuit).
- Knock Sensor Mounting Bolt Torque — expected: 15.7 - 23.5 Nm (11.6 - 17.3 lb-ft). Failure: Incorrect torque can cause the sensor to misread vibrations or be damaged. The mounting surface must be perfectly clean before installation.
- Knock Sensor Shield Wire Ground — expected: Continuity to ground with minimal resistance.. Failure: High resistance or an open circuit on the shield wire can allow electrical noise (EMI/RFI) to interfere with the signal, causing a false P0331 code.
Scan Tool Commands That Help
- Hyundai GDS (Global Diagnostic System): Live Data Monitoring: 'Knock Sensor Signal' or 'Knock Filtered Value' PID — This is the primary method for professional diagnosis. A technician watches this value while revving the engine or on a test drive. A healthy sensor shows a responsive voltage/waveform. A flat-lined or erratic signal, despite good wiring, confirms a failed sensor.
- Advanced Oscilloscope: Waveform Analysis — Used to visually inspect the AC voltage signal from the sensor when tapping the block near the sensor (engine off) or with the engine running. A good sensor produces a clear AC sine wave that corresponds to vibrations. No waveform or a distorted one indicates a bad sensor.
Wiring & Ground Locations
- Knock Sensor Shield Ground — The knock sensor wiring is shielded. This shield has its own ground connection, often designated in wiring diagrams.. A poor or broken shield ground allows electromagnetic interference (EMI) from ignition coils, injectors, and alternators to corrupt the low-voltage signal from the knock sensor, which the PCM can misinterpret as a sensor fault, setting a P0331.
- GHG03 (Engine Ground) — Located on the left rear of the engine.. This is a primary engine ground point. While not directly for the sensor, a poor main engine ground can create floating voltages and electrical noise across all sensors, potentially contributing to sensor circuit codes.
- Starter Motor Bolt Ground — A common location for aftermarket grounding kits is a 14mm bolt on the starter motor where it connects to the transmission bell housing.. While not a factory ground point for the knock sensor, the Genesis Coupe is known for having weak factory grounds. Owners often add grounding kits to improve electrical stability. Ensuring all major ground points are clean and tight is a good practice when diagnosing any electrical fault.
Real Owner Repair Stories
- gencoupe.com forum user (Genesis Coupe (engine not specified, but likely 2.0T with aftermarket tune)) — Intermittent P0331 code with slight power loss, especially after running for a while.
❌ Tried (didn't work) Adding octane booster and water remover to fuel (code returned after 20 minutes)., Visual inspection and electrical testing of the knock sensor and wiring (all checked out fine).
✅ What actually fixed it The owner, who was running higher-than-stock boost, found forum posts from others with similar tunes experiencing minor knock. They replaced the stock spark plugs with one-step-colder NGK Iridium IX plugs (model LTR6IX-11), which resolved the intermittent P0331 code. - Hyundai Owner Complaint (NHTSA ODI #11587348) — An owner of a vehicle with the same engine family reported that while driving at approximately 35 mph, the Check Engine Light came on for a P0331 Knock Sensor fault. Although the light was cleared, it returned after driving only 14 miles.
OEM Part Supersession History
Unknown, for BK1 models→39320-3C700— Standard part evolution and updates.
Heads up: This part is for the BK1 3.8L MPI engine.Unknown, for BK2 models→39320-3C750— Part designed for the updated GDI engine.
Heads up: This part is for the BK2 3.8L GDI engine. While it may physically fit a BK1, the sensing characteristics could be different. Always use the correct part for the specific generation.
Model Year Variations Within This Range
- 2010-2012 (BK1): Uses knock sensor part number 39320-3C700. The engine is Multi-Port Injection (MPI).
- 2013-2016 (BK2): Uses knock sensor part number 39320-3C750. The engine is Gasoline Direct Injection (GDI), which operates at higher pressures and has different combustion characteristics, likely requiring a sensor with slightly different calibration.
Diagnostic Flowchart
Other Known Issues on This Vehicle
Issues unrelated to this code that are worth knowing about as an owner of this generation:
- Manual Transmission 2nd Gear Lockout/Grind 🟠 Medium — Very common on manual transmission models, especially during high-RPM 1-2 shifts. Can occur at any mileage. (Ref: No TSB or recall, but it is a widely discussed owner complaint. Common owner fixes include upgrading transmission fluid (e.g., Redline MT-85), installing a new transmission mount, and/or an engine leash to reduce drivetrain movement.)
- Timing Chain Rattle / Tensioner Issues 🔴 High — More prevalent on higher mileage (80k+ miles) engines, particularly on the 2.0T but also reported on the 3.8L. Often presents as a brief rattle on cold startup. (Ref: No recall for the 3.8L, but it is a known issue. Failure can be catastrophic. Some owners of BK1 models proactively replace their timing chain with the improved BK2 version.)
- Interior/Exterior Trim and Paint Quality 🟡 Low — Common across all years. Owners report the matte clear coat on interior 'chrome' plastic pieces (steering wheel, door handles) flaking off. Exterior paint, particularly on early models, can be prone to chipping and peeling.
- Water Leaks into Trunk 🟡 Low — Reported by numerous owners. Often caused by failed taillight gaskets, allowing water to pool in the spare tire well.
- Carbon Buildup on Intake Valves (BK2 GDI) 🟠 Medium — An inherent issue with all Gasoline Direct Injection (GDI) engines, as fuel is not sprayed over the back of the intake valves to clean them. Can cause performance loss over time (typically noticeable after 60k+ miles). (Ref: No TSB or recall. Preventative measures include installing an oil catch can; cleaning requires walnut blasting the intake ports.)
Used vs. New Parts: Buying Guide for This Vehicle
When a used part is the smart pick: Never. Given the 3-4 hours of labor required to remove the intake manifolds for access, using a salvaged knock sensor is extremely poor economy. The risk of a used sensor failing shortly after installation far outweighs the minor cost savings over a new part.
What to inspect on the donor part:
- Not applicable as used parts are not recommended.
OEM-only on this vehicle (don't cheap out):
- Knock Sensor
- Knock Sensor Sub-Harness
- Intake Manifold Gaskets
Aftermarket brands forum-validated for this vehicle:
- NTK (often the OEM supplier)
- Bosch
- Standard Motor Products (SMP)
Brands owners have reported issues with on this vehicle:
- Ultra-cheap, unbranded sensors from online marketplaces. The quality control is non-existent, and the risk of premature failure is very high, forcing a repeat of the entire labor-intensive job.
Real Owner Stories
Aggregated from forums and TSBs cited above. Mileages and costs reflect what owners reported in those sources.
2016 Hyundai Genesis Coupe 3.8L
Symptoms: The owner reported getting code P0331 immediately after performing a clutch replacement and installing a catch can.
What fixed it: The community consensus indicated the sensor failure was coincidental; the standard fix for this code is knock sensor replacement via intake manifold removal.
Source hint: r/genesiscoupe - A user with a 2016 3.8L reported getting code P0331 immediately after a clutch replacement and catch can installation
2012 Hyundai Genesis Sedan 3.8L
Symptoms: Owner inquired if a knock sensor code could be related to a loose timing chain.
What fixed it: The consensus was that the sensor/circuit issue was likely independent of the mechanical timing chain rattle.
Source hint: r/MechanicAdvice - A user with a 2012 Genesis 3.8 Sedan (same engine family) asked if a loose timing chain could cause a knock sensor code
Related OBD-II Codes
Frequently Asked Questions
Does the Hyundai TSB for the Knock Sensor Detection System (KSDS) software update apply to my P0331 code?
I have a 2016 3.8L R-Spec and just installed a clutch and catch can; could these have caused the P0331 code?
Can I just replace the Bank 2 sensor since that is what P0331 indicates?
What is the specific torque spec for the knock sensors on the Lambda 3.8L V6?
Could a loose timing chain be the reason my knock sensor code is triggered?
Why is the knock sensor prone to failure on the Genesis Coupe?
What does NHTSA ODI #11587348 report regarding the P0331 code?
Helpful Videos

Used OEM Parts in Stock
New Aftermarket Parts Available


The information in this article is provided for general reference and educational purposes only. Vehicle specifications, procedures, and part compatibility can vary by production date, trim level, and region. Always consult your vehicle's factory service manual and verify part numbers before purchasing or performing repairs. Safety-critical components such as airbags, seat belts, and braking systems should be installed by a qualified professional.
- Hyundai Genesis Coupe:
- 🧭 Diagnostic Flowchart
- 🎬 Helpful Videos
- 🛍️ Shop This Part
- What's Unique About the 2010-2016 Hyundai Genesis Coupe
- Symptoms You May Notice
- Most Likely Causes
- Rare But Worth Checking
- Diagnosis Steps
- Parts You'll Likely Need
- Related Codes That Often Appear With This One
- Technical Service Bulletins (TSBs) & Recalls
- Platform-Specific Known Issues
- Mechanic-Grade Diagnostic Values
- Scan Tool Commands That Help
- Wiring & Ground Locations
- Real Owner Repair Stories
- OEM Part Supersession History
- Model Year Variations Within This Range
- Other Known Issues on This Vehicle
- Used vs. New Parts: Buying Guide for This Vehicle
- Real Owner Stories
- 2016 Hyundai Genesis Coupe 3.8L
- 2012 Hyundai Genesis Sedan 3.8L
- Related OBD-II Codes
- Frequently Asked Questions
- 🎟️ Get 5% Off