
P0333 on 2018-2025 Audi SQ5: Knock Sensor 2 Circuit High Causes and Fixes
On a 2018-2025 Audi SQ5, code P0333 almost always points to a failed knock sensor on Bank 2 (driver's side) or its wiring. The repair is complex as the sensor is buried under the intake manifold in the hot 'V' of the engine. Expect a shop cost of $580-$800 for the sensor replacement, which requires intake removal.
- P0333 on your SQ5 means the knock sensor on the driver's side (Bank 2) has an electrical circuit problem, usually high voltage.
- The most common causes are a failed sensor or a heat-damaged wiring harness located in the hot engine valley.
- This is not a simple DIY fix. The sensor is buried under the intake manifold, requiring extensive labor and replacement of single-use gaskets.
- Do not ignore this code. The engine's main protection against harmful detonation is compromised, and the vehicle will have reduced performance. In rare cases, it can be a symptom of a much larger engine problem.
- Expect a repair bill between $580 and $800 at an independent shop. It is highly recommended to replace both sensors and the harness at the same time.
What's Unique About the 2018-2025 Audi SQ5
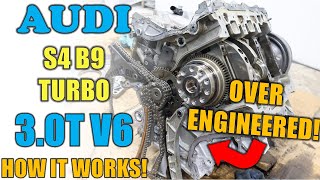
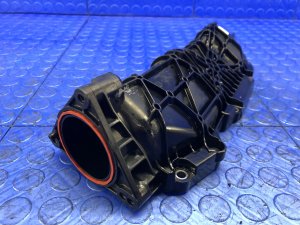
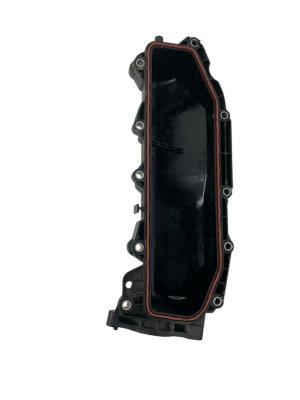
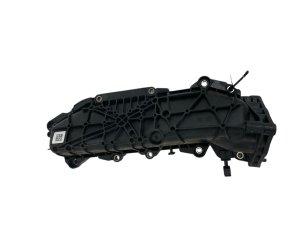
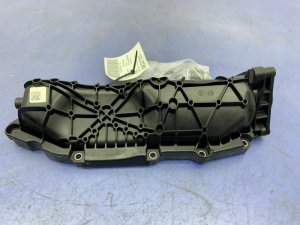
The 3.0L TFSI V6 engine (code EA839) in the B9/B9.5 generation SQ5 utilizes a 'hot-V' design, where the single turbocharger and exhaust manifolds are located within the valley between the cylinder banks. 🎬 Watch: A detailed teardown of the EA839 engine's hot-V design. This architecture subjects components in the valley to extreme heat. The primary issue on this platform is the physical location of the knock sensors; they are buried deep in this hot engine valley, underneath the intake manifold. This location makes them and their wiring harnesses highly susceptible to heat-cycle fatigue, brittleness, and damage, while also making diagnosis and replacement a significantly labor-intensive job.
Diagnostic Flowchart
Tap your situation to follow the diagnostic path that matches what you're seeing on this vehicle.
Generation note: The 2018-2025 model years cover the B9 (2018-2020) and B9.5 facelift (2021-2025) generations of the Audi SQ5. Both use the same 3.0L TFSI V6 engine (EA839, code CWGD), so the causes and repairs for P0333 are consistent across this range.
Symptoms You May Notice
- Check Engine Light is on
- Reduced engine power and acceleration (limp mode)
- Engine hesitation or stumbling, sometimes with delayed gear shifts.
- Audible engine pinging or knocking noise (in some cases)
- Decreased fuel economy.
- Rough or uneven idle.
- Replacing spark plugs or ignition coils, assuming the hesitation is a misfire without checking codes.
- Assuming bad fuel is the sole cause without investigating the sensor circuit. While poor fuel can cause knock, it typically won't cause a 'Circuit High' fault code, which points to an electrical issue.
Most Likely Causes
- Faulty Knock Sensor 2 🔴 High Probability → Shop Ignition Knock (Detonation) Sensor The sensor is located in the high-heat 'hot-V' engine valley under the intake manifold, which can lead to premature failure of its internal piezoelectric components over time.
How to confirm: After confirming the wiring is intact, testing the sensor's resistance with a multimeter is the next step. However, due to the difficult access, most shops and experienced DIYers will replace the sensor (and often the harness) as a preventative measure once they have removed the intake manifold.
Typical fix: Replace the knock sensor on Bank 2. It is highly recommended to replace the Bank 1 sensor and the wiring harness at the same time due to the labor involved.
Est. part cost: $80-$150 - Wiring Harness or Connector Damage 🟡 Medium Probability The wiring harness runs through the hot engine valley and can become brittle, chafed, or damaged by rodents seeking shelter. Coolant leaks from the water pump or thermostat housing (another common issue in this area) can also contaminate and ruin the harness and connectors.
How to confirm: Visually inspect the wiring harness leading to the knock sensor for any signs of melting, chafing, or breaks. Check the connector for corrosion or a loose connection. This requires removal of the intake manifold for a thorough inspection.
Typical fix: Repair the damaged section of the wiring harness or replace the entire knock sensor sub-harness. A pigtail connector kit (e.g., part # 3B0973703G-KIT) may be used for connector-specific damage.
Est. part cost: $20-$70 - Loose or Improperly Torqued Knock Sensor ⚪ Low Probability → Shop Ignition Knock (Detonation) Sensor This is more likely if recent engine work has been performed. The sensor is a microphone that must be properly torqued to the engine block to correctly detect knock frequencies. Over-torquing can make the sensor overly sensitive and trigger false codes, while under-torquing can prevent it from detecting real knock.
How to confirm: Check that the sensor's mounting bolt is torqued to the manufacturer's specification. For many Audi V6 engines, this is 20 Nm (approx. 15 ft-lbs). This can only be done after removing the intake manifold.
Typical fix: Torque the knock sensor mounting bolt to the correct specification (20 Nm).
Est. part cost: $0
Rare But Worth Checking
- Engine Control Module (ECM) Failure: → Shop Engine Control Module (ECM) This is a very uncommon cause. The ECM should only be suspected after the sensor and wiring have been definitively ruled out and tested good.
- Severe Internal Engine Problem: In several extreme cases reported by owners of the 3.0T EA839 engine, a P0333 code was an early symptom of a catastrophic internal engine failure (e.g., piston or rocker arm failure) requiring a full engine replacement. 🎬 See: A real-world example of severe internal engine damage. This is exceptionally rare but highlights the importance of addressing the code promptly.
Diagnosis Steps
- Scan the vehicle for all stored DTCs. Note if P0333 appears with other knock sensor codes like P0328, P0332, or P0327.
- If possible with an advanced scan tool, monitor the live data from Knock Sensor 2. A static, high voltage reading (Audi documentation suggests >1.0V can trigger the fault) would point towards a circuit issue.
- Perform a thorough inspection for other issues in the engine valley. Check for signs of coolant leaks from the thermostat housing or water pump, as this can damage the knock sensor harness.
- Gain access to the engine valley by removing the intake manifold. This is a complex step involving the fuel rail.
- Visually inspect the knock sensor and its wiring harness for any obvious damage, such as melted plastic, chafed wires, rodent damage, or coolant contamination.
- Disconnect the sensor and inspect the electrical connector for corrosion or damage.
- Test the wiring harness for continuity and check for shorts to power or ground. Wire resistance should be very low, approximately 0.1-0.5 ohms.
- If the wiring and connector are confirmed to be good, the knock sensor itself is the most likely culprit and should be replaced. Best practice is to replace both sensors (Bank 1 and 2) and the harness at the same time.
- Ensure the new sensor is torqued to the manufacturer's specification (20 Nm / 15 ft-lbs). Do not over-tighten.
- Replace intake manifold gaskets upon reassembly.
- Clear all fault codes and perform a test drive to ensure the code does not return. Consider resetting ECU adaptive memory with a capable scan tool.
Parts You'll Likely Need
- Knock Sensor (Bank 2)
(OEM #06E905377C (or superseding revisions like 06E905377J))— This is the most common failure point for a P0333 code after wiring issues are ruled out. Bank 2 is the driver's side in North America.
Trusted brands: Bosch, FAE, Genuine Audi
OEM price range: $110-$140
Aftermarket price range: $70-$100 - Knock Sensor Wiring Harness
(OEM #06E971822D (Verify with VIN))— Often fails along with the sensors due to extreme heat in the engine valley. It is considered best practice to replace this harness during a knock sensor job.
Trusted brands: Genuine Audi
OEM price range: $50-$80
Aftermarket price range: N/A - Intake Manifold Gaskets
(OEM #06M129717F (Verify with VIN))— These are single-use gaskets that must be replaced anytime the intake manifold is removed for service. 🎬 Watch: How to perform carbon cleaning while the manifold is off.
Trusted brands: Victor Reinz, Elring, Genuine Audi
OEM price range: $40-$60 (set)
Aftermarket price range: $25-$40 (set)
Related Codes That Often Appear With This One
- P0328 — This is the 'Circuit High' code for the knock sensor on Bank 1. It's common for both sensors or their shared harness to fail around the same time due to their shared location in the hot engine valley.
- P0332 — This is the 'Circuit Low' code for the same sensor (Bank 2). Seeing both may indicate an intermittent wiring problem or a failing sensor.
- P0327 — This is the 'Circuit Low' code for the Bank 1 sensor. Seeing multiple knock sensor codes together strongly points to a problem with the shared wiring harness under the intake.
Technical Service Bulletins (TSBs) & Recalls
- TSB 2081342/3: Provides information for Drive System Malfunction DTCs related to Knock Sensor P0327, P0332, P0328, P0333 on V6 TFSI engines. It confirms this is a known fault pattern to Audi.
Platform-Specific Known Issues
- Audi has issued Technical Service Bulletin #TSB 2081342/3 for V6 TFSI engines regarding drive system malfunctions that include DTC P0333, indicating a known issue with the knock sensor system. [⭐ MANUFACTURER TSB — highest authority]
- The location of the knock sensors under the intake manifold in the 'hot-V' makes this repair significantly more labor-intensive and costly than on many other vehicles where the sensors are externally accessible.
- In rare but documented cases on forums, a P0333 code on the EA839 engine has been a precursor to discovering major internal engine damage, such as piston or rocker arm failure, leading to engine replacement.
Mechanic-Grade Diagnostic Values
- Knock Sensor Signal Voltage (Live Data) — expected: Fluctuating voltage, typically below 1.0V at idle.. Failure: A static voltage reading that is greater than 1.0V for a set period.
- Knock Sensor Harness Continuity — expected: Approximately 0.1 - 0.5 ohms.. Failure: A reading of OL (Over Limit) indicates an open circuit (broken wire). A reading significantly higher than 0.5 ohms indicates excessive resistance.
- Knock Sensor Mounting Bolt Torque — expected: 20 Nm (15 ft-lbs).. Failure: Incorrect torque can lead to false signals (too tight) or missed signals (too loose).
Scan Tool Commands That Help
- VCDS (VAG-COM) or equivalent: Read Measuring Value Block (MVB), Display Group 015 and 016. — To functionally check and observe the live voltage output and timing retardation adjustments for each individual knock sensor during engine operation.
Wiring & Ground Locations
- J623 — The Engine Control Module (ECM). The knock sensor harness connects directly to this module.. A fault could exist at the pin on the ECM connector itself. The knock sensor signal for Bank 1 (G61) connects to the T60 60-pin connector at the ECM.
- Ground Point 12 — In the engine compartment on the left side, typically on the frame rail or strut tower area.. This is a primary chassis ground point for the engine bay. A poor connection here can cause floating grounds and erratic voltage readings for multiple sensors, including the knock sensors.
- Knock Sensor Shielding Ground — The shielded wire within the knock sensor harness itself.. The third wire in the knock sensor connector is a shield designed to prevent electromagnetic interference. This shield must have good continuity to an engine ground for the sensor to provide a clean signal.
Real Owner Repair Stories
- Reddit user on r/Audi (2019 Audi SQ5) — Check Engine Light with code P0328 (Bank 1 equivalent of P0333).
❌ Tried (didn't work) Initially planned to replace the knock sensor.
✅ What actually fixed it The code only appeared after an aftermarket '034 Stage 1 91 octane' ECU tune. The user determined it was a fuel quality issue in their region (Eastern Canada) combined with the more aggressive tune. Adding an STP octane booster to every tank of fuel resolved the issue and the code did not return.
Helpful Videos
We Have This Part in Stock

The information in this article is provided for general reference and educational purposes only. Vehicle specifications, procedures, and part compatibility can vary by production date, trim level, and region. Always consult your vehicle's factory service manual and verify part numbers before purchasing or performing repairs. Safety-critical components such as airbags, seat belts, and braking systems should be installed by a qualified professional.
- Audi SQ5:
- 🧭 Diagnostic Flowchart
- 🎬 Helpful Videos
- 🛍️ Shop This Part
- What's Unique About the 2018-2025 Audi SQ5
- Symptoms You May Notice
- Most Likely Causes
- Rare But Worth Checking
- Diagnosis Steps
- Parts You'll Likely Need
- Related Codes That Often Appear With This One
- Technical Service Bulletins (TSBs) & Recalls
- Platform-Specific Known Issues
- Mechanic-Grade Diagnostic Values
- Scan Tool Commands That Help
- Wiring & Ground Locations
- Real Owner Repair Stories
- 🎟️ Get 5% Off