
P0340 on 2017-2019 GMC Yukon Denali: Camshaft Sensor Circuit Causes and Fixes
On a 2017-2019 Yukon Denali, code P0340 is most often caused by a wiring issue, specifically a chafed harness or corroded connector, as noted in GM Technical Service Bulletins. Before replacing the camshaft position sensor (a ~$40-$80 part), thoroughly inspect the wiring harness near the front of the engine, particularly where it passes the X154 connector bracket on the lower driver's side of the front engine cover.
- P0340 on a 2017-2019 Yukon Denali indicates a fault in the camshaft position sensor circuit.
- Before buying any parts, thoroughly inspect the engine wiring harness for chafing and check connector X154 for corrosion, as these are known issues documented by GM.
- Symptoms include hard starting, stalling, and a rough idle.
- If the wiring is intact, the most likely fix is a new camshaft position sensor (ACDelco part #12674716).
- Driving with this code is risky due to the potential for the engine to stall unexpectedly.
What's Unique About the 2017-2019 Gmc YUKON DENALI
For this specific generation of Yukon Denali (K2XX platform), the P0340 code is frequently linked to specific, documented wiring problems rather than just a failed sensor. Multiple Technical Service Bulletins (TSBs) from GM point directly to issues like chafed wiring harnesses and corrosion in a key connector (X154) on the front of the engine. TSB #PIP5553A specifically warns that the harness can rub against a bolt at the X154 connector bracket, while TSB #PIP5335D points to corrosion inside the connector itself from water intrusion. This makes a thorough wiring inspection the most critical first step, as simply replacing the sensor often fails to fix the root cause.
Diagnostic Flowchart
Tap your situation to follow the diagnostic path that matches what you're seeing on this vehicle.
Symptoms You May Notice
- Check Engine Light is on
- Engine is hard to start or has an extended crank time
- Engine may stall, especially at low speeds
- Rough idle
- Reduced engine power or hesitation during acceleration
- Vehicle enters 'Limp Mode' or 'Reduced Engine Power' mode
- Replacing the camshaft position sensor without first inspecting the wiring. The TSBs for this platform strongly indicate wiring is a common root cause, and a new sensor will not fix a broken or chafed wire.
- Confusing the camshaft position sensor with the crankshaft position sensor. They are different sensors with different functions and codes. P0340 specifically points to the camshaft sensor circuit.
Most Likely Causes
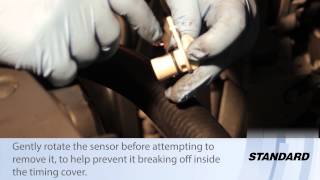
- Chafed or Damaged Wiring Harness 🔴 High Probability Multiple GM TSBs (including #PIP5553A) cite a chafed wiring jumper harness as a primary cause for P0340. Specifically, the harness is known to rub against a bolt at the X154 connector bracket on the lower driver's side of the engine's front cover, leading to shorts or open circuits.
How to confirm: Carefully inspect the entire wiring harness leading to the camshaft position sensor on the front of the engine. Per TSB #PIP5553A, pay extremely close attention to the harness where it is routed near the X154 connector bracket on the front, lower, driver's side of the engine. Look for any signs of rubbing, melting, or exposed wires where it may contact a bolt head.
Typical fix: Repair the damaged section of the wiring. This may involve soldering the broken wires and protecting them with heat-shrink tubing or anti-abrasion tape. The harness should be re-routed or secured with a zip tie to prevent future chafing against the bracket or bolt.
Est. part cost: $10-$30 - Corroded Electrical Connector (X154) 🟡 Medium Probability TSB #PIP5335D specifically mentions that P0340 can be caused by corrosion in the X154 connector on the front engine cover, often due to water intrusion. This 16-pin connector is a known failure point for this platform.
How to confirm: Locate connector X154 on the driver's side of the front engine cover, near the engine-driven vacuum pump. Disconnect it and inspect the pins and terminals for any green or white crusty deposits (corrosion) or signs of moisture.
Typical fix: Clean the connector terminals thoroughly with an electrical contact cleaner and a small brush. Allow it to dry completely, then apply a small amount of dielectric grease to the connector seal before reassembling to prevent future moisture intrusion.
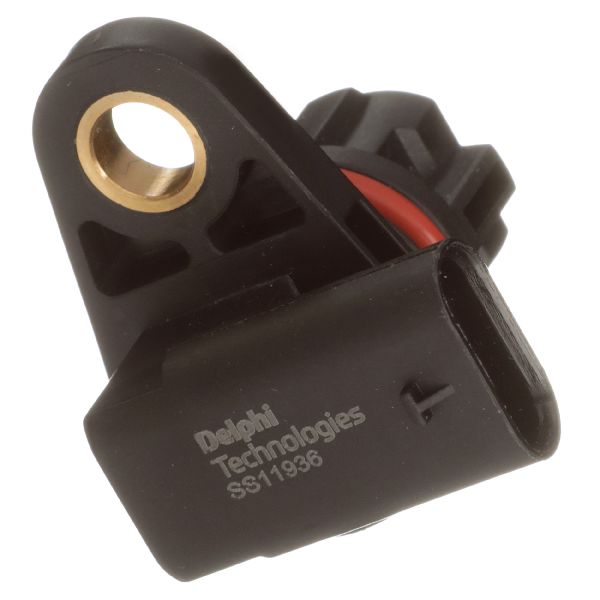
Est. part cost: $5-$15 - Faulty Camshaft Position Sensor 🟡 Medium Probability → Shop Engine Camshaft Position Sensor While wiring is a primary suspect, the sensor itself is a common failure item due to constant heat cycles and vibration in the engine bay. Aftermarket sensors have also been reported to be faulty out of the box, making an OEM part a safer bet.
How to confirm: If the wiring and connectors are confirmed to be in good condition, the sensor is the next logical culprit. A definitive test requires an oscilloscope to check the sensor's square wave signal. However, given the relatively low cost, replacement is a common diagnostic step after ruling out wiring.
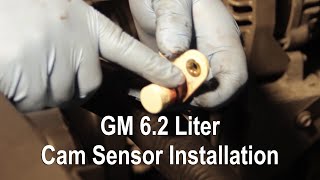
Typical fix: Replace the camshaft position sensor. On the 6.2L engine, it is located on the front timing cover and held by a single 10mm bolt, making it fairly accessible. 🎬 See this walkthrough for installing a new 6.2L cam sensor.
Est. part cost: $40-$80
Rare But Worth Checking
- Stretched Timing Chain: → Shop Engine Timing Chain On higher mileage engines (typically over 150,000 miles), a stretched timing chain or failed tensioner can cause the cam and crank signals to become out of sync, triggering P0340. This is usually accompanied by rattling noises on startup and other timing correlation codes (e.g., P0016).
- Weak or Failing Battery: → Shop Vehicle Battery Low system voltage during cranking can sometimes cause erratic signals from various sensors, including the camshaft position sensor, leading to a P0340 code. Before diving into complex diagnostics, ensure the battery is healthy (approx. 12.6V engine off, 13.7-14.7V running).
- Failing Powertrain Control Module (PCM): → Shop Engine Control Module (ECM) This is extremely rare and should only be considered after all other possibilities (sensor, wiring, connectors, and mechanical timing) have been exhaustively ruled out. Water intrusion into the ECM connectors can also cause this issue.
Diagnosis Steps
- Read all diagnostic trouble codes with an OBD-II scanner. Note any other codes that are present, as they can provide clues (e.g., P0341, P0335).
- CRITICAL: Perform a detailed visual inspection of the engine wiring harness. Per TSB #PIP5553A, focus on the area where the harness passes the X154 connector bracket on the front, lower, driver's side of the engine. Check for chafing against a bolt head.
- CRITICAL: Locate and inspect the 16-pin connector X154 on the driver's side of the front engine cover near the vacuum pump. Disconnect it and check for any signs of corrosion or moisture as indicated by TSB #PIP5335D.
- If no visible wiring issues are found, use a multimeter to test the sensor's connector. With the ignition ON, you should find a 5-volt reference (typically 4.8-5.2V), a good ground (less than 1 ohm resistance to chassis ground), and a signal wire.
- If wiring, connectors, and power/ground are all good, the camshaft position sensor itself is the most likely cause.
- For advanced diagnosis, use an oscilloscope to view the sensor's output. It should produce a clean square wave as the engine is cranked. A missing or erratic waveform points to a bad sensor.
- After repair, clear the codes and perform a test drive to ensure the issue is resolved.
Parts You'll Likely Need
- Camshaft Position Sensor
(OEM #12690653 (Supersedes 12674716))— This is the sensor that generates the signal. It is a common failure point after wiring issues have been ruled out. Using an OEM part is recommended as some aftermarket sensors have been reported as faulty.
Trusted brands: ACDelco (GM Genuine), Delphi, NGK, Bosch
OEM price range: $60-$80
Aftermarket price range: $40-$65 - Wiring Pigtail / Connector Repair Kit
(OEM #ACDelco PT2628 (example, verify fitment))— If the connector itself is damaged, corroded, or if wires are broken near the connector, a pigtail is used to splice in a new, healthy connector end.
Trusted brands: ACDelco, Dorman
OEM price range: $25-$40
Aftermarket price range: $15-$30
Related Codes That Often Appear With This One
- P0341 — This code indicates a range/performance issue with the same sensor circuit. TSBs #PIP5335D and #PIP5553A mention it appearing alongside P0340, often pointing to the same wiring or corrosion issues.
- P0335 / P0336 — These are codes for the crankshaft position sensor. TSB #PIP5553A lists them as potentially appearing with P0340, likely due to a shared wiring harness that is chafing, affecting both sensor circuits.
- P0300 — This is a random/multiple cylinder misfire code. An incorrect cam sensor signal can disrupt timing enough to cause misfires. TSB #PIP5553A also lists this as a related code from the same wiring fault.
Technical Service Bulletins (TSBs) & Recalls
- Bulletin #PIP5553A: Mentions P0340 in a list of DTCs that can be caused by a chafed wiring jumper harness, resulting in a stall or no-start. Specifies the chafe point is often at the X154 connector bracket.
- Bulletin #PIP5335D: Notes that DTCs P0340 and P0341 may set and directs technicians to inspect for corrosion in connector X154 (or X159 for 2015 models)
Platform-Specific Known Issues
- TSB #PIP5553A: Chafed Wiring Harness: Points to a potential for a chafed wiring jumper harness at the X154 connector bracket on the lower left front of the engine. This can cause P0340 along with numerous other electrical codes, leading to a stall or no-start condition.
- TSB #PIP5335D: Connector Corrosion: Specifically calls out P0340 and P0341 and advises technicians to inspect for corrosion in connector X154 (or X159 on 2015 models) on the front engine cover, which is prone to water intrusion.
Mechanic-Grade Diagnostic Values
- 5V Reference at CMP Sensor Connector — expected: 4.8-5.2 Volts DC (with key on, engine off). Failure: Voltage below 4.8V or above 5.2V points to a problem in the reference circuit from the ECM.
- Ground Circuit at CMP Sensor Connector — expected: < 1.0 Ohm resistance to a known good chassis ground. Failure: High resistance indicates a poor ground connection, which can cause erratic sensor signals.
- Signal Circuit Voltage at CMP Sensor Connector — expected: Should toggle between approximately 0V and 5V as the engine is cranked (requires an oscilloscope for accurate viewing as a square wave). With the sensor disconnected and key on, it may read near 5V.. Failure: A flatline signal (stuck at 0V or 5V) or an erratic, non-square waveform indicates a faulty sensor or wiring issue.
Wiring & Ground Locations
- X154 Connector — On the driver's side of the front engine cover, near the engine-driven vacuum pump. It serves as the connection point for the engine harness to the camshaft position sensor jumper harness.. This connector is explicitly cited in TSB #PIP5335D as a common location for corrosion due to water intrusion, directly causing P0340 and P0341. TSB #PIP5553A also identifies the harness near this connector's bracket as a primary chafe point.
- G101 — Located at the front, lower-left side of the engine block.. This is a primary ground for the Engine Control Module (ECM). A loose or corroded connection at G101 can cause a wide range of erratic sensor readings and codes, including P0340, because it disrupts the ECM's reference ground.
- Camshaft Position Sensor Connector — Directly on the sensor, which is mounted on the front timing cover, held by a single 10mm bolt.. This is the final connection point. The three wires are typically a 5V reference, a low reference (ground), and the signal wire. Testing voltages here is a key diagnostic step.
OEM Part Supersession History
12674716→12690653— Standard part revision and improvement by the manufacturer.
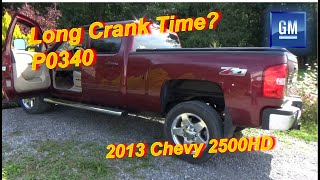
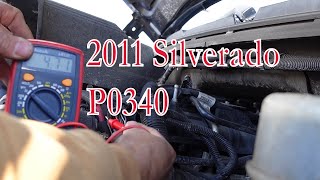
Helpful Videos
We Have This Part in Stock


The information in this article is provided for general reference and educational purposes only. Vehicle specifications, procedures, and part compatibility can vary by production date, trim level, and region. Always consult your vehicle's factory service manual and verify part numbers before purchasing or performing repairs. Safety-critical components such as airbags, seat belts, and braking systems should be installed by a qualified professional.
- Gmc YUKON DENALI:
- 🧭 Diagnostic Flowchart
- 🎬 Helpful Videos
- 🛍️ Shop This Part
- What's Unique About the 2017-2019 Gmc YUKON DENALI
- Symptoms You May Notice
- Most Likely Causes
- Rare But Worth Checking
- Diagnosis Steps
- Parts You'll Likely Need
- Related Codes That Often Appear With This One
- Technical Service Bulletins (TSBs) & Recalls
- Platform-Specific Known Issues
- Mechanic-Grade Diagnostic Values
- Wiring & Ground Locations
- OEM Part Supersession History
- 🎟️ Get 5% Off