
P0400 on 2009-2015 Toyota Prius: EGR Flow Malfunction Causes and Fixes
On a 3rd Gen Prius, P0400 almost always means the EGR system is clogged with carbon. The fix is a thorough cleaning of the EGR valve, EGR cooler, and intake manifold passages, not just replacing the valve. Expect 3-5 hours of labor.
- P0400 on a 2009-2015 Prius is not a simple sensor or valve failure; it's a systemic clogging of the entire EGR circuit with carbon.
- The most common symptom is a distinct engine shudder or rattle during light acceleration or when the engine is cold.
- A proper fix requires removing and cleaning the EGR valve, EGR cooler, EGR pipe, AND the intake manifold passages. Replacing just one part will not solve the problem long-term.
- This is a labor-intensive DIY job (4/5 difficulty) due to the need to remove the windshield cowl and intake manifold to access the components.
- Always use new gaskets when reassembling the EGR system and intake manifold to prevent vacuum or exhaust leaks.
What's Unique About the 2009-2015 Toyota Prius
The 3rd Generation Prius (2009-2015) is uniquely prone to this issue due to the design of its EGR system, which includes an EGR cooler. Over time, carbon deposits (soot) heavily clog the EGR valve, the EGR cooler, and the small passages in the intake manifold. This widespread clogging causes a signature engine shudder and requires a full system cleaning, not just a simple part swap, to resolve permanently.
Generation note: The 2009-2015 model years cover the entire third generation (Gen 3) of the Toyota Prius. This EGR clogging issue is a hallmark problem for this specific generation.
Symptoms You May Notice
- Check Engine Light is on.
- Engine shaking, shuddering, or rattling, especially on cold starts or under light acceleration.
- Rough or fluctuating idle.
- Hesitation or loss of power.
- Reduced fuel economy.
- Engine knocking or pinging sounds.
- Replacing only the EGR valve. This is the most common mistake. If the EGR cooler and intake manifold are not also cleaned, the P0400 code and associated shudder will return, often within a few weeks or months.
- Replacing spark plugs or ignition coils for the associated misfire codes (P030X) without addressing the root cause in the EGR system.
Most Likely Causes
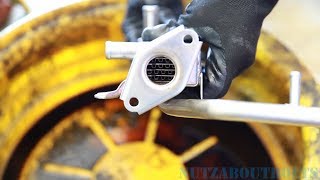
- Clogged EGR Cooler and Passages 🔴 High Probability → Shop Exhaust Gas Recirculation (EGR) Valve The EGR cooler has many small fins that are highly effective at cooling gas but are also perfect for trapping carbon soot. Over tens of thousands of miles, this buildup becomes a hard blockage, restricting flow.
How to confirm: Remove the EGR cooler assembly. Visually inspect the inlet and outlet ports for thick, hard carbon deposits. The passages will be visibly restricted.
Typical fix: The EGR cooler must be removed and meticulously cleaned. This often involves soaking it in a strong solvent (like brake cleaner or a dedicated EGR cleaner) and using brushes and picks to manually remove all carbon. Many owners choose to replace it with a new or refurbished unit to save time. 🎬 Watch: Tips for removing and cleaning your EGR cooler
Est. part cost: $100-$250 - Clogged or Sticking EGR Valve 🔴 High Probability → Shop Exhaust Gas Recirculation (EGR) Valve As the main control for the system, the valve is directly exposed to exhaust soot. Carbon builds up on the valve's pintle and seat, causing it to stick open or, more commonly, fail to open sufficiently.
How to confirm: Remove the EGR valve and inspect its port and pintle for heavy carbon buildup. The valve should move freely when actuated manually (if possible) or with a scan tool.
Typical fix: Clean the valve thoroughly with a wire brush and solvent, ensuring the pintle can move smoothly. If cleaning doesn't restore function or if it's an electronic valve that has failed, it must be replaced.
Est. part cost: $150-$300 - Clogged Intake Manifold Passages 🟡 Medium Probability The design of the intake manifold features small, individual ports that distribute EGR gases to each cylinder. These ports, especially for cylinders 1 and 2, are prone to clogging completely with carbon. This causes uneven gas distribution, leading to misfires.
How to confirm: After removing the intake manifold, inspect the EGR distribution passages on the cylinder head mating surface. You will likely find one or more ports completely blocked by carbon.
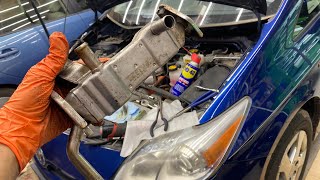
Typical fix: The intake manifold must be removed and the carbon deposits must be drilled or scraped out of the small passages. This is a critical step; skipping it will cause the problem to return quickly. Toyota released a TSB (T-SB-0116-15) related to replacing the manifold for this issue. 🎬 See this step-by-step intake manifold cleaning walkthrough
Est. part cost: $0 (if cleaning), $200-$400 (if replacing)
Diagnosis Steps
- Confirm the presence of P0400 and any related codes (like P0401 or P030x) with an OBD-II scanner.
- Given the high probability on this vehicle, plan for a full EGR system service. This is not a simple 'replace one part' job.
- Disconnect the 12V battery.
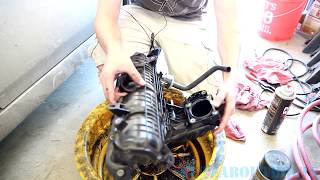
- Gain access to the rear of the engine. This requires removing the windshield cowl and wiper assembly. 🎬 Watch: Complete Prius EGR and intake manifold service guide
- Remove the air filter housing and intake manifold.
- Remove the EGR valve, EGR pipe, and EGR cooler. This is a labor-intensive process with several hard-to-reach bolts.
- Thoroughly inspect all components. You will almost certainly find heavy carbon buildup in the cooler, the valve, and the intake manifold ports.
- Clean every component. Scrape, pick, and soak the parts in solvent until all carbon is removed. Pay special attention to the small passages in the cooler and the intake manifold.
- Alternatively, replace the clogged components with new or refurbished parts. Many owners opt to replace the cooler rather than clean it.
- Reassemble the system with new gaskets.
- Reconnect the battery, clear the codes, and perform a test drive.
Parts You'll Likely Need
- EGR Valve — This valve is a primary point of failure due to carbon buildup causing it to stick.
Trusted brands: Aisin, Denso, Standard Motor Products
OEM price range: $200-$300
Aftermarket price range: $100-$200 - EGR Cooler
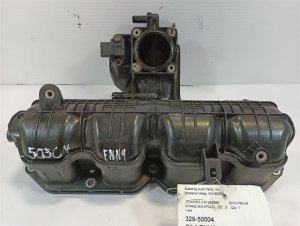
(OEM #25601-37010)— This is the component that clogs most severely and is the root cause of the flow restriction.
Trusted brands: Dorman, Genuine Toyota
OEM price range: $250-$400
Aftermarket price range: $150-$250 - Intake Manifold
(OEM #17120-37054)— The EGR passages within the manifold get clogged, causing misfires. While it can be cleaned, some may opt to replace it per TSB-0116-15.
Trusted brands: Genuine Toyota
OEM price range: $200-$400
Aftermarket price range: $150-$250 - EGR System Gaskets — All removed components (valve, cooler, pipe, intake manifold) require new gaskets upon reinstallation to prevent leaks.
Trusted brands: Fel-Pro, Genuine Toyota
OEM price range: $20-$40
Aftermarket price range: $10-$25
Related Codes That Often Appear With This One
- P0401 — P0401 ('EGR Flow Insufficient') is a more specific version of P0400. Both are caused by the same carbon clogging issue in the Prius.
- P0300, P0301, P0302, P0303, P0304 — These are misfire codes. When EGR passages in the intake manifold clog unevenly, some cylinders get the wrong air/fuel/exhaust mixture, causing them to misfire.
Technical Service Bulletins (TSBs) & Recalls
- T-SB-0116-15: Addresses misfire codes (P030x) caused by clogged intake manifold EGR passages, recommending manifold replacement.
Platform-Specific Known Issues
- Toyota issued a Warranty Enhancement Program (ZEG) for the sticking EGR valve on 2010-2012 models, extending coverage for this specific problem.
- Technical Service Bulletin T-SB-0116-15 addresses misfires (P030x) that occur during light acceleration due to uneven EGR flow from a clogged intake manifold, recommending manifold replacement.
Mechanic-Grade Diagnostic Values
- EGR Valve Stepper Motor Coil Resistance — expected: Approximately 21 ohms between each of the two coil pairs (Terminals EGR1 & EGR3, and EGR2 & EGR4).. Failure: An open circuit (infinite resistance) or a reading significantly different from 21 ohms indicates a failed coil in the stepper motor.
Scan Tool Commands That Help
- Toyota Techstream: Active Test: 'Control the EGR Valve Step' — This function allows a technician to command the EGR valve to open to specific step positions (0-110 steps). It is used to verify if the valve is physically responding to ECU commands. A lack of response or change in engine idle indicates a stuck valve or a circuit problem.
Wiring & Ground Locations
- Engine Bay Ground Cluster — There are three main ground wire connection points for the engine harness. One is on the engine itself, and two are clusters that bolt to the chassis, one of which is located underneath the coolant reservoir.. The ECU controls the EGR valve stepper motor by grounding its coils in a specific sequence. A poor or corroded ground connection at these points can cause erratic EGR valve operation or a complete failure to actuate, potentially logging a P0400 code even if the valve itself is clean.
- EGR Valve Connector — A 6-pin connector directly on the EGR valve assembly, located at the rear of the engine near the firewall.. This is the primary point for electrical testing. The pins correspond to two +B power inputs and four ground-side control terminals (EGR1, EGR2, EGR3, EGR4) for the stepper motor coils. Verifying power and control signals here is critical for diagnosing a circuit fault versus a mechanical one.
Real Owner Repair Stories
- Reddit user in r/prius (2010 Toyota Prius with ~225,000 miles) — Engine 'death rattle' (violent shaking) and misfires.
❌ Tried (didn't work) The user had already replaced fuel injectors, spark plugs, and valve cover gaskets, but a misfire on cylinder 1 (P0301) persisted.
✅ What actually fixed it A hybrid mechanic diagnosed and cleaned the entire EGR system. The EGR cooler, valve, pipe, and intake manifold were found to be 'filthy'. Replacing the PCV valve was also part of the comprehensive service that resolved the issue. - CARspec auto shop blog (2010+ Toyota Prius) — Cold soak rattle noise, check engine light with codes P0301-P0304 and/or P0401.
❌ Tried (didn't work) Diagnosing only the misfire codes by looking at spark plugs and coils, without considering the EGR system as the root cause.
✅ What actually fixed it The final, effective repair involved replacing the intake manifold and EGR valve with updated parts from Toyota. In some cases, cleaning the original intake and replacing only the EGR valve was sufficient. The key was addressing the carbon buildup in the EGR passages of the intake manifold.
OEM Part Supersession History
17120-37050, 17120-37051, 17120-37052, 17120-37053→17120-37054— Toyota released an updated intake manifold design to mitigate the effects of carbon buildup and condensation from the EGR ports, which was causing misfires. This is the fix recommended in TSB T-SB-0116-15.25620-37110→25620-37120 (and kit 04004-58137)— An updated EGR valve was designed to be less prone to sticking. For 2010-2012 models, a TSB recommended this new valve. An ECU software update may also be recommended when installing the revised valve.
Model Year Variations Within This Range
- 2010-2012: These earlier Gen 3 models were most prone to the original sticking EGR valve design. Toyota released a redesigned valve around 2012 and a Warranty Enhancement Program (ZEG) specifically for this issue on these years.
- 2014-2015: Late 2014 and all 2015 models received improved piston rings to address oil consumption issues that were prevalent in earlier years. While this doesn't directly affect the P0400 code, it's a significant engine revision. The EGR system design and its tendency to clog, however, remained a problem through 2015.
Diagnostic Flowchart
Used vs. New Parts: Buying Guide for This Vehicle
When a used part is the smart pick: Buying a used EGR cooler, valve, and intake manifold can be a smart strategy to minimize vehicle downtime. The owner can purchase a used set, clean them thoroughly on a workbench over several days, and then perform the entire swap in a single day.
Donor-vehicle mileage cap: roughly under 120000 miles for the part to have meaningful remaining life.
What to inspect on the donor part:
- CRITICAL: Before installation, test a used EGR cooler for internal coolant leaks. Plug the exhaust ports and blow into a coolant port; if you hear or feel air escaping from the exhaust side, the cooler is bad and will destroy your engine.
- Inspect the intake manifold for any cracks or damage to the mounting surfaces. The carbon clogging is expected and will be cleaned.
- For the EGR valve, ensure the electrical connector is not damaged. The valve itself will likely be seized with carbon but can be cleaned.
OEM-only on this vehicle (don't cheap out):
- EGR Valve: Many forum members and mechanics strongly recommend using a genuine OEM Toyota EGR valve (Denso/Aisin). Aftermarket valves have a reputation for premature failure or being faulty out of the box.
Aftermarket brands forum-validated for this vehicle:
- Dorman: Offers an aftermarket EGR cooler (P/N 668-001) that is a common alternative to the more expensive OEM unit.
Brands owners have reported issues with on this vehicle:
- Unbranded/generic EGR valves: Cheaper aftermarket EGR valves, especially from online marketplaces, are frequently reported to fail quickly or not function correctly, leading to the code returning.
Real Owner Stories
Aggregated from forums and TSBs cited above. Mileages and costs reflect what owners reported in those sources.
2010 Toyota Prius 1.8L
Symptoms: I have a 2010 toyota prius [experiencing] engine shaking, shuddering, or rattling, especially on cold starts or under light acceleration.
What fixed it: Widespread carbon clogging in the EGR valve, cooler, and intake manifold required a full system service including cleaning or replacement of these components.
Source hint: PriusChat forum citations and owner_reports
Related OBD-II Codes
Frequently Asked Questions
Is there a Toyota TSB for the engine shaking and misfiring on my 2010-2015 Prius?
Does Toyota offer any warranty extensions for EGR issues on the 2010-2012 Prius?
Can I use an aftermarket EGR valve to fix the P0400 code?
Why is my Prius rattling specifically during cold starts or light acceleration?
Is it better to clean or replace the EGR cooler?
What should I check if I buy a used EGR cooler to save money?
Helpful Videos

We Have This Part in Stock

The information in this article is provided for general reference and educational purposes only. Vehicle specifications, procedures, and part compatibility can vary by production date, trim level, and region. Always consult your vehicle's factory service manual and verify part numbers before purchasing or performing repairs. Safety-critical components such as airbags, seat belts, and braking systems should be installed by a qualified professional.
- Toyota Prius:
- 🧭 Diagnostic Flowchart
- 🎬 Helpful Videos
- 🛍️ Shop This Part
- What's Unique About the 2009-2015 Toyota Prius
- Symptoms You May Notice
- Most Likely Causes
- Diagnosis Steps
- Parts You'll Likely Need
- Related Codes That Often Appear With This One
- Technical Service Bulletins (TSBs) & Recalls
- Platform-Specific Known Issues
- Mechanic-Grade Diagnostic Values
- Scan Tool Commands That Help
- Wiring & Ground Locations
- Real Owner Repair Stories
- OEM Part Supersession History
- Model Year Variations Within This Range
- Used vs. New Parts: Buying Guide for This Vehicle
- Real Owner Stories
- 2010 Toyota Prius 1.8L
- Related OBD-II Codes
- Frequently Asked Questions
- 🎟️ Get 5% Off