
P0401 on 2012 Toyota Prius V: EGR Insufficient Flow Causes & Fixes
On a 2012 Prius V, code P0401 is almost always caused by heavy carbon buildup clogging the EGR valve, EGR cooler, and intake manifold passages. The fix is a thorough cleaning of the entire system, not just the valve. Ignoring the issue is a known contributor to premature head gasket failure. Expect to spend $30-$100 on gaskets and cleaning supplies for a DIY job.
- P0401 on a 2012 Prius V is a system-wide problem, not just a single part failure. A complete fix requires cleaning the EGR cooler, EGR valve, and intake manifold passages.
- The most common symptom, besides the Check Engine Light, is a distinct engine rattle or rough idle, especially when the engine is cold.
- This is a known issue acknowledged by Toyota through TSBs and a warranty extension program.
- Ignoring this code can lead to more severe engine problems, including potential head gasket failure, due to increased combustion temperatures.
- Always use new gaskets when reassembling the components to prevent future leaks.
What's Unique About the 2012-2012 Toyota PRIUS V

The 2012 Prius V uses the 2ZR-FXE engine, which is well-known for issues with its EGR system. Due to the engine's design, which includes low-tension piston rings for efficiency, and the frequent on-off cycling of a hybrid powertrain, it is highly susceptible to oil consumption and heavy carbon and soot accumulation throughout the entire EGR circuit. This isn't just a simple valve problem; the EGR cooler, connecting pipes, and even small passages in the intake manifold are all prone to severe clogging. This widespread blockage is so common that it's the primary cause of P0401, often leading to secondary symptoms like engine rattling on cold starts and, if ignored, can contribute to head gasket failure.
Diagnostic Flowchart

Tap your situation to follow the diagnostic path that matches what you're seeing on this vehicle.
Symptoms You May Notice
- Check Engine Light is on
- Engine rattling or knocking sound, often described as 'marbles in a can', especially on a cold start.
- Rough, vibrating, or shaky idle, particularly when the engine is cold.
- Engine hesitation or stumbling
- Blinking check engine light during acceleration, indicating a misfire.
- Reduced fuel economy.
- Engine stalling in some cases.
- Replacing only the EGR valve without cleaning the EGR cooler and intake manifold. The code will almost certainly return because the primary restriction (the cooler) has not been addressed.
- Replacing the MAP sensor before thoroughly cleaning the entire EGR system.
- Mistaking the cold start rattle for a more serious engine internal issue before inspecting the EGR system. The rattle is often caused by the engine stumbling from improper EGR flow at startup.
Most Likely Causes


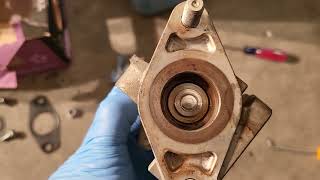
- Clogged EGR Cooler 🔴 High Probability → Shop Exhaust Gas Recirculation (EGR) Valve The EGR cooler on this engine has many small fins, like a small radiator, to cool exhaust gases. These fins are extremely prone to getting completely blocked with hard carbon deposits, severely restricting flow before it even reaches the EGR valve. This is often the primary point of restriction in the entire system.
How to confirm: Remove the cooler and visually inspect the passages. If you cannot see light through the channels or water/cleaner cannot flow through, it is clogged.
Typical fix: Thoroughly clean the cooler. A popular and effective DIY method is soaking it overnight in a hot water and Oxi-Clean solution, then using brushes or a pressure washer to remove all deposits. If it cannot be cleaned, it must be replaced.
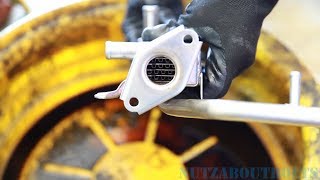
Est. part cost: $150-$400 for a new cooler, plus gaskets. - Clogged or Sticking EGR Valve 🔴 High Probability → Shop Exhaust Gas Recirculation (EGR) Valve Carbon that gets past the cooler builds up in the EGR valve itself, causing the internal plunger to stick. Toyota TSB T-SB-0027-16 directly addresses a sticking EGR valve due to excess carbon build-up causing P0401. An updated valve kit was released to address this.
How to confirm: Remove the valve and inspect for carbon buildup. Check if the plunger moves freely and snaps shut. A bidirectional scan tool can also be used to command the valve open and closed to test its electronic function and observe changes in MAP sensor readings.
Typical fix: Clean the valve thoroughly with brake cleaner or throttle body cleaner and brushes, ensuring the plunger moves smoothly. If the valve is physically damaged, worn, its internal motor has failed, or cleaning doesn't resolve the issue, it must be replaced.
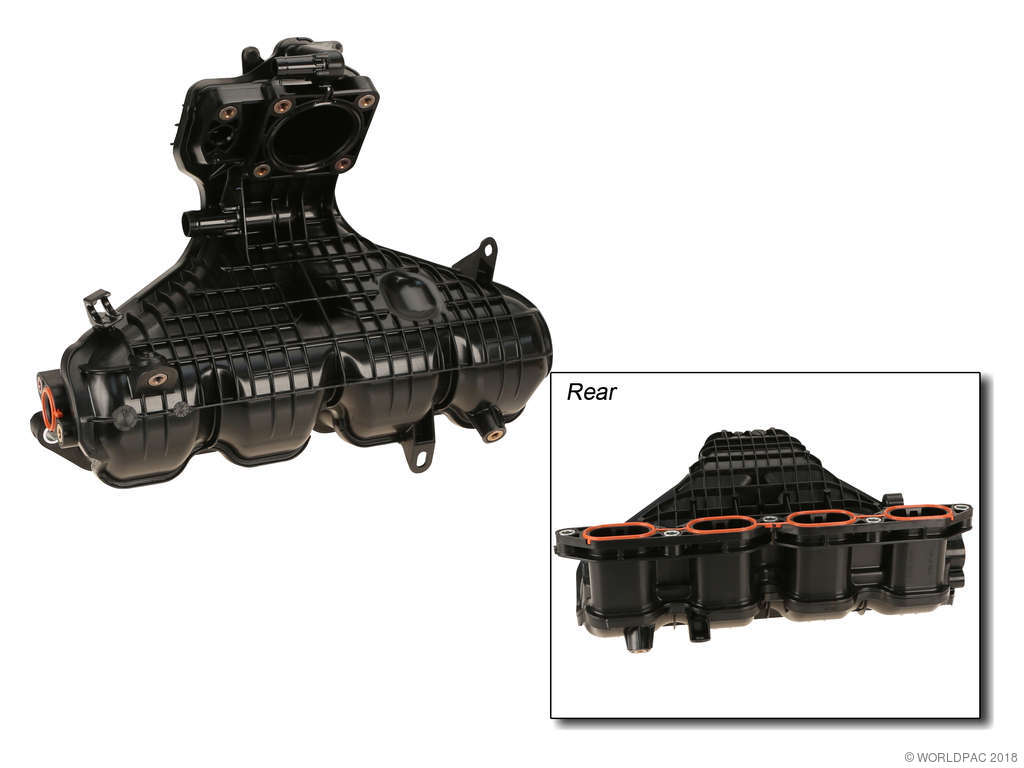
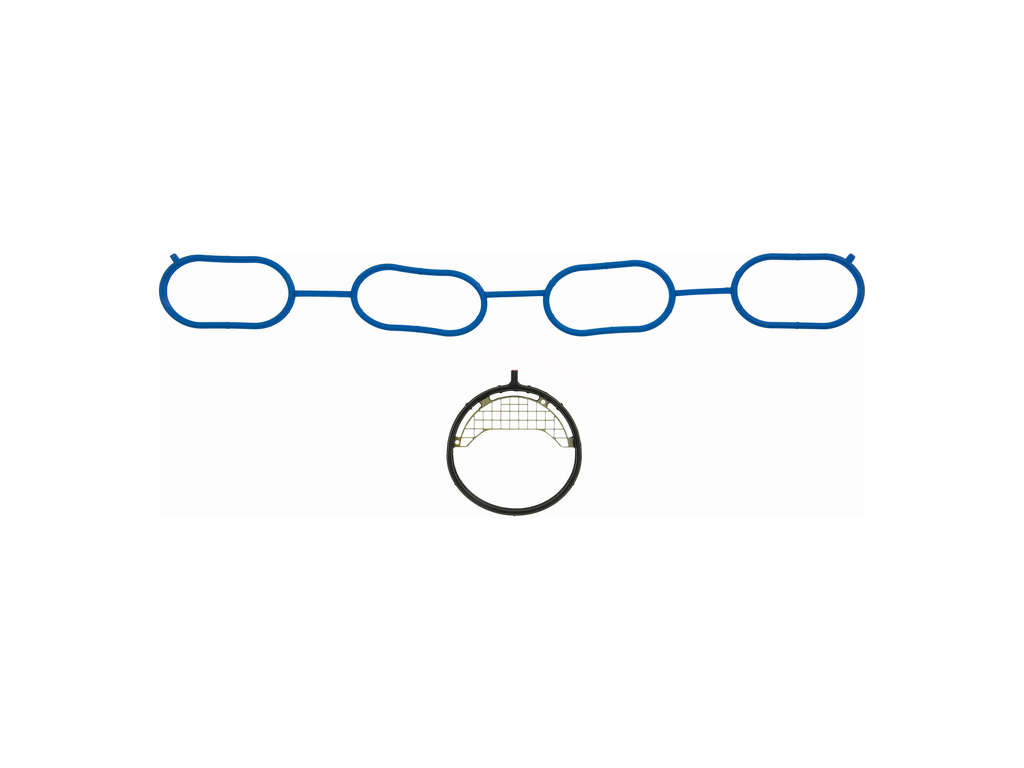
Est. part cost: $150-$250 for a new valve. - Clogged Intake Manifold Passages 🟡 Medium Probability → Shop Engine Intake Manifold The EGR system distributes exhaust into each cylinder via small, individual passages in the plastic intake manifold. These small ports are easily blocked by a combination of carbon from the EGR and oil blow-by from the PCV system, leading to poor distribution and insufficient flow detection.
How to confirm: After removing the intake manifold, visually inspect the small EGR ports where the EGR pipe connects. They are often completely caked with carbon.
Typical fix: Clean the intake manifold and all EGR ports using long, thin brushes (pipe cleaner sets work well), picks, and solvent. While the manifold is off, it is a good time to also replace the PCV valve, as it is a contributor to the buildup and is now easily accessible.
Est. part cost: $10-$20 for a PCV valve and gaskets. - Faulty MAP Sensor ⚪ Low Probability → Shop Manifold Absolute Pressure Sensor The ECM uses the Manifold Absolute Pressure (MAP) sensor to verify EGR flow by detecting a pressure change when the valve opens. A faulty or dirty sensor can provide incorrect readings, leading the ECM to believe there is a flow issue when there isn't one. This is an uncommon cause and should only be considered after the entire EGR path is confirmed to be clear.
How to confirm: After confirming all EGR passages are clear, check the MAP sensor reading with a scan tool. A sensor that is slow to respond or reads incorrectly when the EGR valve is manually opened may be faulty. The P0401 diagnostic procedure in the repair manual details how to perform an active test.
Typical fix: Replace the MAP sensor.
Est. part cost: $50-$150
Diagnosis Steps
- Confirm P0401 is the active code using an OBD-II scanner.
- Listen for a distinct engine rattle or knocking sound on a cold start, a classic symptom of this issue on the Prius.
- Plan for a full system cleaning. The fix almost always requires removing and cleaning the EGR valve, EGR cooler, EGR pipes, and intake manifold.
- Begin disassembly. This is a labor-intensive job (3-5 hours) that requires removing the windshield wipers and the cowl assembly to access the back of the engine.
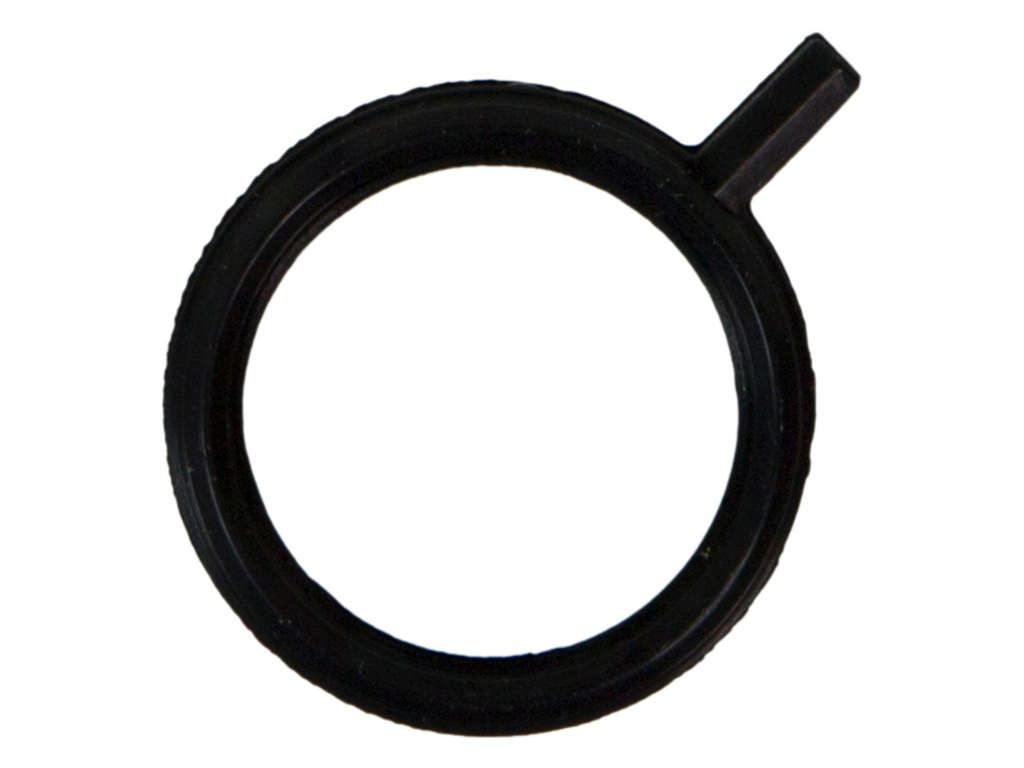
- Drain about a gallon of engine coolant to avoid spills when disconnecting the EGR cooler hoses.
- Remove the EGR valve, EGR pipe, and EGR cooler assembly. This requires various 10mm and 12mm sockets, and an E-8 Torx socket for the cooler studs.
- Thoroughly inspect and clean all components. The EGR cooler is the most likely to be severely clogged. Soaking in cleaners (Oxi-Clean and water is a popular DIY method) and using brushes or a pressure washer is effective.
- Remove and clean the intake manifold, paying close attention to the small EGR distribution ports.
- Consider replacing the PCV valve while the intake manifold is off.
- Reassemble the system using new gaskets for all components to prevent vacuum or exhaust leaks.
- Refill and bleed the cooling system to remove any air pockets.
- Clear the trouble code with a scan tool and perform a drive cycle to confirm the fix.
Parts You'll Likely Need
- EGR Valve
(OEM #25620-37120)— The valve itself gets clogged with carbon and can stick. While it can often be cleaned, replacement is sometimes necessary if it's worn or the internal motor has failed. An updated part kit (04004-58137) was specified in TSBs.
Trusted brands: Toyota (OEM), Standard Motor Products, Dorman
OEM price range: $180-$250
Aftermarket price range: $100-$180 - EGR Cooler
(OEM #25601-37010)— This is the most common point of restriction in the system. It is often completely blocked with carbon and must be cleaned or replaced to restore flow.
Trusted brands: Toyota (OEM), Dorman
OEM price range: $300-$400
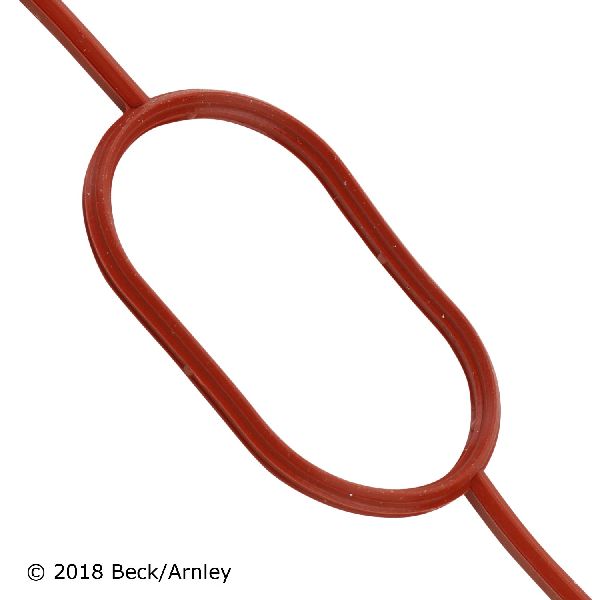
Aftermarket price range: $150-$250 - EGR Cooler Gasket (No. 1)
(OEM #25685-37010)— A new gasket is required for the connection between the EGR cooler and the EGR pipe.
Trusted brands: Toyota (OEM), Fel-Pro
OEM price range: $4-$8
Aftermarket price range: $2-$5 - Intake Manifold Gasket
(OEM #17177-0T020)— A new gasket is required when removing the intake manifold to clean the EGR ports. This part should not be reused.
Trusted brands: Toyota (OEM), Fel-Pro
OEM price range: $15-$25
Aftermarket price range: $10-$20
Related Codes That Often Appear With This One
- P0300, P0301, P0302, P0303, P0304 — If the EGR passages in the intake manifold are unevenly clogged, it can cause misfires in individual cylinders, leading to these codes. This is addressed in Lexus TSB L-SB-0019-16 for the sister platform CT200h.
Technical Service Bulletins (TSBs) & Recalls
- T-SB-0027-16
- T-SB-0075-13
- ZF3 (Warranty Enhancement)
Platform-Specific Known Issues
- Toyota has issued Technical Service Bulletin (TSB) T-SB-0027-16 for the 2012 Prius V, which notes that some vehicles may exhibit a rough idle, tapping noise, and illuminate the Check Engine Light with DTC P0401. The cause is identified as excess carbon build-up causing the EGR valve to stick.
- Toyota also created a Warranty Enhancement Program (ZF3) for the 2012 Prius V, extending the warranty coverage for the sticking EGR valve condition.
Mechanic-Grade Diagnostic Values
- EGR Valve Coil Resistance — expected: 19.9 - 23.4 Ohms. Failure: A resistance reading outside of this range indicates a faulty coil in the valve's stepper motor.
- MAP Sensor Reading During EGR Active Test — expected: MAP value should increase by at least +10 kPa (75 mmHg) when the EGR valve is commanded open from 0 to 30 steps.. Failure: If the MAP value does not change significantly, it confirms a blockage in the EGR passages or a non-functioning valve.
- Techstream EGR Step Position Test at Idle — expected: On a clean system, opening the valve to step 15-20 should cause a noticeably rough idle or stall the engine.. Failure: If the valve can be opened to a high step number (e.g., 30+) with no change in idle quality, it indicates a severe blockage preventing gas flow.
Scan Tool Commands That Help
- Toyota Techstream: Active Test: Control the EGR Step Position — This is the primary diagnostic command to functionally test the EGR system. A technician can manually command the EGR valve to open in small increments (0-110 steps) while monitoring the MAP sensor value and engine idle. If the valve is commanded open and the MAP reading doesn't increase and the idle doesn't roughen, it confirms a flow problem (clog) or a non-responsive valve.
- Toyota Techstream: Utility: EGR Flow Sufficiency Check — This is an automated test within Techstream that checks the EGR system and provides a pass/fail result with a measured kPa value. It can be used to confirm if the system is operating within its expected parameters after a repair.
Wiring & Ground Locations
- ECM (Engine Control Module) — Located on the left side of the engine compartment.. The ECM controls the EGR valve via a stepper motor and reads the MAP sensor to verify flow. In rare cases of wiring issues, checking for signal continuity between the ECM connectors and the EGR valve/MAP sensor may be necessary.
- EGR Valve Connector — On the EGR valve assembly, located at the rear of the engine.. This 6-pin connector is the main point for electrical testing of the EGR valve's stepper motor, including checking for voltage supply and coil resistance.
Real Owner Repair Stories
- Torque News article by Peter Neilson (2010 Toyota Prius) — Persistent P0401 code after a head gasket replacement where the entire EGR system (valve, cooler, passages) was thoroughly cleaned.
❌ Tried (didn't work) Complete and verified cleaning of the EGR cooler, EGR valve, and intake manifold passages.
✅ What actually fixed it The issue was a faulty EGR stepper motor, even though it passed a resistance test. The author swapped the motor, magnet, and spring from another valve onto his cleaned valve body, which resolved the code. This indicates the electronic part of the valve can fail without being a simple clog. - PriusChat user 'ALTEREG0' (2012 Prius) — P0401 code returned a year after a full EGR system cleaning and installation of a new EGR valve.
❌ Tried (didn't work) Complete system cleaning., New EGR valve., New PCV valve., Installation of an oil catch can.
✅ What actually fixed it The user discovered the 'ramp looking plastic inside the EGR Valve magnet' was worn out. Replacing just the magnet assembly from another valve caused the code to go away, suggesting a mechanical wear issue inside the valve's actuator rather than a clog or electronic failure.
OEM Part Supersession History
25620-37110→25620-37120— The original valve was prone to sticking. The updated part is designed to better resist carbon buildup issues.N/A→04004-58137— This is a kit part number specified in TSBs T-SB-0075-13 and the ZF3 Warranty Enhancement. It includes the updated EGR valve and required gaskets for the repair.
Helpful Videos


We Have This Part in Stock


The information in this article is provided for general reference and educational purposes only. Vehicle specifications, procedures, and part compatibility can vary by production date, trim level, and region. Always consult your vehicle's factory service manual and verify part numbers before purchasing or performing repairs. Safety-critical components such as airbags, seat belts, and braking systems should be installed by a qualified professional.
- Toyota PRIUS V:
- 🧭 Diagnostic Flowchart
- 🎬 Helpful Videos
- 🛍️ Shop This Part
- What's Unique About the 2012-2012 Toyota PRIUS V
- Symptoms You May Notice
- Most Likely Causes
- Diagnosis Steps
- Parts You'll Likely Need
- Related Codes That Often Appear With This One
- Technical Service Bulletins (TSBs) & Recalls
- Platform-Specific Known Issues
- Mechanic-Grade Diagnostic Values
- Scan Tool Commands That Help
- Wiring & Ground Locations
- Real Owner Repair Stories
- OEM Part Supersession History
- 🎟️ Get 5% Off