
P0440 on 2004-2009 Mazda 3: EVAP System Malfunction Causes and Fixes
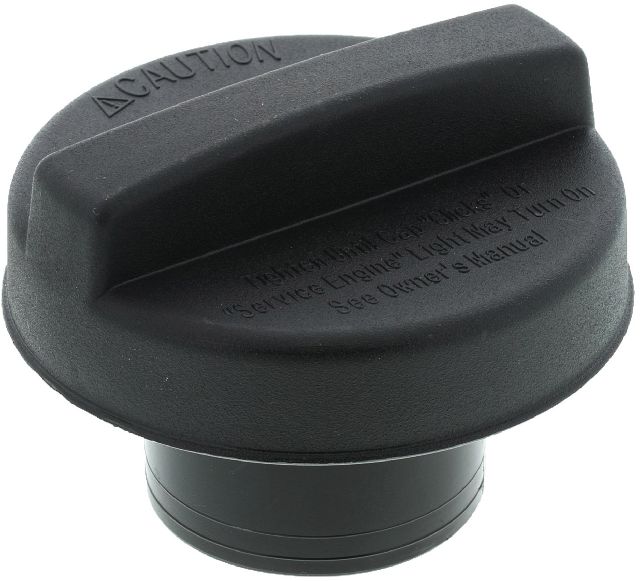
For a first-generation Mazda 3, the P0440 code most often points to a loose or faulty gas cap. If a new gas cap doesn't fix it, the next most likely cause is a failed EVAP purge valve. A new OEM-spec gas cap costs around $20-$40, and a purge valve is about $40-$100.
- Always start with the simplest fix: check that your gas cap is tight. If it's old, replace it.
- The P0440 code on a 2004-2009 Mazda 3 is most likely caused by a bad gas cap or a faulty purge valve.
- If you smell a strong odor of fuel, the problem could be a more significant leak, possibly from a cracked fuel pump lock ring on top of the tank.
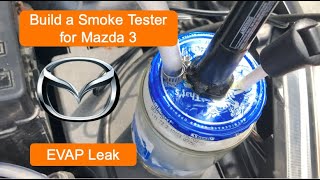
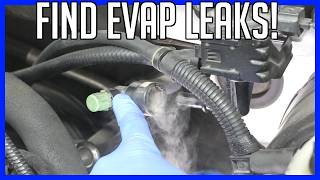
- A smoke test is the most reliable way to find a leak if the cause isn't immediately obvious.
- This code will not stop you from driving the car, but it will cause you to fail an emissions test.
What's Unique About the 2004-2009 Mazda 3
On the first-generation Mazda 3, the EVAP system is prone to a few common failures. Mazda issued a Technical Service Bulletin (TSB 01-002/18, which references an earlier TSB 01-020/10) for related EVAP leak codes that involved an improved-design fuel filler cap, indicating the original cap was a known weak point. Additionally, owners have discovered a unique failure point: the large plastic lock ring that secures the fuel pump module to the top of the gas tank can crack, causing a significant leak and a strong fuel smell. The purge solenoid valve is also a frequent point of failure.
Symptoms You May Notice
- Check Engine Light is on
- A noticeable smell of gasoline, especially after filling the tank or around the rear of the car.
- Potentially failing an emissions inspection.
- Slight decrease in fuel economy.
- Replacing the oxygen sensors. O2 sensors are not related to the EVAP system and will not fix a P0440 code.
- Replacing the fuel tank pressure (FTP) sensor without proper diagnosis. While an FTP sensor can fail, it's less common than a simple leak or a bad valve.
Most Likely Causes
- Loose or Faulty Gas Cap 🔴 High Probability → Shop Fuel Tank Cap Mazda released TSB 01-020/10 (referenced in 01-002/18) advising replacement with an improved fuel cap design to resolve EVAP leak codes, confirming the original part was problematic. The rubber seal on the cap can also dry out and crack over time, preventing a proper seal.
How to confirm: First, ensure the cap is tightened until it clicks several times. Inspect the rubber O-ring on the cap for cracks, stiffness, or damage. Check the fuel filler neck for rust or debris that could prevent a good seal. An aftermarket cap is a common point of failure; an OEM cap is recommended.
Typical fix: Replace the gas cap with a new, high-quality OEM part (Part No. BNYF-42-250).
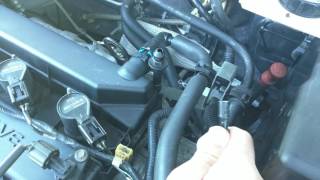
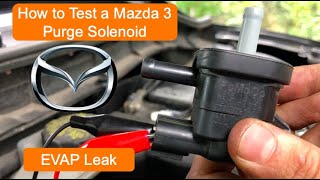
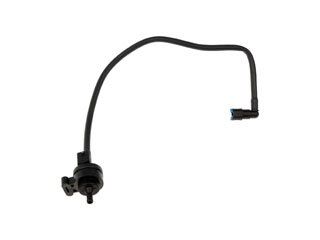
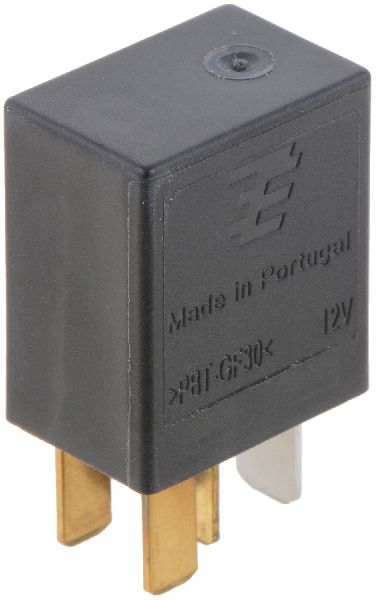
Est. part cost: $20-$40 - Failed EVAP Purge Solenoid Valve 🟡 Medium Probability → Shop Vapor Canister This is a common failure point on many vehicles from this era. The valve, located in the engine bay near the intake manifold, can get stuck open or closed, disrupting the flow of fuel vapors.
How to confirm: The valve is located in the engine bay, typically mounted near the passenger side. With the engine off, disconnect the hoses and try blowing through it; if air passes, it's stuck open and is faulty. You can also apply 12V power to its terminals to see if it clicks open and closed. A multimeter should show a resistance between 30-38 Ohms. 🎬 Watch: Step-by-step guide to testing your purge solenoid
Typical fix: Replace the purge solenoid valve. An OEM part number is L3K9-18-740B, with many aftermarket crosses available.
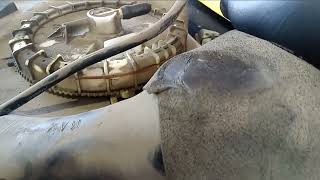
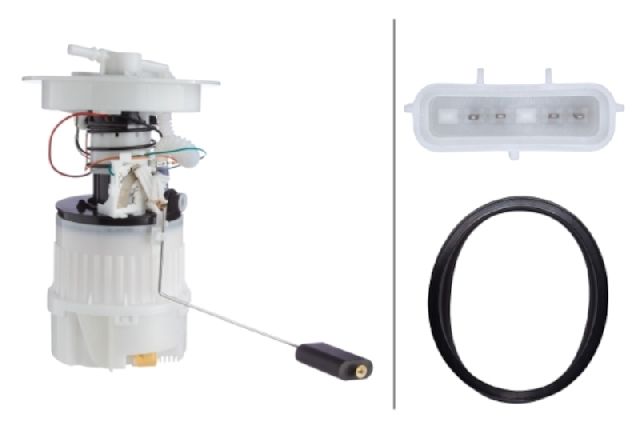
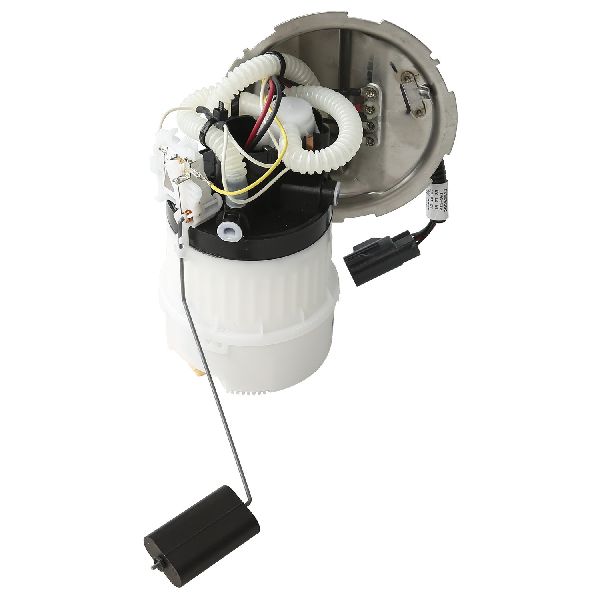
Est. part cost: $40-$100 - Cracked Fuel Pump Lock Ring ⚪ Low Probability → Shop Fuel Pump On models with a plastic fuel tank, the large plastic nut (lock ring) that holds the fuel pump assembly in place can develop cracks over time, leading to a leak directly on top of the tank.
How to confirm: This is best confirmed with a smoke test. Smoke will be seen escaping from the fuel pump access panel area under the rear seat. A strong fuel smell inside the cabin, especially after filling up, is a major clue.
Typical fix: The fuel tank must be partially dropped to access and replace the cracked lock ring. 🎬 Watch: How to fix a cracked lock ring and gas smell Some owners have successfully sealed small cracks with fuel-safe epoxy as a temporary measure.
Est. part cost: $20-$50 - Cracked or Disconnected EVAP Hoses ⚪ Low Probability The rubber and plastic hoses in the EVAP system can become brittle and crack with age and exposure to engine heat and the elements.
How to confirm: Visually inspect all accessible EVAP lines running from the engine bay to the charcoal canister near the fuel tank. A smoke test is the most effective way to find a small crack or leak that isn't obvious.
Typical fix: Replace the damaged section of hose.
Est. part cost: $10-$30
Rare But Worth Checking
- Failed Canister Vent Valve: → Shop Vapor Canister This valve, located near the charcoal canister under the car, can get stuck open or closed. It's less common than the purge valve failure but should be tested if other causes are ruled out.
- Cracked Charcoal Canister: → Shop Vapor Canister The canister itself can crack from road debris or age, causing a leak. This is usually found during a smoke test.
Diagnosis Steps
- Read the Code: Use an OBD-II scanner to confirm P0440 is the only code present. Note any other codes.
- Check the Gas Cap: Remove the gas cap. Inspect the seal for cracks or damage. Reinstall it and ensure it clicks at least 3 times. Clear the code and drive for a few days to see if it returns. Using a genuine Mazda OEM cap (BNYF-42-250) is strongly recommended as aftermarket caps are a frequent source of issues.
- Visual Inspection: If the code returns, visually inspect all visible EVAP hoses in the engine bay and under the car near the fuel tank for obvious cracks, disconnections, or damage.
- Test the Purge Solenoid: Locate the purge solenoid in the engine bay, mounted near the intake manifold. Disconnect the electrical connector and hoses. Try to blow through the valve; if air passes, it is stuck open and needs replacement. If it's closed, apply 12V from the battery to the electrical pins and listen for a click. Check the coil resistance with a multimeter; it should be between 30-38 Ohms.
- Smoke Test: If the gas cap and purge valve are good, the most effective next step is a smoke test. A mechanic will introduce pressurized smoke into the EVAP system's service port. Smoke will exit from any leaks, pinpointing the exact location, whether it's a hose, the charcoal canister, the vent valve, or the fuel pump lock ring.
- Inspect Fuel Pump Lock Ring: If a smoke test reveals a leak at the top of the fuel tank, access the fuel pump under the rear seat (by lifting the seat cushion) to inspect the plastic lock ring for visible cracks.
Parts You'll Likely Need
- Fuel Filler Cap
(OEM #BNYF-42-250 (supersedes multiple previous part numbers))— This is the most common cause of P0440. The seal wears out over time, and Mazda issued a TSB related to an improved cap design.
Trusted brands: Mazda OE, Stant, Motorad
OEM price range: $25-$40
Aftermarket price range: $15-$25 - EVAP Canister Purge Solenoid Valve
(OEM #L3K9-18-740B (cross-references to many aftermarket parts))— A very common failure item that gets stuck open or closed, causing this code.
Trusted brands: Dorman (911-702), Standard Motor Products (CP753), Bosch
OEM price range: $70-$120
Aftermarket price range: $40-$80 - Fuel Pump Lock Ring — A known, though less common, failure point on plastic tanks for this model, causing a large leak at the top of the tank.
Trusted brands: Mazda OE
OEM price range: $20-$50
Aftermarket price range: $15-$30
Related Codes That Often Appear With This One
- P0442 — P0442 indicates a small leak. If the system has a borderline leak, it might trigger the general P0440 code at first, or both codes may appear. Both are covered under the diagnostic procedure in TSB 01-002/18.
- P0455 — P0455 indicates a large leak. This might appear with P0440 if there is a significant breach, such as a cracked fuel pump lock ring or a disconnected hose. This is also covered by TSB 01-002/18.
- P0443 — This code points to an electrical fault in the 'Purge Control Valve Circuit'. If you see this with P0440, it strongly suggests the purge valve itself, its wiring, or its connector is the problem, rather than a physical leak.
Technical Service Bulletins (TSBs) & Recalls
- 01-002/18 - MULTI-MODEL - DETERMINING EVAPORATIVE SYSTEM LEAK LOCATION FOR DTCs P0441 / P0442 / P0455 / P0456. This TSB provides a flowchart for diagnosing EVAP leaks on the 2004-2010 Mazda 3, instructing technicians to check the fuel cap, perform a system test with a diagnostic tool, and use a smoke machine if necessary. 🎬 Watch: Build a cheap DIY smoke tester for your Mazda
- 01-020/10 - This TSB is referenced by 01-002/18 and advises replacing the original fuel filler cap with an improved part to resolve EVAP leak codes.
Platform-Specific Known Issues
- A cracked plastic fuel pump lock ring on top of the gas tank has been documented by owners as a cause for P0440, often accompanied by a strong fuel smell.
- Mazda TSB 01-002/18 (superseding earlier versions) provides diagnostic steps for EVAP leaks on the 2004-2010 Mazda 3 and references a separate TSB (01-020/10) for an updated fuel filler cap design to resolve leak codes.
Mechanic-Grade Diagnostic Values
- Purge Solenoid Valve Coil Resistance — expected: 30 - 38 Ohms at room temperature. Failure: A reading significantly outside this range indicates a faulty internal coil.
- Canister Vent Solenoid Coil Resistance — expected: 48 - 65 Ohms. Failure: A reading outside this range suggests the solenoid coil is bad.
- Fuel Tank Pressure (FTP) Sensor Voltage — expected: ~2.5V (Key On, Engine Off, Gas Cap Off). Failure: A reading that is stuck high (e.g., 5V) or low (e.g., <1.5V) with the system open to atmosphere suggests a faulty sensor or wiring issue.
Scan Tool Commands That Help
- Mazda IDS (or equivalent professional scanner): EVAP System Test / Purge/Seal — This bidirectional command allows a technician to manually close the vent solenoid and command the purge solenoid open while monitoring the Fuel Tank Pressure (FTP) sensor. A rapid vacuum should build in the tank. If it doesn't, there's a large leak or a blockage. If it builds vacuum but doesn't hold it after sealing the system, it confirms a leak. This can quickly verify the integrity of the system and the function of the valves without a smoke machine.
Wiring & Ground Locations
- G5 — Left front of the engine compartment.. A poor ground at this location can affect various engine sensors and actuators, potentially including EVAP components controlled by the ECU.
- G8 — Behind the right end of the dashboard.. This is an interior ground point. While less likely to be the primary cause, intermittent electrical issues for ECU-controlled systems can sometimes be traced to corroded or loose interior grounds.
- G11 — Below the driver's seat.. This ground point is relevant for components located toward the rear of the vehicle. A bad ground here could potentially affect the fuel pump assembly or canister vent solenoid circuits.
- Purge Solenoid Valve ECU Pin — On the ECU connector (Pin 2AB on a 2007 Mazdaspeed3, wire color Black/Orange).. Knowing the specific ECU pin allows for end-to-end continuity testing of the control wire between the ECU and the purge solenoid, which is crucial for diagnosing an electrical fault (like code P0443).
Real Owner Repair Stories
- YouTube user video (Older Toyota (demonstrates a common EVAP failure pattern)) — Persistent P0440 check engine light.
❌ Tried (didn't work) Replaced gas cap, Inspected engine bay hoses, Replaced other EVAP electronic components from a junkyard
✅ What actually fixed it After dropping the fuel tank, a visible hairline crack was found on the plastic nipple of the fuel tank vent valve, which was part of the charcoal canister assembly. Replacing this component resolved the leak and the code.
"I Checked Everything" — The Actual Cause
- The most common reason for a P0440 to return after a smoke test passes is a faulty Fuel Tank Pressure (FTP) sensor. The system may be perfectly sealed, but the sensor provides incorrect data to the ECU, tricking it into thinking there's a leak.
- An intermittent electrical failure in the purge or vent solenoid can cause the code. The solenoid may test correctly with a multimeter and even click with 12V applied, but fail to operate correctly under specific drive cycle conditions, causing the onboard diagnostic test to fail.
- A clogged atmospheric reference port or hose for the FTP sensor can cause the code with no actual leak. The sensor needs to compare tank pressure to the outside air; if its reference is blocked (e.g., by dust or debris), its readings will be skewed, leading to a false failure.
OEM Part Supersession History
L3K9-18-740, L3K9-18-740A→L3K9-18-740B— Standard part revision and improvement by the manufacturer.
Heads up: The newer part (L3K9-18-740B) is the correct service replacement for the earlier versions.
Model Year Variations Within This Range
- 2004-2009 (Varies by state of sale): PZEV (Partial Zero Emissions Vehicle) models, sold primarily in California and other CARB states, have a more complex EVAP system designed to have zero evaporative emissions. This can include different fuel tank liners, an auxiliary carbon scrubber for the charcoal canister, and potentially different ECU programming. When ordering EVAP parts, it is critical to verify if the vehicle is a PZEV or non-PZEV model, as components like the charcoal canister may not be interchangeable.
Diagnostic Flowchart
Other Known Issues on This Vehicle
Issues unrelated to this code that are worth knowing about as an owner of this generation:
- Passenger-Side Engine Mount Failure 🔴 High — Extremely common, often failing between 30,000 and 90,000 miles. It is a fluid-filled mount that leaks, causing excessive engine vibration at idle and clunking noises.
- Automatic Transmission Control Module (TCM) Failure 🔴 High — A well-documented issue where the TCM, mounted directly to the hot transmission, fails due to heat and vibration causing cracked solder joints. Symptoms include harsh shifting, getting stuck in gear (limp mode), and illumination of the 'AT' and Check Engine lights.
- Rear Wheel Well and Rocker Panel Rust 🟠 Medium — A notorious problem, especially for cars in the Salt Belt. The design of the rear wheel well liner traps moisture and debris, leading to severe rust-through from the inside out. By the time paint bubbling is visible, the damage is often extensive.
- Failing Thermostat (Stuck Open) 🟡 Low — A common issue where the thermostat fails in the open position, leading to a P0126 code, slow engine warm-up, and poor heater performance in winter.
Used vs. New Parts: Buying Guide for This Vehicle
When a used part is the smart pick: For this repair, used parts are generally not recommended for the most common failure items. However, a large structural component like a charcoal canister assembly or a specific plastic hose could be sourced from a low-mileage, rust-free donor vehicle if a new part is unavailable or prohibitively expensive.
Donor-vehicle mileage cap: roughly under 80000 miles for the part to have meaningful remaining life.
What to inspect on the donor part:
- Check for rust on any metal components, especially on the vent valve body.
- Inspect plastic hose ends for brittleness or cracking.
- Ensure electrical connectors are free of corrosion or damage.
- If possible, verify the donor vehicle did not have EVAP-related codes.
OEM-only on this vehicle (don't cheap out):
- Fuel Filler Cap: Aftermarket caps are a very common cause of persistent EVAP codes. The OEM Mazda cap (BNYF-42-250) is strongly recommended as it has a revised design to address this issue.
- PZEV-specific components: Due to their unique design and calibration, it is highly advisable to use OEM parts for any PZEV-specific EVAP components to ensure compatibility and proper function.
Aftermarket brands forum-validated for this vehicle:
- Dorman (for purge valves like 911-700/911-702 and metal fuel pump lock rings like 579-013)
- Standard Motor Products (for solenoids)
- Bosch (for solenoids)
Brands owners have reported issues with on this vehicle:
- Unbranded, no-name gas caps from online marketplaces.
- Extremely low-cost purge or vent solenoids that do not list resistance specifications.
Real Owner Stories
Aggregated from forums and TSBs cited above. Mileages and costs reflect what owners reported in those sources.
2010 Mazda 3
Symptoms: P0440 code with a strong gas smell.
What fixed it: A smoke test revealed a crack in the fuel pump locking ring. The repair involved dropping the fuel tank and replacing the ring.
Source hint: Mazda3Forums - 'P0440 and gas smell'
Related OBD-II Codes
Frequently Asked Questions
Which Mazda TSB addresses the fuel cap issue for my 2004-2009 Mazda 3?
What is the specific Mazda part number for the recommended replacement gas cap?
I smell gas inside the cabin of my Mazda 3 after filling up; what should I check first?
How can I test the purge solenoid valve on my Mazda 3 at home?
Is there a specific TSB that provides a diagnostic flowchart for P0440 on this model?
What is the part number for the EVAP purge solenoid valve for the Mazda 3?
Helpful Videos
We Have This Part in Stock


The information in this article is provided for general reference and educational purposes only. Vehicle specifications, procedures, and part compatibility can vary by production date, trim level, and region. Always consult your vehicle's factory service manual and verify part numbers before purchasing or performing repairs. Safety-critical components such as airbags, seat belts, and braking systems should be installed by a qualified professional.
- Mazda 3:
- 🧭 Diagnostic Flowchart
- 🎬 Helpful Videos
- 🛍️ Shop This Part
- What's Unique About the 2004-2009 Mazda 3
- Symptoms You May Notice
- Most Likely Causes
- Rare But Worth Checking
- Diagnosis Steps
- Parts You'll Likely Need
- Related Codes That Often Appear With This One
- Technical Service Bulletins (TSBs) & Recalls
- Platform-Specific Known Issues
- Mechanic-Grade Diagnostic Values
- Scan Tool Commands That Help
- Wiring & Ground Locations
- Real Owner Repair Stories
- "I Checked Everything" — The Actual Cause
- OEM Part Supersession History
- Model Year Variations Within This Range
- Other Known Issues on This Vehicle
- Used vs. New Parts: Buying Guide for This Vehicle
- Real Owner Stories
- 2010 Mazda 3
- Related OBD-II Codes
- Frequently Asked Questions
- 🎟️ Get 5% Off