
P0455 on 2006-2010 Chevrolet HHR: EVAP Large Leak Causes and Fixes
For a 2006-2010 Chevy HHR, code P0455 is most often caused by a loose or faulty gas cap. If tightening or replacing the cap doesn't work, the next most likely culprits are the EVAP vent solenoid near the gas tank or the purge solenoid in the engine bay. A hard start after refueling is a strong indicator of a failed purge solenoid. These parts are relatively inexpensive and accessible for DIY replacement.
- Always check your gas cap first for code P0455; it's the simplest and most common fix.
- If the gas cap isn't the issue, the next parts to inspect are the purge solenoid (on the engine) and the vent solenoid (under the car near the tank).
- Both solenoids can be tested at home with basic tools before you buy replacements.
- If these simple fixes don't resolve the code, a professional smoke test is the best way to find the exact source of the leak, which could be a cracked hose or rusted line.
What's Unique About the 2006-2010 Chevrolet HHR
The Chevrolet HHR, built on the GM Delta platform, is prone to specific EVAP system failures with age. The plastic and rubber components of the vent and purge solenoids can become brittle and fail. More notably, the metal fuel and EVAP lines running along the vehicle's underbody are highly susceptible to rust where factory insulation traps moisture, a common issue shared with its platform-mate, the Chevrolet Cobalt. A manufacturer's technical service bulletin (TSB #21-NA-124) exists to help technicians diagnose EVAP leaks for codes P0455 and P0442, indicating this is a recognized issue.
Diagnostic Flowchart
Tap your situation to follow the diagnostic path that matches what you're seeing on this vehicle.
Symptoms You May Notice
- Check Engine Light is on
- A faint smell of fuel, especially around the rear of the vehicle or after filling up
- A 'loose gas cap' message may appear on the driver information center
- Difficulty starting the engine right after refueling (long crank time), which strongly points to a faulty purge solenoid stuck open
- Replacing the purge valve when the vent valve is the actual problem, or vice-versa. It's important to test the components before replacing them.
- Replacing other sensors like oxygen sensors, which are not directly related to the EVAP system's integrity.
- Assuming a new part is good. Forum members have reported receiving faulty purge solenoids, especially cheap counterfeit parts from online marketplaces, which fail the simple 'blow-through' test right out of the box.
Most Likely Causes
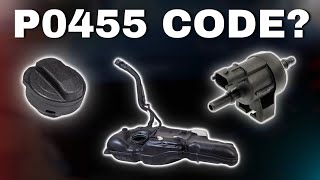
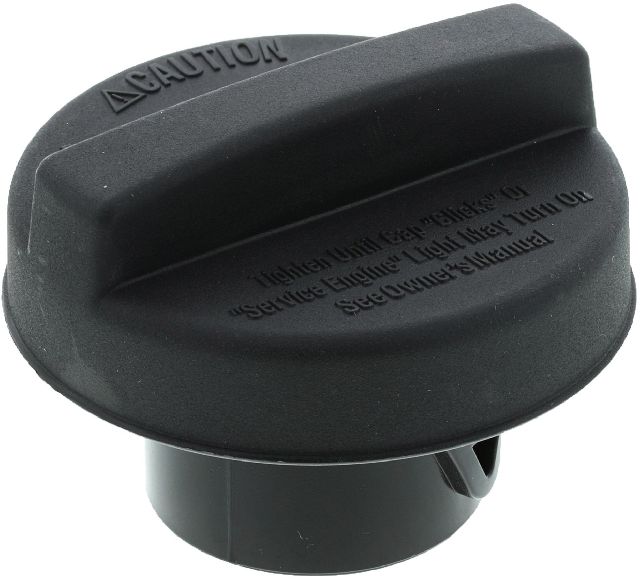
- Loose or Faulty Gas Cap 🔴 High Probability → Shop Fuel Tank Cap This is the most common cause for an EVAP large leak code on any vehicle. The cap's seal can degrade over time, or it may simply not have been tightened correctly (at least 3 clicks) after refueling.
How to confirm: Ensure the gas cap is tightened until it clicks at least once (GM recommends 3 clicks). Inspect the rubber O-ring on the cap for cracks, stiffness, or damage. Clean the sealing surface on the filler neck with a cloth. If the seal is compromised, the cap needs replacement. Many owners on forums report that buying a genuine OEM cap is worth it after having issues with aftermarket ones.
Typical fix: Tighten or replace the gas cap.
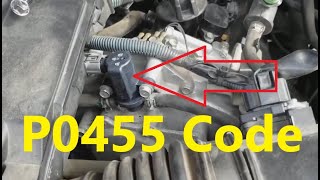
Est. part cost: $10-$25 - Failed EVAP Purge Solenoid/Valve 🟡 Medium Probability → Shop Vapor Canister This valve is located in the engine bay and commonly fails by sticking open, causing a constant vacuum leak into the EVAP system and often leading to hard starts after refueling. This is a very common failure item on many GM vehicles.
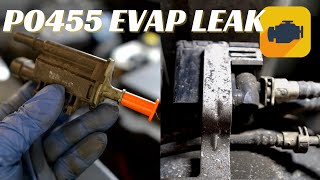
How to confirm: Remove the valve (located on top of the engine on the driver's side) and try to blow through it with your mouth (using shop air may damage it). If air passes through in either direction, it is stuck open and has failed. A functional purge valve should be normally closed, allowing no air to pass.
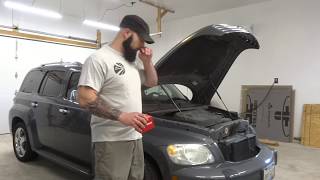
Typical fix: Replace the purge solenoid. This is a very simple repair that takes only a few minutes with a 13mm wrench or socket. 🎬 Watch: A quick walkthrough for replacing the purge solenoid.
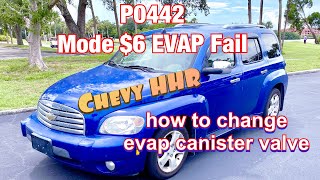
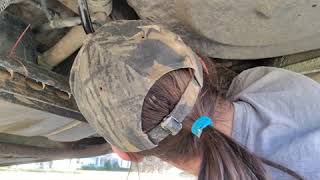
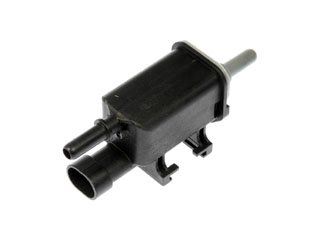
Est. part cost: $20-$50 - Failed EVAP Vent Solenoid 🟡 Medium Probability → Shop Vapor Canister The vent solenoid is located under the car near the charcoal canister and is exposed to the elements, making it susceptible to corrosion and failure. The internal valve can get stuck, or the rubber grommet that seals it to the canister can dry out and leak.
How to confirm: The valve should be normally open. You can test it by applying 12V power to its terminals; it should click closed. If it's stuck open or closed, or doesn't operate with power, it has failed. A forum post on the Chevy HHR Network details the replacement process, which may require a pigtail adapter as GM updated the connector design. 🎬 See how to replace the vent valve solenoid on an HHR.
Typical fix: Replace the EVAP vent solenoid and its grommet/seal. It is located near the charcoal canister by the rear axle.
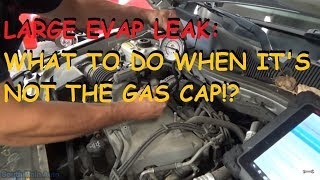
Est. part cost: $25-$60 - Cracked or Rotted EVAP Hoses/Lines ⚪ Low Probability The metal EVAP lines that run alongside the fuel lines under the car are known to rust and develop pinhole leaks, especially in front of the driver's side rear wheel where insulation holds moisture. This is a well-documented issue on the HHR and other GM Delta platform cars.
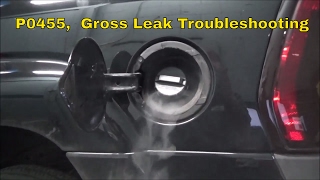
How to confirm: A visual inspection may reveal obvious cracks or heavy rust, but small leaks are hard to spot. The definitive method is to have a professional perform a smoke test, which forces smoke through the EVAP system to reveal the exact location of any leaks. 🎬 Watch: How a professional smoke test identifies hidden EVAP leaks.
Typical fix: Replace the damaged section of the hose or line. Aftermarket nylon line kits are available for a permanent repair.
Est. part cost: $15-$100+ - Poor Connection at Vent Solenoid ⚪ Low Probability The electrical connector for the vent solenoid is under the car and exposed to the elements. The locking tab on the connector can become brittle and break, leading to a loose connection that the ECU interprets as a system fault.
How to confirm: Visually inspect the connector at the vent solenoid. Ensure it is fully seated and that the locking tab is intact. If the tab is broken, the connector may back out over time. One owner reported their new aftermarket solenoid was missing the tab to secure the connector.
Typical fix: Secure the connector. If the locking tab is broken, a zip tie can be used to hold the connector firmly in place. If the wiring is damaged, a new pigtail connector may be needed.
Est. part cost: $0-$20
Rare But Worth Checking
- Cracked Charcoal Canister: → Shop Vapor Canister The plastic housing of the charcoal canister can develop cracks from age or impact from road debris, creating a large leak. This is usually found during a smoke test if all other components check out.
- Damaged Fuel Filler Neck: → Shop Fuel Filler Neck Rust or damage to the metal filler neck where the gas cap seals can prevent a proper seal, even with a new cap. A smoke test is the best way to confirm a leak in this area.
- Loose Fuel Pump Lock Ring: → Shop Fuel Pump In at least one documented case on the Chevy HHR Network, a P0455 code was ultimately traced to a fuel pump lock ring that was not properly fastened after a fuel pump replacement, leaving the top of the tank open to the atmosphere.
Diagnosis Steps
- Check the gas cap. Remove it, inspect the seal for damage, clean the filler neck sealing surface, and reinstall it, making sure it clicks several times. Clear the code and drive for a few days to see if it returns.
- If the code returns, perform a visual inspection of all accessible EVAP hoses in the engine bay and under the vehicle, paying close attention to the metal lines running along the frame on the driver's side for significant rust or damage.
- Locate the purge solenoid on the driver's side of the engine. Disconnect it and attempt to blow through it. If air passes, it is faulty and needs to be replaced.
- Locate the vent solenoid near the charcoal canister by the rear of the car. Inspect its electrical connector for a secure fit. Test the valve by applying 12V power; you should hear a click. If not, or if it's physically stuck, it is likely faulty.
- If the gas cap and both solenoids appear to be working correctly, the most effective next step is a professional smoke test. This test will pressurize the system with visible smoke, making even the smallest leaks from hoses, the filler neck, or the charcoal canister easy to identify.
Parts You'll Likely Need
- Gas Cap
(OEM #GT288)— This is the most frequent cause of P0455 due to a worn seal or improper tightening.
Trusted brands: ACDelco (OEM), Stant
OEM price range: $15-$30
Aftermarket price range: $10-$20 - EVAP Vapor Canister Purge Solenoid
(OEM #12597567)— This valve, located on the engine, commonly fails by sticking open, causing a large leak code and often hard starting after refueling.
Trusted brands: ACDelco (OEM)
Related Codes That Often Appear With This One
- P0442 — P0442 indicates a small EVAP leak. Sometimes a failing component or a rusting line can initially cause a small leak before it worsens and triggers the P0455 large leak code. The manufacturer TSB #21-NA-124 covers both codes.
- P0449 — This code specifically points to a fault in the EVAP vent solenoid control circuit. If you have P0455 and P0449 together, the vent solenoid, its connector, or its fuse (#34 in the under-hood fuse box) is almost certainly the problem.
- P0496 — This code indicates 'EVAP Flow During a Non-Purge Condition,' which almost always points directly to a failed (stuck open) EVAP purge solenoid on the engine.
Technical Service Bulletins (TSBs) & Recalls
- 21-NA-124: "Diagnostic Tip for Malfunction Indicator Lamp (MIL) Illuminated - DTC P0442 and/or P0455 Set." This bulletin advises technicians on a chronological order for diagnosis, starting with inspecting lines and connections before testing the vent and purge valves.
Platform-Specific Known Issues
- Rusted Underbody EVAP Line: The metal EVAP line that runs parallel to the fuel lines under the car is prone to rusting through, causing a leak that can be difficult to see without removing the foam insulation or performing a smoke test. This is a very common failure point just ahead of the driver-side rear wheel.
- Official GM Diagnostic Guidance (TSB 21-NA-124): A TSB was issued by GM to provide dealers with diagnostic advice for finding EVAP leaks related to codes P0442 and P0455. The recommended diagnostic order is: 1) Inspect all EVAP lines for proper connection/damage. 2) Investigate the vent valve for malfunction. 3) Investigate the purge valve for malfunction.
Mechanic-Grade Diagnostic Values
- Fuel Tank Pressure (FTP) Sensor Voltage — expected: Approximately 1.5V with the gas cap removed (atmospheric pressure). Voltage should decrease towards 0.5V as vacuum increases during a system test.. Failure: A voltage reading stuck high (e.g., above 4.5V) or low (near 0V) suggests a faulty sensor or a wiring issue.
- EVAP Vent Solenoid Coil Resistance — expected: 14 - 30 Ohms. Failure: A reading of 0 Ohms indicates a short, while an infinite (OL) reading indicates an open circuit. Either means the solenoid is bad.
- EVAP Purge Solenoid Coil Resistance — expected: 18 - 35 Ohms. Failure: A reading outside this range, especially 0 Ohms (shorted) or infinite (open), indicates a failed coil.
Scan Tool Commands That Help
- Tech2 / GDS2 (or equivalent professional scanner): EVAP Service Bay Test — This is an automated test that commands the purge and vent solenoids and monitors the FTP sensor to verify the system can seal and hold a vacuum. It's the most effective way to confirm system integrity after a repair.
- Tech2 / GDS2 (or equivalent professional scanner): EVAP Purge/Seal — This command allows a technician to manually command the purge valve on/off and seal the system to watch FTP sensor data in real-time, helping to isolate a leak.
- Tech2 / GDS2 (or equivalent professional scanner): EVAP Vent Solenoid Command (On/Off) — Used to manually command the vent solenoid closed to seal the system for a smoke or pressure test. If the system won't seal, but the command is sent, it points to a faulty vent solenoid or a large leak.
Wiring & Ground Locations
- Fuse #34 (EMISSIONS) — Under-hood fuse block (UBEC).. This 15A fuse provides battery voltage to the EVAP canister vent solenoid. If this fuse is blown, the vent solenoid cannot be commanded closed, which will prevent the system from sealing and immediately set a P0455 and/or P0449.
- G401 / G402 — On the frame rails in the rear of the vehicle, near the fuel tank.. These are the primary chassis grounds for rear-mounted components. Corrosion at these points can cause intermittent or failed operation of the EVAP vent solenoid and fuel pump module, leading to various EVAP codes.
- EVAP Vent Solenoid Connector — At the EVAP vent solenoid, near the charcoal canister by the rear axle.. The pink wire should have 12V+ with the key on. The light green wire is the control wire, which the ECM grounds to close the valve. Checking for voltage here is a key step in diagnosing a P0449 code that often accompanies P0455.
Real Owner Repair Stories
- Chevy HHR Network Forum (2008 Chevrolet HHR) — P0455 code, smell of fuel.
❌ Tried (didn't work) Replaced gas cap, Replaced purge solenoid, Replaced vent solenoid
✅ What actually fixed it The fuel filler neck was rusted through high up near the body, creating a large leak. The rust was not obvious on a visual inspection and was only found after a smoke test focused on that specific area, confirming a leak that a new gas cap could not seal. - Chevy HHR Network Forum (2009 Chevrolet HHR) — P0455 and P0442 codes.
❌ Tried (didn't work) Visual inspection of lines
✅ What actually fixed it The metal EVAP line running under the driver's side had a rust pinhole leak hidden under the factory insulation wrap. A smoke test did not initially show the leak. The owner had to pressurize the system and spray the entire line with soapy water to find the bubbles indicating the small hole that had grown large enough to trigger P0455. The rusted section was cut out and replaced with 5/16" nylon fuel line. - Chevy HHR Network Forum (N/A) — P0455 and P0449 codes returned immediately after replacing the vent solenoid.
❌ Tried (didn't work) Replacing the vent solenoid with a new part.
✅ What actually fixed it The plastic housing on the *new* aftermarket vent solenoid was molded incorrectly and prevented the electrical connector from fully seating and locking. The connector felt like it was plugged in but would not make a secure electrical connection. The owner had to use a file to remove excess plastic on the new part to allow the connector to lock in place, which resolved the codes.
"I Checked Everything" — The Actual Cause
- In several owner-documented cases, a standard smoke test came back clean. The eventual cause was found to be a rusted fuel filler neck, where the leak was too high up or obscured to be easily seen, or a pinhole in the metal EVAP line under insulation that was only found by spraying soapy water along the line while the system was pressurized.
OEM Part Supersession History
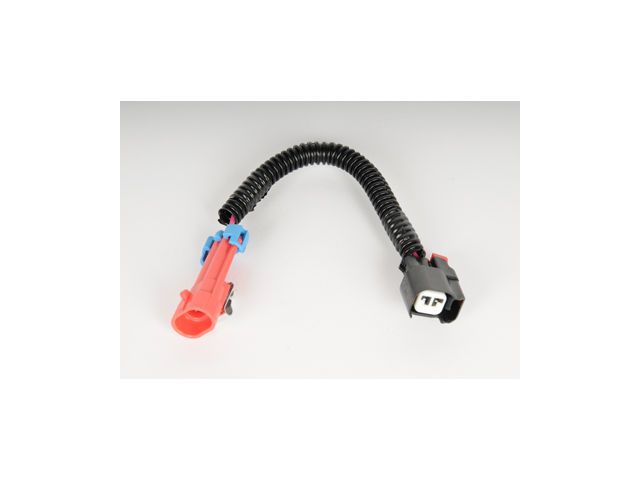
10386359, 15759044 (Vent Solenoid)→ACDelco 214-2149, Dorman 911-031 (Kit with new pigtail)— GM updated the electrical connector design for the vent solenoid for better weather resistance.
Heads up: The new style solenoid will not plug into the original vehicle harness. You MUST use the included pigtail adapter, which requires cutting the old connector off and splicing the new one on. Failure to use the adapter will make installation impossible.
Model Year Variations Within This Range
- 2008-2010 (SS Models): The 2.0L LNF turbo engine in the HHR SS has a different engine bay layout. The EVAP purge solenoid is located in a different position compared to the 2.2L and 2.4L naturally aspirated engines. While its function is identical, its physical location for testing and replacement is not the same.
Helpful Videos

We Have This Part in Stock


The information in this article is provided for general reference and educational purposes only. Vehicle specifications, procedures, and part compatibility can vary by production date, trim level, and region. Always consult your vehicle's factory service manual and verify part numbers before purchasing or performing repairs. Safety-critical components such as airbags, seat belts, and braking systems should be installed by a qualified professional.
- Chevrolet HHR:
- 🧭 Diagnostic Flowchart
- 🎬 Helpful Videos
- 🛍️ Shop This Part
- What's Unique About the 2006-2010 Chevrolet HHR
- Symptoms You May Notice
- Most Likely Causes
- Rare But Worth Checking
- Diagnosis Steps
- Parts You'll Likely Need
- Related Codes That Often Appear With This One
- Technical Service Bulletins (TSBs) & Recalls
- Platform-Specific Known Issues
- Mechanic-Grade Diagnostic Values
- Scan Tool Commands That Help
- Wiring & Ground Locations
- Real Owner Repair Stories
- "I Checked Everything" — The Actual Cause
- OEM Part Supersession History
- Model Year Variations Within This Range
- 🎟️ Get 5% Off