
P0462 on 2011-2020 Toyota Sienna: Fuel Level Sensor Circuit Low Causes and Fixes
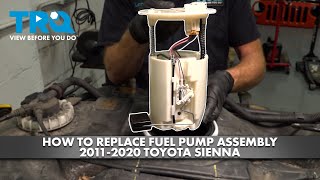
This code means the fuel gauge is unreliable due to a low voltage signal from the fuel level sensor. The most common fix is replacing the fuel level sending unit, which is part of the fuel pump assembly in the tank. Some owners cut an access panel under the second-row seats to avoid dropping the fuel tank. Expect to pay $80-$150 for the sender or $400-$700 for a full OEM pump assembly, plus 3-4 hours of labor if the fuel tank must be removed.
- P0462 means your Sienna's fuel gauge is not reliable because of a low voltage signal from the fuel level sensor.
- The most likely cause is a worn-out fuel level sending unit inside the fuel tank.
- You can still drive the vehicle, but you must track your mileage to avoid running out of fuel.
- The fix requires dropping the fuel tank as there is no access panel. It's often practical to replace the entire fuel pump assembly at the same time due to the high labor cost.
- Before buying parts, confirm the diagnosis by testing the sensor's wiring and connector for shorts or corrosion, as a wiring fault can mimic a failed sender.
What's Unique About the 2011-2020 Toyota Sienna
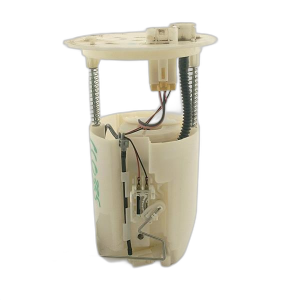
On the 2011-2020 Toyota Sienna, the fuel system is generally reliable, but like any vehicle, the in-tank components are subject to wear. The fuel level sending unit is integrated into the fuel pump module. While the sender can sometimes be purchased separately, most mechanics and DIYers replace the entire fuel pump assembly at the same time. This is because the labor to access the unit—which involves removing the fuel tank—is significant, making it practical to replace the pump and sender together to avoid future failures. Unlike some vehicles, this generation of Sienna does not have a factory service access panel under the seats, requiring the entire fuel tank to be dropped for service. Some enterprising owners have documented cutting their own access hole in the floor pan to simplify future service.
Symptoms You May Notice
- Check Engine Light is on
- Fuel gauge reads empty or is stuck in one position, regardless of the actual fuel level
- Fuel gauge fluctuates erratically, sometimes jumping between full and empty.
- Low fuel warning light stays on even when the tank is not empty
- Replacing the fuel pump when only the sending unit has failed. While often replaced as an assembly, if the pump itself is functioning correctly, only the sender might be needed. However, given the labor involved, replacing the whole assembly is often preventative maintenance.
- Assuming the sending unit is bad when it is a wiring short to ground. A thorough check of the wiring harness for shorts is crucial before condemning the in-tank unit.
Most Likely Causes
- Failed Fuel Level Sending Unit 🔴 High Probability → Shop Fuel Tank Sending Unit The variable resistor on the sending unit's arm wears out over time from constant contact and movement, creating 'dead spots' or a short that causes the voltage signal to drop. Fuel additives and contaminants can also accelerate wear on the resistor contacts.
How to confirm: Test the resistance of the sending unit at its electrical connector. The reading should change smoothly as the float arm is moved. An open circuit (infinite resistance) or a short (zero resistance) confirms failure. This requires accessing the top of the fuel tank.
Typical fix: Replace the fuel level sending unit. It is often sold as part of the complete fuel pump assembly.
Est. part cost: $80-$150 for sender only, $300-$700 for full assembly - Wiring or Connector Issue 🟡 Medium Probability The wiring harness leading to the fuel tank is exposed to road debris, moisture, and salt, which can lead to corrosion, chafing, or breaks in the wires, causing a short to ground. The connector on top of the fuel pump module is a common point for corrosion to develop.
How to confirm: Visually inspect the wiring harness from the PCM to the fuel tank. Check the connector on top of the fuel pump module for corrosion or damage. Use a multimeter to test for a short to ground on the signal wire between the PCM and the tank connector.
Typical fix: Repair the damaged section of wiring or clean/replace the corroded connector.
Est. part cost: $10-$50
Rare But Worth Checking
- Faulty Instrument Cluster: → Shop Instrument Cluster The instrument cluster (combination meter) processes the signal from the fuel level sensor to display it on the gauge. A failure within the cluster's circuitry, such as a bad solder joint or internal CPU fault, can mimic a sensor problem. This is rare and should only be considered after the sensor and wiring are confirmed to be good. On some vehicles, wiggling or pressing on the cluster can cause the gauge to change, indicating an internal fault.
- Powertrain Control Module (PCM) Fault: An internal fault in the PCM is extremely rare but possible. This is a last-resort diagnosis and requires professional-level tools to confirm.
Diagnosis Steps
- Read the code with an OBD-II scanner to confirm P0462 is present.
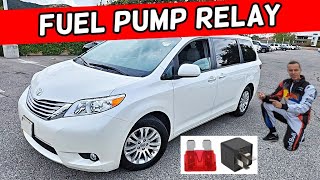
- Check the fuses related to the fuel pump and instrument cluster. For the 2011-2020 Sienna, this includes the C/OPN and Fuel Pump 🎬 See this fuel pump relay location guide relays in the engine bay fuse box.
- Depressurize the fuel system by removing the fuel pump relay and starting the engine until it stalls.
- Safely raise and support the vehicle. Visually inspect the wiring harness leading to the fuel tank for any visible damage, chafing, or corrosion. Pay close attention to the main connector on top of the fuel pump assembly.
- Using a multimeter, back-probe the signal wire at the fuel pump connector. Check for a proper voltage signal, which should vary with the fuel level. A reading near 0 volts suggests a short to ground or a failed sender.
- If the voltage is stuck low, disconnect the sensor and check the wiring for a short to ground between the PCM and the tank connector. If the wiring is okay, the fault is with the sending unit itself.
- To definitively test the sender, the fuel tank must be lowered to access it. Once accessed, test the resistance of the sender directly at its terminals while moving the float arm. The resistance should change smoothly.
- If the sender fails the resistance test, it needs to be replaced. If the sender and wiring are good, the issue may be with the instrument cluster or PCM, which requires more advanced diagnostics.
Parts You'll Likely Need
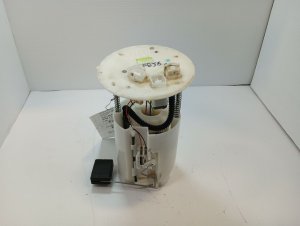
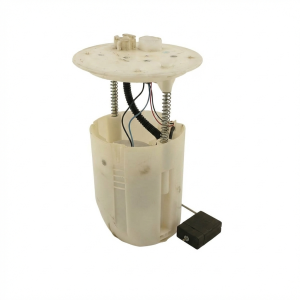
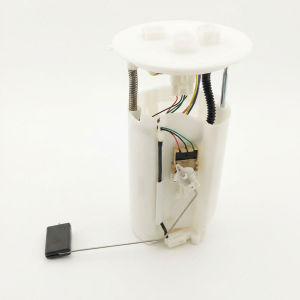
- Fuel Pump and Sending Unit Assembly
(OEM #77020-08050)— This is the most common failure point. Replacing the entire assembly is often recommended to also replace the fuel pump and filter, avoiding another high-labor job in the near future. The part number 77020-08050 is cited for 2011-2017 models. It includes the pump, sender, filter, and regulator. Verify the part number for your specific year and VIN.
Trusted brands: Toyota Genuine, Denso, Aisin
OEM price range: $470-$720
Aftermarket price range: $250-$450 - Fuel Level Sending Unit (Sender)
(OEM #83320-08030)— If you are certain the fuel pump is healthy, you can replace only the sending unit to save on part costs. This part is cited for the Sienna and is noted as being included with the fuel pump assembly. This is a more economical repair if you are doing the labor yourself and are willing to disassemble the fuel pump module.
Trusted brands: Toyota Genuine
OEM price range: $80-$150
Aftermarket price range: $50-$100
Related Codes That Often Appear With This One
- P0463 — P0463 is 'Fuel Level Sensor Circuit High Input'. Seeing both codes intermittently could indicate a failing sensor or a loose connection causing the voltage to swing between extremes.
- P0461 — P0461 is 'Fuel Level Sensor Circuit Range/Performance'. This code suggests the signal is erratic or not changing as expected (e.g., not changing after a fill-up), which is another symptom of a failing sending unit.
Technical Service Bulletins (TSBs) & Recalls
- T-SB-0083-23: Abnormal Fuel Gauge Operation: While not for the 2011-2020 generation, a TSB for the 2021-2022 Sienna Hybrid addresses a fuel gauge reading that changes inaccurately on an incline. This indicates Toyota is aware of fuel gauge logic issues in the Sienna platform, though the cause (software logic) is different from the typical hardware failure seen in the 3rd generation.
Platform-Specific Known Issues
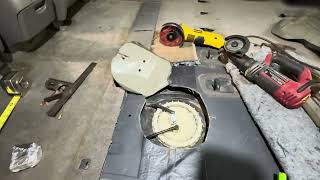
- No Factory Fuel Pump Access Panel: → Shop Fuel Pump Unlike many other vehicles, the 3rd generation Sienna does not have an access panel under the rear seats to get to the fuel pump. The entire fuel tank must be dropped to perform the replacement, significantly increasing the labor time and complexity. This is a major pain point mentioned by DIYers.
- DIY Access Panel Creation: Some owners on forums and YouTube have documented cutting an access hole in the floor pan above the fuel pump to avoid dropping the tank. This is an unofficial modification and requires precise measurements and careful cutting to avoid damaging fuel lines or the pump itself. A video for a 2009 Sienna shows the process, which would be similar for the 3rd generation. 🎬 Watch: DIY fuel pump access panel creation
Mechanic-Grade Diagnostic Values
- Fuel Level Sender Resistance — expected: Approximately 15 Ohms at Full and 410 Ohms at Empty. Some sources cite slightly different ranges, such as ~110-115 Ohms for empty and 2-3 Ohms for full on older models. The key is a smooth, consistent change across the float's range of motion.. Failure: A reading of 0 Ohms (short), infinite/OL (open circuit), or erratic jumps in resistance as the float arm is moved.
- Signal Voltage at Combination Meter — expected: The meter CPU measures the voltage between the sender's variable resistor and internal resistors in the meter. The highest voltage seen should be approximately half of the battery voltage.. Failure: A voltage reading near zero at the signal wire input to the combination meter would be consistent with a P0462 code (short to ground).
Scan Tool Commands That Help
- Toyota Techstream: Active Test: Body Electrical > Main Body > Active Test > Combination Meter — This command allows the technician to force the fuel gauge needle to sweep through its range (e.g., Full, 1/2, Empty). If the gauge responds correctly to the command, it proves the instrument cluster and gauge motor are functional, pointing the diagnosis back towards the sender or wiring.
- Toyota Techstream: Data List: Body Electrical > Combination Meter > Data List — This allows viewing the raw fuel level value (resistance or voltage) that the Combination Meter is receiving from the sender. This is useful to see if the value is stuck low, as the P0462 code suggests, without having to back-probe wires.
- Toyota Techstream: Active Test: Powertrain > Engine and ECT > Active Test > Control the Fuel Pump / Speed — While not directly for the level sensor, this test can operate the C/OPN relay, which is part of the fuel pump circuit. This can help verify the integrity of related relays and wiring in the engine bay fuse box.
Wiring & Ground Locations
- Fuel Pump Connector — On top of the fuel tank, accessible after the tank is lowered.. This is the primary connection point for the fuel level sender. Corrosion or damage here is a common cause of P0462. The sender signal wire and ground wire must be tested at this connector.
- Combination Meter Connector — On the back of the instrument cluster, behind the dashboard trim.. The fuel level sender signal wire (FL+) and ground (FL-) terminate here. A wiring diagram is needed to identify the exact pins (e.g., Pin 1 for FL- and Pin 2 for FL+ on some diagrams) to test for continuity back to the tank.
- C/OPN Relay and FUEL PUMP Relay — In the engine compartment fuse/relay box, on the driver's side.. These two relays control power to the fuel pump. While not directly part of the sender's signal circuit, a fault in this area could indicate broader fuel system electrical issues. The C/OPN (Circuit Opening) relay is the primary relay that must be operational for the pump to get power.
- Fuel Pump Ground — The fuel pump assembly grounds to the chassis. A wiring diagram shows a W-B (White with Black stripe) wire typically used for ground connections in this area.. A poor or corroded ground connection for the sender circuit can cause incorrect voltage readings, leading to the P0462 code.
OEM Part Supersession History
77020-08050→Current— This part number is consistently cited for the 2011-2017 model years.
Heads up: Part number 77020-08050 is specified for 2011-2017 Sienna models. Later models (2018-2020) may use a different part number. Always verify with a VIN.
Model Year Variations Within This Range
- 2011-2017 vs 2018-2020: The fuel pump assembly part number may differ for the facelifted 2018+ models. While the core issue and diagnostic process remain the same, the specific OEM part number should be verified by VIN for later years in this generation.
Diagnostic Flowchart
Other Known Issues on This Vehicle
Issues unrelated to this code that are worth knowing about as an owner of this generation:
- Power Sliding Door Cable Failure 🟠 Medium — Very common. The cables fray and break, causing grinding noises and eventual failure of the power sliding function. Often occurs after 5-8 years. (Ref: Multiple recalls and TSBs have been issued, including a major recall for doors potentially opening while driving.)
- VVT-i Oil Line Rupture (2011-2012 V6 models) 🔴 High — A known issue on earlier 3rd-gen models where a rubber section of the VVT-i oil line can rupture, leading to rapid oil loss and potential engine seizure. Most have been replaced under a service campaign with an all-metal line. (Ref: Limited Service Campaign (LSC) 90K was issued by Toyota to replace the rubber hose with a metal one.)
- Transmission Shudder/Hesitation (2017-2020 models with 8-speed) 🟠 Medium — The UA80 8-speed automatic transmission introduced in 2017 can exhibit harsh shifting, hesitation, and whining noises. Some owners report needing transmission replacements. Class-action lawsuits have been filed regarding this transmission. (Ref: Toyota has issued software updates (like TSB ZJC) to address shift quality, but some owners report persistent issues.)
- Dashboard Material Melting/Getting Sticky 🟡 Low — Common in hot climates. The dashboard material can degrade under sun exposure, becoming shiny, sticky, and creating a glare on the windshield. (Ref: Toyota had a Warranty Enhancement Program (ZE6) for this issue on many models, including the Sienna, but it has since expired.)
- AC Compressor Flow Sensor Failure 🟠 Medium — The flow sensor on the AC compressor is a common failure point, causing the AC to stop working. The sensor is often not sold separately from the compressor, leading to a costly repair.
Used vs. New Parts: Buying Guide for This Vehicle
When a used part is the smart pick: Given the high labor cost of dropping the fuel tank, installing a used part is generally not recommended. The risk of a premature failure of the used pump or sender outweighs the parts cost savings. The only scenario where it might be considered is for a DIY repair where labor cost is zero and the donor part has verifiable low mileage.
Donor-vehicle mileage cap: roughly under 50000 miles for the part to have meaningful remaining life.
What to inspect on the donor part:
- Verify the part came from a vehicle that was not in a major collision, especially a rear-end impact.
- Inspect the electrical connector pins for any signs of corrosion, melting, or damage.
- If possible, test the resistance of the sending unit with a multimeter before purchase to ensure it reads within spec and sweeps smoothly.
- Check the plastic housing for any cracks or signs of degradation.
OEM-only on this vehicle (don't cheap out):
- Fuel Pump and Sending Unit Assembly
Aftermarket brands forum-validated for this vehicle:
- Denso (Often the OEM supplier for Toyota)
- Aisin
Brands owners have reported issues with on this vehicle:
- Unknown, no-name brands from online marketplaces should be avoided due to the high labor cost of replacement if the part fails prematurely.
Real Owner Stories
Aggregated from forums and TSBs cited above. Mileages and costs reflect what owners reported in those sources.
2011-2020 Toyota Sienna
Symptoms: The fuel gauge is non-linear and stays on 'Full' for a long time before dropping quickly; owners are sensitive to inaccurate behavior.
What fixed it: Dropping the fuel tank to replace the fuel level sending unit (often as part of the fuel pump assembly).
Source hint: Reddit r/ToyotaSienna: Fuel gauge
2009 Toyota Sienna
Symptoms: Difficulty accessing the fuel pump/sender without dropping the tank.
What fixed it: Cutting an unofficial access hole in the floor pan above the fuel pump to avoid dropping the tank.
Source hint: vehicle_specific_issues: DIY Access Panel Creation
Related OBD-II Codes
Frequently Asked Questions
Does the 2011-2020 Toyota Sienna have an access panel to reach the fuel level sending unit?
Is there a TSB for fuel gauge issues on my 2011-2020 Sienna?
Can I just replace the fuel level sensor, or do I need the whole fuel pump assembly?
What causes the P0462 code to trigger on this specific vehicle?
Are there any fuses I should check before replacing the fuel sender?
Helpful Videos
Used OEM Parts in Stock
New Aftermarket Parts Available


The information in this article is provided for general reference and educational purposes only. Vehicle specifications, procedures, and part compatibility can vary by production date, trim level, and region. Always consult your vehicle's factory service manual and verify part numbers before purchasing or performing repairs. Safety-critical components such as airbags, seat belts, and braking systems should be installed by a qualified professional.
- Toyota Sienna:
- 🧭 Diagnostic Flowchart
- 🎬 Helpful Videos
- 🛍️ Shop This Part
- What's Unique About the 2011-2020 Toyota Sienna
- Symptoms You May Notice
- Most Likely Causes
- Rare But Worth Checking
- Diagnosis Steps
- Parts You'll Likely Need
- Related Codes That Often Appear With This One
- Technical Service Bulletins (TSBs) & Recalls
- Platform-Specific Known Issues
- Mechanic-Grade Diagnostic Values
- Scan Tool Commands That Help
- Wiring & Ground Locations
- OEM Part Supersession History
- Model Year Variations Within This Range
- Other Known Issues on This Vehicle
- Used vs. New Parts: Buying Guide for This Vehicle
- Real Owner Stories
- 2011-2020 Toyota Sienna
- 2009 Toyota Sienna
- Related OBD-II Codes
- Frequently Asked Questions
- 🎟️ Get 5% Off