
P0500 on 1997-2001 Honda CR-V: Vehicle Speed Sensor Malfunction Causes and Fixes
On a 1997-2001 CR-V, P0500 is almost always caused by a failed Vehicle Speed Sensor (VSS) on the transmission. Before replacing it, check the 7.5A 'Fuse 15' under the dash, as a wiring short is a known issue. An aftermarket sensor costs $20-$50 and is a simple DIY fix taking less than an hour.
- P0500 on a 1997-2001 CR-V points directly to the Vehicle Speed Sensor (VSS) circuit.
- Always check the 7.5A 'Fuse 15' under the dash before buying parts. A blown fuse indicates a wiring short that must be fixed, most likely where the harness rubs the intake manifold bracket.
- The most common fix is replacing the VSS, which is an affordable part and a simple DIY job located on top of the transmission.
- Symptoms like a dead speedometer and harsh shifting strongly suggest a VSS problem, not a major transmission failure.
- Avoid the cheapest, unbranded sensors, as they are known to fail quickly; opt for an OEM or reputable aftermarket brand like Denso or Standard Motor Products.
What's Unique About the 1997-2001 Honda CR-V
Unlike modern cars (including newer Hondas) that use multiple ABS wheel speed sensors to determine vehicle speed, the first-generation CR-V relies on this single, transmission-mounted Vehicle Speed Sensor (VSS) for the PCM and speedometer. This design makes the VSS a critical single point of failure for multiple systems. Furthermore, a known issue on Hondas of this era, detailed in TSB 99-029 for the contemporary Civic, is an engine wiring harness short near the intake manifold bracket. This short blows the fuse powering the VSS, perfectly mimicking a sensor failure and making a visual wiring inspection critical.
Symptoms You May Notice
- Check Engine Light is on
- Speedometer is erratic or reads zero
- Odometer is not working
- Harsh, erratic, or delayed automatic transmission shifts
- Cruise control does not work
- Flashing 'D' (Drive) indicator light on the instrument cluster
- Hesitation during acceleration
- Replacing transmission shift solenoids or the entire transmission. The harsh shifting symptoms are often mistaken for a major mechanical transmission failure when the root cause is a simple lack of a speed signal.
Most Likely Causes
- Failed Vehicle Speed Sensor (VSS) 🔴 High Probability → Shop Drive Shaft Sensor The VSS is a very common failure item on this generation of CR-V due to age, vibration, and heat cycles from the transmission.
How to confirm: After confirming the fuse and wiring are intact, the sensor itself is the most likely cause. It can be tested with a multimeter set to AC Voltage by spinning the sensor's gear and observing a changing voltage. However, given the low cost and high failure rate, replacement is a common and effective diagnostic step.
Typical fix: Replace the Vehicle Speed Sensor on the transmission.
Est. part cost: $20 - $60 - Damaged Wiring or Connector 🟡 Medium Probability The wiring harness for the VSS can become brittle and crack from age and heat. A specific known issue is the engine wiring harness rubbing against the intake manifold support bracket, causing a short circuit that blows Fuse 15. The 3-pin connector itself is also notorious for corrosion and loose pin fitment.
How to confirm: Visually inspect the wiring harness leading to the VSS for any signs of damage, fraying, or melting, paying close attention to where it passes the intake manifold bracket. Wiggle the connector while the engine is running to see if it affects the speedometer (if it works intermittently). Check the electrical connector for green/white corrosion or loose pins.
Typical fix: Repair the damaged section of wiring using solder and heat shrink, then protect it with loom or electrical tape. Clean the connector with electrical contact cleaner or replace the connector pigtail if it's damaged. A user on Honda-Tech fixed their P0500 by finding a wire that had rubbed through on the intake manifold bracket, as described in TSB 99-029. 🎬 Watch: How to diagnose and fix a Honda P0500 code
Est. part cost: $5 - $25 - Blown Fuse ⚪ Low Probability The VSS shares the No. 15 (7.5A) fuse with the alternator and primary oxygen sensor. A short circuit in the VSS wiring harness (as described above) is a common reason for this fuse to blow.
How to confirm: Check the No. 15 (7.5A) fuse in the under-dash fuse/relay box. If it is blown, do not simply replace it. There is an underlying short circuit in one of the connected components' wiring that must be found and repaired first.
Typical fix: Find and fix the short circuit (most likely the VSS harness rubbing on the intake bracket), then replace the 7.5A fuse.
Est. part cost: $1 - $5
Rare But Worth Checking
- Faulty Instrument Cluster: → Shop Instrument Cluster While rare, a failure within the speedometer's internal circuitry or a bad solder joint at the back of the cluster can cause a dead speedometer, but it usually won't cause the P0500 code or transmission shifting issues on its own.
- Faulty Powertrain Control Module (PCM): This is extremely rare. The PCM is robust, and all other potential causes (sensor, wiring, fuse, cluster) should be exhaustively ruled out before considering a PCM failure.
Diagnosis Steps
- Read the trouble codes with an OBD-II scanner to confirm P0500 is present.
- Check the Fuse First: Inspect the 7.5A 'Fuse 15' in the fuse box located under the driver's side of the dashboard. If it's blown, you have a short circuit that must be located.
- Inspect the Wiring: Carefully inspect the VSS wiring harness, which runs from the top of the transmission toward the firewall. Pay extremely close attention to the area where the harness passes the sharp metal intake manifold support bracket. Look for any signs of rubbing, chafing, or exposed copper wires.
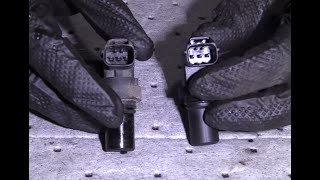
- Inspect the Connector: Disconnect the 3-pin VSS electrical connector. Check for green or white corrosion, bent pins, or a loose fit. A poor connection here is a very common problem.
- Test the Sensor (Optional): To test a Hall effect sensor like this one, you can check for power, ground, and signal. With the key on, probe the connector's wires. You should find ~12V on the Black/Yellow wire (power), good ground on the Black wire, and the Blue/White wire is the signal. A more definitive test involves removing the sensor, connecting it to a multimeter set to AC volts, and spinning the gear with a drill. The voltage should increase with speed.
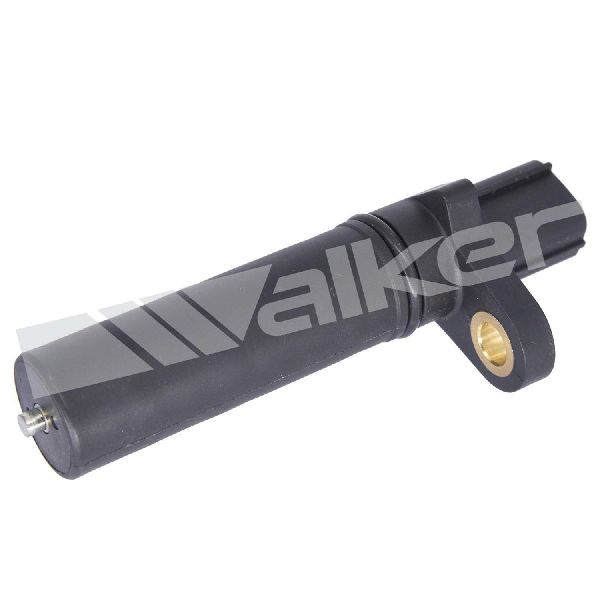
- Replace the VSS: The VSS is located on the top of the transmission, underneath the air intake tube. Remove the air intake assembly for access. The sensor is held in by a single 10mm bolt. Disconnect the connector, remove the bolt, and twist while pulling the old sensor out. It may be stuck. Lubricate the O-ring of the new sensor with a little automatic transmission fluid before installation to ensure a good seal.
- Clear the Code: After the repair, clear the P0500 code with an OBD-II scanner and take a test drive to confirm the speedometer works and the transmission shifts smoothly.
Parts You'll Likely Need
- Vehicle Speed Sensor (VSS)
(OEM #78410-S10-003)— This sensor is the most common failure point for the P0500 code on this vehicle.
Trusted brands: Honda (Genuine), Denso (OEM Manufacturer), Standard Motor Products (e.g., SC136), Walker Products (e.g., 240-1073), NTK/NGK
OEM price range: $115 - $240
Aftermarket price range: $20-$50
Technical Service Bulletins (TSBs) & Recalls
- TSB 99-029 (Applies to 1996-99 Civic but describes a wiring short issue that is identical in nature to failures seen on the 1997-2001 CR-V)
Platform-Specific Known Issues
- A Technical Service Bulletin for the 1996-99 Honda Civic (TSB 99-029) highlights an issue directly applicable to the CR-V, where the engine wiring harness can rub against the intake manifold bracket. This causes a short that blows the 7.5A Fuse 15, cutting power to the VSS, primary O2 sensor, and alternator, directly causing the P0500 code and other issues.
Mechanic-Grade Diagnostic Values
- VSS Connector Pin (Black/Yellow Wire) to Chassis Ground — expected: Approximately 12 Volts with ignition ON. Failure: 0V or low voltage indicates a blown Fuse 15 or an open in the power wire.
- VSS Connector Pin (Black Wire) to Chassis Ground — expected: Near 0 Ohms (good continuity). Failure: High or infinite resistance indicates a bad ground connection for the sensor.
- VSS Connector Pin (Blue/White Wire) Voltage — expected: Pulsing square wave voltage (e.g., 0V to 5V+ or higher) when drive wheels are turning. Frequency increases with speed.. Failure: No voltage pulse or a steady voltage indicates a failed sensor or a break in the signal wire.
Wiring & Ground Locations
- G101 — Lower right front corner of the engine compartment, near the battery.. This is a primary ground distribution point for the engine bay. A corroded or loose connection here can cause various electrical issues, including erratic sensor readings.
- G114 — Lower left rear of the engine.. An engine block ground that is critical for the proper operation of sensors mounted to the engine and transmission, including the VSS.
- Thermostat Housing Ground — A ground wire bolted directly to the thermostat housing.. This is a well-known main ground for the ECU. A poor connection here is a notorious cause of bizarre engine management and sensor-related problems on many Honda models.
- VSS Connector Pins — 3-pin connector at the Vehicle Speed Sensor on the transmission.. Pin assignments are critical for testing: Pin 1 is Ground (Black), Pin 2 is Power (Black/Yellow), and Pin 3 is Signal (Blue/White).
Real Owner Repair Stories
- Unofficial Honda FIT Forums user 'StickerThere' (Honda Fit (similar VSS diagnostics)) — P0500 code, intermittent speedometer.
❌ Tried (didn't work) Replacing the Vehicle Speed Sensor with a new $128 part.
✅ What actually fixed it After the new sensor didn't work, voltage testing at the connector revealed a broken wire in the harness. Repairing the wire resolved the P0500 code and fixed the speedometer. - Honda-Tech user '97lx-project' (1997 Honda Civic (identical VSS circuit)) — P0500, speedometer reads 0 mph on live data.
❌ Tried (didn't work) Replacing the VSS twice., Replacing the VSS connector pigtail.
✅ What actually fixed it The user was still diagnosing, but had traced the issue to a lack of continuity on the signal wire (Blue/White) between the instrument cluster and the ECU, suspecting a break in the wire inside the dashboard harness. This highlights the signal path from VSS -> Cluster -> ECU.
OEM Part Supersession History
78410-S10-003→78410-S10-003— No supersession found.
Heads up: This part number appears to be consistent for all 1997-2001 CR-V models with automatic transmission. The OEM manufacturer is Denso.
Diagnostic Flowchart
Other Known Issues on This Vehicle
Issues unrelated to this code that are worth knowing about as an owner of this generation:
- Burnt Exhaust Valves 🔴 High — Common on engines where valve clearance adjustments are neglected. The recommended interval is often debated, but issues can arise before 100k miles if not checked.
- Rear Differential Noise/Groan 🟡 Low — Very common on AWD models. A groaning or chattering noise from the rear during tight turns indicates the fluid needs to be changed with Honda Dual Pump II fluid.
- Faulty Ignition System (Coil/Distributor) 🟠 Medium — The distributor housing, ignition coil, and igniter are known failure points due to age and heat cycles, leading to no-start or stalling conditions.
- Malfunctioning Clock 🟡 Low — Extremely common; the digital clock in the dashboard is known to fail. It's often a simple fix requiring re-soldering a resistor on the clock's circuit board.
- Rusted Brake and Fuel Lines 🔴 High — In regions with road salt, the steel lines running the length of the vehicle are prone to severe corrosion and leakage, which is a major safety concern and a labor-intensive repair.
Used vs. New Parts: Buying Guide for This Vehicle
When a used part is the smart pick: A used OEM VSS from a junkyard is a reasonable choice for this repair, as the failure is often electrical and not strictly wear-related. Given the high cost of a new OEM sensor, a tested, used unit can provide significant savings.
Donor-vehicle mileage cap: roughly under 150000 miles for the part to have meaningful remaining life.
What to inspect on the donor part:
- Inspect the plastic drive gear at the tip of the sensor. Ensure it is not cracked, stripped, or showing excessive wear.
- Check the 3-pin connector housing for cracks or physical damage.
- If possible, get the sensor from a vehicle with known mileage to gauge its remaining life.
Aftermarket brands forum-validated for this vehicle:
- Denso (OEM supplier)
- Standard Motor Products (SMP)
- NTK
- Walker Products
Brands owners have reported issues with on this vehicle:
- Generic, unbranded, or 'white-box' sensors from online marketplaces. Forum users and repair sites specifically warn that the plastic gears on these cheapest options are prone to breaking off inside the transmission, creating a much more difficult repair.
Real Owner Stories
Aggregated from forums and TSBs cited above. Mileages and costs reflect what owners reported in those sources.
1997 Honda CR-V
Symptoms: P0500 code along with an inoperative odometer.
What fixed it: The owner investigated whether the issue was the VSS or the Input Transmission Sensor; the classic symptom combination pointed to the VSS system.
Source hint: Reddit r/MechanicAdvice: 'P0500 and P0715 -- Bad VSS or Input Transmission Sensor? (Honda CRV 1997)'
1997-2001 Honda CR-V
Symptoms: Dead speedometer, flashing 'D' light, and harsh shifts.
What fixed it: Replacement of the Vehicle Speed Sensor (VSS) on top of the transmission.
Source hint: CRVownersclub.com: Multiple threads
1996-1999 Honda Civic (Platform Mate)
Symptoms: MIL is on with a blown Fuse 15; issues with the VSS and O2 sensor.
What fixed it: Repaired a wire that had rubbed through on the intake manifold bracket as described in TSB 99-029.
Source hint: Honda-Tech: '***Civic 96-99 TSB 99-029 - MIL Is On With Blown Fuse 15...'
Related OBD-II Codes
Frequently Asked Questions
Does TSB 99-029 apply to my 1997-2001 Honda CR-V?
Why is my CR-V's 'D' indicator light flashing along with the P0500 code?
Which fuse should I check if my speedometer and odometer stopped working?
Can a bad VSS cause my CR-V to hesitate during acceleration?
Is it worth testing the VSS, or should I just replace it?
What is the specific wiring issue near the intake manifold?
Helpful Videos


We Have This Part in Stock


The information in this article is provided for general reference and educational purposes only. Vehicle specifications, procedures, and part compatibility can vary by production date, trim level, and region. Always consult your vehicle's factory service manual and verify part numbers before purchasing or performing repairs. Safety-critical components such as airbags, seat belts, and braking systems should be installed by a qualified professional.
- Honda CR-V:
- 🧭 Diagnostic Flowchart
- 🎬 Helpful Videos
- 🛍️ Shop This Part
- What's Unique About the 1997-2001 Honda CR-V
- Symptoms You May Notice
- Most Likely Causes
- Rare But Worth Checking
- Diagnosis Steps
- Parts You'll Likely Need
- Technical Service Bulletins (TSBs) & Recalls
- Platform-Specific Known Issues
- Mechanic-Grade Diagnostic Values
- Wiring & Ground Locations
- Real Owner Repair Stories
- OEM Part Supersession History
- Other Known Issues on This Vehicle
- Used vs. New Parts: Buying Guide for This Vehicle
- Real Owner Stories
- 1997 Honda CR-V
- 1997-2001 Honda CR-V
- 1996-1999 Honda Civic (Platform Mate)
- Related OBD-II Codes
- Frequently Asked Questions
- 🎟️ Get 5% Off