
P0504 on 2008-2022 Toyota Sequoia: Brake Switch Correlation Causes and Fixes
On a 2008-2022 Sequoia, code P0504 is almost always caused by a faulty or misadjusted brake light switch. This often triggers VSC, TRAC, and ABS lights. A new switch is inexpensive (~$25-$60) and the replacement is a simple 15-minute DIY job.
- P0504 on a Sequoia is overwhelmingly likely to be a bad or misadjusted brake light switch.
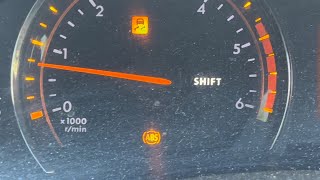
- This code is a very common cause for the VSC, TRAC, and ABS lights to all come on.
- Before driving, verify your brake lights work. If they don't, the vehicle is unsafe.
- Replacing the brake light switch is a very easy and inexpensive DIY repair that takes less than 30 minutes and requires basic tools.
What's Unique About the 2008-2022 Toyota Sequoia
On the second-generation Sequoia, the brake switch is a critical input for more than just the brake lights. It is tied directly into the Vehicle Stability Control (VSC), TRAC (traction control), and ABS systems. As a result, a failing brake switch is one of the most common reasons for the 'Christmas tree' effect on the dashboard, where the VSC, TRAC, and ABS lights all illuminate at once, 🎬 Watch: How to address these common Toyota dashboard warning lights. even if the brakes seem to be working fine. This happens because the VSC/ABS module relies on the brake signal, and when the signal is deemed unreliable by the ECM, it disables these safety systems as a precaution.
Generation note: The 2008-2022 model years cover the entire second generation of the Toyota Sequoia. The cause, symptoms, and repair process for code P0504 are consistent across this generation, as they share the same fundamental electronic and braking systems.
Symptoms You May Notice
- Check Engine Light is on
- VSC, TRAC, and/or ABS warning lights are illuminated on the dashboard
- Cruise control does not work or disengages unexpectedly
- Brake lights do not illuminate when the pedal is pressed
- Brake lights stay on constantly, even when the pedal is not pressed
- Inability to shift the transmission out of Park without using the manual override
- Intermittent illumination of the warning lights, which may turn off and on during drives
- Replacing ABS or VSC modules. The P0504 code is the root cause, and the ABS/VSC lights are a secondary symptom. Always address the P0504 code first.
- Assuming the brake light switch is good just because the brake lights work. The switch has two separate circuits for redundancy; one can fail while the other still operates the lights, but the mismatched signals will still trigger the P0504 code.
Most Likely Causes
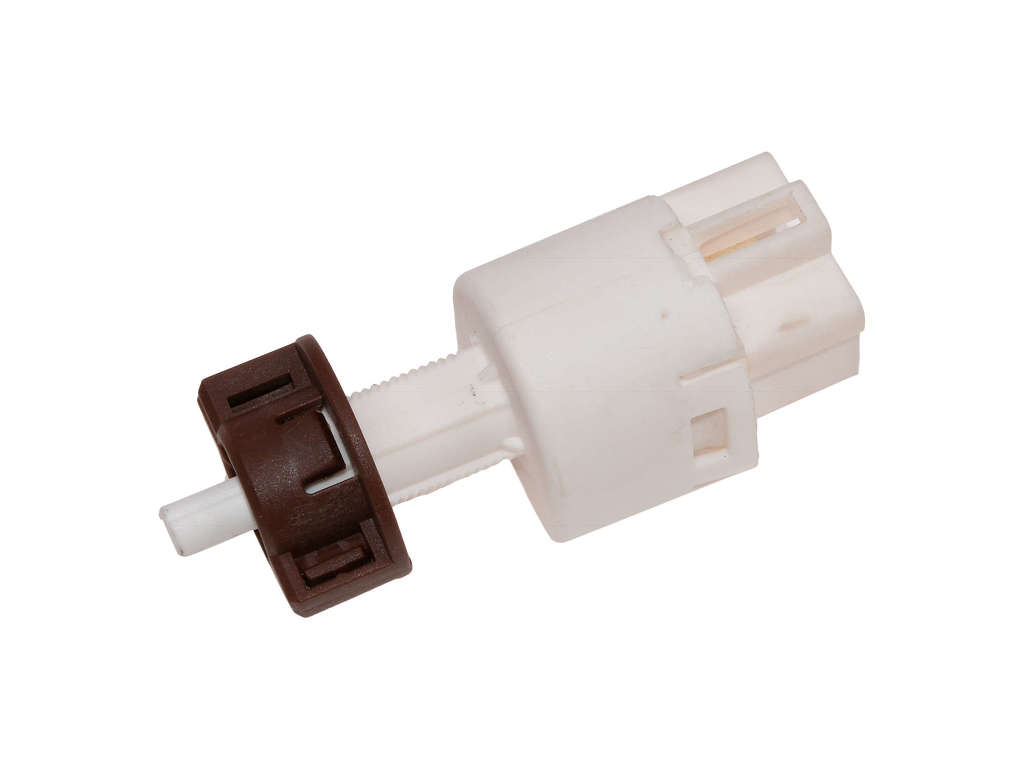
- Faulty Brake Light Switch 🔴 High Probability → Shop Brake Light Switch The switch is a small electromechanical part with internal contacts that wear out over time from constant use. It is a common failure point on many Toyota vehicles, including the Sequoia and its platform-mate, the Tundra.
How to confirm: Use a multimeter to test the switch's two circuits for continuity as the plunger is pressed and released. Alternatively, given the low cost of the part, many owners opt to replace it as the first step. A scan tool can also monitor the 'Stop Light SW' (STP) and 'ST1-' signal status in live data to see if they are reporting illogical states.
Typical fix: Replace the brake light switch. It is located on the brake pedal bracket under the dashboard. The process involves disconnecting the electrical connector, loosening the 14mm lock nut, unscrewing the old switch, and installing/adjusting the new one. 🎬 Watch this step-by-step guide to replacing and adjusting the switch.
Est. part cost: $25-$95 - Improperly Adjusted Brake Light Switch 🟡 Medium Probability → Shop Brake Light Switch The switch is threaded into its bracket, allowing for adjustment. If it's too close or too far from the pedal arm, it can send incorrect signals. This can happen if it was installed incorrectly or has loosened over time.
How to confirm: Check the clearance of the switch plunger. The service manual specifies an adjustment procedure. Ensure the plunger is fully depressed when the pedal is released and has free play when the pedal is pressed. A visual check can confirm if the brake lights activate with only very slight pedal movement.
Typical fix: Adjust the switch by loosening the lock nut (typically 14mm), screwing the switch body in or out to the correct position, and then tightening the lock nut. The goal is for the brake lights to turn on just as the pedal begins to be pressed.
Est. part cost: $0 - Blown 'STOP' Fuse ⚪ Low Probability
How to confirm: Locate and inspect the 'STOP' fuse for the stop lamp circuit in the vehicle's fuse box. If the fuse is blown, the brake lights will not work at all.
Typical fix: Replace the blown fuse. If the new fuse blows immediately, it indicates a short circuit in the wiring that needs to be diagnosed.
Est. part cost: $1-$5
Rare But Worth Checking
- Wiring or Connector Issue: Although less common than switch failure, a damaged wire or corroded connector pin between the switch and the ECM can cause the same symptoms. This is worth checking if a new switch doesn't solve the problem. A diagnostic procedure would involve checking for shorts and measuring voltage at the ECM connector.
- Failed Engine Control Module (ECM): This is extremely rare. The ECM should only be considered as the cause after all other possibilities, including the switch, adjustment, and wiring, have been thoroughly ruled out by a professional.
Diagnosis Steps
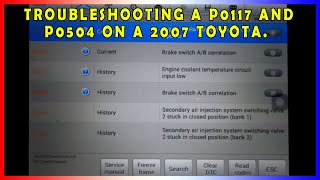
- Read Fault Codes: Use an OBD-II scanner to confirm P0504 is the primary code. Note any other codes present, like P0571.
- Check Brake Lights: Have an assistant observe the brake lights as you press and release the pedal. Note if they are inoperative, always on, or delayed.
- Inspect Brake Light Switch: Visually inspect the switch located on the brake pedal bracket. Ensure it is securely mounted and that the plastic stopper on the pedal arm that contacts the switch is not broken or missing.
- Check Live Data (if possible): Use a capable scan tool to view the live data for the 'Stop Light SW' (STP) and 'ST1-' signals. Confirm that they change state logically (one ON, one OFF) as you press and release the brake pedal. A mismatch confirms the fault.
- Check for Proper Adjustment: Loosen the lock nut on the switch and adjust its position. Per the service manual, the switch should be screwed in until it contacts the pedal stopper, then turned back slightly to achieve the correct clearance. Tighten the lock nut.
- Test the Switch: If adjustment fails, disconnect the switch and use a multimeter to test the two pairs of terminals for continuity as you operate the plunger. One pair should have continuity only when the plunger is released, and the other pair only when the plunger is pressed. If either circuit fails, the switch is bad.
- Inspect Fuse and Wiring: If the switch tests good, check the 'STOP' fuse. If the fuse is good, inspect the wiring harness and connector for any visible damage, corrosion, or loose pins.
- Replace the Brake Light Switch: If the switch is confirmed to be faulty or is highly suspected, replace it. This is the most common resolution.
Parts You'll Likely Need
- Brake Light Switch (Stop Lamp Switch)
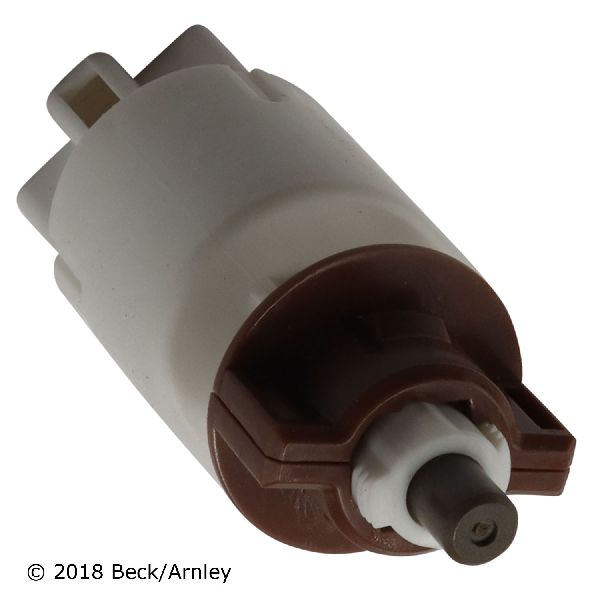
(OEM #84340-69025)— This is the most common point of failure for code P0504. The internal contacts wear out, causing the signal correlation fault. Note: Part number 84340-09310 may also be cited, but 84340-69025 is a common replacement.
Trusted brands: Toyota (Genuine OEM), Standard Motor Products (Intermotor), Beck/Arnley
OEM price range: $60-$95
Aftermarket price range: $25-$45
Related Codes That Often Appear With This One
- P0571 — P0571 is 'Brake Switch 'A' Circuit Malfunction'. It is very similar to P0504 and often appears alongside it, pointing directly to a problem with the brake light switch or its circuit.
- C1203 — This code indicates a communication issue between the VSC/ABS module and the ECM. It can be triggered by the P0504 fault because the VSC/ABS module is not receiving the expected brake signal information from the ECM.
Mechanic-Grade Diagnostic Values
- ST1- Signal Voltage at ECM Connector — expected: 7.5V - 14V with brake pedal released; Below 1.5V with brake pedal depressed.. Failure: Voltage that does not change when the pedal is pressed/released, or voltage outside the expected ranges, points to a fault in the switch or wiring.
- Brake Light Switch Continuity Test — expected: With the 4-pin connector unplugged: One pair of pins should have continuity only when the plunger is pressed in (pedal released). The other pair should have continuity only when the plunger is out (pedal depressed).. Failure: If a circuit shows no continuity in either state, or has continuity in both states, the switch is faulty.
Scan Tool Commands That Help
- Toyota Techstream: Data List > Primary > 'STOP LIGHT SW' and 'ST1-' — This is the primary method to diagnose P0504 without disassembly. It allows you to watch the live status of both brake switch signals as reported to the ECM. When you press the brake pedal, 'STOP LIGHT SW' should change from OFF to ON, and 'ST1-' should do the opposite. Any deviation, such as both being ON or OFF simultaneously for more than a moment, confirms the correlation fault.
- Toyota Techstream: Active Test > 'Start Engine' — In rare cases where the P0504 fault prevents the vehicle from cranking (common on push-to-start models), this command can be used to bypass the normal starting sequence and force the engine to start for further diagnosis, confirming the issue is in the starting interlock logic tied to the brake signal.
Wiring & Ground Locations
- Stop Light Switch Connector (A3) — Directly on the brake light switch, located on the bracket above the brake pedal arm under the driver's side dashboard.. This is the first place to check for voltage and signal integrity. Corrosion or a loose pin in this connector can mimic a failed switch.
- ECM Connector (A9) — The Engine Control Module is typically located behind the right side of the dashboard (glove box area).. This is where the final voltage test for the STP and ST1- signals should be performed if a new switch and connector inspection do not solve the issue. Testing here confirms if the signal is successfully reaching the ECM, ruling out wiring breaks between the switch and the module.
- Instrument Panel J/B (Junction Block) — Located behind the left end of the dashboard.. This junction block contains the 'STOP' fuse (typically 15A) that provides power to the brake light circuit. A fault here or with the fuse itself will cause the STP signal to fail.
Real Owner Repair Stories
- YouTube user 'Car Light', Toyota Yaris (similar system) (2007 Toyota Yaris) — P0504 code, no brake lights at all.
❌ Tried (didn't work) Initial assumption was a simple switch failure.
✅ What actually fixed it The brake light switch had catastrophically failed and melted, burning the wiring harness connector and several inches of wire leading to it. The fix required obtaining a donor connector from a junkyard and splicing it into the vehicle's harness, in addition to replacing the switch itself. This highlights that a simple code can sometimes be caused by a more severe underlying electrical failure. - Reddit user in r/toyotasequoia (2004 Toyota Sequoia (1st Gen, but similar issue)) — Brake lights staying on constantly while the engine is running.
❌ Tried (didn't work) Visual inspection of the switch showed it moving freely., Checking fuses, which were all good.
✅ What actually fixed it The small plastic/rubber stopper (cushion) on the brake pedal arm that physically presses the switch's plunger had broken and fallen off. Without the stopper, there was a gap, and the plunger was never fully depressed when the pedal was released, causing the lights to stay on. The fix was to replace the stopper (a very inexpensive part, sometimes temporarily fixed with a bolt or penny).
OEM Part Supersession History
84340-0C020→84340-69025— Standard part consolidation and potential minor internal design improvements by Toyota over the vehicle's long production run.
Diagnostic Flowchart
Other Known Issues on This Vehicle
Issues unrelated to this code that are worth knowing about as an owner of this generation:
- Secondary Air Injection Pump Failure 🔴 High — Common on earlier 2008-2012 models. The internal foam filter can degrade, sending debris into the pumps and valves, causing failure and check engine lights (P244x codes). Can cost thousands to repair if valves are damaged. (Ref: Toyota issued a Warranty Enhancement Program (CSP ZLA) extending coverage to 10 years/150,000 miles for some 2008-2010 models. TSBs T-SB-0230-12 and T-SB-0160-11 also address this.)
- Leaking Water Pump 🟠 Medium — The water pump on the 5.7L V8 is a known weak point, often failing and leaking coolant from its weep hole around 60,000-100,000 miles. Look for pink, crusty residue on the front of the engine.
- Cam Tower Oil Leak 🟠 Medium — A well-documented issue where the sealant between the cam housing and cylinder head fails, causing an oil leak on the front of the engine, often noticeable above the alternator. It is a labor-intensive repair.
- Cracked/Sticky Dashboard 🟡 Low — Very common on models from the 2000s, especially in hot climates. Prolonged sun exposure causes the dashboard material to become brittle and crack or melt into a sticky, shiny surface. (Ref: Toyota issued a Warranty Enhancement Program (ZLD) for some affected vehicles, though it has since expired for most.)
- Rust on Rear Hatch and Frame 🟠 Medium — Like other Toyota trucks of the era, the Sequoia can be susceptible to frame rust, particularly in regions that use road salt. The lower part of the rear liftgate is also a common spot for rust to develop. (Ref: Toyota has had frame rust recall campaigns for other trucks, but the Sequoia was not always included. Inspection is critical.)
Used vs. New Parts: Buying Guide for This Vehicle
When a used part is the smart pick: For this specific repair, buying a used brake light switch is NOT recommended. The part is a low-cost wear item, and a used switch from a junkyard has an unknown amount of life left and may fail soon after installation. A used part only makes sense for obtaining the wiring connector pigtail if the original has melted or been damaged, as seen in some rare failure modes.
Donor-vehicle mileage cap: roughly under 150000 miles for the part to have meaningful remaining life.
What to inspect on the donor part:
- For the connector pigtail: Ensure the plastic is not brittle or cracked.
- Check that the locking tab is intact.
- Look for any signs of melting, charring, or corrosion on the pins.
- Ensure there are at least a few inches of wire to work with for splicing.
OEM-only on this vehicle (don't cheap out):
- While not strictly 'OEM-only', the Genuine Toyota part is highly recommended. Given the low price difference and its critical safety function, the guaranteed fitment and quality of the OEM switch (84340-69025) is a smart investment over potentially less reliable aftermarket versions.
Aftermarket brands forum-validated for this vehicle:
- Standard Motor Products (SMP)
- Beck/Arnley
Brands owners have reported issues with on this vehicle:
- Unbranded, no-name parts from online marketplaces should be avoided due to inconsistent quality control for this critical safety component.
Real Owner Stories
Aggregated from forums and TSBs cited above. Mileages and costs reflect what owners reported in those sources.
First Generation Toyota Sequoia
Symptoms: The owner reported codes P0571 and P0504, along with illuminated ABS and VSC lights, even though the brake lights appeared to be functioning correctly.
What fixed it: The community confirmed that the brake light switch was the near-certain culprit for the combination of codes and symptoms.
Source hint: Reddit (r/toyotasequoia)
Related OBD-II Codes
Frequently Asked Questions
My VSC, TRAC, and ABS lights all came on with the Check Engine Light for P0504. Is this normal for a Toyota Sequoia?
My cruise control stopped working. Could this be related to the P0504 code?
I can't shift my 2010 Sequoia out of Park. Is the P0504 code the reason?
My brake lights seem to work fine, but I still have a P0504 code and the VSC light is on. Could it still be the brake light switch?
Is the brake light switch that causes P0504 a common problem on other Toyota trucks like the Tundra?
The mechanic said my brake light switch just needs adjustment. Is this something I can do myself?
Helpful Videos

We Have This Part in Stock


The information in this article is provided for general reference and educational purposes only. Vehicle specifications, procedures, and part compatibility can vary by production date, trim level, and region. Always consult your vehicle's factory service manual and verify part numbers before purchasing or performing repairs. Safety-critical components such as airbags, seat belts, and braking systems should be installed by a qualified professional.
- Toyota Sequoia:
- 🧭 Diagnostic Flowchart
- 🎬 Helpful Videos
- 🛍️ Shop This Part
- What's Unique About the 2008-2022 Toyota Sequoia
- Symptoms You May Notice
- Most Likely Causes
- Rare But Worth Checking
- Diagnosis Steps
- Parts You'll Likely Need
- Related Codes That Often Appear With This One
- Mechanic-Grade Diagnostic Values
- Scan Tool Commands That Help
- Wiring & Ground Locations
- Real Owner Repair Stories
- OEM Part Supersession History
- Other Known Issues on This Vehicle
- Used vs. New Parts: Buying Guide for This Vehicle
- Real Owner Stories
- First Generation Toyota Sequoia
- Related OBD-II Codes
- Frequently Asked Questions
- 🎟️ Get 5% Off