
P0524 on 2005-2013 Chevrolet Corvette: Engine Oil Pressure Too Low Causes and Fixes
P0524 on a C6 Corvette indicates critically low oil pressure. Most often, it's a false alarm caused by a failed oil pressure sensor and its clogged filter screen, not a bad engine. The parts are cheap (~$50-$75), but the repair is labor-intensive ($400-$700+) because the sensor is located under the intake manifold against the firewall.
- P0524 is a critical code. Stop the engine immediately to prevent catastrophic damage.
- The first step is always to check the oil level. The second, most important diagnostic step is to verify the true oil pressure with a mechanical gauge.
- On the C6 Corvette, the most likely cause is a faulty oil pressure sensor and its filter screen, not a failed engine.
- The parts are inexpensive, but the repair is difficult and labor-intensive due to the sensor's location under the intake manifold.
- Always replace both the sensor (ACDelco 12673134) and the filter screen (ACDelco 12585328) at the same time.
What's Unique About the 2005-2013 Chevrolet Corvette
On the C6 Corvette's LS-series V8 engines, the P0524 code is a very well-documented issue. While the code signifies a potentially catastrophic loss of oil pressure, it is most frequently caused by the failure of an inexpensive sensor rather than a major mechanical problem like a bad oil pump. The oil pressure sensor is notoriously prone to failure and is located in a very difficult-to-access position at the top rear of the engine block, underneath the intake manifold and flush against the firewall, making replacement a labor-intensive job.
Symptoms You May Notice
- "Low Oil Pressure - Stop Engine" warning on the Driver Information Center (DIC)
- Check Engine Light is on
- Oil pressure gauge reads zero, erratically, or is pegged at maximum.
- Engine ticking, whining, or knocking noises (indicates true low pressure).
- Reduced engine power or engine going into limp mode
- Oil leaking from the sensor itself, dripping onto the back of the engine or exhaust.
- Replacing the oil pump without first verifying actual oil pressure with a mechanical gauge. The sensor system is a far more common failure point.
- Replacing only the oil pressure sensor but not the small filter screen underneath it, which can lead to the same code returning quickly.
- Assuming the engine is failing when the gauge reads zero, without considering the high probability of a sensor failure.
Most Likely Causes
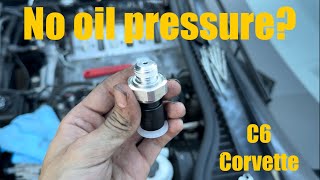
- Faulty Engine Oil Pressure Sensor (Sending Unit) 🔴 High Probability The oil pressure sensor on LS engines is a known common failure point. It can fail electrically, provide incorrect readings (pegging high or low), or leak oil through its body into the electrical connector, causing a short.
How to confirm: After verifying actual oil pressure is normal with a mechanical gauge, a faulty sensor is the most likely culprit. The gauge reading on the dash will not match the mechanical gauge. A key-on, engine-off gauge reading that is not zero also points to a bad sensor.
Typical fix: Replace the oil pressure sensor. Due to its location, this requires removing the intake manifold. 🎬 Watch: Step-by-step LS3 oil pressure sensor replacement Some owners opt to install an oil pressure sensor relocation kit at this time to make future replacements easier.
Est. part cost: $40-$60 - Clogged Oil Pressure Sensor Filter Screen 🔴 High Probability A small, thimble-sized filter screen sits directly below the oil pressure sensor to protect it. This screen can become clogged with sludge and debris, starving the sensor of oil and causing a false low-pressure reading. This is especially common on engines with Active Fuel Management (AFM), though the Corvette LS engines do not have AFM.
How to confirm: This is typically diagnosed along with a faulty sensor. It is impossible to inspect without first removing the sensor.
Typical fix: The filter screen should always be replaced when replacing the oil pressure sensor. It is an inexpensive part that is critical to the proper function of the new sensor. Skipping this step can cause the new sensor to fail or read incorrectly.
Est. part cost: $8-$15 - Low Engine Oil Level 🟡 Medium Probability Some LS engines can consume oil between changes. The LS7, in particular, has a dry-sump system that requires a specific checking procedure; an incorrectly checked level could lead to under-filling.
How to confirm: Check the engine oil dipstick according to the owner's manual procedure. This should be the very first check performed when this code appears.
Typical fix: Top off the engine oil to the correct level using a manufacturer-approved oil (typically a full synthetic 5W-30 meeting Dexos specs). Check for oil leaks.
Est. part cost: $10-$20 - Wiring or Connector Issue ⚪ Low Probability The sensor connector is in a high-heat area and can become brittle. Oil leaking from a failed sensor can also contaminate the connector and wiring, causing a poor connection.
How to confirm: Inspect the wiring harness and connector for the oil pressure sensor. Look for signs of heat damage, corrosion, or oil contamination from a leaking sensor.
Typical fix: Repair the damaged wiring or clean/replace the connector pigtail.
Est. part cost: $15-$40
Rare But Worth Checking
- Failing Oil Pump or Worn Internal Engine Components: → Shop Engine Oil Pump This is a true mechanical failure. It is much less common than a sensor issue but is the worst-case scenario. Causes can include a failing oil pump, a stuck pressure relief valve, a clogged oil pickup tube screen in the pan, or excessive clearances from worn engine bearings. Confirming this requires testing with a mechanical oil pressure gauge. If the mechanical gauge shows low pressure, the engine has a serious internal problem that may require significant repair or replacement.
Diagnosis Steps
- CRITICAL: Immediately and safely shut off the engine to prevent potential damage.
- Check the engine oil level using the dipstick, following the correct procedure for your specific engine (wet sump vs. dry sump). If it is low, add the correct type and amount of oil.
- If the oil level is correct, DO NOT start the engine again until true pressure can be verified.
- Connect a mechanical oil pressure gauge to the engine. This is the most important step to determine if you have a real low-pressure emergency or a sensor-related fault.
- Start the engine briefly and observe the mechanical gauge. If pressure is within specification (generally above 25 PSI at idle when warm, and increasing with RPM), the engine itself is likely healthy.
- If mechanical pressure is good, the cause is almost certainly a faulty oil pressure sensor and/or a clogged filter screen.
- If mechanical pressure is low, the engine has a serious internal mechanical problem (e.g., oil pump, bearings) and requires professional teardown and diagnosis.
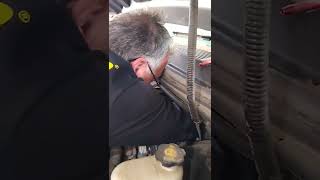
- To replace the sensor and screen, the intake manifold must be removed to gain access to the sensor at the rear of the engine block. Some DIYers cut an access hole in the plastic cowl panel, but this is not a recommended practice. 🎬 See how to replace the sensor and screen without removing the intake
- Once the intake is removed, disconnect the sensor's electrical connector, and use a special deep socket (typically 1-1/16") to remove the sensor.
- Use a pick or needle-nose pliers to pull out the old filter screen from the block.
- Install the new filter screen and thread in the new sensor by hand to avoid cross-threading before tightening to specification (typically 15 lb-ft / 20 N-m).
- Reassemble the intake manifold using new gaskets, reconnect all hoses and electrical connectors, and clear the trouble code.
Parts You'll Likely Need
- Engine Oil Pressure Sensor / Sending Unit
(OEM #12673134)— This is the most common part to fail and cause a false P0524 code on LS engines. The original part number 12621234 was superseded by this part.
Trusted brands: ACDelco (OEM), Delphi
OEM price range: $40-$60
Aftermarket price range: $25-$50 - Engine Oil Pressure Sensor Filter Screen
(OEM #12585328)— This small screen is located under the sensor and is a primary culprit, getting clogged with sludge and causing a false low-pressure reading. It should always be replaced with the sensor.
Trusted brands: ACDelco, Dorman
OEM price range: $8-$15
Aftermarket price range: $5-$10 - Intake Manifold Gasket Set — These gaskets are one-time use and must be replaced anytime the intake manifold is removed to access the oil pressure sensor.
Trusted brands: ACDelco, Fel-Pro
OEM price range: $30-$50
Aftermarket price range: $20-$40
Related Codes That Often Appear With This One
- P0521 — This code indicates 'Engine Oil Pressure Sensor/Switch Range/Performance'. It often appears alongside P0524 as both relate to sensor performance issues caused by a faulty sensor or a clogged screen.
Platform-Specific Known Issues
- The location of the oil pressure sensor on all C6 Corvette engines (LS2, LS3, LS7, LS9) is at the top rear of the engine block, directly behind the intake manifold and against the firewall. This makes access impossible without either removing the entire intake manifold or cutting an access hole in the plastic cowl panel. While some forum users advocate for cutting the cowl, it is generally considered an improper repair.
- A popular modification during this repair is to install an oil pressure sensor relocation kit. This involves running a braided stainless steel line from the original sensor port to a more accessible location on the engine, making future sensor replacements a simple 10-minute job.
Mechanic-Grade Diagnostic Values
- Engine Oil Pressure (Mechanical Gauge) — expected: Minimum 6 PSI @ 1000 RPM, 18 PSI @ 2000 RPM, 24 PSI @ 4000 RPM (GM minimum specs). A healthy engine is typically 25-40 PSI at hot idle.. Failure: Pressure below the minimum specifications confirms a mechanical fault.
- Oil Pressure Sensor Signal Voltage — expected: The sensor operates on a 0.5V to 4.5V scale. Voltage should increase with engine RPM/oil pressure.. Failure: Voltage stuck at 0V, 5V, or a static value that doesn't change with RPM points to a failed sensor or wiring issue.
- Sensor 5V Reference Voltage at Connector — expected: Approximately 5.0V with key-on, engine-off.. Failure: 0V or significantly low voltage indicates a problem with the ECM or the 5V reference circuit, which is shared by other sensors.
Scan Tool Commands That Help
- Tech2 / GDS2: Live Data - Engine Oil Pressure (EOP) — This is the primary data PID to monitor the pressure value the ECM is seeing from the sensor. Comparing this live data to a mechanical gauge reading is the core diagnostic step. If the scan tool shows 0 PSI but the mechanical gauge shows 30 PSI, the fault is in the sensor or its circuit.
Wiring & Ground Locations
- Oil Pressure Sensor Connector — Top rear of the engine, under the intake manifold against the firewall.. This 3-pin connector can become brittle from heat or contaminated with oil from a leaking sensor, causing poor contact and false readings. The pins are typically A: Low Reference (Ground), B: Signal, C: 5V Reference.
- ECM Connector C2 (Pin 24 or 50) — The Engine Control Module (ECM) is located behind the right front fender liner. The oil pressure sensor signal wire (typically Tan/White or Dk Blue/White) runs to a specific pin on one of the main ECM connectors (Pin 24 on some diagrams, Pin 50 on others).. If the sensor and its pigtail are good, a continuity test from the signal pin at the sensor to this pin at the ECM can identify a break in the harness.
- Engine Ground Straps (e.g., G103/G109) — Primary engine-to-chassis grounds are located on the engine block, often near the starter or on the cylinder heads.. A loose or corroded main engine ground can introduce electrical noise and voltage offsets, affecting the accuracy of sensor readings that rely on a stable ground reference, including the oil pressure sensor.
Real Owner Repair Stories
- CorvetteForum user (2006 Corvette Z06 (LS7)) — Broke the locking tab on the oil pressure sensor connector during other work. The replacement pigtail had all white wires, and the original was lost, creating confusion.
❌ Tried (didn't work) Searching for wiring diagrams online initially yielded confusing results.
✅ What actually fixed it Another forum member provided the correct wire orientation for the connector: With the snap tab at the top, the Black wire (Ground) is top-left, the Grey wire (5V Reference) is top-right, and the Orange/White wire (Signal) is bottom-center. This allowed the user to correctly splice the new pigtail and restore sensor function.
OEM Part Supersession History
12621234→12673134— Updated design by GM/ACDelco for improved reliability.
Heads up: The parts are directly interchangeable. The original part number 12596951 was also superseded by 12673134.
Model Year Variations Within This Range
- 2005: The 2005 Corvette with the LS2 engine uses the E40 ECM, while 2006-2013 models use the E38 or E67 ECM. While the sensor function and location are the same, the specific pinout location for the oil pressure signal wire at the ECM connector itself differs.
Diagnostic Flowchart
Other Known Issues on This Vehicle
Issues unrelated to this code that are worth knowing about as an owner of this generation:
- Harmonic Balancer Wobble / Failure 🔴 High — Common across all C6 models, especially LS2/LS3. The rubber bonding delaminates or the crank bolt can back out, causing a wobble that can damage the oil seals, steering rack, or throw the belt. (Ref: TSB 05-06-01-001 (for early 2005 bolt issue))
- LS7 Valve Guide Wear ('Valve Drop') 🔴 High — Specific to the 7.0L LS7 engine in the Z06. Excessive wear in the valve guides can cause the valve head to break off and destroy the engine. Onset can be as low as 4,000 miles, but is a concern at any mileage.
- Fuel Level Sending Unit Failure 🟠 Medium — Very common on all C6 models. The sensors on the fuel pumps wear out, causing an erratic or empty fuel gauge reading, often triggering a Check Engine Light for code P2068. (Ref: TSB 15682 (related to cracked fuel pumps))
- Removable Roof Panel Delamination ('Flying Roof') 🔴 High — Primarily affects early 2005-2007 models. The adhesive bonding the roof panel to its frame fails, causing noise, leaks, or complete separation of the panel while driving. (Ref: NHTSA Recalls 06V313000 and 09V432000)
- 'Service Active Handling System' Message 🟠 Medium — Common on 2005-2006 models. Repeated movement of the telescoping steering column can damage wiring, causing an error message and, in rare cases, unintended braking. (Ref: NHTSA Recall 10V172000; TSB 06-02-35-002B)
- Steering Column Lock Failure (2005 models) 🟠 Medium — A carry-over issue from the C5, primarily affecting 2005 models. The electronic column lock can fail, preventing the car from starting and displaying a 'Service Column Lock' message. (Ref: TSB #18-NA-346 (authorizes disabling the system))
Used vs. New Parts: Buying Guide for This Vehicle
When a used part is the smart pick: For this repair, a used intake manifold is a perfectly acceptable and cost-effective choice. The manifold itself is a durable plastic component with no moving parts. Ensure it is not cracked or damaged.
Donor-vehicle mileage cap: roughly under 150000 miles for the part to have meaningful remaining life.
What to inspect on the donor part:
- Inspect for cracks, especially around bolt holes and mounting points.
- Ensure all threaded inserts for bolts are intact and not stripped.
- Check that the gasket surfaces are clean and free of deep gouges.
OEM-only on this vehicle (don't cheap out):
- Engine Oil Pressure Sensor
- Engine Oil Pressure Sensor Filter Screen
Aftermarket brands forum-validated for this vehicle:
- ACDelco (OEM for sensor, filter, gaskets)
- Delphi (Sensor)
- Fel-Pro (Intake Manifold Gaskets)
Brands owners have reported issues with on this vehicle:
- Unbranded 'white-box' sensors from online marketplaces have a high rate of Dead-on-Arrival (DOA) or premature failure according to forum discussions. While Dorman is a common aftermarket brand, some users have reported early failures with their sensors for this application.
Real Owner Stories
Aggregated from forums and TSBs cited above. Mileages and costs reflect what owners reported in those sources.
2005-2013 Chevrolet Corvette C6
Symptoms: The owner experienced a debate over the best way to access the sensor, noting symptoms of failure and discussing whether to remove the intake manifold or use the controversial method of cutting the plastic cowl for access.
What fixed it: Replacement of the oil pressure sensor, with the suggestion of installing a relocation kit to simplify future repairs.
Source hint: CorvetteForum.com - "Oil Pressure Sensor issues" (https://www.corvetteforum.com/forums/c6-tech-performance/4211301-oil-pressure-sensor-issues.html)
2005-2013 Chevrolet Corvette C6
Symptoms: The owner sought a 'shortcut' method to reach the sensor due to its difficult location behind the intake manifold against the firewall.
What fixed it: Cutting an access panel in the cowl (though noted as a controversial shortcut) and installing an oil pressure sensor relocation kit.
Source hint: CorvetteForum.com - "Cut cowl for Oil Pressure sensor" (https://www.corvetteforum.com/forums/c5-tech-performance/4594689-cut-cowl-for-oil-pressure-sensor.html)
Related OBD-II Codes
Frequently Asked Questions
Can I replace the oil pressure sensor on my C6 Corvette without removing the intake manifold?
Is there a way to make future oil pressure sensor failures easier to fix on my LS3?
Why is my LS7 dry-sump engine showing a low oil pressure warning even when the oil seems fine?
Should I just replace the sensor, or is there another part I need?
My oil pressure gauge is pegged at maximum; does this mean I have high oil pressure?
Does the Corvette LS engine suffer from the same AFM-related sensor clogging as the Silverado?
Helpful Videos
We Have This Part in Stock


The information in this article is provided for general reference and educational purposes only. Vehicle specifications, procedures, and part compatibility can vary by production date, trim level, and region. Always consult your vehicle's factory service manual and verify part numbers before purchasing or performing repairs. Safety-critical components such as airbags, seat belts, and braking systems should be installed by a qualified professional.
- Chevrolet Corvette:
- 🧭 Diagnostic Flowchart
- 🎬 Helpful Videos
- 🛍️ Shop This Part
- What's Unique About the 2005-2013 Chevrolet Corvette
- Symptoms You May Notice
- Most Likely Causes
- Rare But Worth Checking
- Diagnosis Steps
- Parts You'll Likely Need
- Related Codes That Often Appear With This One
- Platform-Specific Known Issues
- Mechanic-Grade Diagnostic Values
- Scan Tool Commands That Help
- Wiring & Ground Locations
- Real Owner Repair Stories
- OEM Part Supersession History
- Model Year Variations Within This Range
- Other Known Issues on This Vehicle
- Used vs. New Parts: Buying Guide for This Vehicle
- Real Owner Stories
- 2005-2013 Chevrolet Corvette C6
- 2005-2013 Chevrolet Corvette C6
- Related OBD-II Codes
- Frequently Asked Questions
- 🎟️ Get 5% Off