
OBD-II Code P0653: Sensor Reference Voltage 'B' Circuit High
What P0653 means, why it triggers, and how to fix it
- P0653 triggers when the PCM detects over 5.3 volts on the 5-volt 'B' sensor circuit, usually caused by a shorted wire, a failed sensor, or a bad ground.
- Never replace the Powertrain Control Module (PCM) first; it is the rarest cause of this code and costs upwards of $1,000 to replace and program.
- Diagnose P0653 by measuring the circuit voltage with a multimeter and unplugging sensors one by one until the voltage drops back to the normal 5-volt range.
- Verify your specific manufacturer's definition for P0653, as brands like Volkswagen and Jeep use this code for completely different data bus or ABS failures.
- Stop driving if the vehicle enters 'limp mode'; running the engine rich for more than 100 miles will overheat and destroy the catalytic converter, adding $1,500+ to your repair bill.
What Does P0653 Mean?
The Powertrain Control Module (PCM) sends a steady 5-volt reference signal to power various engine and transmission sensors. Code P0653 triggers when the PCM detects voltage on the 'B' circuit exceeding 5.3 volts. This over-voltage condition confuses the computer, corrupts sensor data, and causes erratic engine or transmission behavior. The 'B' circuit simply designates a specific group of sensors sharing a single PCM power source.
Technical definition: The SAE/OBD-II definition is Sensor Reference Voltage 'B' Circuit High. The PCM expects a normal operating range of 4.75V to 5.25V on this circuit. P0653 triggers when voltage exceeds 5.3V for more than a fraction of a second. This high-voltage fault disrupts all sensors on the shared circuit and, if ignored, permanently damages the PCM's internal voltage regulator.
Can I Drive With P0653?
Yes, But With Caution. You can drive short distances, but you must address it immediately. The vehicle will likely stall, run rough, or shift erratically, posing a safety risk. If the fault forces 'limp mode,' the engine runs overly rich; driving hundreds of miles will overheat and destroy the catalytic converter, a $1,500+ repair.
Common Causes
- Damaged Wiring or Corroded Connectors (Very Common) — A wire in the 5-volt reference circuit loses its insulation and touches a 12-volt power source, creating a 'short to voltage'. Corrosion inside a connector from moisture also creates an unintended path for electricity, raising the circuit's voltage.
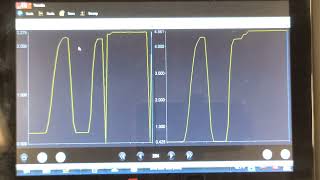
- Faulty Sensor on the 'B' Circuit (Common) — A sensor sharing the 'B' circuit (like the MAP or APP sensor) fails internally and back-feeds extra voltage into the 🎬 Watch: How shorted sensors affect reference voltage during testing shared 5-volt system.
- Poor Ground Connection (Common) — The sensor circuit requires a solid ground. A loose, rusty, or broken ground wire creates high resistance, causing the PCM to read the circuit voltage artificially high.
- Faulty Shared Circuit Component (e.g., Coolant Valve, Actuators) (Less Common) — Components like three-way coolant control valves (common on Dodge 3.6L V6s) or swirl flap actuators share the 5-volt reference circuit. When they short internally, they leak their 12-volt power supply directly into the 5-volt line.
- Aftermarket Electrical Modifications (Less Common) — Poorly installed remote starters, stereos, or lighting accessories mistakenly tap into the 5-volt sensor reference line instead of a 12-volt source, causing an immediate voltage spike.
- Blown Fuse or Fusible Link (Rare) — While the 5-volt reference circuit is rarely fused directly, a related 12-volt circuit shorting to the reference line blows its own fuse. This leaves a high-voltage path open to the sensor circuit.
- Faulty Powertrain Control Module (PCM) (Rare) — The internal voltage regulator inside the PCM fails and outputs excessive voltage. Always rule out wiring and sensor shorts before replacing the PCM.
Symptoms
- Check Engine Light is On — The PCM immediately illuminates the Malfunction Indicator Lamp (MIL) upon detecting the high voltage.
- Engine Stalls or Fails to Start — Severe voltage spikes corrupt critical crankshaft or camshaft sensor data, preventing the engine from running or triggering a restrictive 'limp mode'.
- Transmission Shifting Problems — If the 'B' circuit powers transmission sensors, the vehicle experiences harsh shifting, delayed gear engagement, or gets stuck in a single gear.
- Erratic Gauges or Warning Lights — The speedometer fluctuates wildly, or secondary warning lights (ABS, Electronic Throttle Control) illuminate due to shared data bus corruption.
- Poor Engine Performance (also visible on scanner) — The engine hesitates, misfires, runs rough, or lacks power because corrupted sensor data forces the PCM to guess the correct air-fuel mixture.
- Reduced Fuel Economy (also visible on scanner) — The PCM defaults to a rich air-fuel mixture to protect the engine during a sensor fault, causing a noticeable drop in MPG.
Diagnostic Flowchart
Tap your situation to follow the diagnostic path that matches what you're seeing on this code.
Common Fixes & Costs
- Repairing Damaged Wiring — Parts: $10-$50, Labor: $100-$300, ~2 hr book time (Intermediate)
- Replacing a Faulty Sensor (e.g., APP, MAP, Coolant Valve) — Parts: $50-$300, Labor: $80-$150, ~1.2 hr book time (DIY)
- Cleaning or Replacing a Corroded Connector — Parts: $10-$50, Labor: $50-$150, ~0.8 hr book time (DIY)
- Repairing a Faulty Ground Connection — Parts: $5-$20, Labor: $50-$100, ~0.5 hr book time (DIY)
- Replacing a Faulty Powertrain Control Module (PCM) — Parts: $800-$1,600, Labor: $150-$300, ~2 hr book time (Professional)
DIY vs Professional
- Repairing Damaged Wiring — Beginner: No
Tools: Digital Multimeter, wire strippers, soldering iron or crimp connectors, heat shrink tubing, wiring diagrams. - Replacing a Faulty Sensor — Beginner: Yes
Tools: Basic socket/wrench set, screwdriver. - Cleaning or Replacing a Corroded Connector — Beginner: Yes
Tools: Electrical contact cleaner, small brush, dielectric grease. Wire crimpers if replacing a pigtail. - Repairing a Faulty Ground Connection — Beginner: Yes
Tools: Socket/wrench set, wire brush, sandpaper. - Replacing a Faulty Powertrain Control Module (PCM) — Beginner: No
Tools: Socket set, specialized J2534 programming tool.
Used vs. New Parts: Buying Guide
When a used part is worth it: For common sensors (APP, MAP), a used part from a low-mileage vehicle is budget-friendly if the OEM part is prohibitively expensive. Used PCMs are only viable if sourced from a reputable supplier that pre-programs it to your VIN.
Donor-vehicle mileage cap: roughly under 60000 miles for the part to have meaningful remaining life.
Donor quality checklist:
- Verify the exact part number matches; small variations cause immediate failure.
- Avoid electronic donors from flood-damaged or heavy rust-belt vehicles.
- Confirm the donor vehicle was not salvaged due to an electrical fire.
Decision logic:
- If A new aftermarket sensor with a warranty is available for under $100 → buy the new aftermarket part for reliability.
- If The vehicle is over 150,000 miles and requires an expensive OEM-only sensor → buy a used part from a low-mileage donor to save money.
- If The PCM requires replacement → buy a remanufactured unit with a pre-programming service and a long-term warranty.
Warranty tradeoff: Salvage yard parts offer a 30-90 day warranty. New aftermarket parts include a 1-year to limited lifetime warranty. New OEM parts carry a 1-2 year manufacturer warranty.
Worst-case if a used part fails: $200-$500 if a used sensor fails, requiring repeat labor and a second replacement part.
What Happens If You Wait — Timeline
- 0-2 weeks: The Check Engine Light illuminates. You experience subtle hesitation or a slight drop in fuel economy, but the vehicle remains drivable. (MPG impact: 0-5%% · Added cost: $0)
- 2 weeks - 3 months: Engine performance degrades significantly, causing rough idle, hesitation on acceleration, and harsh transmission shifts. (MPG impact: 5-15%% · Added cost: $30-$90 in wasted fuel)
- 3-6 months: The vehicle enters 'limp mode,' severely limiting power. The resulting rich fuel mixture overheats and destroys the catalytic converter. (MPG impact: 10-20%% · Added cost: $1200-$2800)
- 6+ months: Sustained high voltage permanently burns out the PCM's internal voltage regulator and destroys multiple sensors sharing the circuit. (MPG impact: 10-20%% · Added cost: $1000-$2500+)
Cost of Not Fixing It
- 0-1 month: Noticeable drop in fuel economy (5-15%), poor engine performance, and frequent stalling. (Added cost: $20-$60 in wasted fuel.)
- 1-6 months: A forced rich fuel condition ('limp mode') overheats and melts the internal honeycomb of the catalytic converter. (Added cost: $1200-$2800)
- 6+ months: Sustained high voltage permanently burns out the PCM's internal voltage regulator and destroys other sensors on the shared circuit. (Added cost: $1000-$2500+)
Diagnosis Steps
- Read Codes and Freeze Frame Data
Use an OBD-II scanner to confirm P0653. Document any accompanying codes (e.g., P2127 for APP sensor, P26A6 for coolant valve), as they pinpoint the exact failing component. Record the freeze frame data to see the engine conditions when the fault occurred.
Tools: OBD-II Scanner (Beginner) - Check for Technical Service Bulletins (TSBs)
Search for manufacturer TSBs related to P0653 for your specific year, make, and model. For example, Chrysler TSB 07-009-23 identifies a faulty coolant valve on 3.6L V6 engines as the primary cause.
Tools: Internet access (Beginner) - Visually Inspect Wiring and Connectors
Inspect the wiring harnesses for rubbed, pinched, or burnt sections. Unplug connectors for sensors on the 'B' circuit and check for green corrosion, water intrusion, or bent pins.
Tools: Flashlight (Beginner) - Test the Reference Voltage
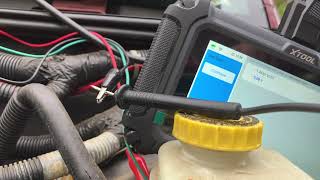
Turn the ignition ON (engine off). Use a digital multimeter to measure voltage at the reference wire of an accessible sensor on the 'B' circuit. A reading above 5.3 volts confirms the high-voltage short.
Tools: Digital Multimeter (Intermediate) - Isolate the Faulty Component
While monitoring the high voltage with your multimeter, unplug sensors on the 'B' circuit one by one. If the voltage drops to the normal 5V range after unplugging a specific sensor, that sensor is internally shorted and must be replaced.
Tools: Digital Multimeter, Vehicle-specific wiring diagram (Intermediate) - Perform a 'Wiggle Test' for Intermittent Shorts
If the voltage fluctuates, have a helper watch the multimeter while you gently wiggle the wiring harness and connectors. A sudden voltage spike isolates the exact location of a broken or shorted wire.
Tools: Digital Multimeter (Intermediate) - Check for a Short to Voltage
If unplugging all sensors doesn't normalize the voltage, the harness is shorted. Turn the ignition OFF and disconnect the PCM. Measure resistance (Ohms) between the 5-volt reference wire and the battery positive cable. A low resistance reading confirms the wire is shorted to power.
Tools: Digital Multimeter, Vehicle-specific wiring diagram (Advanced) - Perform a Voltage Drop Test on the Ground Circuit
Connect the black multimeter lead to the battery negative terminal and the red lead to the ground pin on a sensor connector. With the key ON, the reading must be under 100 millivolts (0.1V). Higher readings indicate a bad ground connection.
Tools: Digital Multimeter (Advanced) - Advanced Scan Tool Analysis
Use an advanced scan tool to graph the live data PID for 'Sensor Reference Voltage B'. Compare this graph against individual sensor PIDs (e.g., 'APP Sensor Voltage'). An erratic graph on one specific sensor PID pinpoints the failure source.
Tools: Advanced OBD-II Scan Tool (with live data) (Advanced) - Sensor Resistance Checks
Test a suspected sensor's internal resistance using a multimeter set to Ohms. Compare the pin-to-pin readings against the factory service manual specifications. A reading of 'O.L.' indicates an open circuit, while near-zero indicates a dead short.
Tools: Digital Multimeter, Vehicle-specific service manual (Advanced)
When This Code Triggers (Freeze-Frame Conditions)
- Engine Coolant Temp: 180-210°F (Engine at full operating temperature.)
- RPM: 1200-2500 (During steady-state cruise or light acceleration.)
- Engine Load: 25-50% (The fault appears under normal driving load, rarely at idle.)
- Vehicle Speed: 30-60 mph (Occurs during active driving as the PCM continuously monitors sensor circuits.)
Related Codes
- P0652 — The direct opposite of P0653, indicating the 'B' circuit voltage is too low (under 4.75V). This is typically caused by a short to ground rather than a short to power.
- P0651 — Indicates an 'Open' in the 'B' circuit, meaning the PCM detects 0 volts. A broken wire or completely disconnected sensor harness causes this.
- P0641 — Indicates an 'Open' in the 'A' reference circuit. Seeing this alongside P0653 suggests a catastrophic wiring harness failure or a dead PCM.
- P2127 — Accelerator Pedal Position Sensor 2 Circuit Low. This code frequently accompanies P0653 on Dodge/Ram vehicles because the APP sensor shares the 'B' circuit and fails when hit with high voltage.
Climate & Environmental Factors
- High Humidity: Moisture accelerates corrosion inside electrical connectors. This corrosion bridges the gap between the 5-volt pin and a 12-volt pin, creating a high-voltage short.
- Extreme Engine Bay Heat: Prolonged exposure to extreme engine heat degrades wiring insulation over time. Once the insulation becomes brittle and cracks, the exposed 5-volt reference wire easily shorts against a 12-volt power source or hot metal component.
- Road Salt (Winter Climates): Salty road spray infiltrates the engine bay and aggressively corrodes wiring harnesses and ground straps, leading to high resistance and voltage shorts.
How to Talk to a Mechanic About This Code
Say this: "I have a P0653 code, 'Sensor Reference Voltage B High'. I need a diagnostic to methodically test the 5-volt 'B' circuit for a short-to-voltage, a bad sensor, or a ground issue. Please do not replace any parts until the electrical fault is proven with a multimeter."
This proves you understand P0653 is an electrical diagnostic issue. It forces the technician to perform specific electrical tests rather than guessing and replacing expensive parts.
Avoid saying:
- 'My check engine light is on, can you look at it?'
- 'Just fix whatever's wrong.'
- 'My car is acting weird, I think it's a bad sensor.'
Questions to ask before authorizing the repair:
- What was the exact voltage reading on the 'B' reference circuit?
- Did you isolate the fault by unplugging sensors or testing the wiring harness?
- Can you show me the damaged wire or the failed part?
- Is this repair guaranteed to fix the P0653 code?
- What is the warranty on the parts and labor for this specific repair?
Where to Take It: Dealer vs Independent vs Chain
- Dealer:
Best if you have a known TSB issue or are under warranty. For out-of-warranty vehicles, an independent specialist offers better value.
Best for: Vehicles under factory warranty, Known manufacturer-specific issues covered by a TSB (e.g., Ram 3.6L coolant valve), Complex electrical issues requiring PCM replacement and programming
Downsides: Highest labor rates, often 40-50% more than independent shops., Dealers prefer replacing entire wiring harnesses ($1,000+) rather than repairing a single wire ($150). (Typical cost: +40% vs. baseline) - Independent Shop:
The best fit for most situations. An independent shop specializing in diagnostics pinpoints the exact electrical fault without dealership overhead.
Best for: Out-of-warranty vehicles where cost is a factor., Diagnosing intermittent and complex electrical faults., Targeted wire repairs instead of full harness replacements.
Downsides: Quality varies widely; you must verify the shop employs ASE-certified electrical diagnostic technicians. (Typical cost: +0% vs. baseline) - Chain Shop:
AVOID for diagnosis. Chain shops will likely misdiagnose the issue or replace parts by guessing.
Best for: Simple, high-volume jobs like oil changes, tires, and brakes.
Downsides: Technicians lack the training and tools for complex electrical diagnostics., High pressure to upsell leads to unnecessary parts replacement. (Typical cost: -10% vs. baseline)
When to Walk Away From the Repair
If the estimated repair cost exceeds 40-50% of the car's private-party value, sell or trade the vehicle instead of repairing it.
- Car worth $3500, fix is $1800: Walk away. The repair cost is over 50% of the car's value. Put that money toward a more reliable vehicle.
- Car worth $12000, fix is $950: Fix it. The repair cost is less than 10% of the vehicle's value and restores proper function and safety.
- Car worth $5000, fix is $2200: Borderline. At 44% of the car's value, get a second opinion to confirm the diagnosis. If the car has other pending issues, walk away.
What Scan Tool You Need for This Code
Minimum: A tool that reads and displays live data streams, specifically sensor voltage PIDs. Basic code readers are useless for this diagnosis.
Diagnosing P0653 requires viewing circuit voltage in real-time to confirm the 'high' condition while unplugging sensors or wiggling wires.
Budget: Ancel BD310 or Kingbolen Ediag Elite (~$60-80) — Connects to a smartphone app to display live sensor voltages, allowing you to see the fault in action and confirm if unplugging a sensor resolves it.
Mid-range: XTOOL D7 or Innova 5610 (~$300-400) — Provides detailed live data graphing and basic bidirectional controls to test components, speeding up the verification of a fix.
Professional: Autel MaxiCOM MK808S or Launch X431 CRP919E (~$450-600) — Offers extensive bidirectional control, access to manufacturer-specific codes, and ECU coding required for professional-level electrical diagnostics.
Rent vs buy: Auto parts stores rent scanners for free, but you MUST ensure their rental tool displays live data. If you perform regular maintenance, buying a budget live-data scanner is mandatory.
How to Clear the Code After You Fix It
- Use an OBD-II scan tool to erase the diagnostic trouble codes.
- Perform a complete OBD-II drive cycle to allow readiness monitors to run.
- Rescan to confirm no codes have returned.
Drive cycle (~30 minutes): Start with a cold engine. Idle for 3 minutes with the A/C and defroster on. Drive for 15 minutes in mixed traffic, maintaining a steady 40-60 mph cruise for at least 5 minutes. Perform several smooth accelerations and decelerations.
Readiness monitors affected: Catalyst Monitor, Oxygen (O2) Sensor Monitor, EVAP System Monitor
Before emissions retest: drive at least 100 miles to fully set monitors.
Watch out for:
- Taking the vehicle for an emissions test immediately after clearing the code results in an automatic 'Not Ready' failure.
- Disconnecting the battery does not reliably clear codes or reset monitors on modern vehicles.
Will This Fail Emissions / State Inspection?
Yes — this code typically fails an OBD-II emissions inspection.
- California: An active P0653 causes an automatic smog failure. After repair, a full drive cycle is mandatory; testing with 'Not Ready' monitors results in failure.
- New York: Any vehicle with an illuminated Check Engine Light automatically fails the NYS emissions inspection.
- Texas: An illuminated Check Engine Light is an automatic failure. Vehicles 2001 and newer are allowed only one 'Not Ready' monitor to pass.
Most Commonly Affected Vehicles
- Dodge/Ram 1500 (3.6L V6) (2013-2023) — Frequently caused by a faulty three-way coolant control valve shorting 12V into the 5V reference circuit. Check TSB 07-009-23.
- Dodge Ram 1500 (3.7L V6 / 4.7L V8) (2006-2011) — Prone to wiring harness chafing and shorts in the auxiliary 5-volt supply circuit, often near the oil pressure switch.
- Hyundai Tucson, Sonata (2011-2018) — Experiences severe power loss and 'limp mode' due to intermittent harness shorts or internal PCM faults.
- Volkswagen General (2008-2016) — VW defines P0653 as 'No Fuel Level Bus Message,' indicating a data bus communication failure between the PCM and Body Control Module (BCM), not a sensor voltage issue.
- Kia Carens, General (2014-2019) — Sets P0653 for a high voltage condition on the 'B' reference circuit, leading to immediate performance issues and limp mode.
- Chevrolet/GMC Silverado, Sierra (2007-2018) — GM sometimes defines this as a 'CAN-LS Malfunction,' pointing to a low-speed data network short caused by a faulty audio or climate control module.
- Jeep Cherokee, Grand Cherokee (2014-2021) — Certain Jeeps define P0653 as 'ABS Left Rear Isolation Solenoid Valve Circuit Shorted,' requiring diagnosis of the ABS module rather than engine sensors.
- Ford F-150, Explorer (2011-2019) — Ford defines this code as 'Invalid Data Received From Instrument Panel Control Module,' directing diagnosis to the instrument cluster connections.
Manufacturer-Specific Notes
- Dodge / Ram: On 3.6L V6 models, a faulty three-way coolant control valve is the primary cause, often appearing with P2127. Check TSB 07-009-23.
- Chevrolet / GMC: The definition is often 'CAN-LS Malfunction,' pointing to a problem on the low-speed communication network (like a bad radio) rather than a sensor voltage issue.
- Ford: P0653 means 'Invalid Data Received From Instrument Panel Control Module,' directing diagnosis toward the instrument cluster instead of the 5V reference circuit.
- Volkswagen: Defined as 'No Fuel Level Bus Message,' indicating a data bus communication circuit failure between the PCM and BCM.
- Jeep: Defined as 'ABS Left Rear Isolation Solenoid Valve Circuit Shorted,' requiring diagnosis of the anti-lock braking system.
Real Owner Stories
2017 Ram 1500 3.6L at 161K miles - The Textbook Fix
The Check Engine Light illuminated with fluctuating idle and zero throttle response. The truck entered limp mode, displaying codes P0653, P2127, and P2681.
What they tried:
- A technician noted the 5V reference circuit was shared by the APP sensor and the coolant temperature bypass valve.
- Knowing the coolant valve utilizes a 12V supply, it was the prime suspect for shorting voltage into the 5V circuit.
Outcome: Disconnecting the coolant temperature bypass valve immediately restored the 5V circuit and throttle response. Replacing the valve fixed the issue permanently.
Lesson: On Ram 3.6L engines, P0653 accompanied by an accelerator pedal code (P2127) almost always points to a failed coolant bypass valve.
2015 Hyundai Tucson - The Intermittent Gremlin
The owner experienced severe, intermittent power loss going uphill. A previous shop cleared the code but failed to locate the fault.
What they tried:
- A second mechanic found a history code for P0653, confirming a high voltage condition.
- The mechanic performed a visual inspection and a 'wiggle test' on the main engine harness while monitoring live voltage data.
Outcome: The wiggle test revealed a chafed wire shorting against the engine block. Repairing the harness permanently resolved the power loss.
Lesson: Intermittent electrical faults are usually damaged wires, not failed sensors. A wiggle test while monitoring voltage is the best way to find hidden shorts.
Ram 1500 DIY Repair - The Misdiagnosis Trap
The owner pulled code P26AB and P0653. Online forums pointed to the common three-way coolant valve failure.
What they tried:
- The owner purchased and installed a new three-way coolant valve to avoid dealership diagnostic fees.
Outcome: After replacing the valve, the Check Engine Light returned immediately. The actual cause was a melted wire in the harness leading to the valve, not the valve itself.
Lesson: Never throw parts at a problem based on internet forums. Always perform a visual inspection and multimeter test to confirm the root cause before spending money.
How to Prevent This Code From Triggering
- Apply dielectric grease to connector seals (When servicing nearby components) — Dielectric grease seals electrical contacts against moisture and dirt, preventing the corrosion that causes high-resistance shorts.
- Inspect and secure wiring harnesses (During every oil change) — Securing loose harnesses with zip ties prevents them from vibrating against sharp metal edges or melting on hot exhaust manifolds.
- Use rodent deterrents in the engine bay (Monthly or as needed) — Applying peppermint oil or capsaicin tape prevents rodents from chewing through the soy-based wire insulation used in modern vehicles.
- Clean battery terminals and main ground points (Annually) — Cleaning main power and ground connections to bare metal prevents voltage fluctuations that stress sensitive electronics like the PCM.
Frequently Asked Questions
Can I fix P0653 myself?
If the cause is an accessible sensor or a bad ground, it is a straightforward DIY repair. However, locating an intermittent wiring short requires intermediate diagnostic skills, a digital multimeter, and vehicle-specific wiring diagrams.
How much does it cost to fix P0653?
A professional diagnosis typically costs $150-$215. Simple wiring or ground repairs run $100-$300, while replacing a sensor costs $130-$520. If the PCM failed, expect to pay $1,000-$1,800 including programming.
What are the most common mistakes when diagnosing P0653?
The biggest mistake is replacing a sensor or the PCM without performing electrical tests with a multimeter. The root cause is frequently a damaged wire, corroded connector, or loose ground. Ignoring accompanying diagnostic codes also leads to misdiagnosis.
What sensors are on the 'B' circuit?
The 'B' circuit commonly powers the Accelerator Pedal Position (APP) sensor, A/C pressure sensor, and Manifold Absolute Pressure (MAP) sensor. Because this varies heavily by manufacturer, you must consult a vehicle-specific wiring diagram to identify the exact components.
Will clearing the code fix the problem?
No. Clearing the code only turns off the Check Engine Light temporarily. The code returns immediately as soon as the PCM detects the high voltage condition again.
Can a bad battery cause a P0653 code?
A bad battery is not a direct cause of P0653. This code points specifically to a high voltage condition within a regulated 5-volt reference circuit, not the main 12-volt battery system. However, a faulty alternator overcharging the system contributes to electrical stress.
What is a 'short to voltage'?
A 'short to voltage' occurs when the 5-volt reference wire loses its insulation and touches a wire carrying a higher voltage, like a 12-volt battery feed. This contact leaks the higher voltage into the 5-volt circuit, triggering the P0653 code.
Is this code covered by warranty?
Standard bumper-to-bumper and powertrain warranties cover P0653 repairs if a factory sensor or wiring harness fails. Extended warranties like Mopar FlexCare also cover these complex electrical issues. While no active recalls exist specifically for P0653, check for related control module software updates.
Key Takeaways
- P0653 triggers when the PCM detects over 5.3 volts on the 5-volt 'B' sensor circuit, usually caused by a shorted wire, a failed sensor, or a bad ground.
- Never replace the Powertrain Control Module (PCM) first; it is the rarest cause of this code and costs upwards of $1,000 to replace and program.
- Diagnose P0653 by measuring the circuit voltage with a multimeter and unplugging sensors one by one until the voltage drops back to the normal 5-volt range.
- Verify your specific manufacturer's definition for P0653, as brands like Volkswagen and Jeep use this code for completely different data bus or ABS failures.
- Stop driving if the vehicle enters 'limp mode'; running the engine rich for more than 100 miles will overheat and destroy the catalytic converter, adding $1,500+ to your repair bill.
Helpful Videos

Shop the Parts Behind P0653
Below are the parts most often responsible for code P0653, ranked by how frequently each one is the actual culprit (per the diagnosis above). Tap any to see what we have for your vehicle.


The information in this article is provided for general reference and educational purposes only. Vehicle specifications, procedures, and part compatibility can vary by production date, trim level, and region. Always consult your vehicle's factory service manual and verify part numbers before purchasing or performing repairs. Safety-critical components such as airbags, seat belts, and braking systems should be installed by a qualified professional.
- 🧭 Diagnostic Flowchart
- 🎬 Helpful Videos
- 🛍️ Shop This Part
- What Does P0653 Mean?
- Can I Drive With P0653?
- Common Causes
- Symptoms
- Common Fixes & Costs
- DIY vs Professional
- Used vs. New Parts: Buying Guide
- What Happens If You Wait — Timeline
- Cost of Not Fixing It
- Diagnosis Steps
- When This Code Triggers (Freeze-Frame Conditions)
- Related Codes
- Climate & Environmental Factors
- How to Talk to a Mechanic About This Code
- Where to Take It: Dealer vs Independent vs Chain
- When to Walk Away From the Repair
- What Scan Tool You Need for This Code
- How to Clear the Code After You Fix It
- Will This Fail Emissions / State Inspection?
- Most Commonly Affected Vehicles
- Manufacturer-Specific Notes
- Real Owner Stories
- 2017 Ram 1500 3.6L at 161K miles - The Textbook Fix
- 2015 Hyundai Tucson - The Intermittent Gremlin
- Ram 1500 DIY Repair - The Misdiagnosis Trap
- How to Prevent This Code From Triggering
- Frequently Asked Questions
- Can I fix P0653 myself?
- How much does it cost to fix P0653?
- What are the most common mistakes when diagnosing P0653?
- What sensors are on the 'B' circuit?
- Will clearing the code fix the problem?
- Can a bad battery cause a P0653 code?
- What is a 'short to voltage'?
- Is this code covered by warranty?
- Key Takeaways
- 🎟️ Get 5% Off