
OBD-II Code P1052: Variable Valve Timing (VVT) Control Circuit High
What P1052 means, why it triggers, and how to fix it
- Code P1052 flags a high-voltage short in the Bank 1 VVT control circuit, though definitions vary wildly between brands like BMW, Hyundai, and Subaru.
- Test the VVT solenoid resistance (typically 5-15 Ohms) before replacing parts, as the true fault often lies in a frayed wiring harness shorting to a 12V power source.
- Change your engine oil immediately if it is low or dirty, as sludge buildup physically jams the VVT solenoid and triggers this electrical fault.
- Stop driving if the engine stalls or idles roughly, as running with stuck valve timing destroys a catalytic converter within months, turning a $150 repair into a $2,000 nightmare.
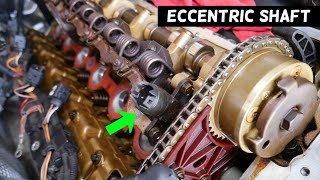
- On 2006-2013 BMWs, inspect the eccentric shaft sensor connector for oil pooling; this $350 sensor fails internally and is the primary cause of P1052 on N52/N55 engines.
What Does P1052 Mean?
P1052 means the engine computer (ECU) detects excessively high voltage in the Bank 1 variable valve timing (VVT) control circuit. The VVT system adjusts valve timing for optimal power and efficiency. High voltage typically indicates a short circuit to power or a failed VVT solenoid.
Technical definition: P1052 is a manufacturer-specific DTC commonly defined as 'Variable Valve Timing (VVT) Control Circuit High Bank 1'. The Engine Control Module (ECM) triggers it upon detecting a continuous, out-of-range high voltage signal from the VVT control solenoid circuit. Verify the exact definition for your vehicle make, as manufacturer meanings vary significantly.
Can I Drive With P1052?
Yes, But With Caution. You can drive short distances, but expect poor engine performance, reduced power, and lower fuel economy. Prolonged driving damages the catalytic converter (an $800-$2,500 repair) due to persistent rich or lean fuel conditions. Stalling in traffic also poses an immediate safety hazard.
Common Causes
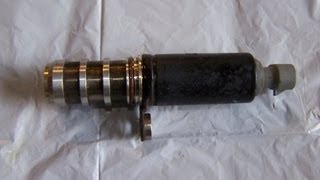
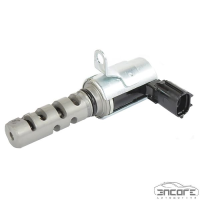
- Failed VVT Control Solenoid (Oil Control Valve) (Very Common) — The solenoid, an electronic valve directing oil flow, gets stuck, clogs with oil sludge, or fails electrically, causing a permanent high voltage signal.
- Poor Oil Condition or Incorrect Viscosity (Common) — Low, dirty, or sludge-filled oil prevents proper hydraulic operation. Using oil thicker or thinner than the manufacturer's specification prevents mechanical components from moving at the correct speed, stressing the control solenoid and triggering an electrical fault.
- Wiring or Connector Damage (Common) — The electrical wiring to the VVT solenoid frays, shorts to power, or corrodes. Rodent damage is a frequent culprit, creating an incorrect high voltage reading that the ECU detects.
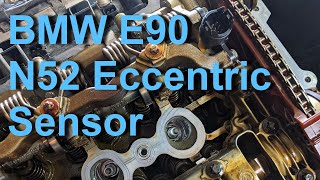
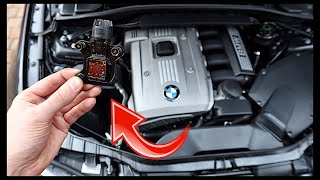
- Failed BMW Eccentric Shaft Sensor (Less Common) — Specific to BMW's Valvetronic system, this sensor tracks the position of the valve lift mechanism. Oil leaks into the sensor's electrical connector, causing it to fail and send faulty data.
- Failed BMW Valvetronic Motor (Less Common) — On BMWs, the electric motor that physically adjusts the valve lift fails. This significant mechanical and electrical failure results in a control circuit high code.
- Worn Timing Components (Chain/Phasers) (Less Common) — In high-mileage vehicles, a stretched timing chain or worn camshaft phasers forces the VVT system to operate outside its expected range. The resulting strain contributes to electrical faults in the control circuit.
- Faulty Engine Control Module (ECU) (Rare) — The driver circuit within the engine's main computer that controls the VVT solenoid fails. Consider this only after thoroughly ruling out all wiring faults.
Symptoms
- Check Engine Light On — The ECU illuminates the check engine light immediately upon detecting the fault. The light remains steady or flashes during severe misfires.
- Rough or Unstable Idle — With the valve timing stuck in one position, the engine shakes, vibrates, or holds an unsteady RPM at idle.
- Reduced Engine Power and Acceleration — The vehicle accelerates sluggishly and responds poorly to the gas pedal because the engine cannot adjust its airflow for optimal power.
- Poor Fuel Economy — The engine runs inefficiently with incorrect valve timing, burning significantly more fuel than usual.
- Engine Stalling — The engine stalls at low speeds or when coming to a stop, creating a dangerous situation in traffic.
- Engine Rattling or Ticking Noise — A failing VVT system produces a rattling or ticking sound from the top of the engine, especially during startup or acceleration.
Diagnostic Flowchart
Tap your situation to follow the diagnostic path that matches what you're seeing on this code.
Common Fixes & Costs
- Replace VVT Control Solenoid (Oil Control Valve) — Parts: $50-$150, Labor: $100-$200, ~1.5 hr book time (DIY)
- Engine Oil and Filter Change — Parts: $40-$80, Labor: $30-$60, ~0.5 hr book time (DIY)
- Repair Damaged Wiring Harness — Parts: $10-$50, Labor: $150-$400, ~2.5 hr book time (Professional)
- Replace BMW Eccentric Shaft Sensor — Parts: $300-$500, Labor: $500-$1,200, ~5.5 hr book time (Professional)
- Replace BMW Valvetronic Motor — Parts: $400-$800, Labor: $400-$900, ~4.5 hr book time (Professional)
DIY vs Professional
- Replace VVT Control Solenoid (GM/Hyundai/Kia) 🟢 Beginner
Tools: Basic socket set (8mm, 10mm), pliers, screwdriver, clean rags. - Engine Oil and Filter Change 🟢 Beginner
Tools: Socket/wrench for drain plug, oil filter wrench, drain pan, funnel. - Repair Damaged Wiring Harness 🟢 Beginner
Tools: Multimeter, wire strippers, soldering iron, heat shrink, automotive-grade wiring. - Replace BMW Eccentric Shaft Sensor 🟢 Beginner
Tools: Extensive socket set, E-Torx sockets, torque wrench, wobble extensions, valve cover gasket kit, potentially fuel injector tools. - Replace BMW Valvetronic Motor 🟢 Beginner
Tools: Similar to Eccentric Shaft Sensor replacement. Requires special tools to release spring tension and a 4mm Allen key to wind the motor.
Used vs. New Parts: Buying Guide
When a used part is worth it: For a common VVT solenoid on a non-luxury vehicle, a used part from a low-mileage donor is a cost-effective option if the budget is extremely tight. However, given the relatively low cost of new aftermarket solenoids, buying new is generally recommended.
Donor-vehicle mileage cap: roughly under 60000 miles for the part to have meaningful remaining life.
Donor quality checklist:
- Verify the donor vehicle was not scrapped for engine-related issues.
- Match the part number exactly, as variations exist even within the same model year.
- Avoid parts that show signs of heavy sludge or contamination.
Decision logic:
- If The part is a complex electronic sensor like a BMW Eccentric Shaft Sensor. → Buy new from the OEM supplier (e.g., VDO) or genuine dealer part. The high labor cost of replacement makes using a cheap or used part too risky.
- If The part is a simple VVT solenoid and a new aftermarket part is under $100. → Buy new. The small savings from a used part do not justify the risk of premature failure.
- If Vehicle is over 150,000 miles and being repaired on a minimal budget. → A used solenoid is acceptable, but understand it has limited remaining life.
Warranty tradeoff: Used parts typically come with a 30-90 day warranty. Quality new aftermarket parts often have a 1-year to limited lifetime warranty. OEM parts carry a 1-2 year warranty.
Worst-case if a used part fails: $200-$500 if a used solenoid fails shortly after installation, primarily due to repeated labor charges.
What Happens If You Wait — Timeline
- 0-2 weeks: Check Engine Light illuminates. The code is stored. Drivability symptoms are absent or very subtle, such as a slightly unsteady idle on a cold start. (MPG impact: 0-5%% · Added cost: $0)
- 2 weeks - 3 months: Symptoms become consistent and noticeable. The engine idles roughly, feels sluggish, hesitates on acceleration, and stalls at low speeds. Fuel economy drops significantly. (MPG impact: 5-15%% · Added cost: $50-$150 in wasted fuel.)
- 3 - 8 months: The engine constantly runs with incorrect timing, leading to an overly rich or lean fuel mixture. This overheats the catalytic converter, causing its internal substrate to melt and become clogged. (MPG impact: 10-20%% · Added cost: $1,000-$3,000 for catalytic converter replacement.)
- 8+ months: Catastrophic secondary damage occurs. The clogged catalytic converter creates extreme backpressure, damaging exhaust valves. On some engines, sustained VVT malfunction accelerates timing chain wear, leading to chain failure. On sludge-prone engines, this signals impending seizure. (MPG impact: 20-50% (or car becomes undrivable)% · Added cost: $2,500-$8,000+ for timing chain replacement or complete engine repair/replacement.)
Cost of Not Fixing It
- 0-1 month: Noticeable drop in fuel economy (5-15%), rough idle, and poor acceleration. Potential for engine stalling. (Added cost: Negligible, other than increased fuel costs.)
- 1-6 months: Incorrect valve timing leads to an inefficient fuel mixture (rich/lean), which overheats and damages the catalytic converter. (Added cost: $1,000-$3,500 for catalytic converter replacement.)
- 6+ months: Sustained strain on timing components contributes to premature wear of the timing chain and camshaft phasers. In severe cases, this leads to catastrophic engine damage. (Added cost: $2,000-$7,000+ for timing chain replacement or major engine repair.)
Diagnosis Steps
- Check Engine Oil and Search for TSBs
Verify the engine oil level is correct and the oil is clean with the proper viscosity. Low or dirty oil is a primary cause of VVT issues. Simultaneously, search for Technical Service Bulletins (TSBs) for your specific vehicle, as manufacturers frequently release updated repair procedures for P1052.
Tools: Dipstick, clean rag, owner's manual, internet access (Beginner) - Scan for Additional Codes
Use an OBD-II scanner to check for related trouble codes. Codes for camshaft position sensors (P0011, P0014) or other VVT circuits pinpoint the problem accurately. Companion codes dictate the diagnostic path.
Tools: OBD-II Scanner (Beginner) - Inspect Wiring and Connectors
Visually inspect the wiring harness and electrical connector at the Bank 1 VVT solenoid. Look for corrosion, melted plastic, frayed wires, or rodent damage. On BMWs, unplug the eccentric shaft sensor and check the connector for engine oil contamination, a definitive sign of sensor failure.
Tools: Flashlight, mirror (Beginner) - Check Circuit Voltage at the Connector
With the ignition key on and engine off, unplug the VVT solenoid connector. Use a multimeter to check the voltage. One pin supplies battery voltage (around 12.6V). The other pin is the ECU control wire. A 'Circuit High' code means this control wire is shorted to power in the harness, showing constant voltage when it shouldn't.
Tools: Multimeter (Intermediate) - Test the VVT Solenoid's Resistance
With the solenoid unplugged, use a multimeter set to Ohms (Ω) to measure internal resistance between its two pins. Compare the reading to the manufacturer's specification (typically 5-15 ohms). Infinity (OL) indicates an open circuit; near zero indicates an internal short circuit.
Tools: Multimeter (Intermediate) - Perform a Solenoid Actuation Test
If resistance is within spec, briefly apply 12V power and a ground to the solenoid's pins using a power probe. A healthy solenoid produces an audible 'click' as the internal plunger moves. No click means it is mechanically seized by sludge or debris.
Tools: Power probe or fused jumper wires (Intermediate) - Advanced: Check for Short to Power
Set the multimeter to DC Volts. Connect the black probe to a good ground and probe the ECU control wire pin on the harness connector with the ignition ON. If you read 12V on the control wire when the ECU is not commanding the solenoid, the wire is shorted to power within the harness.
Tools: Multimeter (Advanced) - Advanced: Analyze Live Data PIDs
Using an advanced scan tool, monitor 'VVT Commanded Angle' and 'VVT Actual Angle' for Bank 1. At idle, values should be near 0 degrees and match. During a test drive, command and actual values must track together. A large discrepancy points to a mechanical or hydraulic issue. Monitor 'VVT Solenoid Duty Cycle'; a value stuck at 0% or 100% indicates a control problem.
Tools: Advanced OBD-II Scan Tool (Advanced) - Advanced: Analyze the ECU Control Signal (Pro Tip)
Use an oscilloscope to view the signal on the control wire while the engine runs. The ECU controls the solenoid using a duty-cycled square wave signal. A flat line at battery voltage confirms a short to power in the harness or a failed ECU driver. A correct signal pattern with no solenoid response definitively points to a bad solenoid.
Tools: Oscilloscope (Scope) (Advanced) - Advanced: Diagnose BMW Valvetronic System (Pro Tip)
On BMWs, if VANOS solenoids and wiring pass testing, the fault lies in the Valvetronic system. Use a BMW-specific diagnostic tool (ISTA) to command the Valvetronic motor and monitor the eccentric shaft sensor's live angle readings. A sensor providing no reading or erratic values is faulty. Disconnecting a faulty sensor forces the engine into 'limp' mode, allowing it to start and confirming the diagnosis.
Tools: Advanced BMW-specific scan tool (Advanced)
When This Code Triggers (Freeze-Frame Conditions)
- Engine Coolant Temp: 180-200°F (The engine has reached full operating temperature.)
- Engine RPM: 1500-2500 RPM (The fault is detected during steady-state cruising or light acceleration, not typically at idle.)
- Engine Load: 30-60% (The ECU actively commands VVT adjustments under moderate load to balance power and efficiency.)
- Vehicle Speed: 35-55 mph (Corresponds to steady highway or arterial road driving where the VVT system is operational.)
Related Codes
- P0011 / P0014 — These generic codes mean 'Camshaft Position Timing Over-Advanced' for Bank 1. P1052 is an electrical circuit code, while P0011/P0014 are mechanical timing codes. The electrical fault in P1052 (a stuck solenoid) directly causes the mechanical timing problem seen in P0011 or P0014. Always diagnose the electrical code first.
- P1051 — This companion code for 'VVT Control Circuit Low' indicates the opposite electrical fault (an open circuit or short to ground). Seeing both P1051 and P1052 intermittently points to a severe wiring issue with a loose connection or a failing ECU driver.
- P1326 — This Hyundai/Kia specific code for the 'Knock Sensor Detection System' indicates vibrations consistent with engine bearing wear. It appears on vehicles with severe oil consumption or sludge, which also causes VVT codes like P1052. If both are present, catastrophic engine failure is likely.
- P1017 — This BMW-specific code for 'Valvetronic Eccentric Shaft Sensor: Plausibility' is commonly seen with P1052-family codes and strongly points to a failed eccentric shaft sensor rather than a VANOS (VVT) solenoid issue.
Climate & Environmental Factors
- Cold Weather: Cold temperatures thicken engine oil beyond its optimal viscosity, increasing strain on the VVT system and causing solenoids to stick or respond slowly. On heavy-duty trucks (Mack/Volvo), P1052 manifests as an intermittent transmission sensor fault that appears in cold weather and resolves as the vehicle warms up.
- High Humidity / Salt: Regions with high humidity or heavy road salt use accelerate corrosion on electrical connectors and wiring harnesses, increasing the likelihood of shorts or poor connections that trigger a 'Circuit High' fault.
How to Talk to a Mechanic About This Code
Say this: "I have a P1052 code, which I understand is a 'VVT Control Circuit High' fault. I'd like to schedule a diagnostic appointment. Please start by testing the VVT solenoid, its connector, and the related wiring for a short to power before recommending a part replacement."
This signals you've done your research and understand that P1052 is an electrical fault, not just a bad part. It directs the technician to perform a proper electrical diagnosis (testing for shorts) rather than just swapping the most common part (the solenoid), saving you money on unnecessary parts and labor.
Avoid saying:
- 'My check engine light is on, can you just fix it?'
- 'The internet says to replace the VVT solenoid.'
- 'Just do whatever you think is best.'
Questions to ask before authorizing the repair:
- What were the specific voltage and resistance readings from the VVT solenoid and its circuit?
- Did you find a short to power in the wiring harness or is the solenoid itself shorted internally?
- For a BMW: Did you inspect the eccentric shaft sensor connector for oil contamination?
- Can you provide a written estimate that separates the cost of parts and labor?
- What is the warranty on the proposed repair and the parts?
Where to Take It: Dealer vs Independent vs Chain
- Dealer:
Best for: Vehicles under warranty., Complex, manufacturer-specific issues, especially on BMWs where the fault is likely in the Valvetronic system and requires proprietary software (ISTA) for diagnosis and relearning procedures., Recalled vehicles where the VVT issue is related to a larger covered problem.
Downsides: Highest labor rates, often 1.5-2x more than independent shops., Defaults to replacing an entire wiring harness for a single shorted wire, a much more expensive repair. (Typical cost: +50% vs. baseline) - Independent Shop:
Best overall fit for most makes (GM, Hyundai, Subaru, etc.). For BMWs, choose an independent shop specializing in European or BMW vehicles.
Best for: Out-of-warranty vehicles with common P1052 causes (e.g., GM, Hyundai, Kia)., Wiring harness diagnostics and repair, as they are more willing than dealers to trace and fix a single wire., Owners looking for the best balance of cost and expertise.
Downsides: Quality and expertise vary widely. Ensure the shop has technicians skilled in electrical diagnostics (ASE A6 certification is a plus)., A general shop lacks the specific tools for BMW Valvetronic repairs. (Typical cost: +0% vs. baseline) - Chain Shop:
AVOID for diagnosis. Acceptable only for a simple oil change as a first step, or for a straightforward VVT solenoid replacement if you have already performed a confident self-diagnosis.
Best for: An oil change, which is a valid first step if you suspect oil quality is the issue.
Downsides: Technician skill varies dramatically and is insufficient for complex electrical diagnosis., High pressure to upsell and recommends unnecessary part replacements without proper testing., Lacks the advanced, manufacturer-specific scan tools needed for in-depth diagnosis of systems like BMW Valvetronic. (Typical cost: -10% vs. baseline)
When to Walk Away From the Repair
If the total estimated repair cost exceeds 40-50% of your car's private-party market value (check Kelley Blue Book or Edmunds), it's time to seriously consider selling or trading it in.
- Car worth $5000, fix is $350: Fix it. This is a relatively low-cost repair for a common VVT solenoid on a Hyundai or Chevy, well below the threshold.
- Car worth $4500, fix is $2200: Walk away. A $2,200 repair for a BMW eccentric shaft sensor is nearly 50% of the car's value. The risk of other age-related repairs is high.
- Car worth $6000, fix is $3500: Walk away. A repair cost this high indicates a wiring harness or major engine computer (ECU) issue. The cost is over 50% of the car's value and not a sound investment.
What Scan Tool You Need for This Code
Minimum: A scanner that reads and graphs live data PIDs, specifically for VVT/camshaft commanded vs. actual position and solenoid duty cycle. A basic code reader is not sufficient.
A $20 code reader only shows 'P1052'. It cannot show if the computer is commanding the solenoid, if the camshaft is responding, or if the circuit voltage is actually high in real-time. This live data is essential to distinguish between a wiring fault, a stuck solenoid, or a mechanical timing issue, preventing you from guessing and replacing the wrong parts.
Budget: BlueDriver Pro (~$120) — Connects to your smartphone via Bluetooth. It reads and clears codes, displays freeze frame data, and graphs live data streams for the VVT system to help you see what's happening in real time.
Mid-range: Foxwell NT510 Elite / NT710 (with BMW software) (~$200) — Offers manufacturer-specific diagnostics. For BMWs, this is critical, as it performs special functions like the 'Valvetronic limit positions' relearn procedure after a sensor or motor replacement, which generic scanners cannot do. It also provides more accurate live data for BMW-specific PIDs.
Professional: Autel MaxiCOM MK808 / MK808S (~$500) — Provides full bidirectional control. This allows you to actively command the VVT solenoid on and off directly from the scan tool to test its mechanical function (the 'click test') without needing jumper wires. It offers comprehensive, OEM-level diagnostics for a wide range of vehicles.
Rent vs buy: For a one-time diagnosis, try AutoZone's Loan-A-Tool program, where you pay a deposit for a scanner that is refunded upon return. However, these are often basic readers. For a P1052 code requiring live data or bidirectional controls, investing in a budget or midrange scanner is a better long-term value for future DIY diagnostics.
How to Clear the Code After You Fix It
- Use an OBD-II scan tool to clear the P1052 fault code.
- Perform a complete drive cycle to allow the vehicle's readiness monitors to reset.
- Reconnect the battery if it was disconnected for the repair, but be aware this clears all monitors.
Drive cycle (~30 minutes): A general drive cycle includes a cold start (engine temp below 122°F/50°C), a 2-3 minute idle, 10-15 minutes of mixed city and highway driving (including steady speeds between 45-65 mph), and a period of coasting down without heavy braking. This allows the ECU to run its self-tests.
Readiness monitors affected: Comprehensive Component Monitor, Catalyst Monitor, Oxygen Sensor Monitor
Before emissions retest: drive at least 100 miles to fully set monitors.
Watch out for:
- Clearing the code with a scanner or disconnecting the battery resets all readiness monitors to 'Not Ready'. You must complete a drive cycle before an emissions test.
- The code returns immediately if the underlying electrical or mechanical fault has not been properly repaired.
Will This Fail Emissions / State Inspection?
Yes — this code typically fails an OBD-II emissions inspection.
- California: An active Check Engine Light for code P1052 is an automatic failure of the smog inspection. All required readiness monitors must be set to 'Ready' before a re-test.
- New York: The NYS DMV inspection includes an OBD-II scan. An illuminated Check Engine Light causes the vehicle to automatically fail the emissions portion of the inspection.
- Texas: In counties requiring emissions testing, an active P1052 code and illuminated Check Engine Light result in an automatic failure.
Most Commonly Affected Vehicles
- BMW 3-Series (E90, E92), 5-Series (E60, F10), X3 (E83), X5 (E70) (2006-2013) — Very common on N52 and N55 engines. The cause is almost always a failed eccentric shaft sensor (due to internal oil leaks) or the Valvetronic servomotor.
- Hyundai Sonata, Santa Fe (2006-2014) — On Theta II engines, this code is caused by a failed Oil Control Valve (OCV) or sludge buildup. These engines were subject to recalls for engine failure, where a knock sensor detection system (P1326) was added, which appears alongside timing codes.
- Kia Optima, Sorento (2006-2015) — Shares powertrains with Hyundai, making it prone to the exact same Oil Control Valve (OCV) failures and engine sludge issues.
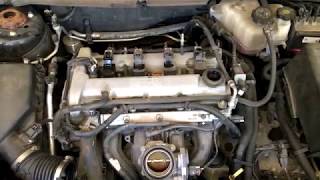
- Chevrolet Equinox, Traverse, Malibu (2010-2017) — Common on the 2.4L Ecotec and 3.6L V6 engines. GM issued TSB #17-NA-098 for 2.4L models recommending the replacement of both VVT solenoids to fix running issues.
- Nissan Rogue, Altima, Sentra (2008-2018) — Models with QR25DE and VQ35DE engines experience VVT solenoid failures. Oil condition is a major factor, and clogged solenoid screens are common.
- Subaru Forester, Outback, WRX/STI (2005-2014) — Subaru's AVCS (Active Valve Control System) sets this code when small filter screens in the banjo bolts for the oil supply lines clog. A common fix is removing these screens entirely.
- Mazda Various with SKYACTIV-D Engines (2012-2019) — On Mazda diesel models, P1052 indicates an issue with a fuel injector, not the VVT system, where the PCM detects excessive torque fluctuation.
- Mack / Volvo Trucks Various with AMT (2008-2020) — On heavy-duty vehicles, P1052 is an intermittent fault for a transmission position sensor, appearing in cold weather and disappearing when the truck warms up.
Manufacturer-Specific Notes
- BMW: This code is frequently linked to the Valvetronic system (valve lift), not the VANOS system (valve timing). The cause is the expensive eccentric shaft sensor or Valvetronic motor located under the valve cover. A key diagnostic step is checking the sensor's connector for oil.
- Hyundai / Kia: P1052 almost always points to a faulty Oil Control Valve (OCV). These failures are accelerated by engine oil sludge from extended oil change intervals common to the Theta II engine. They are often replaced during engine replacements covered under recall campaigns for bearing failure.
- General Motors: On 2.4L and 3.6L engines, VVT solenoid failure is extremely common. GM issued service bulletins (e.g., TSB 17-NA-098) recommending replacing both intake and exhaust solenoids simultaneously, even if only one set a code.
- Saab / Mazda / Mack: The definition of P1052 varies wildly for these brands. It refers to a fuel injector circuit on a Saab 900 or Mazda diesel, or a transmission sensor on a Mack truck. Verify the code's definition with a factory-level scan tool for your specific vehicle.
Real Owner Stories
2008 BMW 328i (E90) at 80K miles with stalling and hesitation.
Owner experienced sudden loss of power, hesitation, and stalling. After restarting, the car cranked but would not start. The Check Engine Light was on with codes related to the eccentric shaft sensor.
What they tried:
- Initially stranded, the owner discovered unplugging the eccentric shaft sensor connector forced the engine into limp mode, allowing it to start and drive.
- Visual inspection confirmed the sensor's electrical connector was full of engine oil, a classic sign of internal failure.
- Owner received a quote for ~$1,300 from an independent mechanic for parts and labor (7.9 hours).
Outcome: The owner opted for a DIY repair, which involves removing the valve cover. The job is complex and high-risk for a beginner but ultimately resolved the Valvetronic-related codes and drivability issues.
Lesson: On a BMW with VVT-related codes, always check the eccentric shaft sensor connector for oil before replacing the more accessible VANOS solenoids. Unplugging the sensor is a temporary workaround to move the vehicle.
2012 Hyundai Sonata (Theta II engine) at 110K miles with rough idle.
Car developed a rough idle, poor fuel economy, and eventually threw code P1052. The owner had been extending oil change intervals.
What they tried:
- An oil and filter change provided a slight temporary improvement, but the code returned.
- Tested the VVT solenoid (OCV) resistance and found it was out of spec (near zero ohms), indicating an internal short.
- Replaced the Bank 1 VVT solenoid, a relatively simple DIY job on top of the engine.
Outcome: Replacing the faulty solenoid for ~$60 (aftermarket part) and performing a fresh oil change with the correct viscosity oil permanently fixed the code and restored smooth engine operation.
Lesson: On Hyundai/Kia engines, P1052 is very often a faulty VVT solenoid (OCV), a failure frequently accelerated by oil sludge. If accompanied by code P1326, it indicates a more severe underlying engine issue covered by a recall.
2007 Subaru WRX STI (EJ engine) with intermittent power loss.
Vehicle felt sluggish and threw AVCS (Subaru's VVT) timing codes. Owner learned about a common, non-obvious cause of oil starvation in these engines.
What they tried:
- Researched Subaru forums and found Technical Service Bulletins (TSBs) regarding tiny, mesh oil filters inside the banjo bolts for the AVCS and turbo oil feed lines.
- Located and removed the banjo bolts, finding the mesh screens partially clogged with debris.
Outcome: The owner removed the mesh screens entirely, a common practice in the Subaru community to prevent future oil flow restriction. After reassembly and an oil change, the AVCS codes cleared and did not return.
Lesson: For Subaru EJ engines, VVT/AVCS codes are caused by clogged banjo bolt filters. Many owners and turbo manufacturers recommend removing these non-serviceable screens as a preventative measure to avoid oil starvation to the AVCS solenoids and turbocharger.
How to Prevent This Code From Triggering
- Use full synthetic engine oil matching the manufacturer's specified viscosity and API rating. (Every oil change.) — High-quality synthetic oil resists breaking down and forming sludge, the number one cause of VVT solenoid and passage clogging. Correct viscosity ensures the system operates at the correct speed and pressure.
- Adhere to or shorten the manufacturer's recommended oil change interval. (Per manufacturer spec (e.g., 5,000-7,500 miles).) — Fresh oil and a new filter are the best defense against the buildup of contaminants and sludge that physically jam VVT components and clog fine mesh screens.
- For Subaru EJ engines: Remove the AVCS banjo bolt oil screens. (Once, ideally during a timing belt change or turbo replacement.) — These small, non-serviceable filters are a known failure point. They clog and starve the AVCS system and/or turbocharger of oil, leading to major failures. Removing them relies on the main oil filter to do its job and eliminates this critical restriction point.
- Use a chemical engine flush with extreme caution, if at all. (Rarely, only on engines with known sludge issues.) — A flush dissolves sludge, but it also dislodges large particles that travel and clog narrow VVT oil passages, making the problem worse. A safer alternative for a sludged engine is performing several short-interval oil changes (e.g., every 1,000 miles for 3 cycles) to gently clean the system.
Frequently Asked Questions
What does 'Bank 1' mean?
On a V-shaped engine, 'Bank 1' is the side containing cylinder #1. On an inline engine, there is only one bank, designated as Bank 1.
Can an oil change really fix a P1052 code?
Yes, if thick, dirty, or incorrect viscosity oil caused the VVT solenoid to stick. A fresh oil change with a high-quality filter restores hydraulic function and is a low-cost first diagnostic step.
What are common misdiagnosis mistakes for P1052?
The most common mistake is replacing the VVT solenoid without testing the electrical circuit for a short to power. On BMWs, mechanics often mistakenly replace the VANOS solenoid when the true culprit is the Valvetronic eccentric shaft sensor.
Do I have to use an expensive OEM part for this repair?
For simple VVT solenoids on standard vehicles, high-quality aftermarket parts work well. However, for complex sensors like the BMW eccentric shaft sensor, always use OEM or genuine dealer parts to prevent premature failure.
Can I just clean the VVT solenoid instead of replacing it?
Cleaning a clogged solenoid screen with brake cleaner sometimes restores temporary function. However, a 'Circuit High' code usually indicates an internal electrical short, requiring complete replacement.
My mechanic quoted $5,000+ to fix a wiring issue. Is that normal?
Dealerships often quote replacing the entire engine wiring harness rather than repairing a single wire. Seek a second opinion from an independent auto electrician who can locate and repair the specific short for a fraction of the cost.
What is the difference between P1052 and P0152?
P1052 is a manufacturer-specific code for the variable valve timing control circuit. P0152 is a generic code indicating high voltage in the Bank 2, Sensor 1 oxygen sensor circuit.
Can a bad battery cause a P1052 code?
While unlikely to be the direct cause, a failing battery causes unstable system voltage that triggers unpredictable error codes. Always ensure your battery and alternator are healthy before performing deep electrical diagnostics.
Key Takeaways
- Code P1052 flags a high-voltage short in the Bank 1 VVT control circuit, though definitions vary wildly between brands like BMW, Hyundai, and Subaru.
- Test the VVT solenoid resistance (typically 5-15 Ohms) before replacing parts, as the true fault often lies in a frayed wiring harness shorting to a 12V power source.
- Change your engine oil immediately if it is low or dirty, as sludge buildup physically jams the VVT solenoid and triggers this electrical fault.
- Stop driving if the engine stalls or idles roughly, as running with stuck valve timing destroys a catalytic converter within months, turning a $150 repair into a $2,000 nightmare.
- On 2006-2013 BMWs, inspect the eccentric shaft sensor connector for oil pooling; this $350 sensor fails internally and is the primary cause of P1052 on N52/N55 engines.
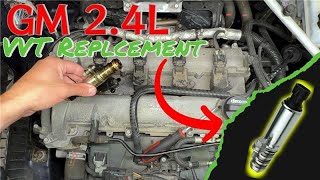
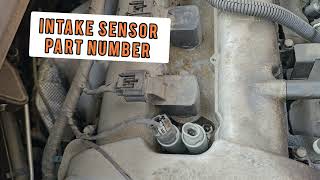
Helpful Videos


Shop the Parts Behind P1052
Below are the parts most often responsible for code P1052, ranked by how frequently each one is the actual culprit (per the diagnosis above). Tap any to see what we have for your vehicle.

The information in this article is provided for general reference and educational purposes only. Vehicle specifications, procedures, and part compatibility can vary by production date, trim level, and region. Always consult your vehicle's factory service manual and verify part numbers before purchasing or performing repairs. Safety-critical components such as airbags, seat belts, and braking systems should be installed by a qualified professional.
- 🧭 Diagnostic Flowchart
- 🎬 Helpful Videos
- 🛍️ Shop This Part
- What Does P1052 Mean?
- Can I Drive With P1052?
- Common Causes
- Symptoms
- Common Fixes & Costs
- DIY vs Professional
- Used vs. New Parts: Buying Guide
- What Happens If You Wait — Timeline
- Cost of Not Fixing It
- Diagnosis Steps
- When This Code Triggers (Freeze-Frame Conditions)
- Related Codes
- Climate & Environmental Factors
- How to Talk to a Mechanic About This Code
- Where to Take It: Dealer vs Independent vs Chain
- When to Walk Away From the Repair
- What Scan Tool You Need for This Code
- How to Clear the Code After You Fix It
- Will This Fail Emissions / State Inspection?
- Most Commonly Affected Vehicles
- Manufacturer-Specific Notes
- Real Owner Stories
- 2008 BMW 328i (E90) at 80K miles with stalling and hesitation.
- 2012 Hyundai Sonata (Theta II engine) at 110K miles with rough idle.
- 2007 Subaru WRX STI (EJ engine) with intermittent power loss.
- How to Prevent This Code From Triggering
- Frequently Asked Questions
- What does 'Bank 1' mean?
- Can an oil change really fix a P1052 code?
- What are common misdiagnosis mistakes for P1052?
- Do I have to use an expensive OEM part for this repair?
- Can I just clean the VVT solenoid instead of replacing it?
- My mechanic quoted $5,000+ to fix a wiring issue. Is that normal?
- What is the difference between P1052 and P0152?
- Can a bad battery cause a P1052 code?
- Key Takeaways
- 🎟️ Get 5% Off